Configuring full coursing
Course ordering refers to a sequence of food deliveries to the table to complete a multi-course meal experience. You can configure course ordering in Aloha Kitchen to activate items based on a course. Coursing items are divided into individual courses which you can fire automatically or manually, to time the dining experience. You can also limit coursing to specific order modes or a kitchen station.
Note: The courses configured in Aloha Kitchen are not tied to the course ordering feature configured in the POS.
What the Aloha Kitchen wizard does
When you run the Aloha Kitchen wizard, the system automatically creates a Default Course record, and also creates a record for each course you defined in the wizard, if any. The system attaches the default course in the 'Default course' drop-down list in Kitchen Settings. If you opted to use full coursing, the system uses the first defined course from the wizard, as the default course in Kitchen Settings.
Visit the Courses function to do the following:
- Adjust the system-generated default course. This is generally not necessary since the default course is used only as a placeholder.
- Adjust the system-generated courses defined in the wizard, if configured. If you ran the wizard without adding any courses, and now want to configure coursing, you must follow the procedures in this section.
- Create another course.
Configuring a course
You must configure each course you support, such as appetizers, salads, entrées, cheese plates, desserts, and more. The ID numbering of courses is important, as the system uses this order to send orders to the kitchen. For example, if 'Appetizer' is your first course of the meal, the course ID must be lower than any subsequent course. For this reason, we recommend you number your courses in increments of 5, such as course ID 5 for appetizers, course ID 10 for entrées, and so on. This ensures you have room for future course expansion and to avoid the need for extensive changes to your database.
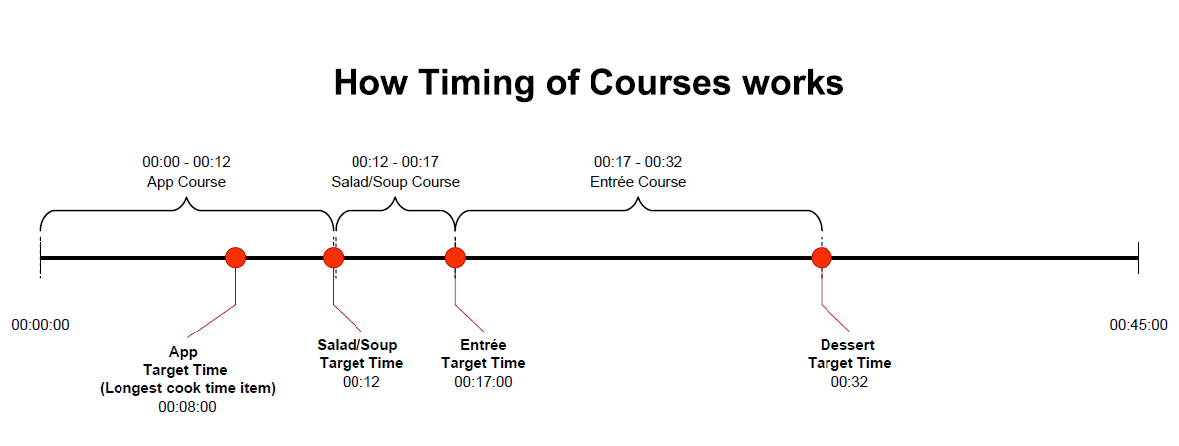
| Course Timing Examples | Expo Screen | Production Order View Screen | All Other Production Screens |
|---|---|---|---|
| Course ID | Name | Duration in minutes | Course Target Time |
| 5 | Appetizer | 12 | 00:00 |
| 10 | Salad/Soup | 5 | 12:00 |
| 15 | Entrée | 15 | 17:00 |
| 20 | Dessert | 0 | 32:00 |
Note: The system sets the target time for the first course based on a course's longest cook time item, not the duration. The longest cook time item on the first course releases immediately. Unless 'Activate relative to first item actual start time' is enabled, all other first course items are activated based on their individual cook times relative to this target time. The system activates subsequent course items based a target time for that course. With the exception of the first course (defined above), the target time of a course is the sum of the 'Duration in minutes' for all prior courses.
Define the 'Duration in minutes' of the first course based on the longest cook time item in the category, plus time to allow a customer to finish this course. For example, if wings take eight minutes to prepare, the wings activate immediately. Based on a first (appetizer) course 'Duration in minutes' of 12 minutes, this allows a table to enjoy a wing appetizer for four minutes before the second (salad/soup) course arrives.
Define the 'Duration in minutes' for subsequent courses to set the target time based on the service standards for your operation. In the table above, the target time for when the entrée course is prepared is 17 minutes, based on a 12 minute appetizer course, plus a five minute salad/soup course.
To configure a course:
- With Kitchen selected in the product panel, select Maintenance > Kitchen Configuration > Course > Course tab.
- Click New.
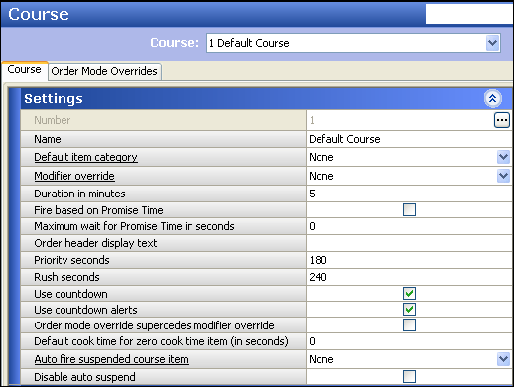
- Type a name for the course.
- Under the 'Settings' group bar, configure the options, as needed:
- Type the number of minutes in Duration in minutes. See "Course Timing Examples".
- Select Use countdown.
- Select Use countdown alerts.
- Type 120 in First alert seconds.
- Type 0 in Second alert seconds.
- Click Save.
- Repeat this procedure for each course in your operations.
- Click Close and exit the Course function.
Note: Courses are activated in numerical order. Number the course IDs appropriately.
Configuring categories for coursing
You must configure a category that contains the items for each course.
To configure a category for a course:
- With Kitchen selected in the product panel, select Maintenance > Menu > Categories.
- Click the New drop-down arrow, select a category type, and click OK.
- Type a name for the category, such as 'Appetizer course.'
- Select the Items tab.
- Select items in the 'Available' list box and click the right arrow to move the items to the 'Included' list box.
- Repeat this procedure to create a category for the Entrée course.
- Click Save and exit the Categories function.
To define the appetizer and entrée course in Kitchen Settings:
- With Kitchen selected in the product panel, select Maintenance > Kitchen Configuration > Kitchen Settings > Kitchen tab.
- Under the 'Items' group bar, select the appetizer category from the 'Appetizer category' drop-down list.
- Select the entrée category from the 'Entree category' drop-down list.
- Click Save.
Overriding a course by order mode
You can override a course by order mode. This is typically used for a takeout course. If you are using this feature, you should select 'Order mode override supersedes modifier override' on the Course tab. You should also clear 'Enable kitchen chit printing' in Maintenance > Kitchen Configuration > Kitchen Settings.
Note: Although you could use order modes for coursing, we recommend using categories for optimal flexibility.
To override a course by order mode:
- With Kitchen selected in the product panel, select Maintenance > Kitchen Configuration > Course.
- Select a Course from the 'Course' drop-down list.
- Select the Order Mode Overrides tab.
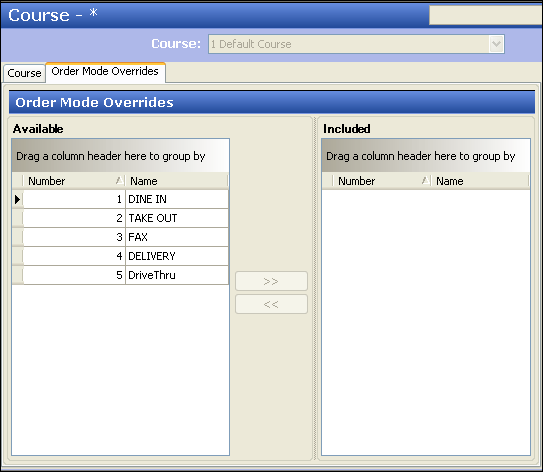
- Select the order mode from the 'Available' list box and click the right arrow to move the order mode to the 'Included' list box.
- Click Save.
- Repeat this procedure for other courses.
- Click Close and exit the Courses function.
Overriding a course by modifier
You can override the coursing of an item using a modifier. For example, a customer may want to order an appetizer as an entree. You can accommodate the request of a customer by configuring an appetizer with an 'As Entree' modifier. You can also configure your system so that you can order entree items as appetizers by attaching an 'As Entree' modifier to an appetizer. To configure your system to accommodate the wishes of a customer, it is necessary to create an 'As Entree' and 'As App' item, attach the items to a modifier group, and define the items as course overrides.
To create a course override modifier:
- With Kitchen selected in the product panel, select Maintenance > Menu > Items.
- Create an item, such as 'As Entrée.'
- Complete the remaining item maintenance options, as normal.
- Click Save.
- Repeat this procedure to create an 'As App' item.
To attach the course override item to a modifier:
- With Kitchen selected in the product panel, select Maintenance > Menu > Modifier Groups.
- Select the modifier group for an appetizer item from the 'Modifier Groups' drop-down list.
- Select the Layout tab.
- Select an available button on the layout screen.
- Under the 'Modifier item' group bar, select the item from the drop-down list. In this example, use either 'As Entree' or 'As App.'
- Click Save.
- Repeat this procedure for any other modifier groups that require a course override item.
To define the course override items in Kitchen Settings.
- With Kitchen selected in the product panel, select Maintenance > Kitchen Configuration > Kitchen Settings > Kitchen tab.
- Under the 'Items' group bar, select As App from the 'As-appetizer item modifier' drop-down list.
- Select 'As Entrée' from the 'As-entree item modifier' drop-down list.
- Click Save.
Limiting courses by a kitchen station
You can limit a course by a kitchen station. This is typically used if you have two expo stations and you want a course to display on one station, and not the other. For example, Expo Station A would handle appetizers and Expo Station B would handle entrées.
To limit courses by a kitchen station:
- With Kitchen selected in the product panel, select Maintenance > Hardware > Kitchen Station.
- Select a kitchen station from the 'Kitchen Station' drop-down list.
- Select the Limit To Courses tab.
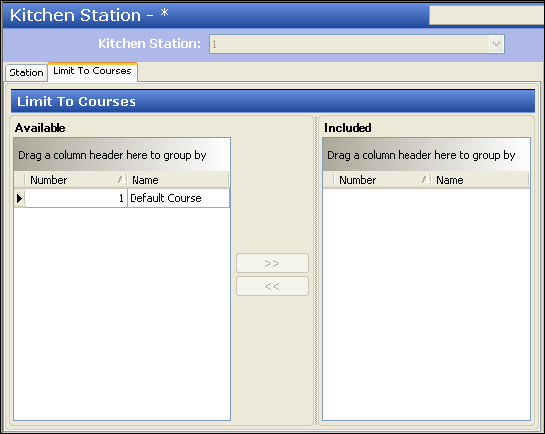
- Select a course from the 'Available' list box and click the right arrow to move the course to the 'Included' list box.
- Click Save.
- Repeat this procedure for other kitchen screens for which you want to limit coursing.
- Click Close and exit the Courses function.
Suspending a course automatically by table
You can automatically suspend a course by table number. Use this feature for a table, or sets of tables, that you want to fire individual courses manually. Use this if your operation has both fine dining and casual dining service.
SCENARIO: A server rings in all items for all meal courses. The appetizer course is fired. When the table is ready, the server informs the kitchen to fire the entrée course. A kitchen employee touches 'Fire' to activate items on the entrée course. Items on the entrée course activate based on your configuration.
To suspend a course automatically by table:
- With Kitchen selected in the product panel, select Maintenance > Kitchen Configuration > Kitchen Settings > Auto Suspend Course By Table tab.
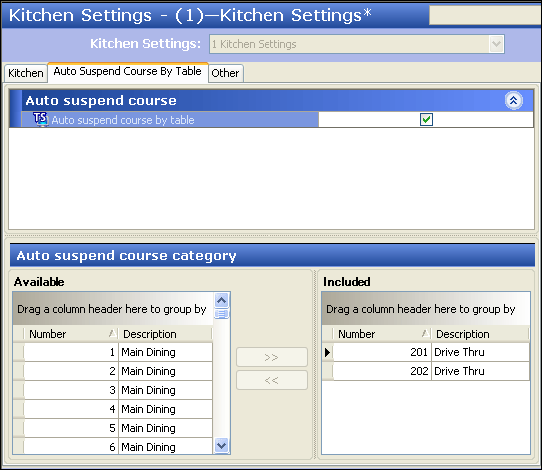
- Under the 'Auto suspend course' group bar, select Auto suspend course by table. The system adds the 'Auto suspend course category' group bar.
- Select a table from the 'Available' list box and click the right arrow to move the table to the 'Included' list box.
- Click Save.
- Repeat this procedure for each table you want to suspend a course.
- Click Close and exit the Kitchen Settings function.