Configuring item routing
Item routing determines on which Aloha Kitchen station items appear. Several methods for item routing are available, depending on your operations. Most restaurants take the granular approach, meaning each item is routed to an appropriate kitchen station using video groups. A less granular approach would be to send an entire order to a kitchen screen, such as by order mode.
What the Aloha Kitchen wizard does
When you run the Aloha Kitchen wizard, the system automatically creates a 'My Routing Rulebook' record in Routing Rulebook Maintenance, configured for video group routing to each kitchen station created by the wizard. The system attaches the generated routing rulebook as the default rulebook in Kitchen Settings.
Visit the Routing Rulebook function to do the following:
- Adjust the system-generated routing rulebook by changing or adding additional conditions.
- Create another routing rulebook to use during non-peak times of the day.
- Create another routing rulebook with a different routing method, such as category, to use instead of routing by video groups.
Before configuring item routing, you need to understand the concept of a "routing rulebook." Regardless of the method of item routing you choose, you must have at least one rulebook to use as the default rulebook. This rulebook should cover your routing needs when your restaurant is at its normal staffing level, and is the default rulebook, active at the start of each day. Then create additional rulebooks, if desired, to cover the routing requirements when you either increase or decrease your staff. You can easily change the active rulebook using the Set Staff Levels command from the Command bar on a touch screen terminal or a bump bar. For example, base the first (default) rulebook on the normal staffing level of five. Later, when you close the extra station, use the Set Staff Levels command to switch to the rulebook based on a lower staffing level.
Reference: Refer to "Configuring Staff Levels to Change Item Routing" for information on how to implement and use the Set Staff Levels command.
| This example depicts a video group routing type that sends items to Grill Station 2. When you close the station, use another routing rulebook to exclude Grill Station 2 and send items to other stations. | This example depicts an order mode routing type that sends the order to the Takeout Production Station. When you close the Takeout Production station, use another routing rulebook to exclude the Takeout Production Station and send orders to the Dine In Production station. |
|---|---|
 |  |
 |  |
The method you choose for routing items determines the configuration steps you are required to perform. Since routing by video group is the most common method chosen, and is a common migration path from the legacy Aloha KPS to Aloha Kitchen, the following instructions are specific to that method. If you need to route items using a method other than by video groups, contact your NCR representative for help.
Configuring a rule for a routing rulebook
Once you designate the appropriate video group for each routed item, you must create a routing rulebook. When you create a routing rulebook, configure the conditions of the rule using the Rules tab. When you configure multiple rules for a rulebook, the system routes items based on a 'top-down' approach. When an item satisfies a routing rule, the system does not continue to the next rule in the list. To prioritize a rule, click the Move Up and Move Down arrows. To delete an element from the routing rule, click Remove.
To configure a rule for a routing rulebook:
-
With Kitchen selected in the product panel, select Maintenance > Kitchen Configuration > Routing Rulebook > Settings tab.

-
Click New.
-
Under the 'Settings' group bar, accept the default number or click the ellipsis (...) button to select another number.
-
Type a name for the routing rulebook.
-
Under the 'Modifiers' group bar, select Regular modifiers always follow the parent item. This is typically selected; otherwise, modifiers do not appear on the kitchen screen.
-
Click the Rules tab.

-
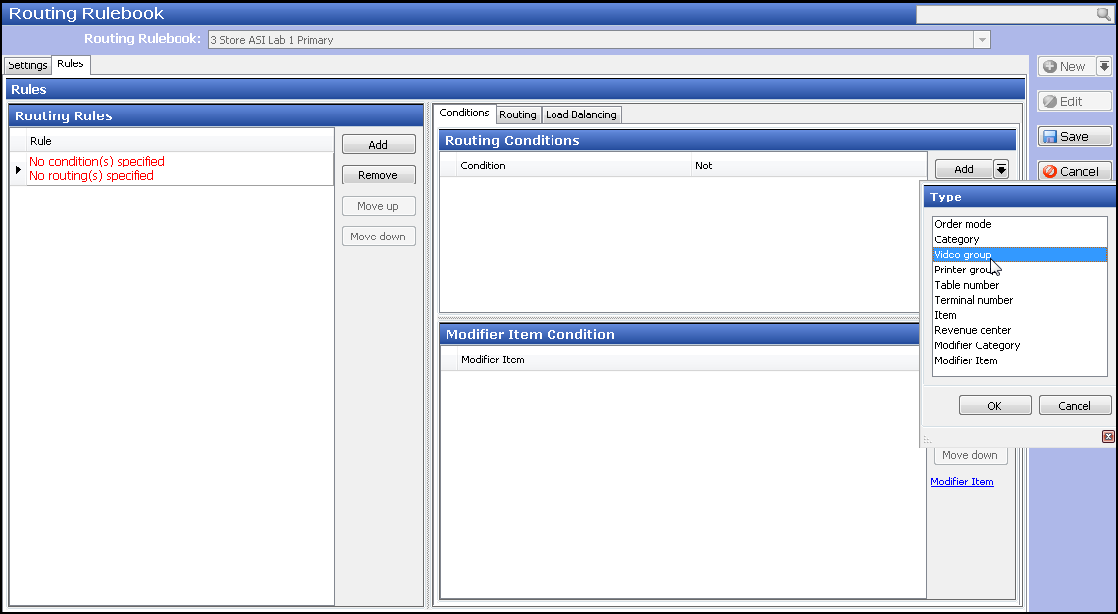
Under the 'Routing Rules' group bar, click Add. The system creates a rule without a condition or routing specified.
-
Select the Conditions tab to the right of the 'Routing Rules' group bar.
-
Under the 'Routing Conditions' group bar, select Video group from the Add drop-down list, and click OK. The routing condition appears under the 'Routing Conditions' group bar. If more information is needed for the selected routing condition, an additional group bar appears below. In this example, a 'Video Group Condition' group bar appears so you can specify the video group you want to use for routing.
Note: Use 'Not' when a condition is defined in a later rule.
-
Under the Video Group Condition group bar, click Add. The systems adds a blank row under the 'Video Group Condition' group bar.
-
Select a video group from the drop-down list.
.png)
-
If you want to include more than one video group, repeat step 10 and select another video group. If you want to add additional routing conditions to the rule, repeat steps 9 and 10 and select another routing condition type. When you finish configuring the routing conditions, the system updates the sentence-formatted rule under the 'Routing Rules' group bar.
Routing Condition Examples 'Not' Option Cleared 'Not' Option Selected
 Multiple Conditions Configured
 Multiple Video Groups Configured
-
Select the Routing tab to define the destination of the routing.
-
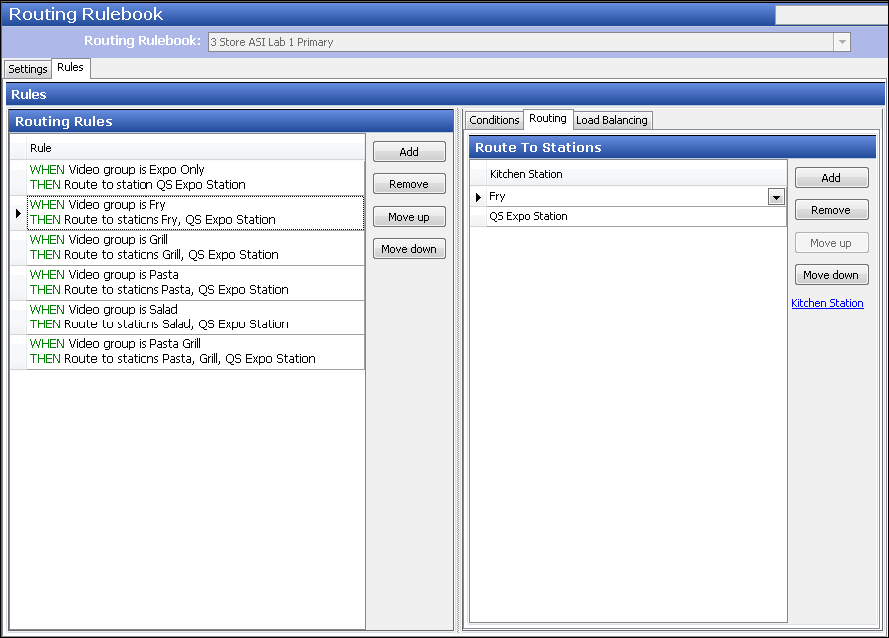
Click Add. The system adds a blank row to the 'Route To Stations' group bar.
-
Select a kitchen station to which to route from the drop-down list.
If you want to include additional kitchen stations to which to route items, for this rule, repeat steps 12 and 13 and select additional kitchen stations.
.png)
Note: In most cases, include the expo station in each routing rule along with a production station, for items to appear on the expo kitchen screen.
When you finish configuring the destination of the routing, the system updates the sentence-formatted rule under the Routing Rules group bar.
Routing Examples Single Station Routing Multiple Station Routing
-
If you want to add more routing rules for the routing rulebook record, repeat steps 6 to 13.

-
Review that your rules are in the order that the system will apply them, from top to bottom. If necessary, select a rule and click Move up or Move down to organize them in 'top-down' order.
-
Click Save.
-
Repeat this procedure for other routing rulebooks you want to configure.
-
Click Close in the Command panel to exit the Routing Rulebook function.
Attaching the default routing rulebook to kitchen settings
If you created a rulebook that you want to use as your default, you must access Kitchen Settings and replace the system-generated rulebook defined in Kitchen Settings. If the rulebook is not your default rulebook, you use the Staff Levels function to change to a particular rulebook, on demand.
Reference: You can use staff levels to change the routing rulebook on demand from the kitchen screen. See "Configuring Staff Levels to Change Item Routing".
To attach the default routing rulebook to Kitchen Settings:
- With Kitchen selected in the product panel, select Maintenance > Kitchen Configuration > Kitchen Settings.
- Under the 'Defaults' group bar, select the routing rulebook from the 'Default routing rulebook' drop-down list.
- Click Save and to exit the Kitchen Settings function.