Configuring item timing
By default, all routed items display (activated) on their respective kitchen screens at the same time. You can configure the timing of items in Aloha Kitchen to allow items to display on a kitchen screen at staggered times (delayed routing) so you can synchronize the completion of the order at the same time. This ensures hot food is served hot and cold food is served cold. The item with a longest cook time displays first, then other items within the order with a shorter cook time displays at the appropriate times. There are several item timing methods you can use. Some methods you can use in conjunction with another timing method, and some override a method.
For example, the guest orders a grilled chicken entrée with an eight minute cook time and a fried shrimp entree with a two minute cook time. The grilled chicken entree appears on the 'Grill' screen for six minutes before the fried shrimp entrée appears on the 'Fry' screen.
In order to stagger the delay of your items, you must activate delay routing and add cook times to your items.
Activating the delay routing
To stagger the times when items appear on-screen, you must activate the delay routing function in Kitchen Settings.
To activate delay routing:
- With Kitchen selected in the product panel, select Maintenance > Kitchen Configuration > Kitchen Settings.
- Under the 'Delay Routing' group bar, select Enable delay routing.
- Click Save and exit the Kitchen Settings function.
Adding cook rimes for items
Adding cook times to your routed items is the very basic requirement for timing your items. The item with the longest cook time displays on-screen first, then all subsequent items within the order display when their cook times arrive. You need only add a cook time to items you are routing.
To add cook times for items:
- With Kitchen selected in the product panel, select Maintenance > Menu > Item Cook Times.
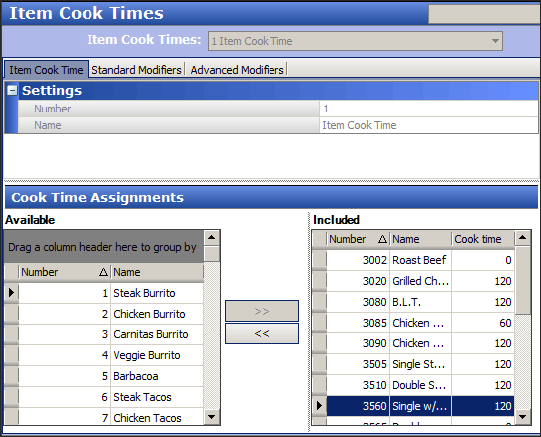
- Click New to create a new item cook time record.
- Select an item from the 'Available' list box and click >> to move the item to the 'Included' list box. To select a range of items, select the first item in the range, hold down the Shift key, and select the last item. To select non-consecutive items, select an item, hold down the Ctrl key, and select each additional item.
- Type the number of seconds it takes to prepare the item in 'Cook time.' To enter the same cook time for a range of items, select the first item in the range, hold down the Shift key, and select the last item. To enter the same cook time for non-consecutive items, select an item, hold down the Ctrl key, and select each additional item.
- Repeat steps 3 and 4 until you configure the cook times for each item.
- Click Save.
- Click Close to exit the Item Cook Time function or continue to the next procedure.
Adjusting an item cook time based on a modifier
You can adjust the cook time of an item when you order the item with a specific modifier, using the Standard Modifiers tab. Typically, you adjust a cook time for temperature modifiers, such as 'Well Done,' or 'Rare.' You can increase or decrease the time, based on a percentage or a fixed amount of seconds. You must place the modifier in a modifier group and associate that modifier group to the applicable item, as you would for any other modifier group configuration.
Note: Be aware the options you configure on the Standard Modifiers tab affects the cook times you configure on the Item Cook Time tab. Furthermore, the modifier configured here equally affects the timing of any item to which you apply this modifier. For example, using a 'Well Done' modifier on a hamburger, a bacon cheeseburger, or a mushroom Swiss burger affects the cook time by the same amount.
To adjust an item cook time based on a modifier:
-
With Kitchen selected in the product panel, select Maintenance > Menu > Item Cook Times > Standard Modifiers tab.
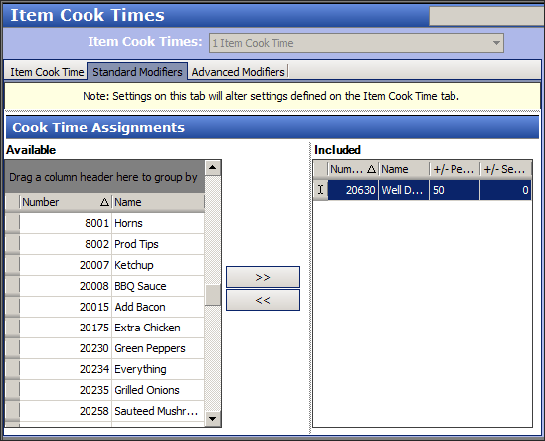
-
Select a modifier from the 'Available' list box and click the right arrow to add the modifier to the 'Included' list box. The modifier you choose must reside in a modifier group and must be attached to the applicable item. Do not select a menu item or a modifier that does not apply.
-
To adjust the cook time by a percentage, type a percentage in the +/- Percent column. Precede the percentage with a minus sign if you want to reduce the original cook time.
-OR-
To adjust the cook time by a fixed number of seconds, type an amount, in seconds, in the +/- Seconds column. Precede the amount with a minus sign if you want to reduce the original cook time.
-
Repeat Steps 2 through 4 for each modifier you want to adjust the original item cook time you order the item with the modifier.
-
Click Save.
-
Click Close to exit the Item Cook Times function or continue to the next procedure.
Overriding an item cook time using an item/modifier pairing
You can override an item cook time, and item cook time adjustment, with a specific pairing of an item and a modifier, using the Advanced Modifiers tab. Typically, you would use this when a cook time adjustment is already in place or you want to use a pairing at all times. For example, if you already have a 'Well Done' modifier to increase the cook time of an item by 50%, but when you order a NY Strip steak takes 100%, you would pair NY Strip steak and Well Done together to create a different cook time amount. You must place the modifier in a modifier group and associate that modifier group to the applicable item, as you would for any other modifier group configuration.
Warning: Be aware the options you configure for a specific pairing on the Advanced Modifiers tab override the options on the Item Cook Time and Standard Modifiers tabs.
To override an item cook time using an item/modifier pairing:
- With Kitchen selected in the product panel, select Maintenance > Menu > Item Cook Times > Advanced Modifiers tab.
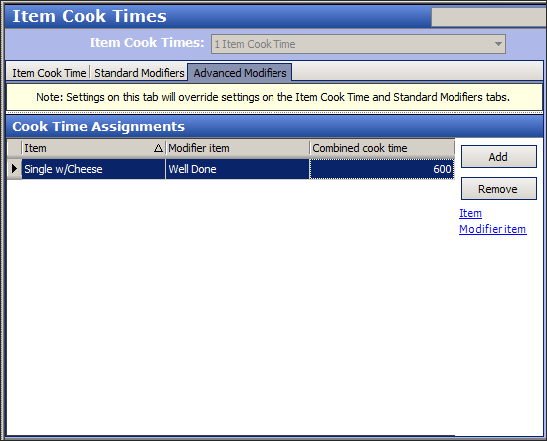
- Click Add. The system adds a blank row under the 'Cook Time Assignments' group bar.
- Select an item from the 'Item' drop-down list.
- Select a modifier from the 'Modifier' drop-down list. Only modifiers associated with the item appear.
- Type the total number of seconds it takes to cook the item when used with this modifier in 'Combined cook time.'
- Repeat Steps 2 through 5 until you add all advanced modifiers you need.
- Click Close to exit the Item Cook Times function.
Overriding item cook times
Use the Item Cook Time Overrides function to override the entire set of item cook times with a new set during abnormal times or special events. You can use the function to increase or decrease the cook time of an item, such as when the number of items ordered, exceeds the capacity of a piece of kitchen equipment during busy meal periods or additional schedule staff increases productivity. If necessary, create one or more item cook time overrides to account for different business and production levels that affect the cook time of various items. After you configure a new set of cook time values, you must access Maintenance > System Settings > Activation Schedule and Event Schedule to activate or deactivate the override.
To configure item cook time overrides:
- With Kitchen selected in the product panel, select Maintenance > Menu > Item Cook Time Overrides.
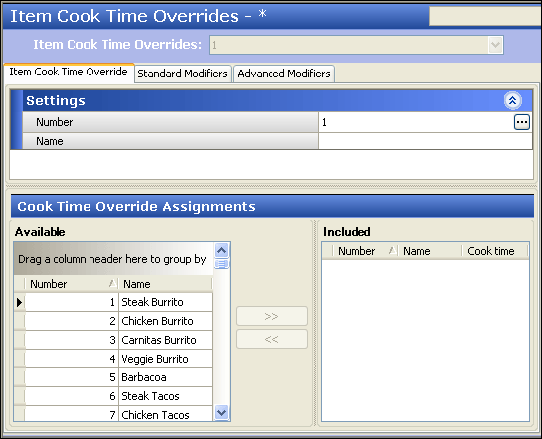
- Click New.
- Under the 'Settings' group bar, type a name for the item cook time override.
- Select one or more items from the 'Available' list box and click the right arrow to move the items to the 'Included' list box.
- Use the Standard Modifiers and Advanced Modifiers tabs to configure cook time overrides for those functions. See Configuring Item Timing for more information.
- Click Save.
- Click Close and exit the Item Cook Time Override function.
To create an activation schedule for a cook time override:
-
With TS or QS selected in the product panel, select Maintenance > System Settings > Activation Schedules.
-
Click the New drop-down arrow, select a type of cook time override from the drop-down list, and click OK.
Note: If you select Weekly, Monthly, or Specific Date from the New drop-down list, you must select additional configuration from the 'Options' group bar.
-
Type a name for the activation schedule.
-
Under the 'Time' group bar, clear Start of day unless the cook time override applies to an entire day.
-
Type a Specific start time for the activation schedule.
-
Click Save and exit the Activation Schedule function.
To create an event schedule for a cook time override:
- With TS or QS selected in the product panel, select Maintenance > System Settings > Event Schedule.
- Select an existing Event Schedule from the 'Event Schedule' drop-down list, or click New to add a new event schedule.
- Select the Events tab.
- Click the Add drop-down list and select Activate Item Cook Time Override.
- Under 'Activation Schedule,' select the activation schedule.
- Select a start date and end date from the drop down calendar.
- Under the 'Activate Item Cook Time Override' group bar, select the item cook time override from the drop-down list.
- Select the Active check box.
- Click Save and exit the Event Schedule function.
Note: To deactivate a cook time override, repeat steps 4 - 9. In step 8, clear the 'Active' check box.
Determining the method to use for items with zero cook time
When you have a zero cook time assigned to an item, and you are using delay routing, the routed item appears on-screen with no delay. The system then uses the timing requirements of the course, even if you have only the default course. You can configure zero cook time items to appear on-screen in Kitchen Settings, based on when a course completes, starts, or by the 'Duration in minutes' option in Course Maintenance.
To determine the method to use for items with zero cook time:
-
With Kitchen selected in the product panel, select Maintenance > Kitchen Configuration > Kitchen Settings.
-
Under the 'Items' group bar, select one of the following from the 'Item with zero cook time option' drop-down list:
a. Select Activate item at course completion to activate items when a course is complete.
b. Select Activate item at course start to activate items based on the start of the course.
c. Select Use default item time as defined in course configuration to activate items based on the 'Default cook time for zero cook time item (in seconds)' value in Maintenance > Kitchen Configuration > Course for the active course.
-
Click Save.
Configuring delay routing
Delay routing options enable staggered activation based on item cook time, course timing, or when using the future order functionality in Aloha Takeout. If delayed routing is cleared, items are activated all at once. If delayed routing is cleared and the order has multiple courses, all items appear at once with each course appearing in separate cells with their respective items.
To configure delay routing:
-
With Kitchen selected in the product panel, select Maintenance > Kitchen Configuration > Kitchen Settings.
-
Under the 'Delay Routing' group bar, configure the following:
a. Select Enable delay routing to activate delay routing. If cleared, all items route normally and become active immediately.
b. Clear Always activate delayed items on same order together to stagger the activation of items. Enable this option if you want to activate all items in a delay group at the same time. Use this option if you use an Aloha Kitchen expo station, but use kitchen chit printing instead of production displays.
c. Type the number of minutes before the target time that Aloha Kitchen forces activation of a delayed item in 'Minimum activation time in minutes,' if it has not been activated by other methods. Recommended: Set this to the shortest cook time item for all courses.
d. Type the number of minutes before the target time that you allow Aloha Kitchen to activate delayed item in 'Maximum activation time in minutes' to prevent items from being released too early. Type '0' to indicate no limit. Recommended: Set this to the cook time of the item that takes the longest time to prepare.
e. Type the number of seconds to add to the activation time in 'Additional activation seconds' for counting, battering, breading, or other preparation you require before cooking items.
f. Select Enable manual activation for delayed orders if you activate orders, as opposed to Aloha Kitchen automatically activating a delayed order. Recommended: Cleared.
g. Select Enable manual activation for delayed items if you activate items, as opposed to Aloha Kitchen automatically activating a delayed item. Recommended: Cleared.
h. Select Add production factor to activation time to calculate the activation time of items.
i. Select Activate relative to first item actual start time to time the activation of items within a course based on when the first item is activated and the cook time of each item. This option ignores the course target time and sets a new target time for all course items, based on the start of the first item on a course and the cook time of that item. Required Options: It is necessary to set a maximum time to wait for the first item in seconds.
j. Specify the Maximum time to wait for first item in seconds to define the seconds other items on a course must wait before the activation of the beginning of a course. This prevents an entire order from being late if you forget to start the first item. Required options: You must select 'Activate relative to first item actual start time' to enable this option.
Note: Selecting '0' delays shorter cook time items indefinitely until the item with the longest cook time is started.
k. Select a behavior from the 'Auto suspend course behavior' drop-down list to determine the automatic suspension of courses.
l. Select Disable in a quick service, quick casual, and casual table service environments to allow Aloha Kitchen to time and automatically fire all courses.
m. Select Suspend all courses in fine dining to release each course for a table manually, including the first course.
n. Select Autofire first course and suspend all subsequent courses in fine dining to automatically fire the first course, then require you to release each remaining course for a table, when necessary.
o. Select Auto fire suspended course minutes to specify the number of minutes, from 0 to 999, to wait before automatically firing a course that has been suspended. The default is 500 minutes (8 hours 20 minutes). Lower the number Sgtpeof minutes to fire a suspended course in case you forget to fire a course.
-
Click Save and exit the Kitchen Settings function.
Configuring item routing method for items
In the POS, an item is sent to the kitchen in a variety of ways, all of which are with the inclusion of the 'Send' function. You can either touch a stand-alone 'Send' button, include the send function within a script, apply an order mode with the send function, and more. You can use Aloha Kitchen to determine at what state of the ordering process in the POS that items appear on the kitchen screen.
To determine when items appear from the POS:
-
With Kitchen selected in the product panel, select Maintenance > Kitchen Configuration > Kitchen Settings.
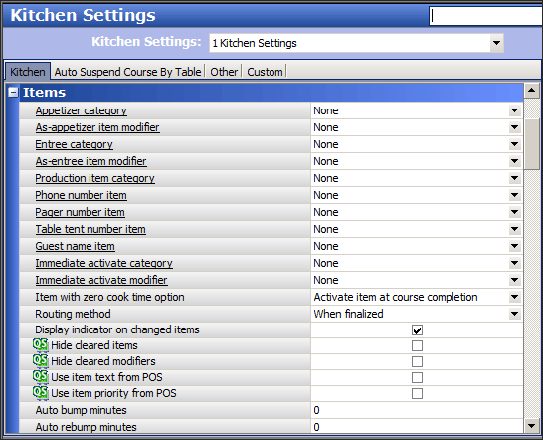
-
Under the 'Items' group bar, configure one of the following options from the 'Routing method' drop-down list:
a. Select When finalized to send an item to the kitchen when you order the item on the POS.
b. Select One behind to send an item to the kitchen only after you enter the next item in the POS.
c. Select Route when POS order is closed to send an item to the kitchen when you close the check on the POS.
d. Select Immediate to send an item to the kitchen as you enter the item, as unordered, on the POS. This is useful for fast quick-service environments.
-
Click Save.