PHC
Warning: Do not change this section.
This area controls mail jobs that are sent out daily or weekly. The options at the bottom of the section are for creating new jobs. This section is mainly for explanation purposes and should not be changed.

Creating new jobs
-
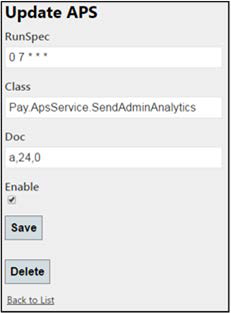
Enter the type of job to run in ‘Class.’ Currently there are three kinds of jobs:
- Pay.ApsService.SendAdminAnalytics sends out the email report for “NCR Mobile Pay Admin Analytics.” This contains stats for all sites marked as active.
- Pay.ApsService.SendOperatorAnalytics sends out the Operator email that is composed of the sites currently mapped to that user.
- Pay.ApsService.SendInactiveAnalytics sends an email that contains the list and stats of sites set as inactive but have check view or payments.
-
Enter the correct values (0 7 * * *, a,24,0, True) in Run Spec for the parameters described below. An asterisk for a parameter indicates a filter is not applied. So, 0 7 * * * means send the email every day at 7:00.
- Minute of Hour (Green) indicates the minute of the hour to send the email. For example, to send an email at 7:10, set this to 10.
- Hour of the Day (Turquoise) indicates the hour of the day to send the email. The email is sent out based on the 24-hour day value.
- Day of the Month (Pink) indicates the day of the month. So first of each month would be a 1.
- Month of the Year (Red) indicates the month of the year.
- Day of the Week (Dark Yellow) indicates the day of the week with Sunday starting as 0.
-
Enter the correct values (0 7 * * *, a,24,0, True) in ‘Doc’ for the parameters described below.
- User Type (Green) designates the User Type to which to send the email. In this case, it is sent out to only administrators.
- Hour range for Data (Turquoise) designates the number of hours back to collect the data. For example, collect the last 24 hours of data. To collect the data for the last week change the number to 168.
- Hour offset (Pink) designates the number of hours to shift time window from the “Hour range for Data”. Positive number shifts the window back in time. For example. (0 7 * * *, a,24,-6, True) collects the last 24 hours of data starting at 1:00 am.
-
Click Save.
Editing an existing job
-
Click Edit next to the job to change.
-
Select Enable to allow the sending of the job form.
-
Click Delete to remove the job completely.
-
Click Save to save your changes.
-
Click Back to List to exit and return to the list of jobs.