Excluding a Menu Element from a Site
You may need to hide certain elements of your menu from specific sites, using exclusions, so they cannot be sold at that location. You would do this for any number of reasons, such as a specific store location may not have the inventory necessary to prepare the menu element the store does not offer the menu element. You can exclude a submenu, menu item, modifier item, sales item, or sales item option from a certain location. For each of these, you can exclude these elements singularly, or by site or site groups.
To exclude a menu element from a site:
You can specify a submenu to exclude for the online ordering site of a specific location. If you have site groups configured, you can also use site groups to quickly assign the exclusion of a submenu to multiple sites.
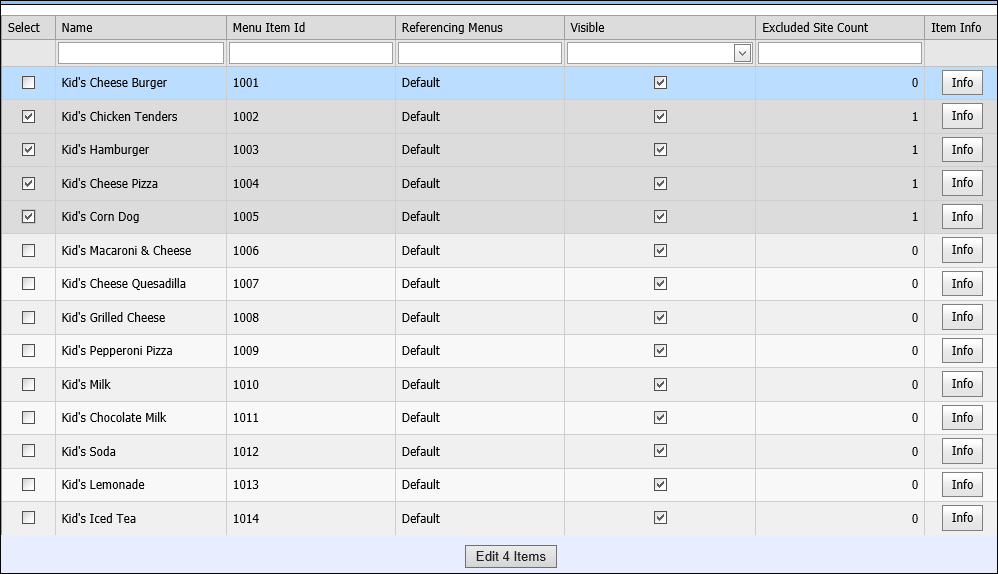
- In Web Admin, select Designs > Exclusions > Menu Item Site Exclusions (shown), Submenu Site Exclusions, Sales Item Site Exclusions, or Sales Item Option Site Exclusions. The appropriate screen appears.

-
If needed, filter the list by name or one of the following criteria:
Function Available Sorting Criteria Submenu Sub Menu Id Referencing Menus Visible Excluded Site Count Menu Item Menu Item Id Referencing Menus Visible Excluded Site Count Sales Item Sales Item Id Referencing Menu\Menu Item Visible Excluded Site Count Sales Item Option Sales Item Option Id Referencing Option Groups Visible Excluded Site Count -
Use the ‘Select’ column on the left side of the screen to make your selections. The number you select tally at the bottom of the screen.
-
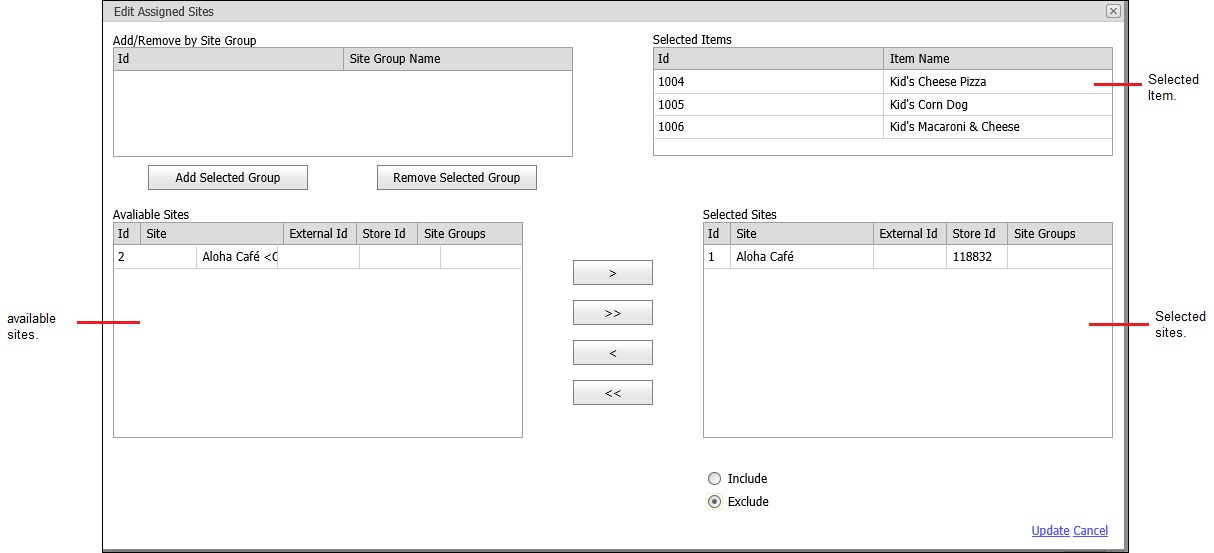
Click Edit x items at the bottom of the screen. The Edit Assigned Sites screen appears.

- To exclude items from your online menu, perform the following:
a. Select the sites from the ‘Available Sites’ list and click > to move the sites to the ‘Selected Sites’ list.
b. Select Exclude on the bottom of the screen. - To include excluded items from your online menu, perform the following:
a. Select the sites from the ‘Available Sites’ list and click > to move the sites to the ‘Selected Sites’ list.
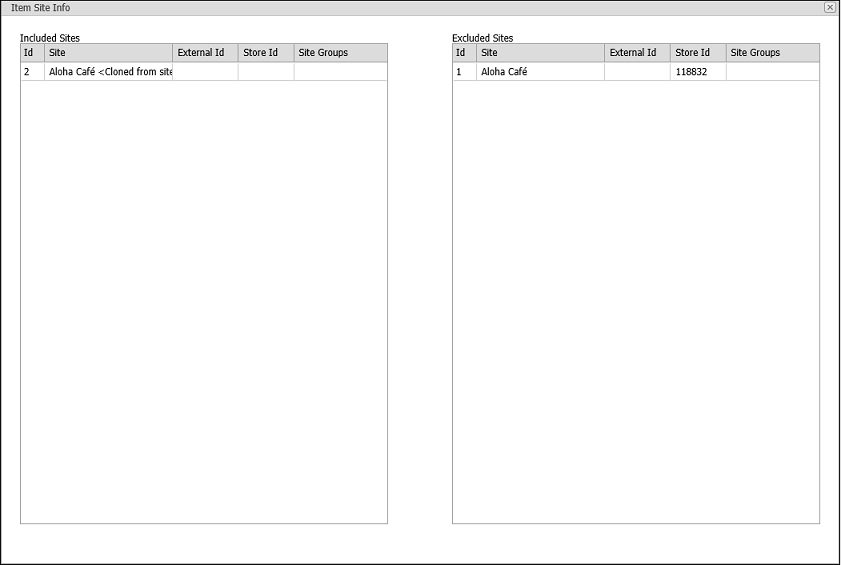
b. Select Include on the bottom of the screen. - Click Update. You can click Info for each element to quickly view the included and excluded sites for the element and click the X in the top right corner to exit the screen.
- Click Edit on the right side of the screen to display the Edit Assigned Sites screen.

- Exit the appropriate screen.
To exclude a menu item:
You can hide a menu item for a specific store location. For example, a specific store location may not have the inventory necessary to prepare a menu item. If you have site groups configured, you can also use site groups to quickly assign the exclusion of a menu item to multiple sites.

- In Web Admin, select Designs > Exclusions > Menu Item Site Exclusions. The menu item site exclusion screen appears.
- Select the menu item to exclude.
- Click Edit. The Edit Assigned Sites screen appears.
- If you have site groups configured, select a site group from the ‘Add/Remove by Site Group’ list.
- To assign the exclusion by adding the sites found in the site group, click Add Selected Group. The sites included in the site group appear in the ‘Selected Sites’ list.
To unassign the exclusion by removing the sites found in the site group, click Remove Selected Group. The system removes sites included in the site group from the ‘Selected Sites’ list. - Under ‘Selected Sites,’ select the store location for which to exclude a menu item, and click Remove Selected. The system moves the store location to ‘Available Sites.’ To remove the exclusion, under ‘Available Sites,’ select the store location, and click Add Selected. The system moves the store location to ‘Selected Sites.’
- Click Update.
To exclude a modifier:
You can hide a modifier item for a specific store location. For example, a store location may not have the inventory necessary to provide a specific modifier item. If you have site groups configured, you can also use site groups to quickly assign the exclusion of a menu item to multiple sites.

- In Web Admin, select Designs > Exclusions > Sales Item Option Site Exclusions. The menu site exclusions screen appears. The system considers all items with an associate price to be a sales item.
- Select the modifier item to exclude.
- Click Edit. The Edit Assigned Sites screen appears.
- If you have site groups configured, select a site group from the ‘Add/Remove by Site Group’ list.
- To assign the exclusion by adding the sites found in the site group, click Add Selected Group. The sites included in the site group appear in the ‘Selected Sites’ list.
To unassign the exclusion by removing the sites found in the site group, click Remove Selected Group. The system removes sites included in the site group from the ‘Selected Sites’ list. - Under ‘Selected Sites,’ select the store location for which to exclude a modifier item, and click Remove Selected. The system moves the store location to ‘Available Sites.’ To remove the exclusion, under ‘Available Sites,’ select the store location, and click Add Selected. The system moves the store location to ‘Selected Sites.’
- Click Update.
To exclude a sales item:
You can hide a sales item for a specific store location. For example, a specific store location may not have the inventory necessary to prepare a sales item. If you have site groups configured, you can also use site groups to quickly assign the exclusion of a menu item to multiple sites.

- In Web Admin, select Designs > Exclusions > Sales Item Site Exclusions. The sales item site exclusion screen appears.
- Select the sales item to exclude.
- Click Edit. The Edit Assigned Sites screen appears.
- If you have site groups configured, select a site group from the ‘Add/Remove by Site Group’ list.
- To assign the exclusion by adding the sites found in the site group, click Add Selected Group. The sites included in the site group appear in the ‘Selected Sites’ list.
To unassign the exclusion by removing the sites found in the site group, click Remove Selected Group. The system removes sites included in the site group from the ‘Selected Sites’ list. - Under ‘Selected Sites,’ select the store location for which to exclude a menu item, and click Remove Selected. The system moves the store location to ‘Available Sites.’ To remove the exclusion, under ‘Available Sites,’ select the store location, and click Add Selected. The system moves the store location to ‘Selected Sites.’
- Click Update.
To exclude a sales item option:
You can hide a sales item option for a specific store location. For example, a specific store location may not have the inventory necessary to prepare a sales item option. If you have site groups configured, you can also use site groups to quickly assign the exclusion of a menu item to multiple sites.

- In Web Admin, select Designs > Exclusions > Sales Item Option Site Exclusions. The sales item option site exclusion screen appears.
- Select the sales item option to exclude.
- Click Edit. The Edit Assigned Sites screen appears.
- If you have site groups configured, select a site group from the ‘Add/Remove by Site Group’ list.
- To assign the exclusion by adding the sites found in the site group, click Add Selected Group. The sites included in the site group appear in the ‘Selected Sites’ list.
To unassign the exclusion by removing the sites found in the site group, click Remove Selected Group. The system removes sites included in the site group from the ‘Selected Sites’ list. - Under ‘Selected Sites,’ select the store location for which to exclude a menu item, and click Remove Selected. The system moves the store location to ‘Available Sites.’ To remove the exclusion, under ‘Available Sites,’ select the store location, and click Add Selected. The system moves the store location to ‘Selected Sites.’
- Click Update.