Managing Modifier Groups
Menu Configurator enables you to manage the modifier groups for your web menu. You can create new modifier groups, share groups, split groups, rename groups, and change the required selections for a modifier group.
To create a new modifier group:
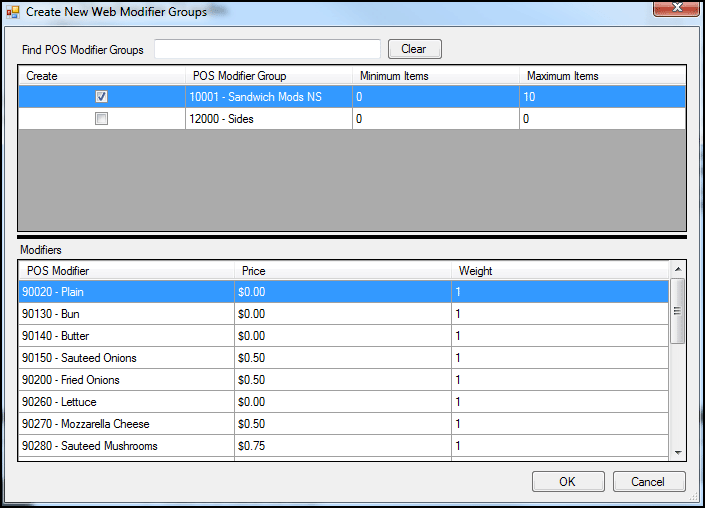
You can create a new modifier group to allow for the customization of a menu item. When you create a new modifier group, it is exclusive to the item for which you create it. This is commonly used when building a specific recipe group for a menu item. You can create several new groups simultaneously.
- In the menu tree, right-click a sales item, and select Create New Web Modifier Groups from the menu that appears. The Create New Web Modifier Groups screen appears.

- Under ‘Create,’ select the POS modifier group to include in the new modifier group. The available modifier items appear under ‘Modifiers.’
- Select the modifier items for the new modifier group. Use Shift + left mouse click to select multiple items in a row or Ctrl + left mouse click to select several scattered items.
- Click OK. The system adds the new modifier group at the bottom of the list of modifier groups for the sales item.
- (Optional) Select the new modifier group and change the Web Modifier Group Name, description, and other items, as necessary.
- Publish the changes.
To share a modifier group:
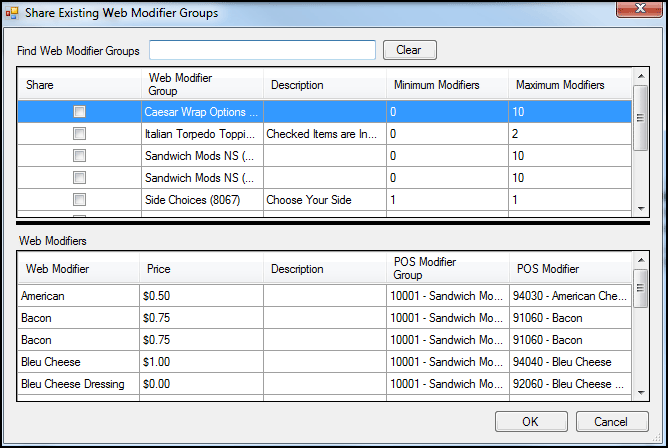
For sales items requiring the same modifier group, you can share a modifier group rather than creating a modifier group for each sales item. For example, you can share an entree sides modifier group with all entree items.
⚠️ When you make any modifications to a shared modifier group, those changes appear across each instance where you use the modifier group. To make a modification on one menu item, build a unique group for the item.
- In the menu tree, right-click the sales item for which to add the modifier group of another item and select Share Existing Web Modifier Groups from the menu that appears. The Share Existing Web Modifier Groups screen appears.

- Under ‘Share,’ select the modifier group to share. The system displays the web modifiers that belong to the group.
- Click OK. The system adds the modifier group to the sales item, and places it at the bottom of the modifier groups for the item.
- Publish the changes.
To split a modifier group:
When you have modifier group with numerous modifier items, you can split the modifier group into smaller groups to make it easier for the consumer to navigate the web menu and make their selections. For example, with a pizza menu, in your POS you may list all the available toppings in one modifier group. For your web menu, you can split the toppings into multiple modifier groups, such as one for meats and one for vegetables.
- In the menu tree, right-click the modifier group to split and select Split Web Modifier Group from the menu that appears.
- Under ‘Web Modifier,’ select the modifiers for the new group. Use Shift + left mouse click to select multiple items in a row or Ctrl + left mouse click to select several scattered items.
- Click OK. The system moves the selected modifier items to the new group and adds the modifier group to the bottom of the list of modifier groups for the sales item
- Select the new modifier group and change the Web Modifier Group Name, description, and other items, as necessary.
- Publish the changes.
To change the min/max selections:
In some cases, your POS may not require a modifier group for in-store operations, but it is necessary for online ordering. For example, for a restaurant that sells build your own burritos or tacos, the consumer tells the employee what type of tortilla, flour or wheat, they want. The POS system may not require the tortilla type for check-out; however, for a consumer placing an online order, it is necessary to require this as a modifier group so you can prepare the item to their specifications.
Prior to configuring the item in Menu Configurator, access your POS, add the modifier group to the menu item and set the minimum and maximum selection requirement to ‘0.’ In Menu Configurator, you can change the minimum and maximum selection requirement, which only affects online orders.
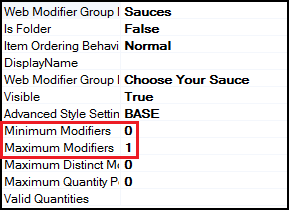
- In the menu tree, select the modifier group for which to change the min/max selections.

-
In ‘Item Properties,’ enter the minimum number of modifiers for the item.
📝 For an item with a minimum number greater than ‘0’ in the POS, you cannot change the minimum number to a lesser number in Menu Configurator. For example, if a menu item contains three minimum modifiers in the POS, you cannot change the minimum number of modifiers to ‘two in Menu Configurator. When a consumer attempts to place an order for the item using the online ordering site, they receive an error message informing them they have not chosen the required number of modifiers. You must change the POS first, before changing Menu Configurator.
-
Enter the maximum number of modifiers for the item. The maximum number of modifiers cannot be less than the minimum number of modifiers.
-
Publish the changes.
To rename a modifier group:
You may want to change the name and description of a modifier group to match your paper menu, and make it easier for your consumers to identify the items for an order.
- In the menu tree, select the modifier group for which to change the name and description.
- In ‘Item Properties,’ type the modifier name to appear on your web menu for the group. The new name for the modifier group occurs in every instance where the modifier group appears.
- Type the description to appear on your web menu for the group. Use this to describe the modifier group, and include instructions for the consumer to choose an item. By default, the system leaves the description blank. If you do not enter text for the description, ‘Optional’ appears for modifier groups without min/max selections, and ‘Required’ appears for modifier groups with min/max selections.
- Publish the changes.
To alphabetize modifier items within a group:
For modifier groups with multiple items, you can alphabetize the modifier items to provide a more user-friendly interface.
-
In the menu tree, right-click the modifier group for which to alphabetize the items and select Sort Modifier Groups A-Z from the menu that appears.
📝 To move a common or popular modifier item to the top of the modifier item list, right-click the modifier item, and select Move Up from the drop-down list.
-
Publish the changes.