Working with Menus
Menu Configurator allows you to create and manage multiple menus, and you can control the attributes for each menu. You may want to configure some menus for particular order modes.
To add an additional menu:
Aloha Online Ordering can provide a separate menu for each of the order mode services you offer, such as Pickup and Delivery. You may find this helpful in situations where the delivery menu does not offer as many items for order as the pickup menu, or when the catering menu offers menu items in larger sizes than the delivery or pickup menu. When placing an order, the consumer selects the order mode, such as pickup or delivery, and Aloha Online Ordering displays the corresponding menu.
You can create a duplicate menu of a previously created menu, but before doing so, ensure you complete all the necessary design changes, such as item naming, spelling, descriptions, modifier group splitting, etc. Copying a design menu prior to completing the design results in dual maintenance.
On the ordering screen for the mobile web platform, the ‘Is this a catering order?” button appears regardless if you configure a catering menu in Menu Configurator or not. If your only menu is defined for catering, the system automatically selects the button for you. If you do not define any menu for catering, the button is disabled.
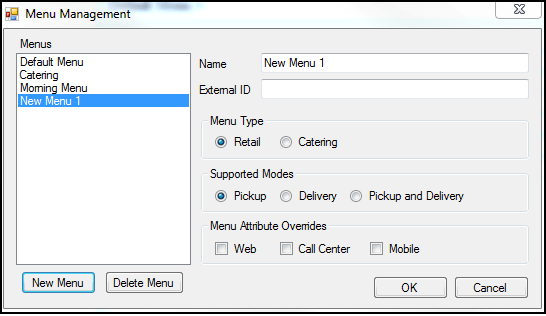
- Select Web Menu > Menu Management. The Menu Management screen appears.

-
Click New Menu.
-
Type the name for the new menu.
-
(Optional) Type an id number for the menu. Aloha Online Ordering uses the External ID as the Menu ID.
-
Select the menu type for the new menu, Retail or Catering.
-
Select the supported order modes for the new menu, Pickup, Delivery, or Pickup and Delivery.
-
(Optional), select any menu attribute overrides, such as Web, Call Center, or Mobile. The menu applies to each menu attribute override you select, however; if you clear all menu attribute overrides, the menu applies to all three attribute overrides. For example, if you select Web, the menu only applies to Web and not to the other two options.
-
Click OK. The system adds the new menu.
📝 To view the new menu and add items to it, select Web Menu > Active Menu, and select the name of the new menu.
To control the menus a consumer sees by access method:
A menu attribute override controls the availability of a menu based on the method by which a consumer accesses the web menu to place an order. Aloha Online Ordering allows you to place an order from a mobile device, call center, or desktop web. A web menu to display for call center ordering is not available to mobile devices or a desktop web.
By default, the system does not assign a menu attribute override to a menu. Without an override, the menu is available for all methods of ordering. You only select a menu attribute override to restrict the selected menu to a specific method of ordering. If you restrict a menu, it is necessary to configure the store location in Web Admin to accept orders by this method.
- Select Web Menu > Menu Management.
- Select the menu for which to configure a menu attribute override.
- Select the attribute override to apply to the menu.
- Click OK.
To share an existing submenu:
When you plan to use a submenu from one menu with another menu, you can share an existing submenu. The system reflects changes made to one submenu in both submenus automatically, including manual updates and the promotion of POS changes.
- In the menu tree, right-click the menu to which to add a submenu from another menu and select Share Existing Submenu from the menu that appears. The Share Existing Submenu screen appears.
- Select the submenu to share.
- Click OK.
- Publish the changes.