Creating POS order modes for Aloha Takeout
As you configure Aloha Takeout, the system bases its screen flow and business functionality on the type of order being entered. For example:
- An order for delivery requires a customer name and address to start an order and orders appear on the Dispatch screen.
- An order for customer pick-up prompts for a customer phone number and orders appear on the Pick Up screen.
In other words, the type of order controls the data you must enter and the ATO screen from which you access an active order, to make the order-taking process more efficient.
Warning: Do not share order modes with Aloha POS and Aloha Takeout. For proper interaction between Aloha Takeout and the Aloha POS, these modules cannot share order modes. Sharing order modes can have undesired results in the flow of order entry, the screens on which orders appear, whether you can assign an order to a driver, reporting, and more. You must create a unique order mode for each ATO order type you accept in your site, separate from the POS order modes.
During the ordering process, if you change the order mode to a check to an order mode that is not aligned in Aloha Takeout, 'Not Set Order' appears on the kitchen chit.
Suggested Settings: POS Order Modes for Aloha Takeout
| Settings | Walk In To Go | Pick-Up | Delivery |
|---|---|---|---|
| Order Mode tab | |||
| Active | ✔️ | ✔️ | ✔️ |
| All Items | ✔️ | ✔️ | ✔️ |
| Include Ordered Items (QS Only) — Select this option, as it is needed to change the order mode in Quick Service. | ✔️ | ✔️ | |
| Service charge group bar | |||
| Apply service charge — Select this option, if adding delivery fees to checks. | ✔️ | ||
| Charge line text | Delivery Fee | ||
| Tax applied to service charge — Aloha Takeout cannot calculate tax on delivery fees, even if you select this option. A different amount than when the items are first ordered appears on the confirmation screen, and the system calculates tax for the service charge. When using Aloha Takeout, set this option to "None" to avoid any tax and total calculation discrepancies. | None (0) | ||
| Fixed — Select Fixed as opposed to Percent. | ✔️ | ||
| Amount — ATO calculates the delivery fee based on the defined Aloha Takeout configuration and passes the amount to the POS, replacing the 0.00 amount. See "Enabling Delivery Fees in Aloha Takeout". | 0 |
To create a POS order mode for use with Aloha Takeout:
- With Takeout selected in the product panel, select Maintenance > System Settings > Order Mode.
- Click New to add a new order mode.
- Using the Suggested Settings: POS Order Modes for Aloha Takeout (refer to the above table), make the desired selections for the order mode your are adding.
- Repeat the steps above for each POS order mode used with Aloha Takeout.
- Click Save and exit the Order Mode function.
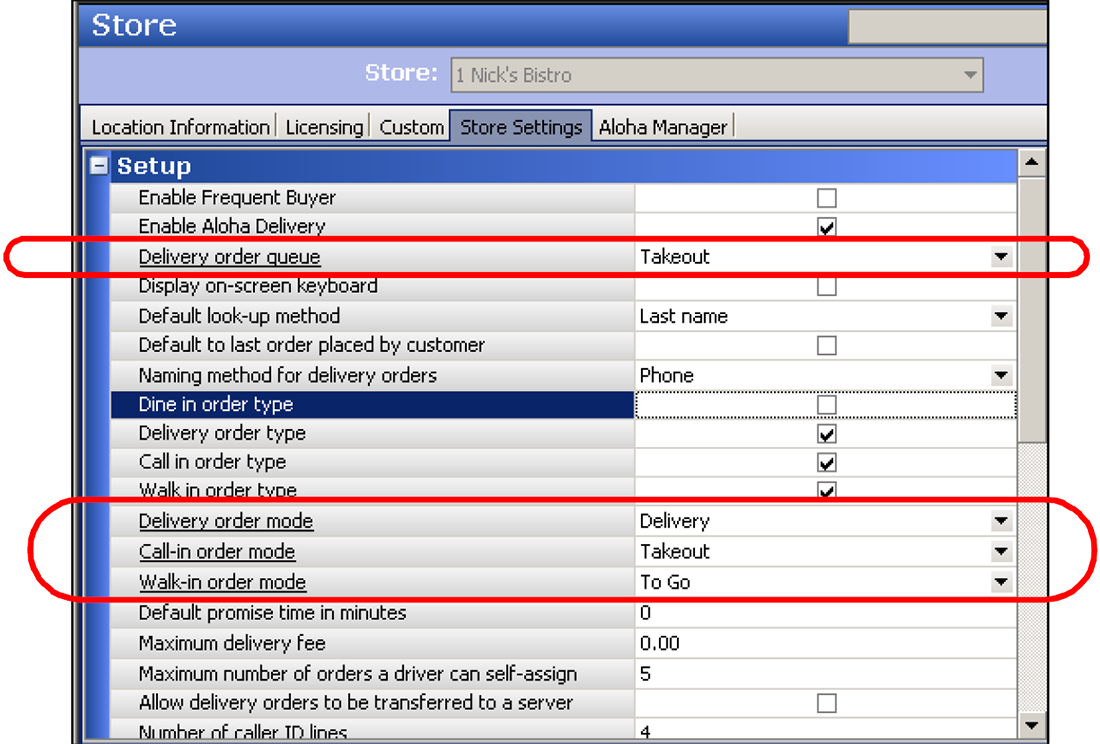
For Table Service operations, the system replaces the order mode buttons that appear at the top of the submenu with those defined on the Store Settings > Delivery tab, when the logged in employee has a 'delivery' job code. It is important to define these order modes in the event you need to change the order mode of an ATO order in Table Service. Aloha Takeout allows you to select up to three order modes. You can select any order mode you align with Aloha Takeout in these three drop-down lists.
Note: Skip this procedure if you are using Quick Service.
Reference: As of ATO v19.x, you must define a Source and Destination record to address all order sources leveraged by an online ordering solution, such as a store website and a delivery marketplace. This enables the online ordering solution to inject orders into ATO. If this record does not exist, order injection fails. Refer to Implementing Aloha Takeout Source and Destination (HKS380) for more information.
To align the takeout order modes with the POS delivery function:
-
With TS sected in the product panel, select Maintenance > Business > Store > Store Settings tab.

-
Select the Delivery group at the bottom of the screen.
-
Under the 'Setup' group bar, select Enable Aloha Delivery.
-
Select the order entry queue you created for use with Aloha Takeout from the 'Delivery order queue' drop-down list.
Note: When you run the Configuration Utility, the system automatically selects 'Enable Aloha Delivery' and associates the order entry queue from the 'Delivery order queue' drop-down list for you.
-
Select order modes to appear at the top of the Table Service order entry screen from the 'Delivery order mode,' 'Call-in order mode,' and 'Walk-in order mode' drop-down lists, as necessary.
-
Click Save and exit the Store function.
To align POS order modes with Aloha Takeout:
- With Takeout selected in the product panel, select Maintenance > Takeout Configuration > Takeout Settings.

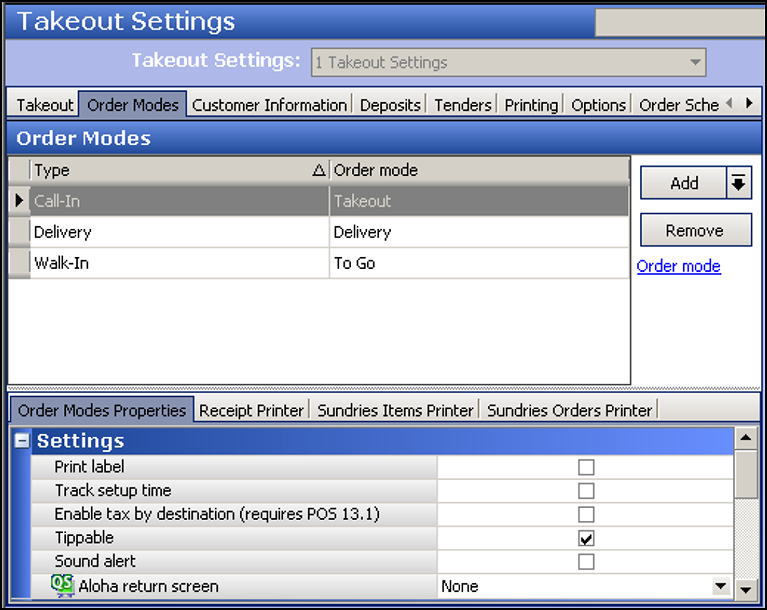
- Select the Order Modes tab.
- Click the Add drop-down arrow, select an ATO order type, and click OK. The Order type is added to the list of order types under the 'Order Modes' group bar.
- Click the Order mode drop-down list for each ATO order mode type and select the POS Order mode to which it aligns.
- On the Order Modes Properties tab, under the 'Settings' group bar, select Print label to print labels for a selected order type.
- Select Tippable to allow you to enter a tip for orders assigned to this order mode, provided that the applied tender in the Aloha POS also allows tips. The Enter Payment Information screen is dynamic in that the prompt to enter a tip amount appears, or does not appear, based on the configuration of the tender and the applied order mode, to reduce confusion for the employee.
- On the Receipt Printer tab, select a printer in the 'Available' list and click the right-arrow to move it to the 'Included' list. This is commonly used to print a guest check to the driver dispatch station after finalizing a delivery order.
- Repeat this procedure for each order type supported at your location.
- Click Save and exit the Order Modes function.