Establishing navigation between the Aloha POS and Aloha Takeout
How you configure the POS and Aloha Takeout to switch between these two applications plays an important role in the success and efficiency of fast-paced takeout and delivery environments. Depending on the role of the employee, you can have Aloha Takeout or the POS screen appear upon login. Depending on which screen appears at login, buttons allow you to switch between the two applications. Ultimately, the goal is to guide the employee through the order flow with the least number of button touches.
-
Bartenders and servers may enter takeout orders on a limited basis depending on the stores takeout business and the availability of dedicated takeout employees. Configure these job codes with the POS as the primary screen. Add buttons to an existing floor plan screen and order entry panel, to switch to takeout, when necessary.
-
Phone order takers primarily address takeout orders. Configure the system to 'Show takeout on log in,' allowing them to immediately look up or add a customer on the phone and start an order. Select Lookup as the return screen to go back to Aloha Takeout, ready for the next phone call, after completing an order.
-
You can also limit drivers and dispatchers from switching to the POS. Select 'Show Takeout on Login,' select an ATO return screen, and clear 'Display 'Aloha' button' to restrict access to the POS for these job codes.
The Aloha POS and Aloha Takeout provide several ways of navigating to Aloha Takeout throughout the order process:
-
At log in — Show Takeout on Login, floor plan, and QS order entry panel.
-
During an order — TS order screen panel buttons and QS order entry panel buttons.
-
Finalizing an order — Return screen.
Adding ATO buttons to Table Service
You must add buttons to the FOH in Table Service to provide access to Aloha Takeout screens. There are two common methods available to make this access easy.
-
Add buttons to a floor plan.
-
Add buttons to an Order Screen panel.
Adding buttons to a floor plan
We recommend using the Floor Plan feature for Table Service employees whose job codes also include Aloha Takeout functions. You can add buttons to an existing POS panel to switch to ATO. If this is not possible, you can create a new panel and screen for this purpose. We recommend you add at least the following three buttons to a floor plan panel:
-
Look Up — Transitions directly to the Look Up screen, in Aloha Takeout, making it possible to begin the order by associating it with a specific customer.
-
WWT — Transitions directly to the working with tables screen, making it possible to begin the order entry process immediately.
-
Exit — Logs out of the FOH.
To add an ATO navigation button to a floor plan panel:
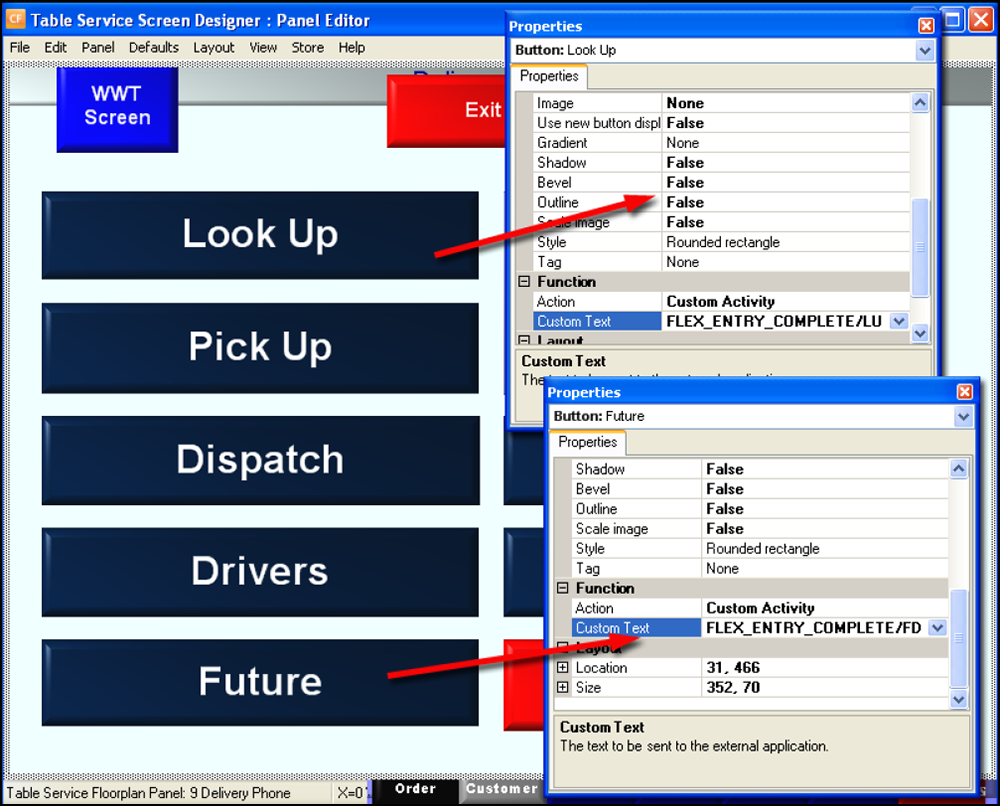
-
With TS selected in the product panel, select Maintenance > Screen Designer > Table Service Screen Designer > Work with Panels.
-
Select Panel.
-
Select Open Panel or New Floorplan Panel.
-
Clear Fixed button layout, if necessary.
Note: You may need to clear 'Mark as template' to edit the 'Fixed button layout' option.
-
Right-click within the panel and select New Button. The 'Properties' dialog box appears.
-
Select Custom Activity from the 'Action' drop-down list. A 'Custom Text' option appears.
-
Type "ORDER_ENTRY_COMPLETE/LU" in 'Custom Text.' This creates a button for you to touch to go from the floor plan to the ATO Lookup screen.
-
Type a name for the button in 'Text' to easily identify the screen that appears when you touch this button.
-
Configure other button properties, as normal.
-
Add a WWT button to the panel, if the panel does not have one.
-
Add an Exit button to the panel, if the panel does not have one.
-
Repeat the above steps to create additional navigation buttons, as needed, using the following 'Custom Text' parameters For example, 'ORDER_ENTRY_COMPLETE/LU.'
Parameter Screen Navigation LU Look Up screen PU Pick Up screen DP Dispatch screen DM Driver screen FD Future screen MP Map screen **Note:**Create multiple floor plan panels and navigation buttons to provide or restrict access to ATO screens for various job codes.
-
Add WWT, table, and other floor plan buttons, as needed.
-
Select Panel > Save Panel.
-
Select File > Close Panel Editor to exit the Panel Editor function.
To add a panel to a floor plan screen:
-
With TS selected in the product panel, select Maintenance > Screen Designer > Table Service Screen Designer > Work with Screens.
-
Click the Screen drop-down list and select an existing screen.
— OR —
Click New to create a new screen.
-
Under the panels frame, click Add and select the panel, created earlier in this procedure, from the Add Panels dialog.
-
Click OK.
-
Click Save and exit the Screen Editor function.
To add the ATO floor plan to a job code:
- Select Maintenance > Labor > Jobcodes > Order Entry tab.
- On the 'Order Entry' tab, under the 'Screens' group bar, select Use floorplan.
- Select the floor plan screen you created for ATO employees from the drop-down list.
- Click Save.
- Repeat the steps above for each ATO job code.
- Exit the Jobcodes function.
Adding buttons to a Table Service Order Screen panel
You must add buttons to an Order Screen panel to finalize Aloha Takeout orders while in the Table Service order entry screen.This requires you to:
-
Create an Order Screen panel or edit an existing one.
-
Add buttons to switch to Aloha Takeout.
-
Configure an event to display the Order Screen panel for ATO job codes.
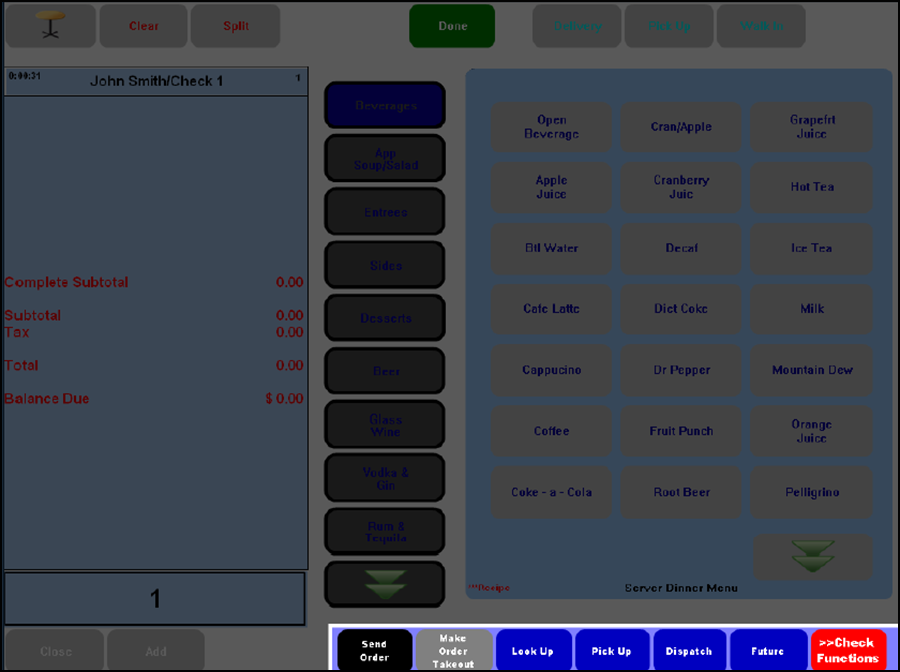
To add ATO buttons to an Order Screen panel:
-
With TS selected in the product panel, select Maintenance > Screen Designer > Table Service Screen Designer > Work with Panels.
-
Select Panel.
-
Select Open Panel to open an existing Order Screen panel or select New Order Entry Panel to create a new Order Screen panel for ATO job codes.
-
Clear Fixed button layout, if necessary.
Note: You may need to clear 'Mark as template' to edit the 'Fixed button layout' option.
-
Right-click within the panel and select New Button. A 'Properties' dialog box appears.
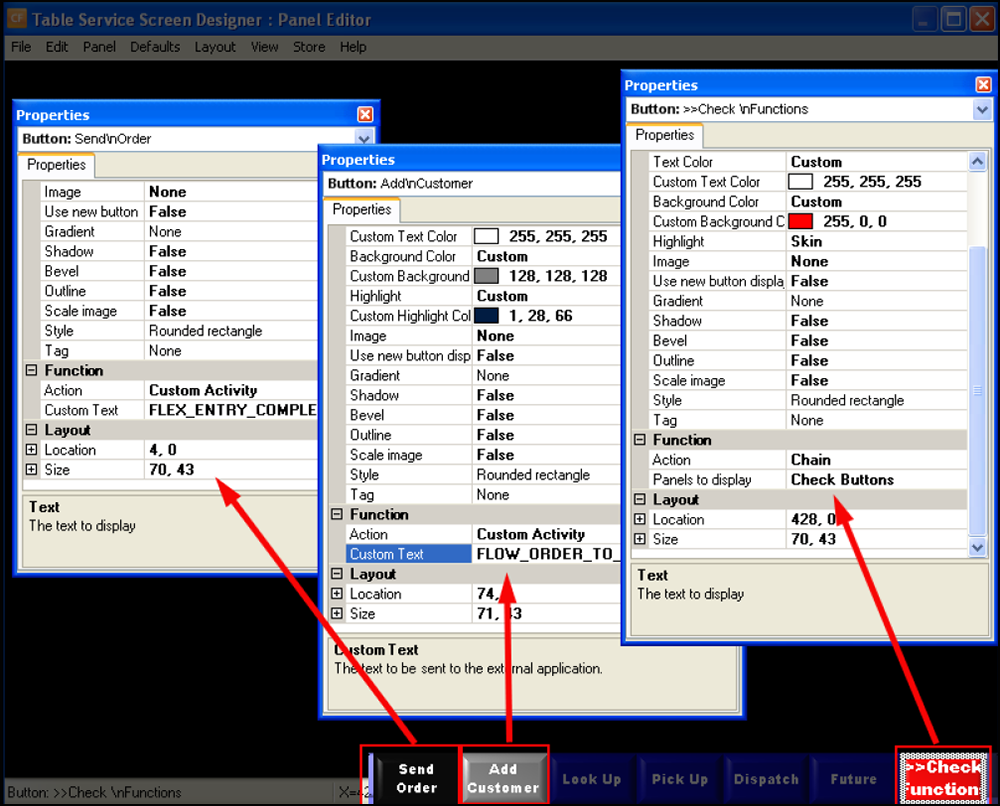
-
Select Custom Activity from the 'Action' drop-down list.
-
Type "FLEX_ENTRY_COMPLETE/LU" in 'Custom Text.' This creates a button that navigates to the ATO Lookup screen.
-
Type a name for the button in 'Text' and configure other button properties as normal.
Note: If you use a custom Order Screen panel for check functions, you can add the new Aloha Takeout button, if there is room.
Note: In most cases, you need to create a new Order Screen panel to provide access to ATO functions and add a 'chain' button function to each Order Screen panel to allow you to switch between the two custom panels, as needed.
-
Add other buttons to the Order Screen panel, as needed.
-
Select Panel > Save Panel.
-
Select File > Close Panel Editor to exit the Panel Editor function.
To create a daily activation schedule:
- Select Maintenance > System Settings > Activation Schedule.
- Confirm you have a 'Daily' activation schedule with 'Start of day' selected. If not, create one.
- Click Save and exit the Activation Schedule function.
To add the event for the ATO Order Screen panel to the daily activation schedule for ATO job codes:
- Select Maintenance > System Settings > Event Schedule.
- Click the Add drop-down arrow and select Set Order Screen Panel by Jobcode to create the order screen event.
- Select the name of the 'Daily' activation schedule from the 'Activation Schedule' drop-down list.
- Leave the start time, start date, and end date as the default values.
- Under the 'Set Order Screen Panel by Jobcode' group bar, select a job code from the 'Jobcode' drop-down list.
- Select the custom Order Screen panel you created for Aloha Takeout from the drop-down list.
- Click Save.
- Repeat this procedure for each job code that needs access to the ATO Order Screen panel.
- Exit the Event Schedule function.
Adding ATO buttons in Quick Service
For Quick Service operations, you must add buttons to the Quick Service FOH to provide access to Aloha Takeout screens.
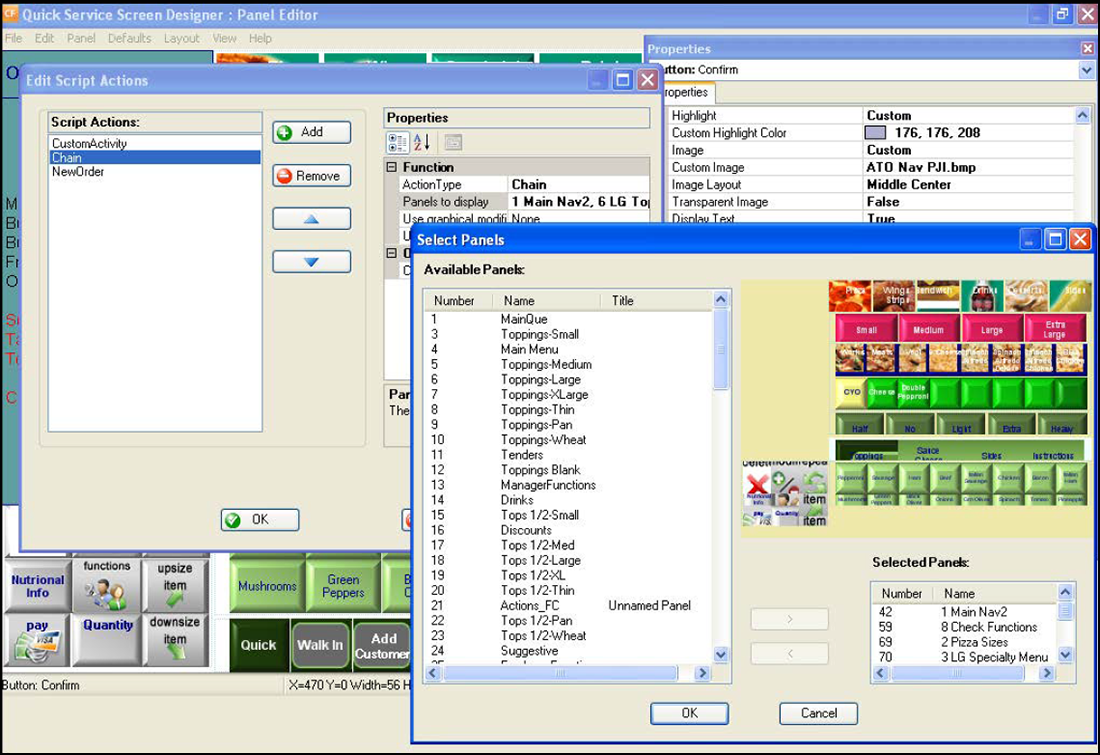
To add ATO buttons to a Quick Service panel:
-
With QS selected in the product panel, select Maintenance > Screen Designer > Quick Service Screen Designer > Work with Panels.
-
Select Panel.
-
Select Open Panel or New Order Panel.
-
Clear Fixed button layout, if necessary.
Note: You may need to clear 'Mark as template' to edit the 'Fixed button layout.'
-
Right-click within the panel and select New Button. The 'Properties' dialog box appears.
-
Select Script from the 'Action' drop-down list. The 'Script Actions' dialog box appears.
-
Within the 'Script Actions' option, click the ellipses button (...). The 'Edit Script Actions' dialog box appears.
-
Click Add.
-
Select Custom Activity from the 'ActionType' drop-down list within the 'Properties' dialog box.
-
Type "FLEX_ENTRY_COMPLETE/LU" in 'Custom Text.'
Parameter Screen Navigation LU Look Up screen PU Pick Up screen DP Dispatch screen DM Driver screen FD Future screen -
Click Add again.
-
Select Chain from the 'ActionType' drop-down list within the 'Properties' dialog box.
-
Within the 'Panels to display' option, click the ellipses button (...). A 'Select Panels' dialog box appears.
-
Hold Ctrl and left-click each panel in 'Available Panel.'
-
Click the arrow to move these panels to 'SelectedPanels.' These panels appear the next time the POS appears as the active window on a terminal.
-
Click OK.
-
Click Add again.
-
Select New Order from the 'ActionType' drop-down list within the 'Properties' dialog box.
-
Select True from the 'Suppress Prompt' drop-down list.
-
Click OK to close the Edit Script Actions dialog box.
-
Type a name for the button in 'Text' and configure other button properties, as normal.
-
Repeat this procedure to add additional buttons to the panel.
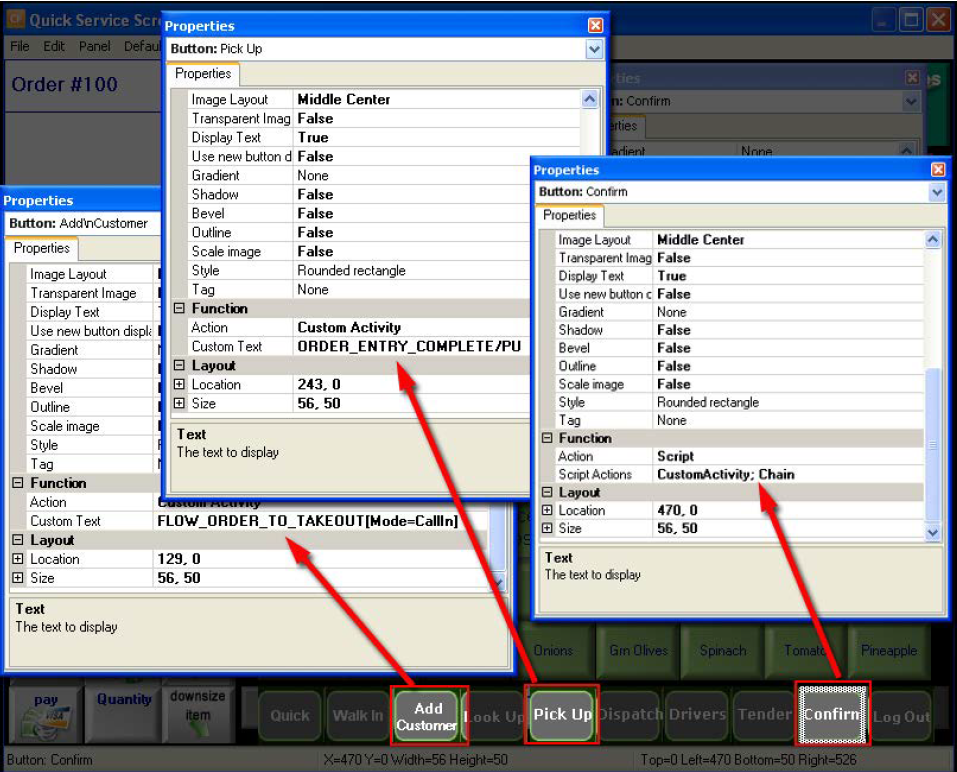
Note: If necessary, create multiple buttons with the same function but different button text, to help guide new users through the order flow.
-
Select Panel > Save Panel.
-
Select File > Close Panel Editor to exit the Panel Editor function.
You may need to create a screen specifically for Aloha Takeout job codes.
To add a screen for Aloha Takeout job codes:
-
Select Work with Screens.
-
Click the Screen drop-down list and select an existing screen.
— OR —
Click New to create a new screen.
-
Click Add and select the panel, created earlier in this procedure, from the 'Add Panels' dialog box.
-
Click OK.
-
Click Save and exit the Screen Editor function.
To associate the custom Aloha Takeout screen with ATO job codes:
- Select Maintenance > Labor > Jobcodes > Order Entry tab.
- Select the screen you created for Aloha Takeout job codes from the 'Order entry screen' drop-down list.
- Click Save.
- Repeat this procedure for each Aloha Takeout jobcode.
- Exit the Jobcodes function.