Configuring deposits
You can use deposits to prepay part or all of a future order to cover labor and food costs in the event a customer abandons the order. Aloha Takeout allows customers to add multiple deposits to a future order until the system releases the order to the kitchen. This section details how to enable deposits, as well as how to specify the way in which Aloha Takeout and the Aloha POS interact to make use of the feature. When a customer pays a deposit for a future order, the deposit is not recognized as sales, as items configured as 'Revenue items' in the Aloha POS do not affect sales.
Creating deposit and deposit surrender items
When you need to accept a deposit for a future order, the Aloha Takeout 'Add Deposit' function creates a check and adds the deposit item to the check in the amount of the deposit. You tender and close the check based on the tender you select on the ATO Deposit screen, as determined by the customer.
A surrendered deposit occurs when a guest cancels or fails to pick up their order within company guidelines. You can perform the deposit surrender function to offset the cost of prepared food and labor costs. When this occurs, it is necessary to surrender the deposit through the Edit Deposits function on the ATO Deposit screen. Aloha Takeout creates a new check and adds the deposit surrender item in the amount of the deposit selected on the Deposit screen. The system automatically closes the check to the Deposit tender you create. See "Creating a Deposit Tender." The system recognizes deposit surrender transactions as sales to offset the deposit payment received earlier.
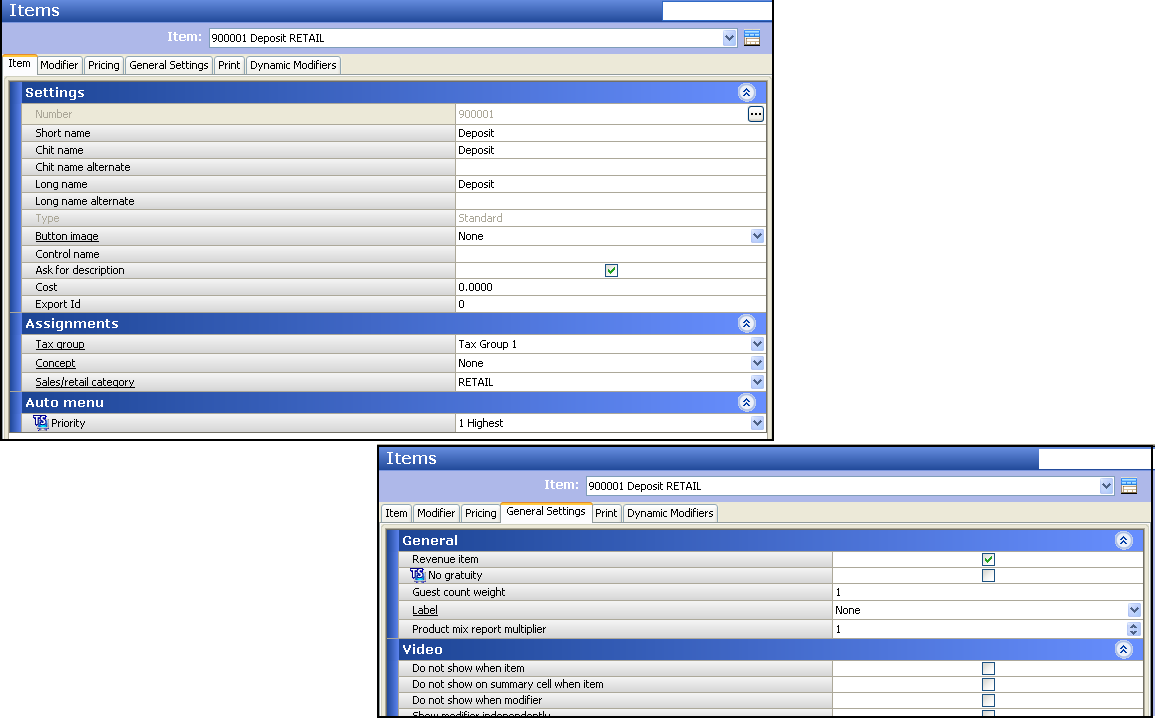
To create a Deposit item:
-
With Takeout selected in the product panel, select Maintenance > Menu > Items > Item tab.
-
Click the New drop-down arrow, select Standard as the item type, and click OK.
-
Under the 'Settings' group bar, type a name for the deposit item in 'Short name.' The system automatically populates the 'Chit name' and 'Long name' when you save.
-
Select Ask for description to enable the system to replace the 'Short name,' 'Chit name,' and 'Long name' with deposit information on the check.
-
Under the 'Assignments' group bar, select a tax group associated with a tax type for which there is a zero percent tax rate. Do not define a tax group for which there is a tax rate other than zero percent for the deposit item. Aloha Takeout cannot fully tender the check, if tax is calculated on this item.
-
Select a category under which you would like deposits to report from the 'Sales/retail category' drop-down list.
-
Select the Pricing tab.
-
Select Ask for Price from the 'Pricing method' drop-down list. The system automatically enters the price based on the deposit amount selected on the Deposit screen.
Note: If the 'Ask for Price' pricing method does not appear as a pricing method, you must clear 'Restrict price edit' in Maintenance > Business > Additional Features > Restriction settings group bar.
-
Select the General Settings tab.
-
Select Revenue item.
-
Click Save and continue to the next procedure.
To create a deposit surrender item:
- With Takeout selected in the product panel, select Maintenance > Menu > Items > Items tab.
- Click the New drop-down arrow, select Standard as the item type, and click OK.
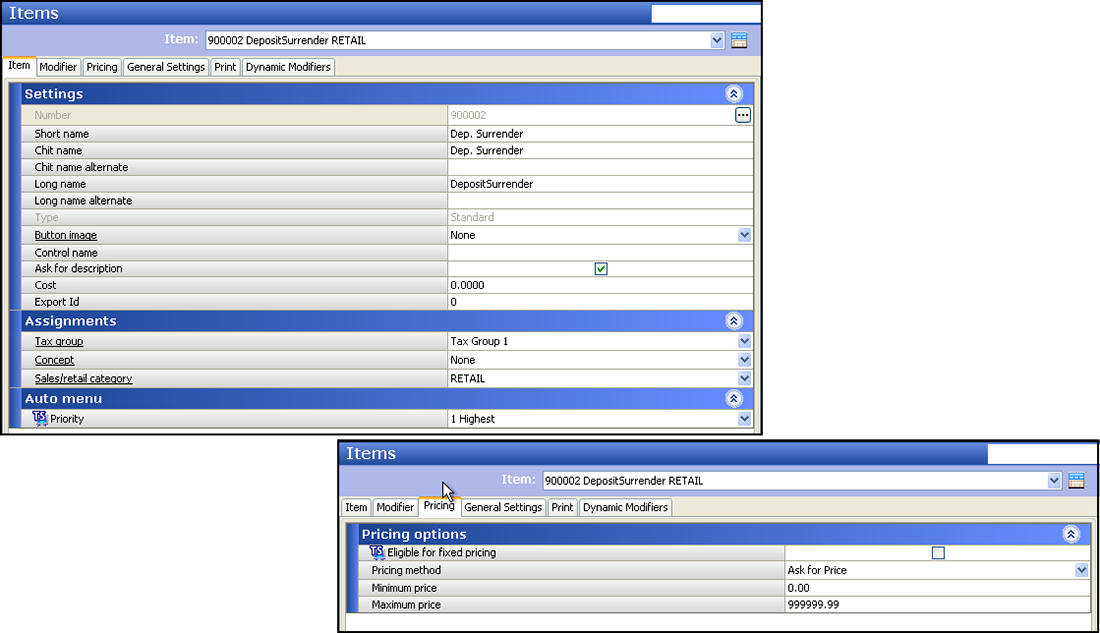
- Under the 'Settings' group bar, type a name for the deposit surrender item in 'Short name.' The system automatically populates 'Chit name' and 'Long name' when you save.
- Select Ask for description to enable the system to replace 'Short name,' 'Chit name,' and 'Long name' with deposit surrender information on the check.
- Under the 'Assignments' group bar, select a tax group to associate with a tax type for which there is a zero percent tax rate.
- Select a category under which you would like the deposit surrender to report from the 'Sales/retail category' drop-down list.
- Select the Pricing tab.
- Select Ask for Price from the 'Pricing method' drop-down list. The system automatically enters the price based on the surrendered deposit amount selected on the Deposit screen.
- Click Save and exit the Items function.
Creating a deposit tender
Aloha Takeout uses the deposit tender to reduce the balance due on the check by the deposit amount previously paid by the guest.
- With Takeout selected in the product panel, select Maintenance > Payments > Tenders > Tender tab.
- Click the New drop-down arrow, select Generic as the 'Tender type,' and click OK.
- Under the 'Settings' group bar, type a name, such as Deposits, to easily identify the deposit tender.
- Select Active.
- Select Track.
- Under the 'Overpayment' group bar, clear Allow overpayment and under the 'Tips' group bar, clear Allows tips, because the system applies the exact amount of each deposit using this tender.
- Do not select any options on the Type tab, as the deposit tender is a 'non-cash' generic tender.
- Click Save and exit the Tenders function.
Specifying POS tenders available for deposits in Aloha Takeout
The Tenders tab in Takeout Settings allows you to specify the Aloha POS tenders available to apply to future deposits in Aloha Takeout. Adding POS tenders on this tab provides the linkage between Aloha Takeout and the POS reporting structure.
- With Takeout selected in the product panel, select Maintenance > Takeout Configuration > Takeout Settings > Tenders tab.
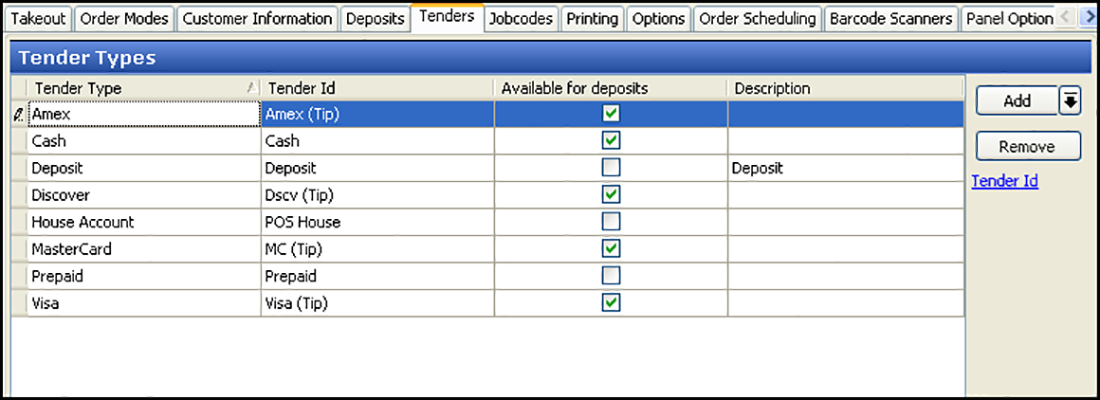
- Under the 'Tender Types' group bar, click the Add drop-down arrow, select an Aloha Takeout tender type, and click OK.
- Select a POS tender created for use with Aloha Takeout from the 'Tender ID' drop-down list.
- Select Available for deposits if you want the tender to appear on the FOH Deposits screen.
- Type the text to appear on the button in 'Description.'
- Repeat this procedure for each tender you want to accept as a deposit in Aloha Takeout.
- Click Save.
Configuring deposits for use with FATO future orders
After creating tenders for use with deposits, you must configure Aloha Takeout to enable the use of deposits.
-
With Takeout selected in the product panel, select Maintenance > Takeout Configuration > Takeout Settings > Deposits tab.
-
Under the 'Deposits' group bar, select Enable deposits. When selected, other deposit configuration options appear.
-
Select the tender you created for use with future order deposits from the 'Deposit tender' drop-down list.
-
Select the order mode to apply when the system creates a deposit check from the 'Deposit order mode' drop-down list.
Note: Do not configure a service charge for the deposit order mode. Aloha Takeout cannot fully tender the deposit if you configure a service charge.
Note: As a best practice, we recommend a separate, non-Aloha Takeout order mode, with no surcharges configured.
-
Select the item specifically created for adding a deposit to a guest check from the 'Deposit revenue item' drop-down list.
-
Select the item specifically created for surrendering a deposit due to canceled orders from the 'Deposit surrendered item' drop-down list.
-
Select Print deposit receipts when collected, refunded, or surrendered to print a guest check any time you complete an activity related to deposits.
-
Click Save and exit the Takeout Settings function.
Receipts for other transactions related to deposits appear very much the same as this one. The information included on these receipts varies, depending upon the type of payment, the type of customer, and more.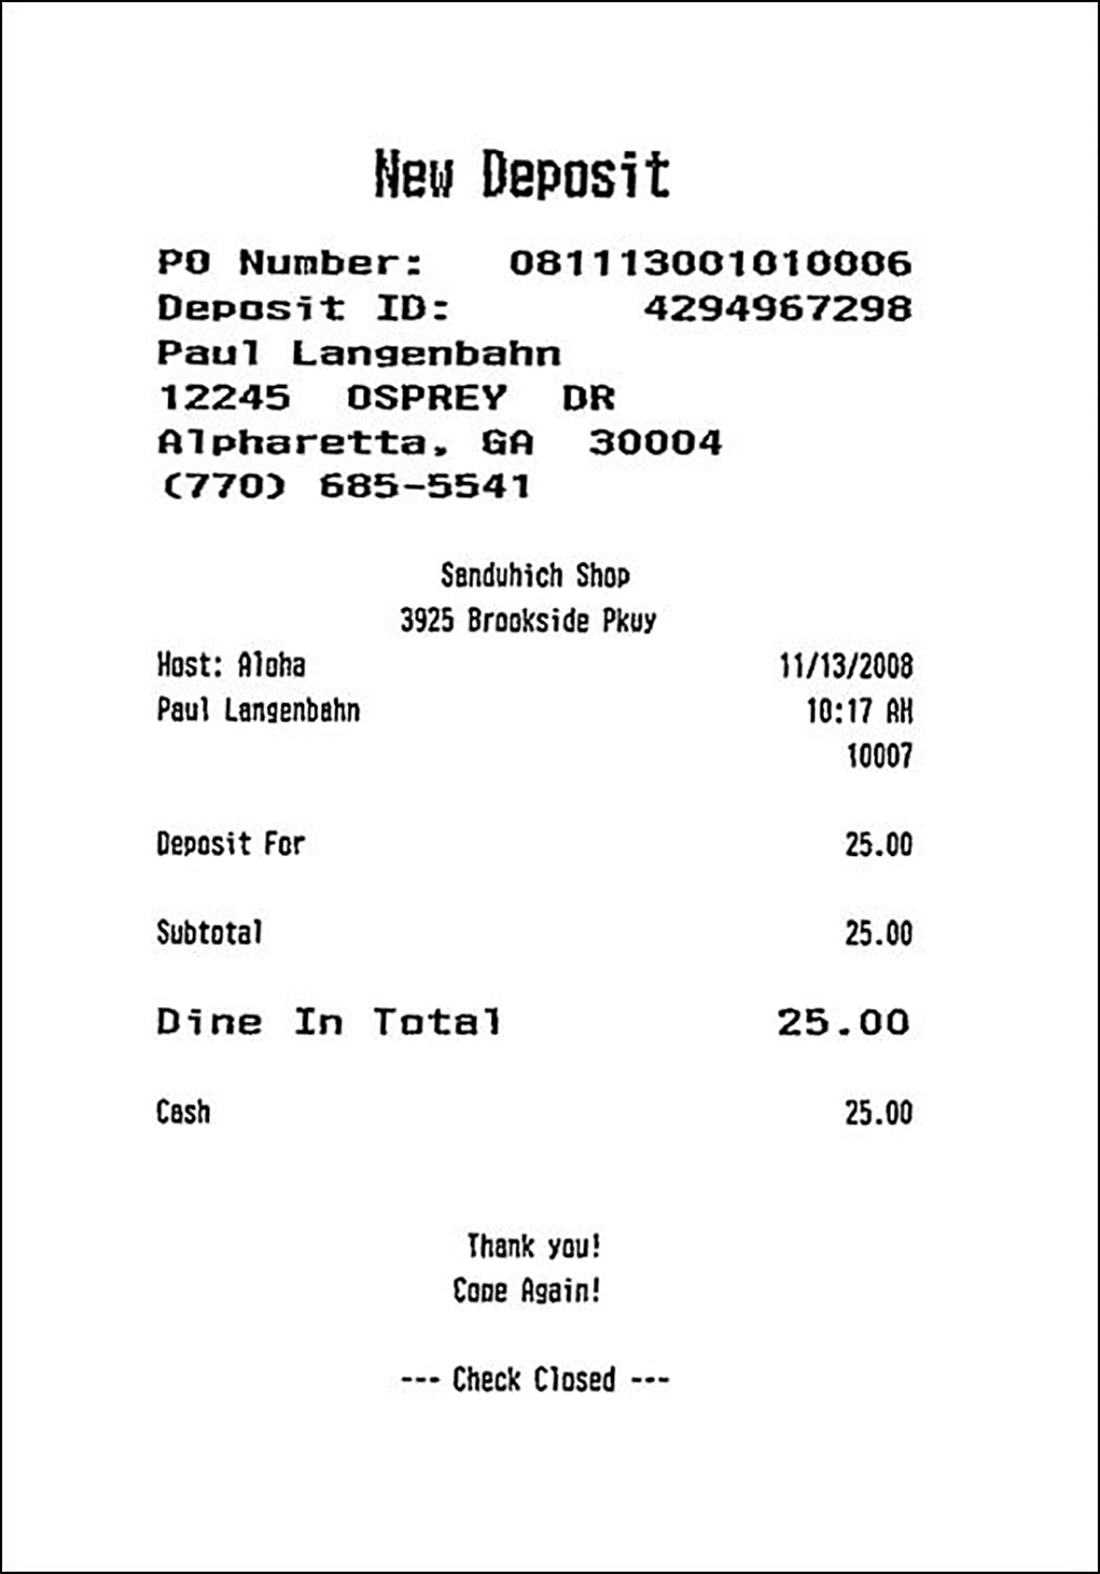
Providing the ability to refund and surrender deposits
With Aloha Takeout, you configure which POS access levels can authorize a deposit refund and surrender deposits.
- With Takeout selected in the product panel, select Maintenance > Labor > Pos Access Levels.
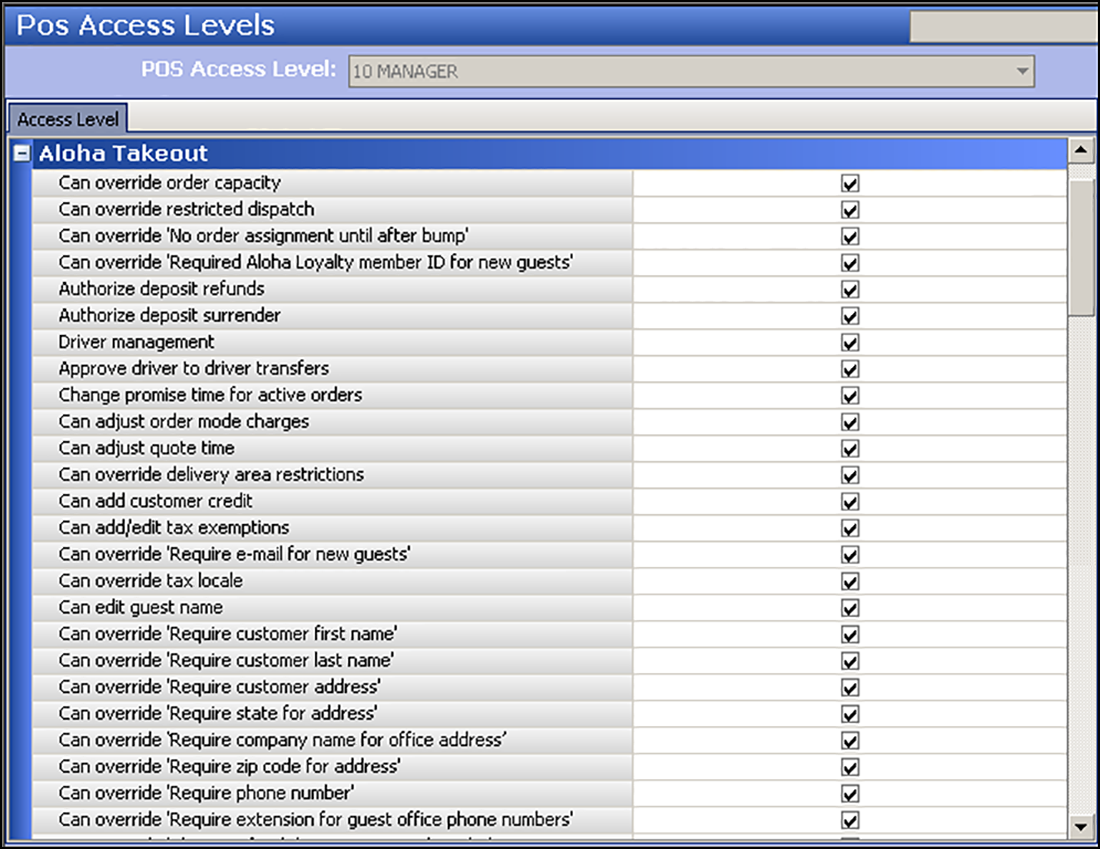
- Select an access level from the drop-down list.
- Under the 'Aloha Takeout' group bar, select Authorize deposit refunds.
- Click Save.
- Repeat for each access level that can refund and surrender a deposit.
- Exit the Pos Access Levels function.
Providing the ability to start a future order
There are several methods you can configure and use to start a future order. You can speed up your order entry process by starting a future order from the express entry screen as you enter the guest information. You can configure all of them, or just one, to limit the training needed to start a future order.
To configure the starting of future orders from the express entry screen:
- With Takeout selected in the product panel, select Maintenance > Takeout Configuration > Takeout Settings > Panel Options tab.
- Select the Express Entry tab located in the middle of the screen.
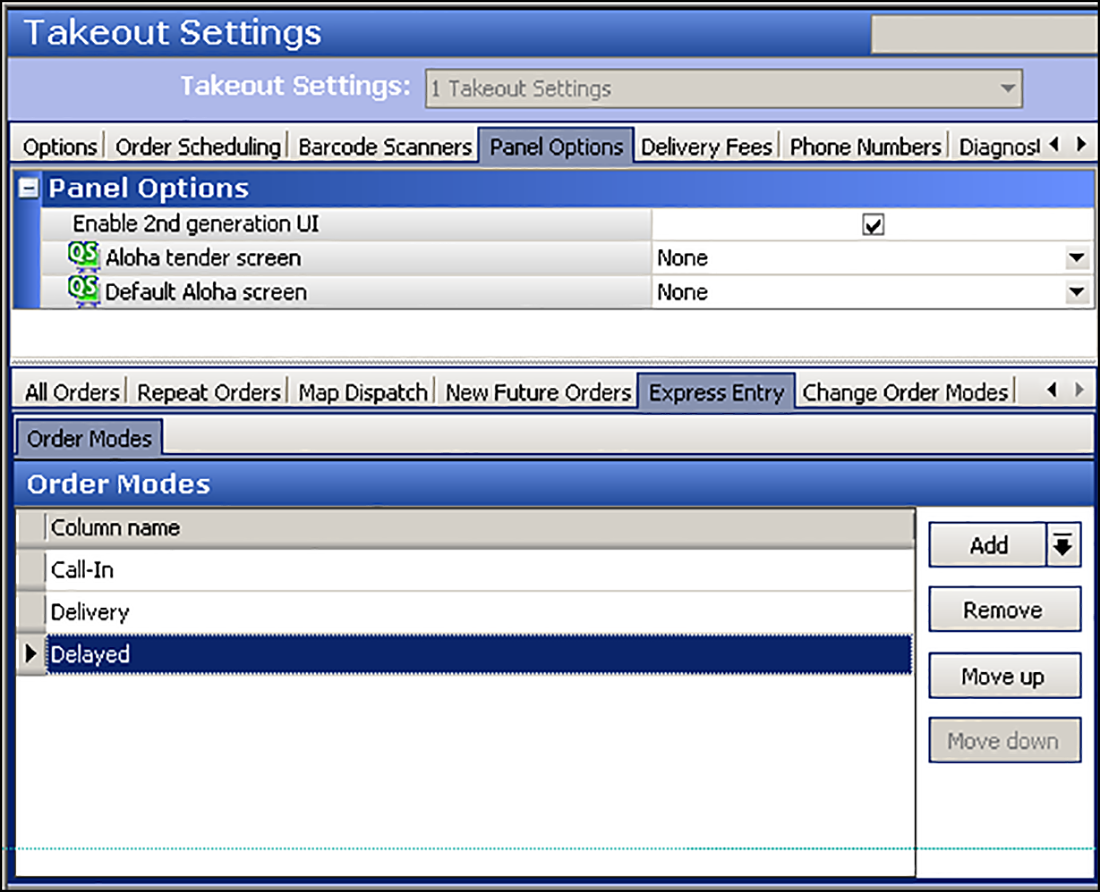
- Under the 'Order Modes' group bar, click the Add drop-down arrow, select Delayed, and click OK.
- Click Save and exit the Takeout Settings function.
Defining the oder modes available on the Delayed Order Information screen
You use the Delayed Order Information screen to select a calendar date and time for a future order. Use the New Future Orders tab to add the order modes available on the screen. In previous versions, you had to define the order modes using the FutureOrderModeButtons.xaml file.
To define the order modes available on the Delayed Order Information screen:
- With Takeout selected in the product panel, select Maintenance > Takeout Configuration > Takeout Settings > Panel Options tab.
- Select the New Future Orders tab located in the middle of the screen.
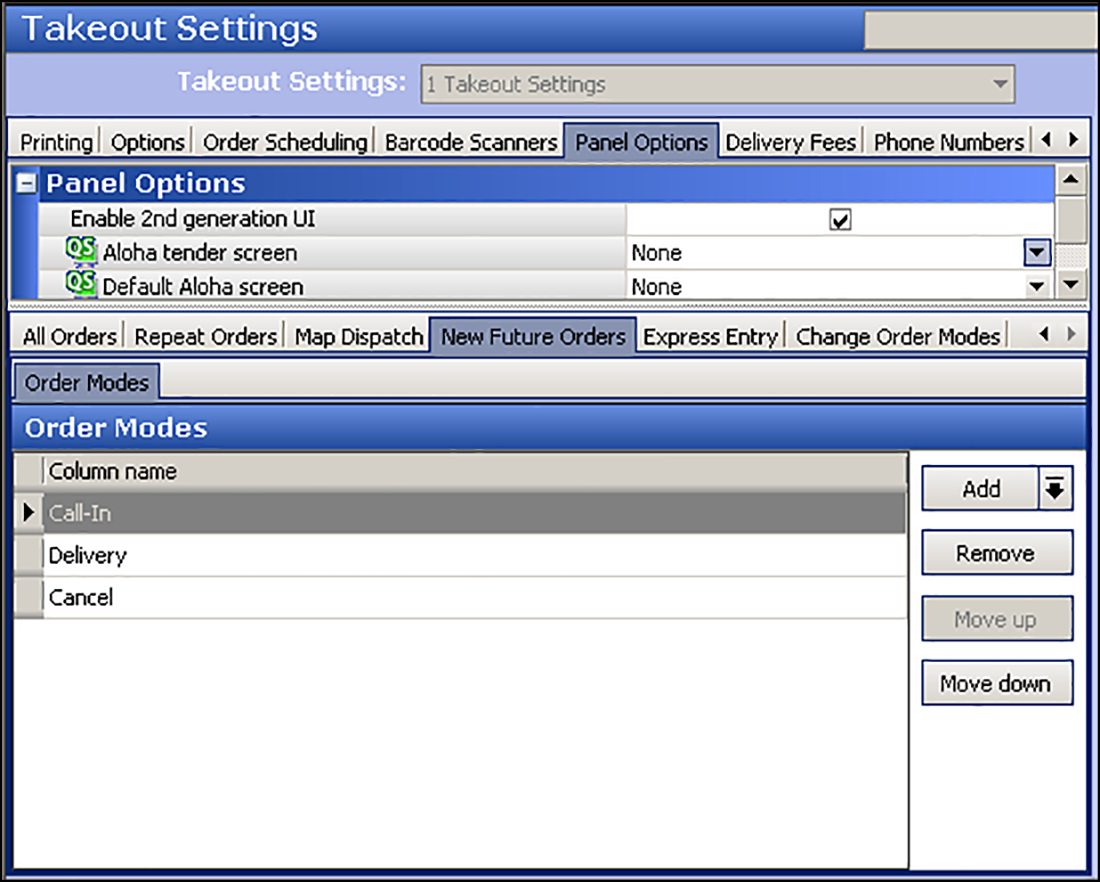
- Under the 'Order Modes' group bar, click the Add drop-down arrow, select an order mode to make available, and click OK.
- Repeat step 3 to add other order modes you want available on the Delayed Order Information screen.
- Click Save.
Configuring the printing requirements for future orders
You can enable Aloha Takeout to print a Future Order Statement to give to the guest when you place the order, or for any other reason, such as a store copy. You can optionally include the delivery zone on the statement.
To configure the printing requirements for a future order:
- With Takeout selected in the product panel, select Maintenance > Takeout Configuration > Takeout Settings > Printing tab.
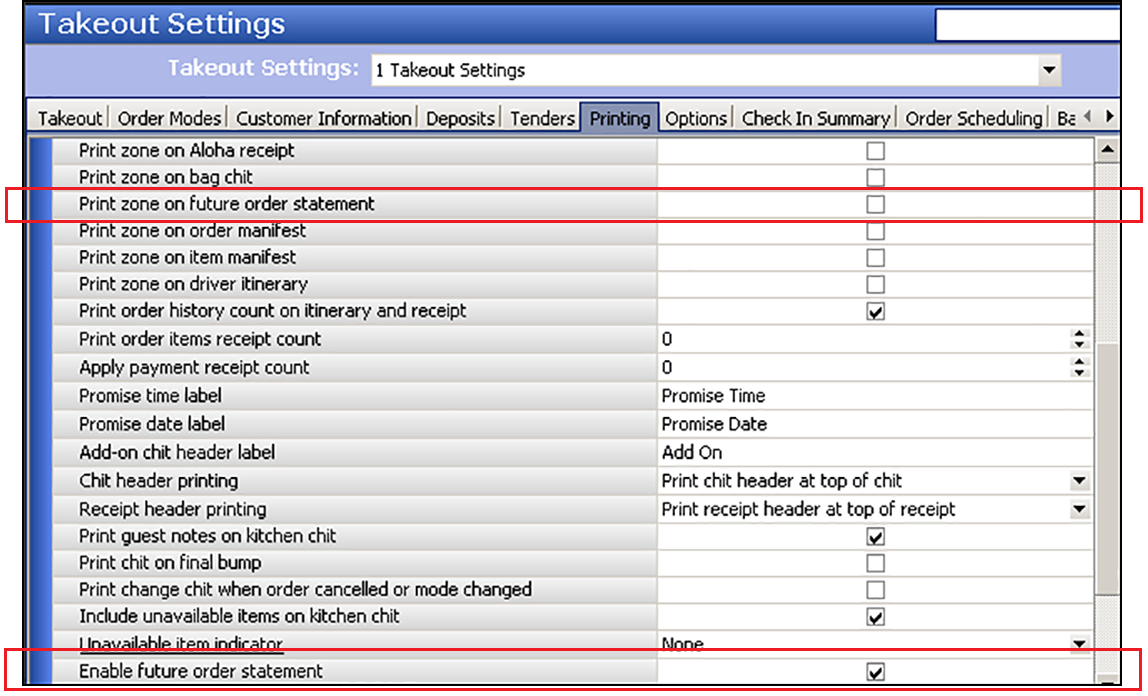
- Under the 'Printing' group bar, select Print zone on future order statement to print the delivery zone on the Future Order Statement.
- Select Enable future order statement to provide the ability to print the Future Order Statement.
- Click Save.