Defining your start day, day parts, and tracking limits
You must define how you want to break down specific ordering scheduling day parts, or segments, to appear on the FOH Dispatch and Future screens. Order scheduling day parts are similar to POS day parts, in concept; however, you base order scheduling day parts on scheduled resources as opposed to sales tracking. They do not need to match.
Once you define your time segments, you configure the maximum number of items and orders you can produce within that time segment so the system knows when the restaurant is approaching maximum capacity.
To configure general settings for order scheduling:
- With Takeout selected in the product panel, select Maintenance > Takeout Configuration > Takeout Settings > Order Scheduling tab.
- Under the 'Settings' group bar, type the default increment of time to break down the day in 'Default display time segment length.' The system uses this value as the 'Inherited default display time segment length,' for each day part; however, you can set a different duration for a time segment on the Schedule Settings tab for the selected day part. If you select 15, then the time segments appear in 15 minute increments, such as 9:00 a.m., 9:15 a.m., and more.
- Select the first day of your business week from the 'Start day of the week' drop-down list.
- Continue to the next procedure to create your order scheduling day parts.
To create order scheduling day parts:
-
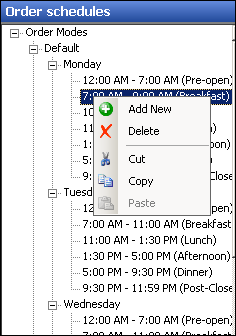
With the Order Scheduling tab still displayed, right click a day of the week in the 'Order schedules' window, and select Add New from the menu that appears to create an order scheduling day part.
-
On the Schedule Settings tab and under the 'General' group bar, type a name for the order scheduling day part, such as 'Breakfast.' If you are using a granular approach, such as 15-minute increments, you can name the day part by the time of day.'
Note: 'The 'Show in week summary' option is no longer supported.
-
Set the Begin time of day and End time of day to reflect the beginning and ending times of a order scheduling day part. For example, for a day part named 'Lunch,' set the 'Begin time of day' to '11:00 a.m.' and the 'End time of day' to '01:30 p.m.'
-
Set a Display time segment length, if you want the time to be different than the default display time segment length. You can adjust the 'Display time segment length' during slower day parts, to consolidate the display time on the ATO FOH screens when you book fewer orders. Increasing the display time length in slower business day parts reduces the need to scroll down on ATO FOH screens and improves screen response. For example, during the afternoon business parts that are slower, set the 'Display time segment length' to a higher increment, such as '04:00,' to cover the four hours between '01:30 p.m.' and '05:30 p.m.'
-
Click Save.
-
Repeat this procedure for each day and its respective day parts.
-
Continue to the next procedure to configure Capacity Tracking.
To configure Capacity Tracking:
-
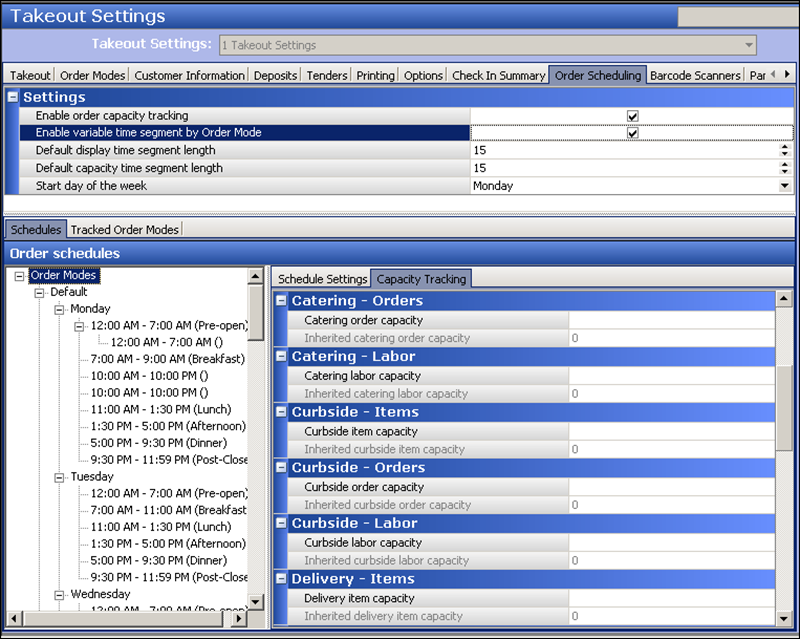
With the Order Scheduling tab displayed, and under the 'Settings' group bar (Figure 2), select Enable order capacity tracking to track the number of orders and items, per time segment, enforcing limitations you place on them. This option also displays the Tracked Order Modes and Schedules > Capacity Tracking tabs.
-
Select Enable variable time segment by Order Mode to allow you to choose a specific order mode for which to compare actual orders to configured order scheduling limits. Once you select the order mode to view, the order capacities appear on the Capacity Detal screen for each time segment, as usual.
-
Select the Default capacity time segment length to establish the increment of time you want to use for controlling the number of orders you can accept for a time frame. Aloha Takeout uses the capacity time segment to calculate whether or not you have reached the number of allowed orders and items for the time segment. In most cases, the 'Default capacity time segment length,' matches the 'Default display time segment length.' Recommended Configuration: Set this number to the length of an average delivery order round trip in your area, or to the defined number of minutes you use to determine kitchen productivity capacity. This is usually 15 or 20 minutes.
-
Select thesubtab.
-
if your kitchen or cashier staff can only fulfill a certain number of orders.Select the Schedules tab, then the Capacity Tracking tab.
-
Select a day part for which you want to implement capacity tracking under 'Order Schedules.'
-
Set the Capacity time segment length, if you want the length to be different than the inherited time segment capacity length.
Note: For periods when the restaurant is closed, enter a time span equal to the number of hours your restaurant is closed. For example, set the pre-open capacity time segment length to 11:00 (11 hours) to account for the time from midnight to 11:00 am when the store is not fulfilling ATO orders.
-
Select the Capacity tracking subtab.
-
Enter the item and order capacity for each order mode, if different from the inherited capacities.
-
Repeat this procedure for each day part. In the figure above, the 'Call-in item capacity' and 'Delivery item capacity' are both set to 90. This is based on an average employee able to produce 30 items within the defined 15 minute 'Capacity time segment length.' You schedule three employees during Friday lunch to address ATO order production. 30 items x 3 employees = 90 item capacity for the Friday lunch day part. Delivery order capacity is set to eight. This is based on the average driver delivering two orders within the defined 15 minute 'Capacity time segment length' and you schedule four drivers during Friday lunch. 2 orders x 4 drivers = 8 delivery order capacity for the Friday lunch day part.
-
Click Save.