Appendix A: Configuring Source and Destination for online ordering injection only
As of ATO v19.x, you must define a Source and Destination record to address all order sources leveraged by an online ordering solution, such as a store website and a delivery marketplace. This enables the online ordering solution to inject orders into ATO. If this record does not exist, order injection fails.
This section details the configuration requirements within Aloha Manager and Aloha Configuration Center (CFC) for Source and Destination to address order modes leveraged by an online ordering solution only. If you need to configure Source and Destination for all order sources besides the ones leveraged by an online ordering solution.
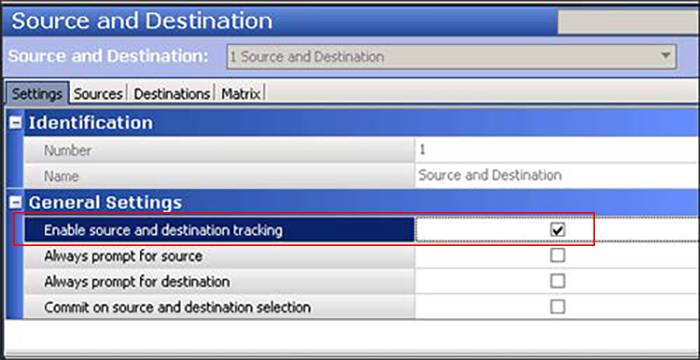
Enabling the Source and Destination feature
To use Source and Destination for an online solution only, you need only to enable the feature on the Settings tab.
To configure the Source and Destination feature for online solution only:
- With Takeout selected in the product panel, select Maintenance > Takeout Configuration > Source and Destination.
- Select the Settings tab.
- Click New to create a new record.

- Under the 'General Settings' group bar, select Enable source and destination tracking to activate the Source and Destination feature.
- Leave all other options on the Settings tab as their default.
- Continue to the next procedure.
Adding order sources
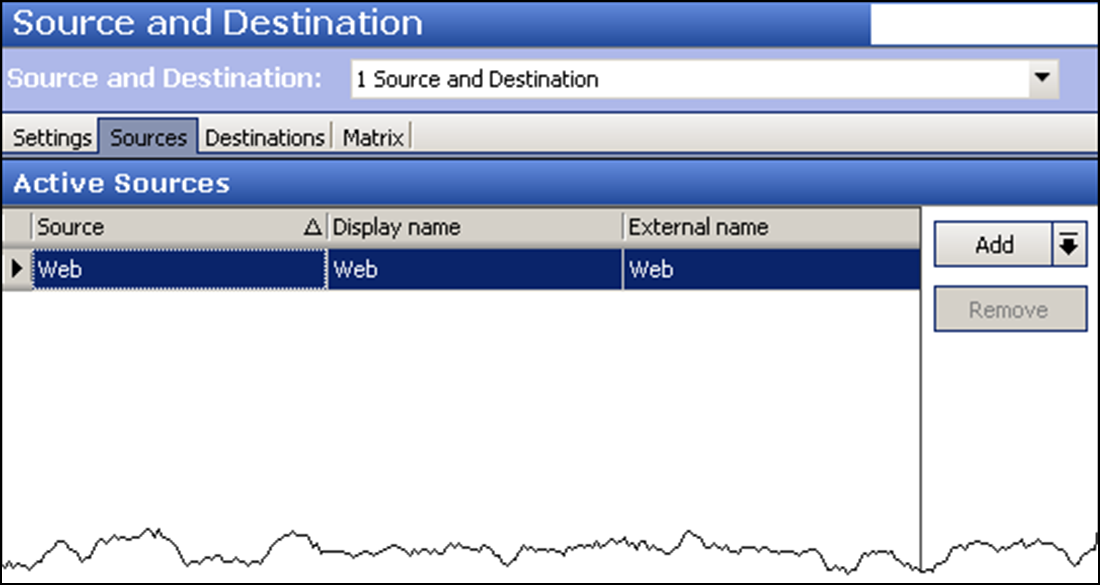
You must add a source record for each order source from which an online order originates. In this example, the Web order source is selected from the Add drop-down list. If an order source you need, such as a new delivery partner, is not available in the drop-down list, enter the partner as a custom order source.
Note: You can add up to 20 custom order sources.
To add an order source:
- Continuing from the previous procedure, select the Sources tab.

- Click the Add drop-down arrow, select an order source, such as Web, and click OK. A new row appears.
- Under the 'Active Sources' group bar, leave the default value or type a name of your choice in 'Display name' to indicate the type of order source, such as Web.
- If needed, type a name to appear in the API call for the selected order source in 'External name.' Typically, this column is for an API user and used by external applications.
- Repeat steps 2 through 4 for each order source you need to add.
- Continue to the next procedure.
Adding destinations
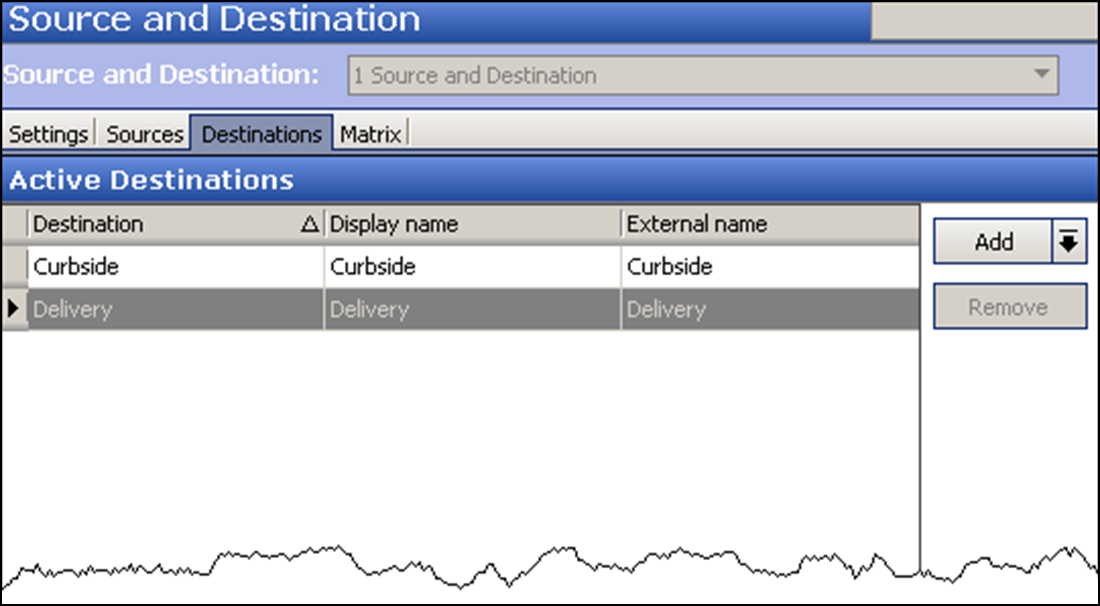
You must add a destination record for each method by which you allow consumers to receive an order. If the destination you need is not available in the drop-down list, enter the destination as a custom destination.
Note: You can add up to 20 custom destinations.
To add a destination:
- Continuing from the previous procedure, select the Destinations tab.

- Click the New drop-down arrow, select a destination from the list, and click OK. A new row appears.
- Under the 'Active Destinations' group bar, leave the Display name as the default, or type a display name of your choice.
- If needed, type a name to appear in the API call for the selected destination in 'External name.' Typically, this column is for an API user and is used by external applications.
- Repeat steps 2 through 4 for each destination you want to add.
- Continue to the next procedure.
Associating each source and destination with an order mode
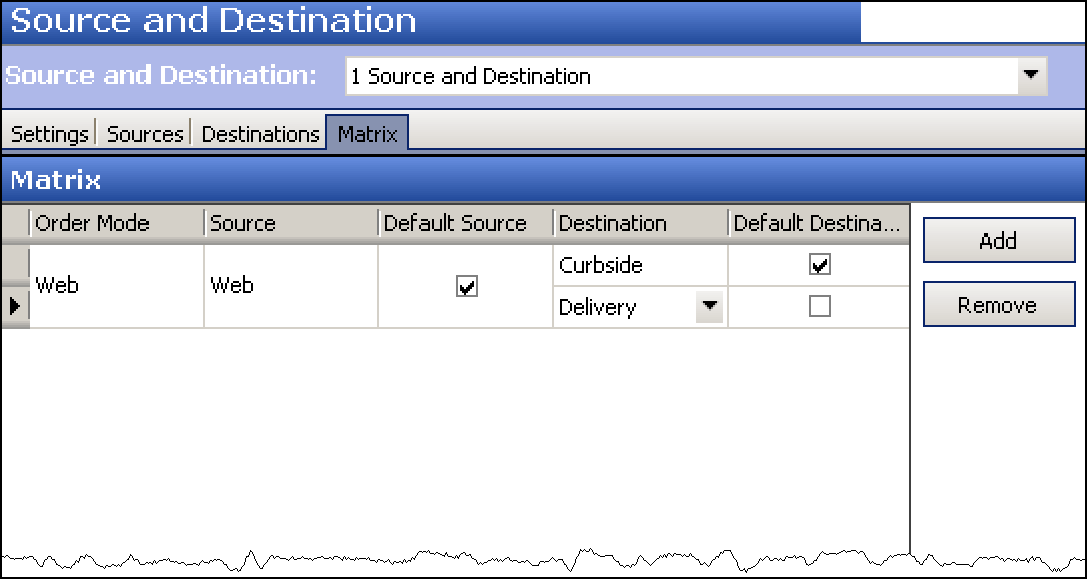
On the Matrix tab, you associate each source and destination with an order mode. A single order mode may have one or more sources or destinations, and you must have a default source and destination defined.
To associate each source and destination with an order mode:
- Continuing from the previous procedure, select the Matrix tab.

- Click Add. A new row appears for edit.
- Under the 'Matrix' group bar, select an order mode, such as Web, from the 'Order Mode' drop-down list.
- Select an order source, such as Web, from the 'Source' drop-down list.
- Select Default Source.
- Select a destination from the 'Destination' drop-down list.
- Select Default Destination for the most commonly used destination for this source; otherwise, leave this option cleared.
- Repeat steps 2 through 7 for each association to include in the matrix.
- Click Save and exit the Source and Destination function.