Overview
Aloha Cloud now supports using a dedicated primary POS device as the server, reducing the hardware cost by eliminating the need to have a Mac mini server in restaurants. This document details the procedures to replace the primary POS device for different scenarios when running Aloha Cloud.
Key points
-
To run Aloha Cloud without a Mac mini server, you must configure a fixed Point-of-Sale (POS) terminal/device as a primary POS device.
-
The primary POS device acts as the server.
-
You can connect a maximum of seven POS devices (including the primary POS device, Kitchen Display System (KDS) devices, and handheld POS devices) to the primary device.
-
You can configure the fixed terminals (for example: PX10/PX15) as a primary device using Aloha Cloud Back Office (ACBO).
-
You can replace an existing primary device from the POS and ACBO.
-
When the POS device that is configured as the primary device is offline, the other POS devices (including the handheld POS devices) in the store continue to run without performing the data sync. This impacts:
- The transfer of tickets from one POS to another.
- The communication between Kitchen and Back Office.
- The ability to clock-in/clock-out from any device.
-
It is always recommended to have at least two fixed terminals in a store. You can configure one of the terminals as a primary device to act as a backup when the primary POS device is offline.
Note: In-store order volume and online orders do not impact the server performance or selection criteria when stores run without a Mac mini.
Configuring fixed terminal as a primary POS device
Aloha Cloud now supports a new server mode that allows a POS device to act as the server for a store, eliminating the need to have a Mac mini server.
To set a fixed terminal (PX10/PX15) as the primary POS device:
-
Log in to Aloha Cloud Back Office.
-
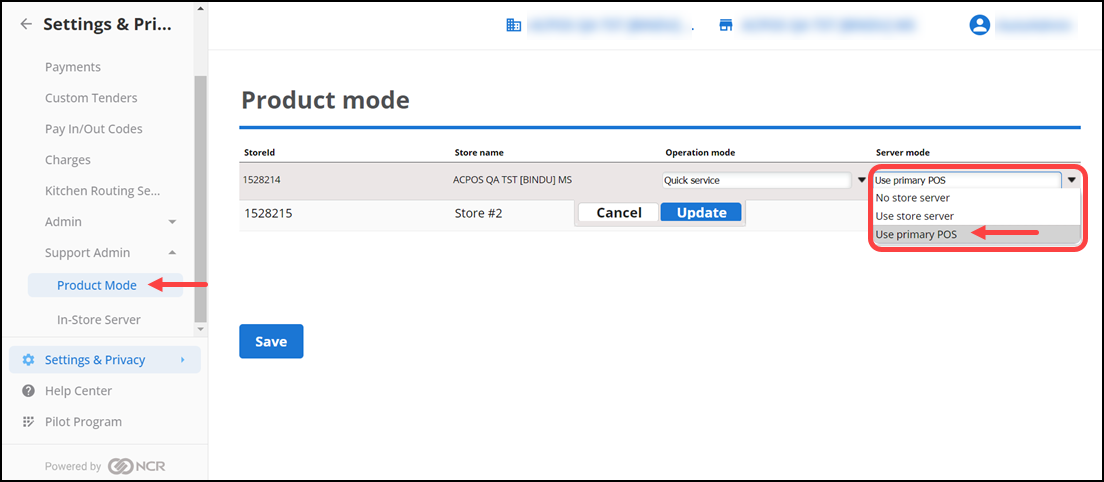
Navigate to Settings & Privacy > Support Admin > Product Mode.
-OR-
Navigate to Settings > Support Admin > Product Mode.
-
Select the desired service (Table Service/Quick Service) from the 'Operation mode' drop-down list.
-
Select Use primary POS from the 'Server mode' drop-down list.
-
Click Update.
-
Click Save.
-
Navigate to My Account > My Devices.
-
Locate and select PRIMARY for the station to set as the Primary Device.
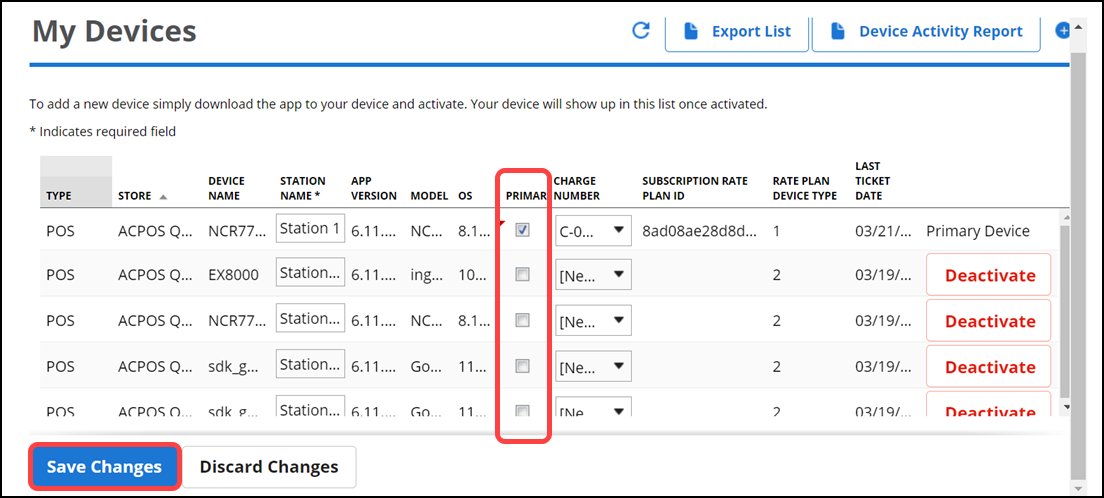
Tip: To view the PRIMARY option in My Account > My Devices, it is always recommended to refresh the page.
-
Click Save Changes. The device is now set as the primary and the TYPE is indicated as MPOS.
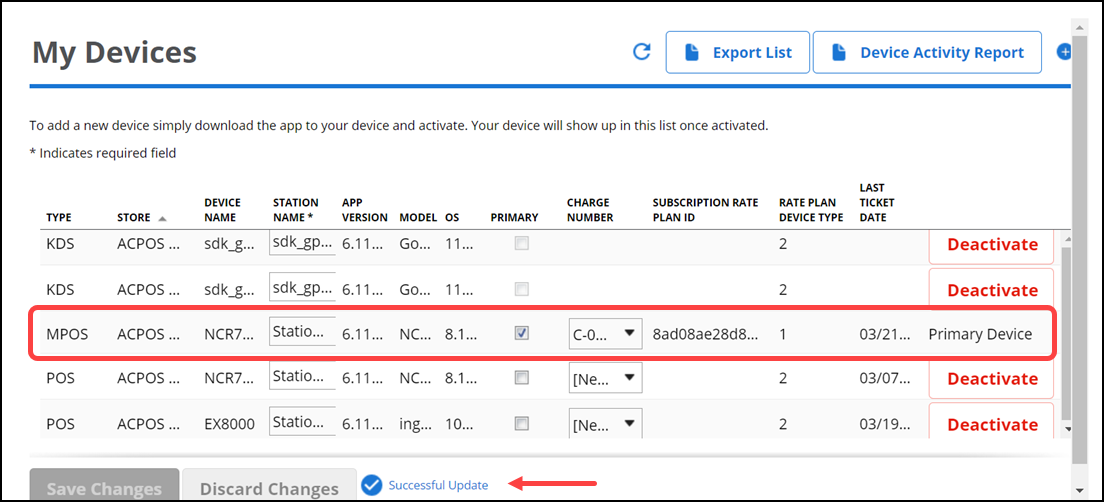
Note: You can configure only one station as the Primary Device.
-
Continue to the next procedure.
To register a fixed terminal (PX10/PX15) as the primary POS device:
-
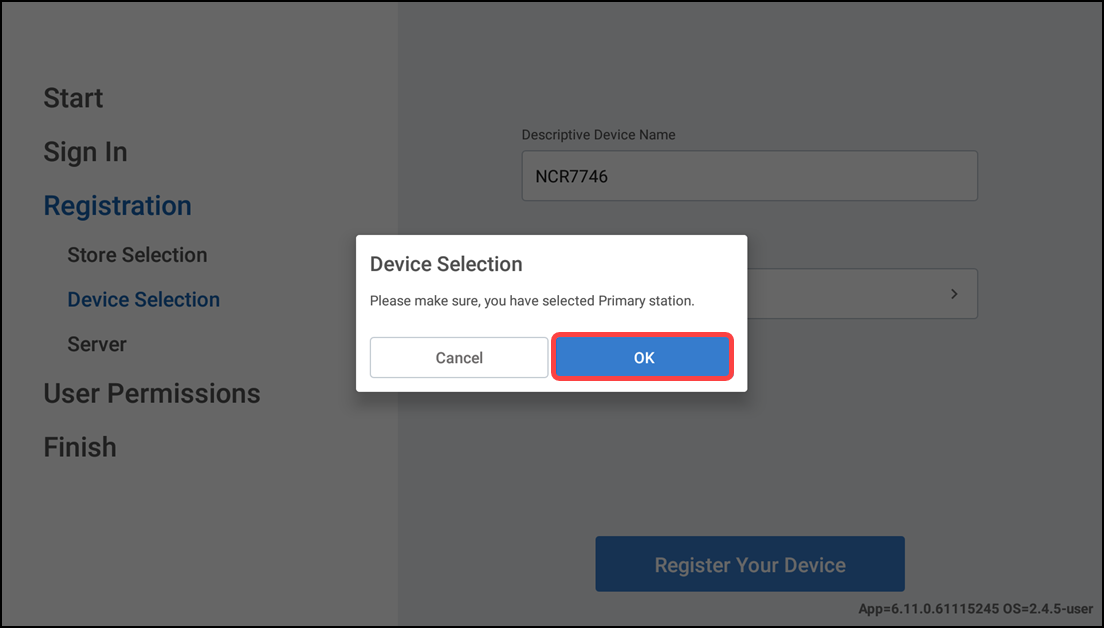
Locate and tap the station just configured as the Primary Device in the list (device type is MPOS). After selecting the POS station, a Device Selection confirmation appears on the screen.
-
Tap OK to continue.
The server running status appears on the primary POS device.
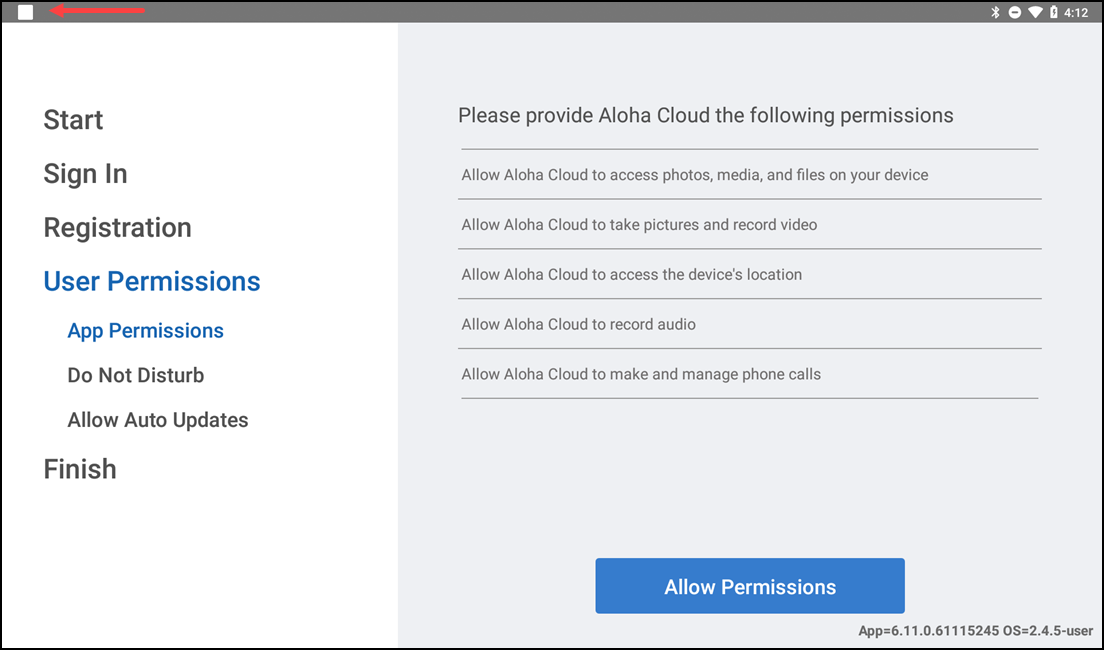
-
Continue with the POS device registration.
Reference: For more information on registering devices, refer to Registering a device for the POS.
-
After a successful registration, the PIN entry screen appears on the device.
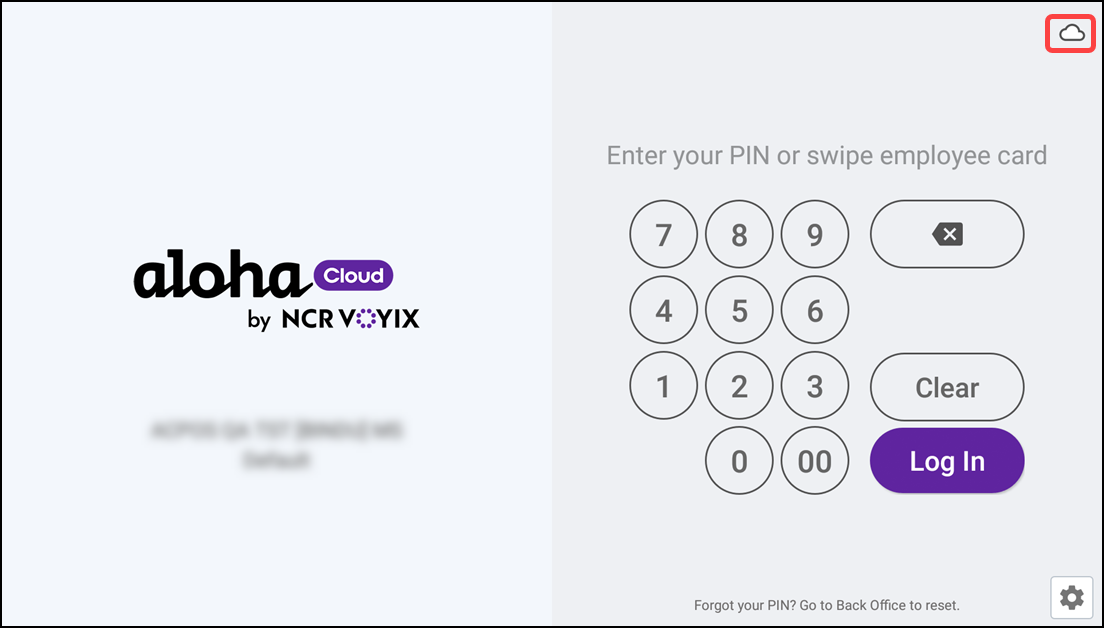
-
Tap the cloud icon in the top right corner to verify the server status details.
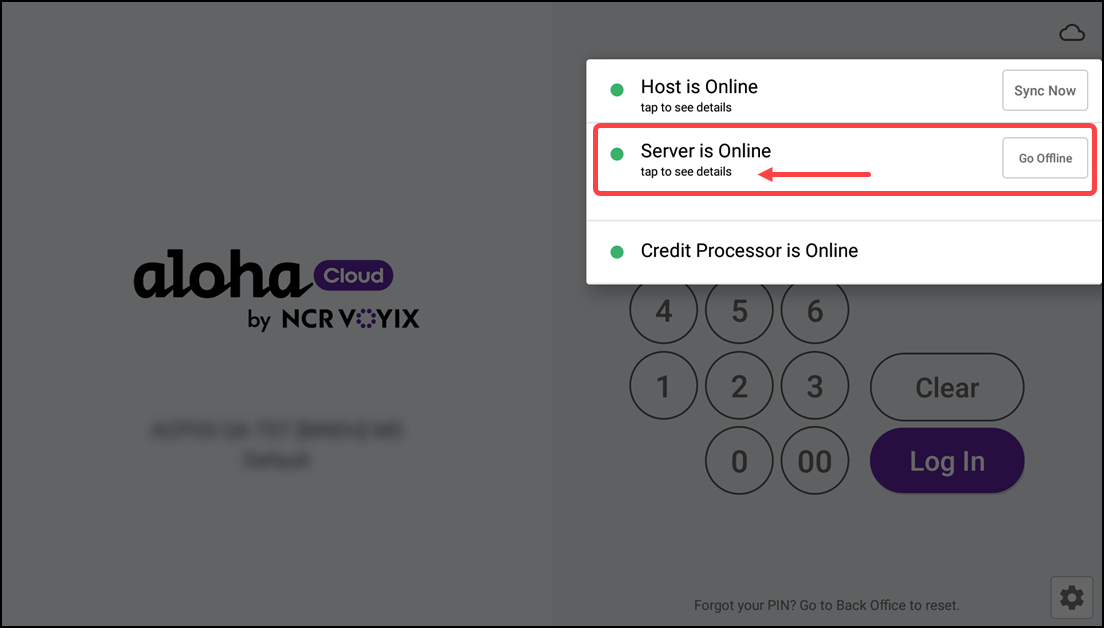
-
Tap Server is Online to verify the primary POS server information.
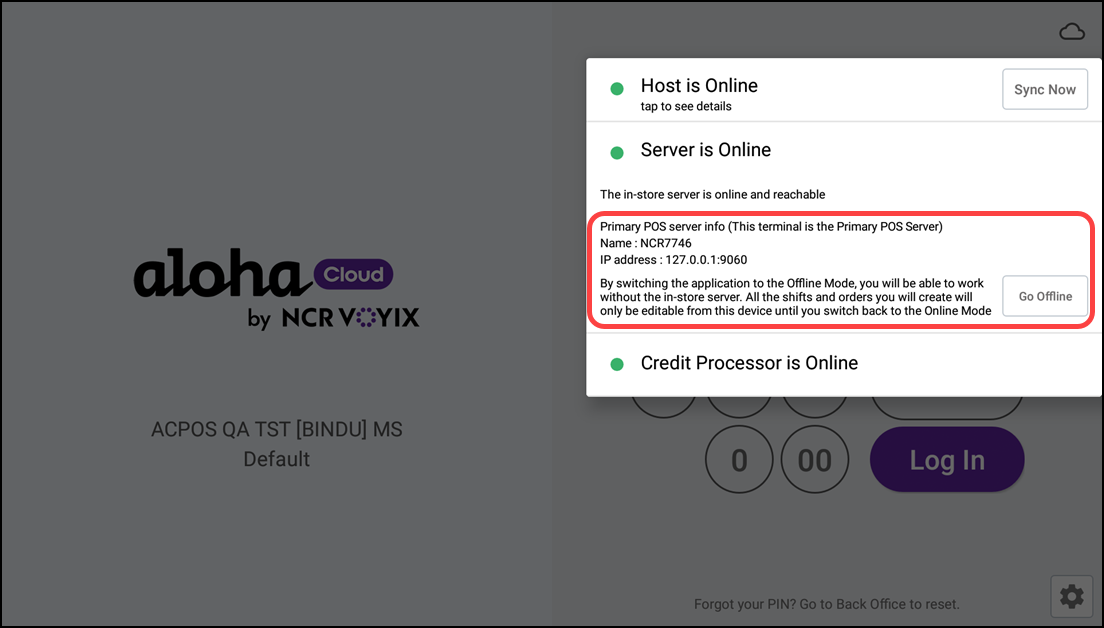
Upon successful registration, all the registered POS devices are connected to the primary POS device.
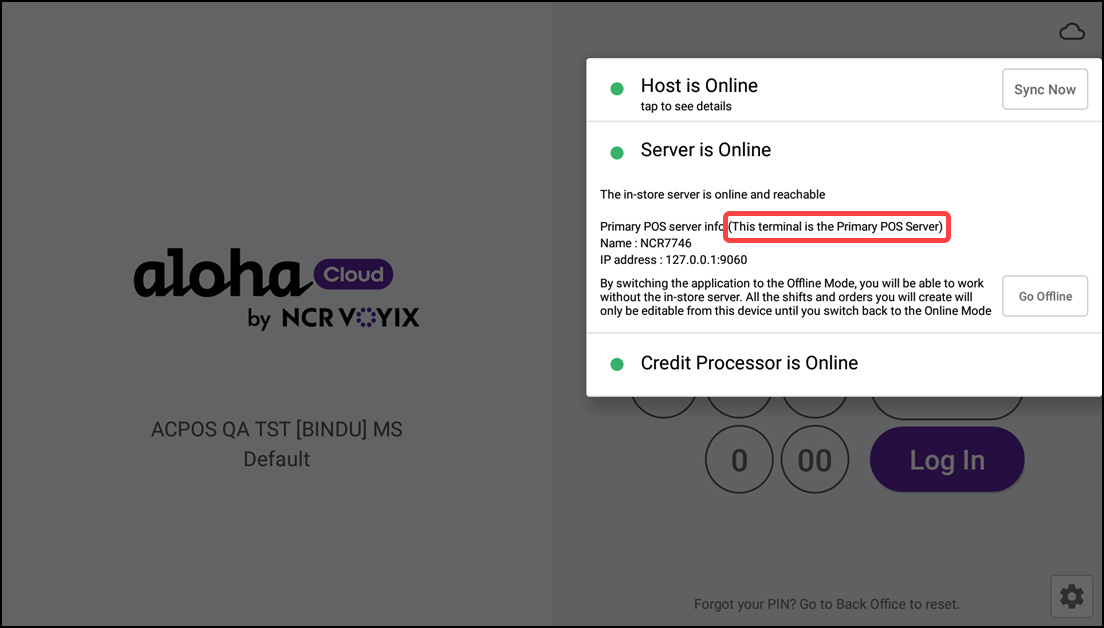
-
(Optional) Tap Server is Online to verify the terminal/POS device is connected to the primary device.
Tip: If the primary device is offline, you can replace it either from the Point-of-Sale (POS) or Aloha Cloud Back Office (ACBO).
The procedures for replacing the primary device in different scenarios are detailed below:
- Replacing the primary device from the POS
- Replacing the primary device from the Back Office
- Switching the primary device to a store server
Replacing the primary device from the POS
When the primary device is offline or there is no network availability, you can set another POS terminal as the primary device from the Point-of-Sale.
Note: From the POS, you can replace another POS terminal/device as the primary device only when the existing primary device/store is offline.
To set another POS terminal as the primary device from the POS:
-
Register two or more devices, one of which is the primary POS device and the other devices are connected to the primary POS.
Reference: For more information on registering devices, refer to Registering a device for the POS.
-
Log in to the POS.
When the primary device is offline, the other devices logged in to the same store are able to see the server status as offline mode and the cloud icon changes to red.
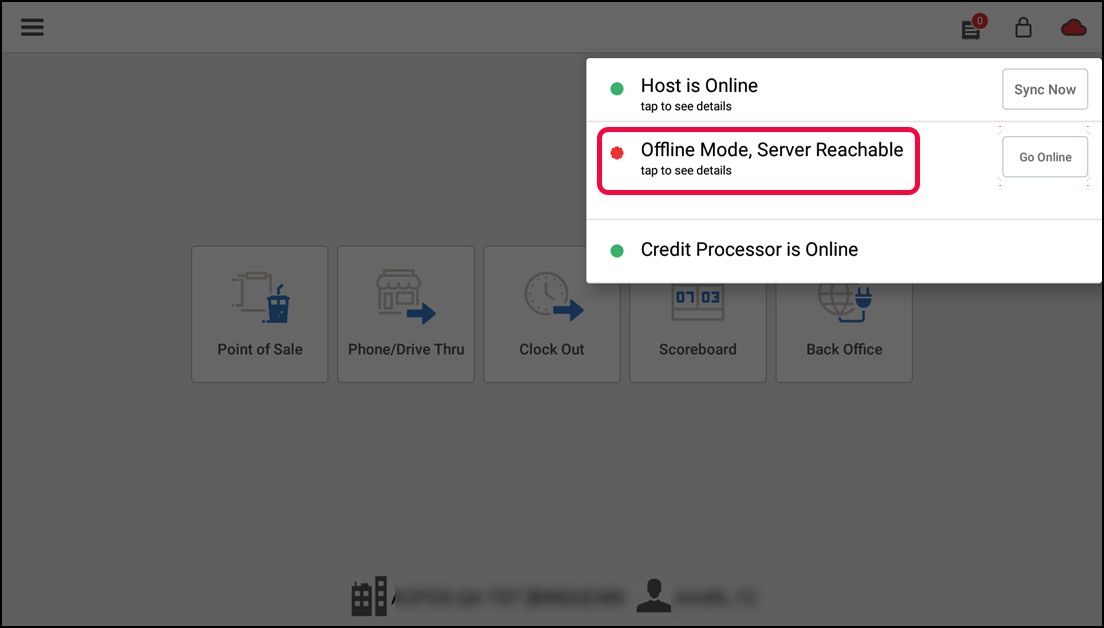
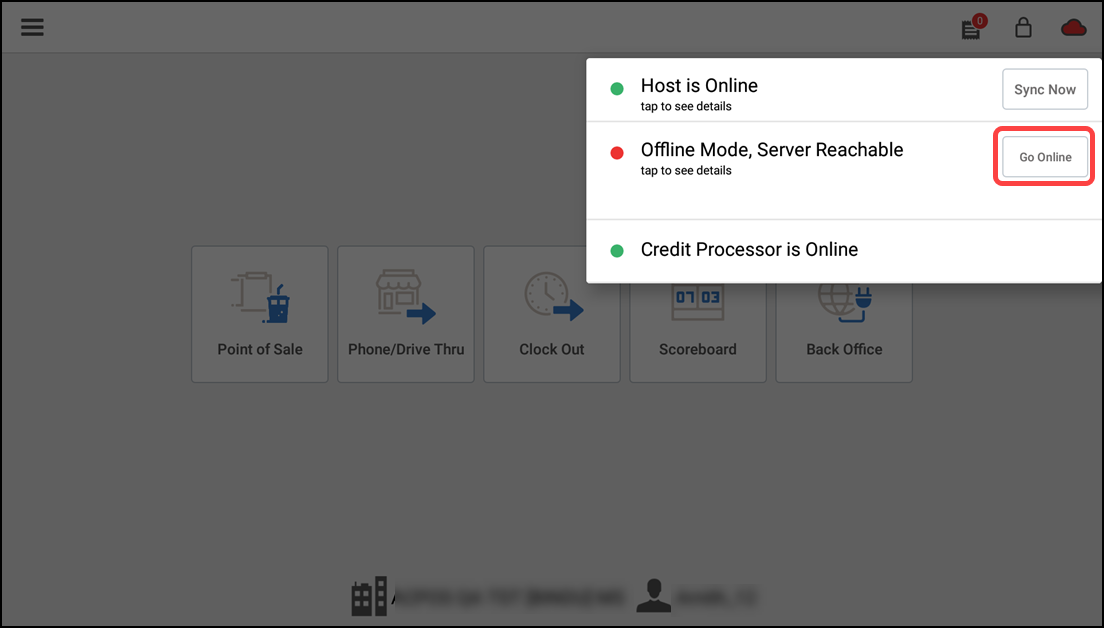
On the primary device, the Offline Mode, Server Reachable message appears.
If you need to replace your primary POS device while the device is still online and your user role (Offline Mode Management) does not have permission to set the primary POS device offline, a supervisor’s approval screen appears to enter the PIN and to override the permissions.
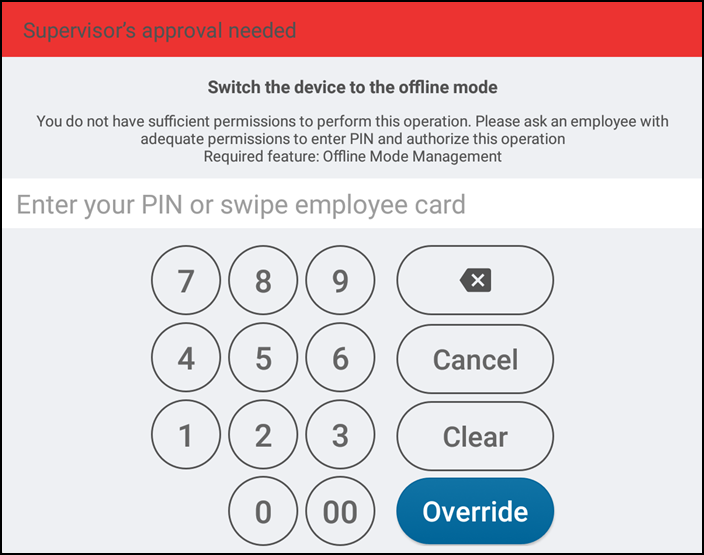
-
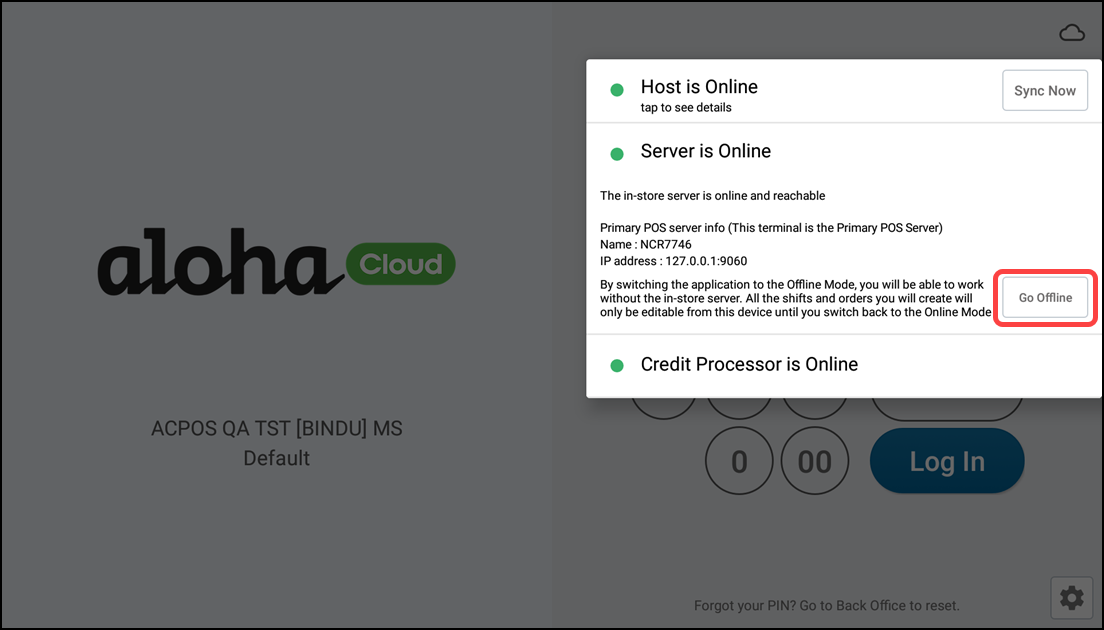
On the second device, tap Server is Offline to see the details, if required.
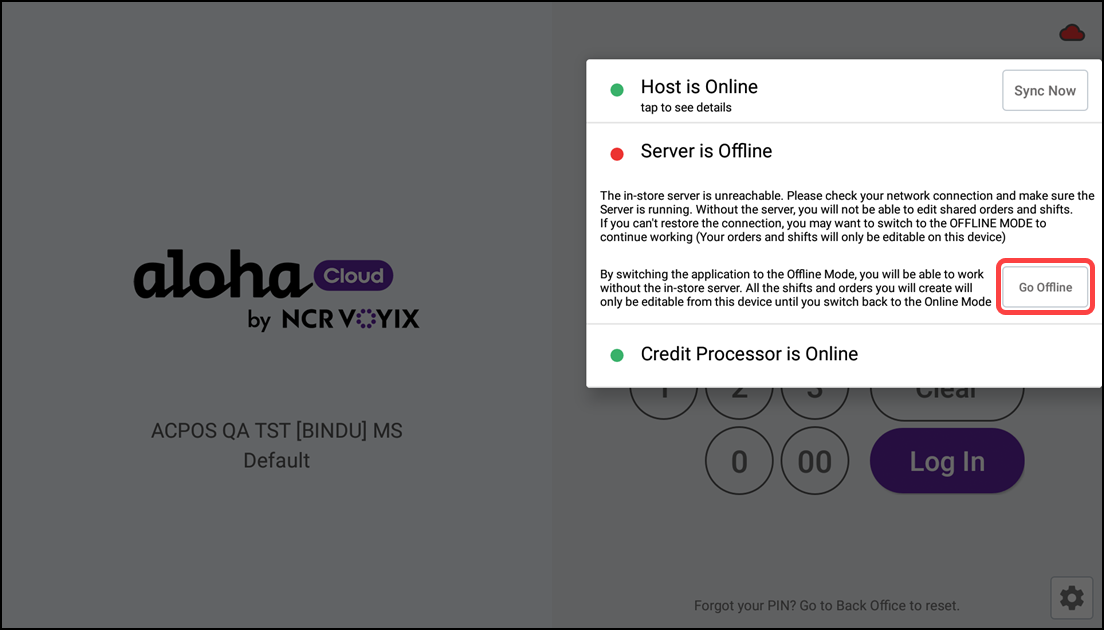
-
Tap Go Offline and wait until it is offline.
-
On the second device, enter the PIN to log in.
-
Tap Hamburger menu icon on the top left to display the slide out menu.
-
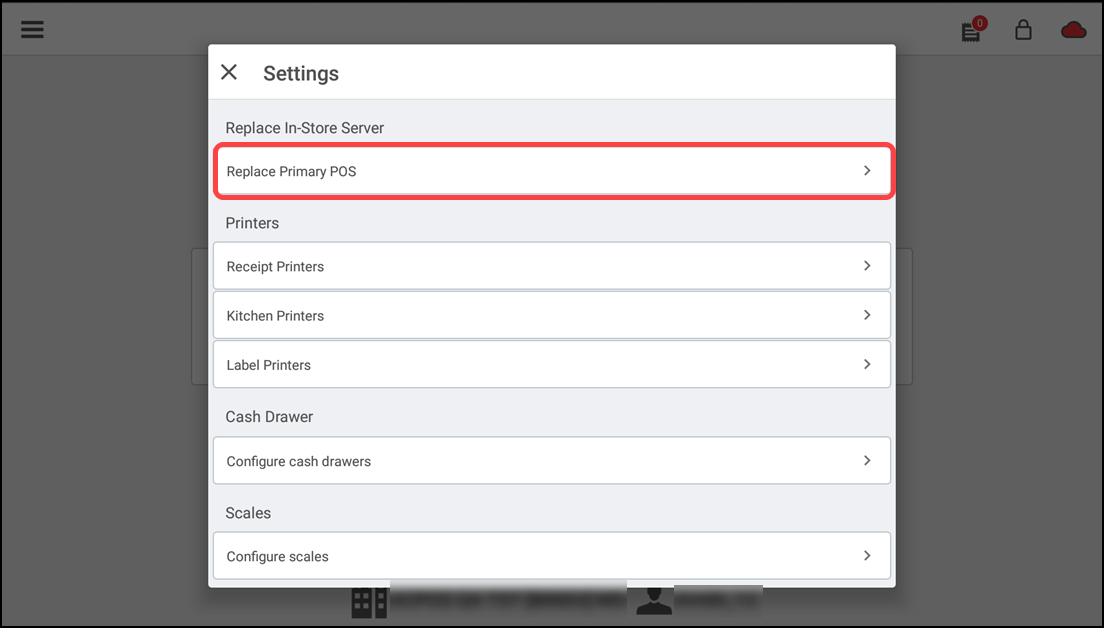
Tap Settings.
-
Tap Replace Primary POS. The Replace Server screen appears to confirm the changes.
-
Tap OK. Now, the first device is offline and the server starts running on the second device.
-
Tap Go Online. The second device appears back online and works as the primary device.
-
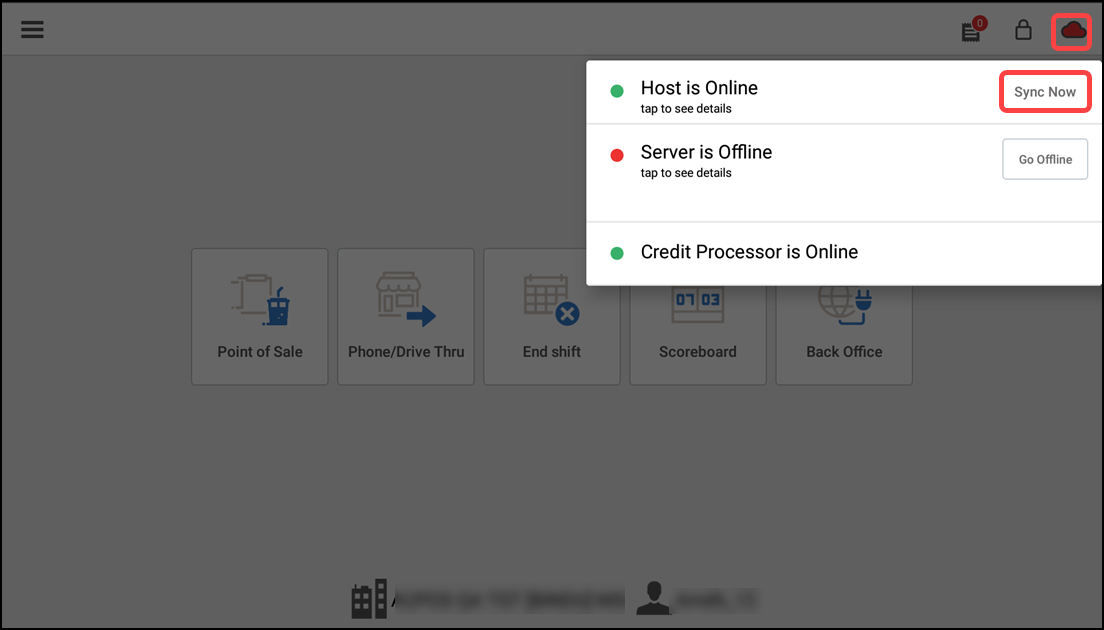
Tap cloud icon > Sync Now or wait for the POS to auto sync. The first device is now connected to the primary device.
-
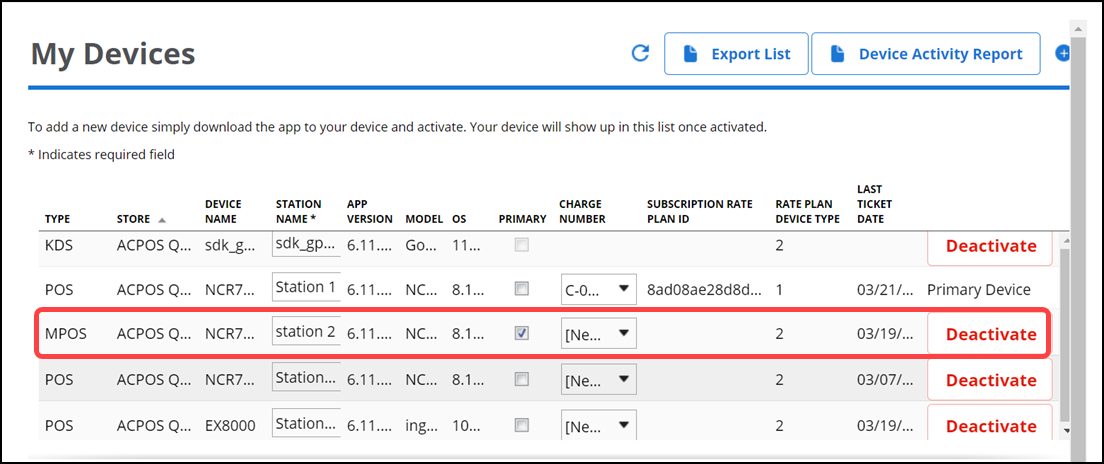
Navigate to Aloha Cloud Back Office > My devices to verify the primary device replacement. MPOS now appears as the type for the second device.
Replacing the primary device from the Back Office
At any point in time, whether the primary POS device is offline or online, follow the below steps to set another POS terminal or device as the primary device from Aloha Cloud Back Office.
To replace the primary POS device from ACBO:
-
Log in to Aloha Cloud Back Office.
-
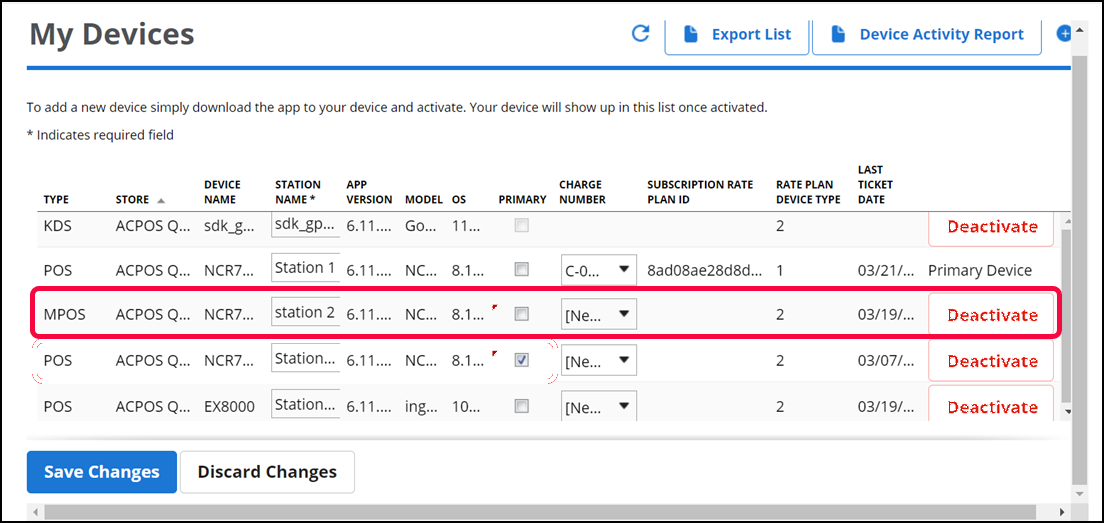
Navigate to My Account > My Devices. The existing primary device type is indicated by MPOS.
-
Log in to the POS.
-
Register two or more devices, one of which is the primary POS device and the other devices are connected to the primary POS.
Reference: For more information on registering devices, refer to Registering a device for the POS.
-
Log in to the Aloha Cloud Back Office.
-
Navigate to My Account > My devices.
-
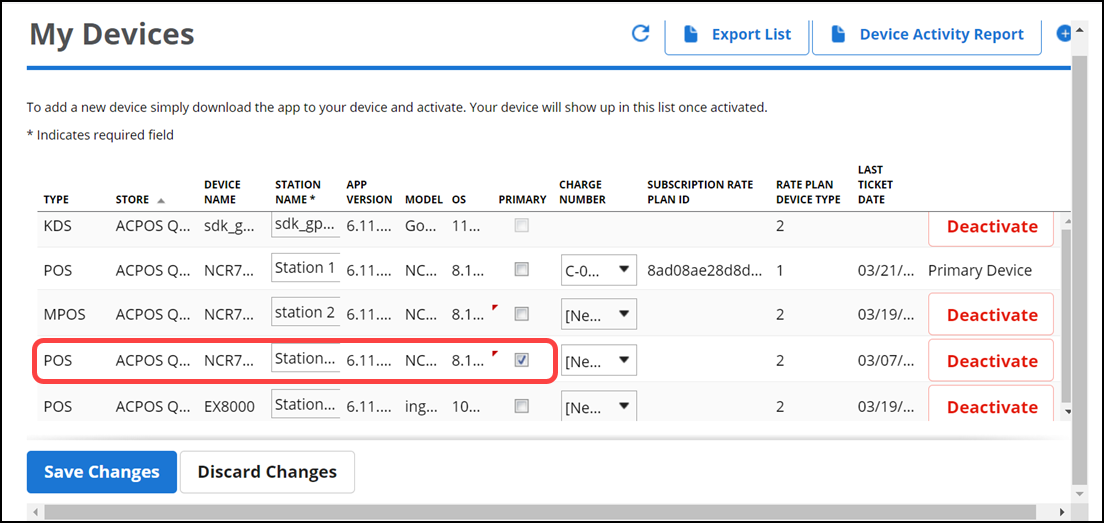
Select PRIMARY for the desired station to make it the primary device. The previously configured primary POS station is cleared automatically and the current selected station works as the primary device.
-
Click Save Changes.
-
Log in to the POS.
-
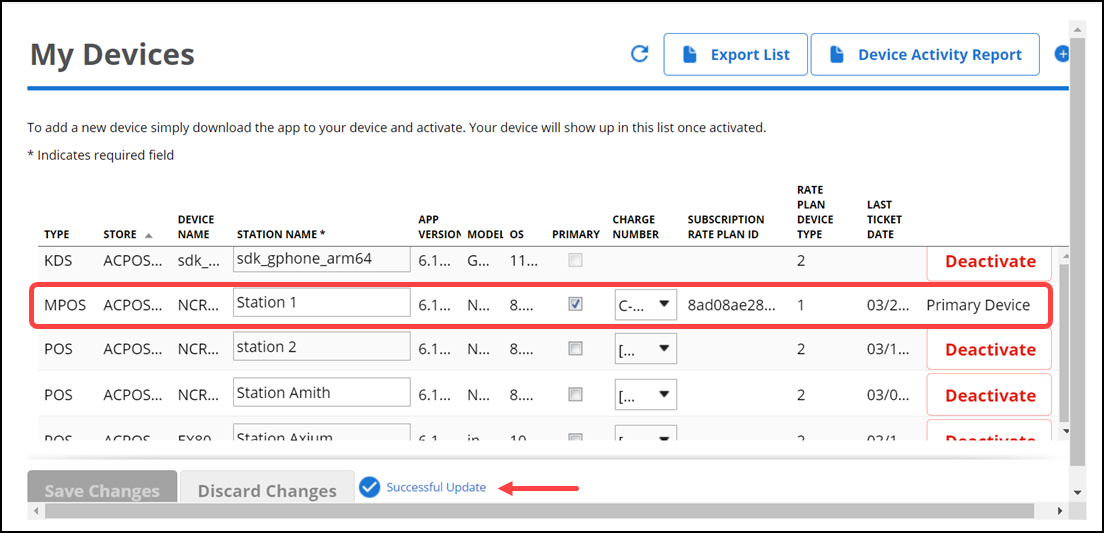
Perform the data sync or wait for the POS to auto-sync.
-
Verify the server status. MPOS now appears as the type for the second device.
Reference: For more information on POS data sync, refer to Performing a data sync.
Switching the primary device to a store server
At the store-level, if you want to switch back to using a Mac mini as the primary server, you can follow the steps listed below.
To switch from the primary POS server to a store server (Mac mini):
-
Log in to Aloha Cloud Back Office.
-
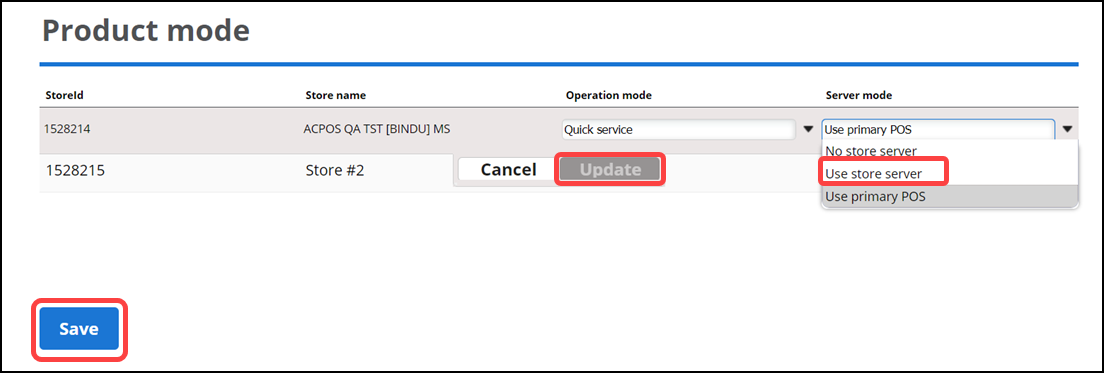
Navigate to Settings & Privacy > Support Admin > Product Mode. -OR- Navigate to Settings > Support Admin > Product Mode.
-
Select the desired service (Table Service/Quick Service) from the ‘Operation mode’ drop-down list.
-
Select Use store server from the ‘Server mode’ drop-down list.
-
Click Update.
-
Click Save.
-
Install Silver Server Package on the Mac mini.
-
Re-register the POS devices. All the POS devices are now connected to the in-store server, which is installed on the Mac mini.
Note: The M70, Axium, and CX5 devices are not optimized to work as the primary POS server. The primary POS is not supported for the stations that are not registered for any device.