Working with Gift Cards
For restaurants offering gift cards to their consumers, Aloha Online Ordering supports the acceptance of Aloha Stored Value and FirstData ValueLink cards as payment for online orders. Additionally, Aloha Online Ordering allows consumers to query their gift card balance on the Account Dashboard page, and the system includes any remaining gift card balance on order receipts and order confirmation email messages.
Configuring Basic Requirements for Gift Cards
You can configure gift cards for use with Aloha Online Ordering. Use Web Admin to enable gift cards to allow a consumer to use a gift card as payment for an online order. You must also create a prepaid tender in the Aloha POS and map the prepaid tender in Aloha Takeout.
Enabling a Prepaid Tender in the Aloha POS
You must create a prepaid tender for the Aloha POS, and you must set the tender as ‘Active.’ After you create the tender, you can then map it to Aloha Takeout.
- In CFC or Aloha Manager, select Maintenance > Payments > Tenders > Tenders tab.
- Click the New drop-down arrow, select Generic as the tender type, and click OK.
- Under the ‘Settings’ group bar, type a name to easily identify this as the gift card prepaid tender for Aloha Online Ordering.
- Select Active.
- Click Save and exit the Tenders function.
- Refresh the data.
Mapping the Prepaid Tender in Aloha Takeout
You must associate the prepaid tender you created for the Aloha POS with Aloha Takeout.
- In CFC or Aloha Manager, select the Aloha Takeout icon.
- Select Maintenance > Takeout Configuration > Takeout Settings > Tenders tab.
- Click the Add drop-down arrow, select an Aloha Takeout tender type, and click OK.
- Select the POS tender you created from the ‘Tender ID’ drop-down list.
- Click Save and exit the Tenders function.
- Refresh the data.
📓 Refer to the NCR Aloha Takeout Implementation Guide for more information.
Enabling Gift Cards in Web Admin
Once you configure the prepaid tender for the Aloha POS and associate the prepaid tender to Aloha Takeout, you can configure gift cards for online ordering in Web Admin. To enable gift cards in Web Admin, you must:
- Contact the Aloha Online Ordering team to confirm the Default Payments Enterprise Id. Your Aloha Gift Card Enterprise Id contained in Aloha Insight must match the Default Payments Enterprise Id in Web Admin.
- Configure the Site External Id in Web Admin for each site location to match the Id used to identify the specific site Id in Aloha Insight. Refer to Adding a Site Location for more information on editing a site location in Web Admin.
- Set the GiftCardEntryVisible company setting to true.
Configuring Aloha Stored Value Gift Card Integration
Supporting Aloha Stored Value gift cards involves three different modules. You must perform the following:
Aloha POS
- Ensure you configure the Aloha POS with all the pre-requisite for supporting Aloha Loyalty transactions.
- Ensure you configure and map the loyalty comps and promotions to the loyalty bonus plans configured in Aloha Enterprise/Loyalty.
Aloha Enterprise
- Ensure you have an Enterprise account. You must access Support@alohaenterprise.com and request the Aloha Stored Value Web Services application is added to the company database.
- Ensure you configure your user accounts, and the requirements for your site setup, loyalty cards, bonus plans, and rewards.
If you need to be given partial access to certain web service methods, the company can grant or deny access to each of the methods independently. This does not include the CheckServices method since it is a system live check.
To security access for individual web service methods:
- Sign into the Aloha Enterprise portal.
- Click System Setup.
- Click Security Class Setup.
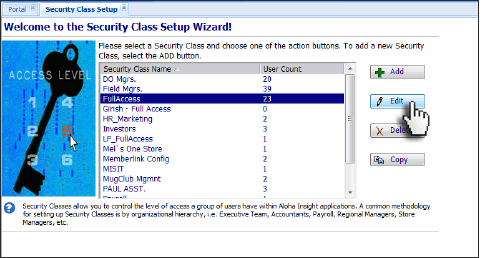
- Select FullAccess from ‘Security Class Name’ and click Edit. The Edit FullAccess Security Class screen appears.
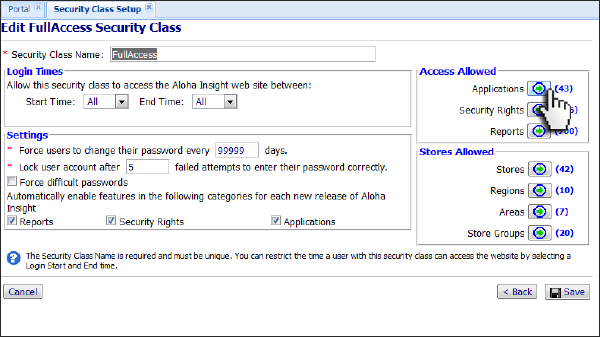
- Under the ‘Access Allowed’ group box, select Applications. The Assign Applications to FullAccess screen appears.
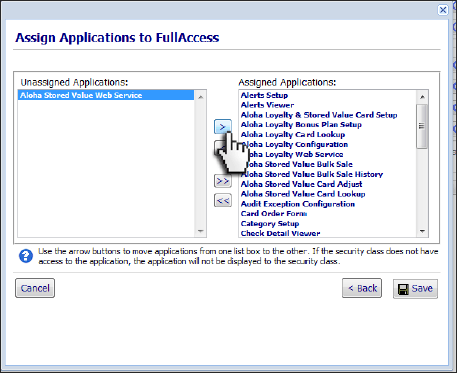
- Select Aloha Stored Value Web Services from the ‘Unassigned Applications’ list box and click > to move it to the ‘Assigned Applications’ list box.
- Click Save to return to the Edit FullAccess Security Class screen.
- Click Security Rights. The Assign Rights to Security Class FullAccess screen appears.
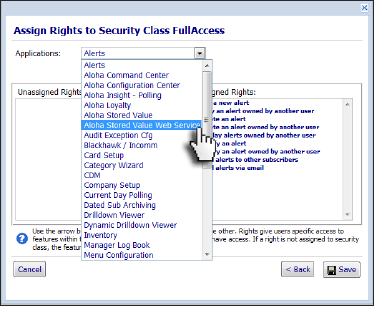
- Select Aloha Stored Value Web Service from the ‘Applications’ drop-down list.
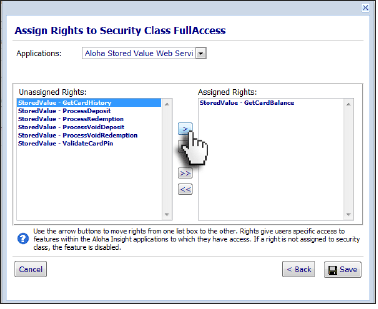
- Assign and unassign rights for each Stored Value function, as necessary.
- Click Save to return to the Edit FullAccess Security Class screen.
- Click Save.
Aloha Online WebAdmin
After you create the Security Class, you must configure a new user in the Aloha Enterprise website. The user name and password properties associated with the user is used in the request. Note: The ‘Force users to change their password every x days’ option for the security class is not enforced by the Aloha Stored Value web service; however, in the event you modify the password, you need to update your request attribute to contain the new value.
Ensure you contact the Online Ordering support team at support@alohaenterprise.com for the following settings:
- The loyalty processor. The Online Ordering support team configures this.
- Aloha Enterprise company ID
- Aloha Enterprise username
- Aloha Enterprise password
Configuring First Data ValueLink Gift Card Integration
For restaurants offering First Data ValueLink gift cards to their consumers, Aloha Online Ordering supports the acceptance of these cards as payment for online orders. Additionally, Aloha Online Ordering allows consumers to query their gift card balance on the Account Dashboard page, and the system includes any remaining gift card balance on order receipts and order confirmation email messages.
Prior to enabling this feature, obtain the following from First Data: your merchant ID, terminal ID, DataWire ID, Service ID, and Application ID. Once you receive this information, contact the Aloha Online Ordering team at [support@alohaenterprise.com] for assistance in completing the configuration for your company in Web Admin.
If necessary, you can override site specific settings for a site location in Site Settings.
To configure site specific settings for the First Data ValueLink integration:
- In Web Admin, select Configuration > Site Setup > Sites.
- Select the store location.
- Click Edit Site.
- Select the Site Settings tab.
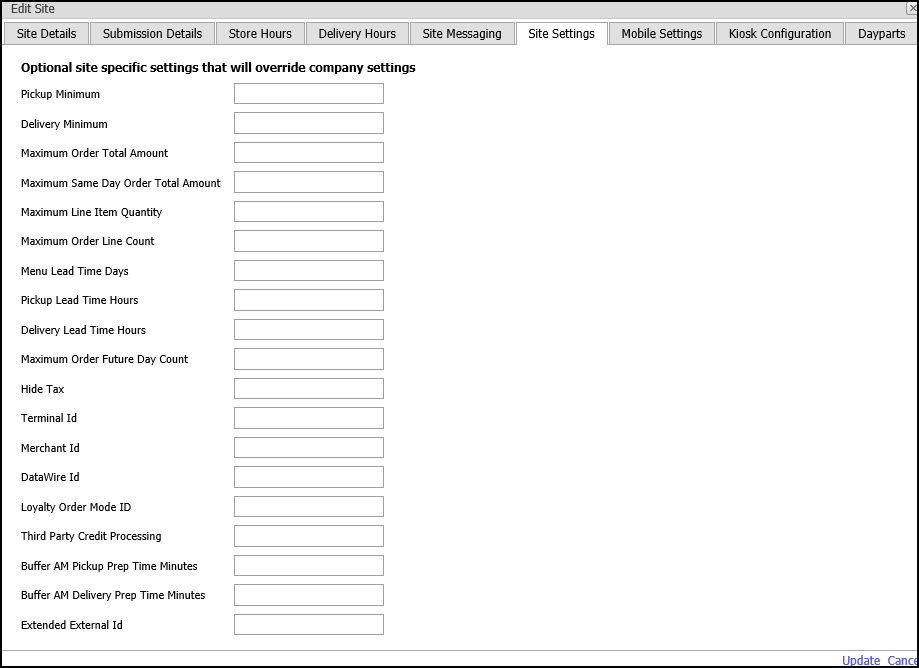
- Type the Terminal Id to override the Terminal Id established at the company level.
- Type the Merchant Id to override the Merchant Id established at the company level.
- Type the DataWire Id to override the DataWire Id established at the company level.
- Click Update and exit Site Settings.