Configure Settings for Each Store Location
You can manage the online ordering settings for each store location. You must first add the store locations for which you plan to use online ordering. Use Site Locations to manage the settings for each store location.
Defining Button Options for Site Configuration
The following button has the respective operation while setting the configurations for a site:
| Button Name | Description |
|---|---|
| Add Site | Allows to add an additional site to a company. |
| Clone Site | Allows to clone an existing site. |
| Edit Site | Allows to edit/update an existing site. |
| View Orders | Allows to view orders for the existing site. |
| Test Site | Allows to run diagnostics on the site. |
| Export Grid | Allows to export .xls file which contains all the sites in site configuration. |
Adding a Site Location
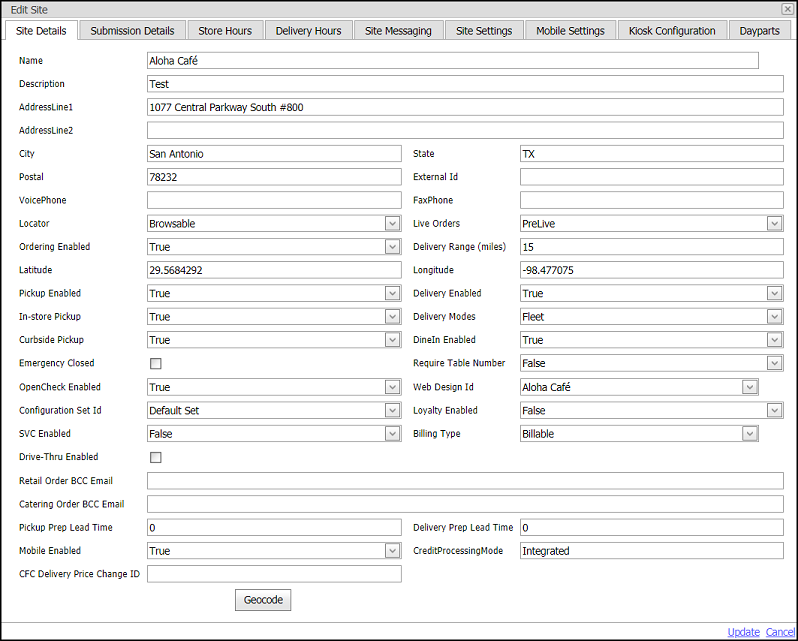
The Sites screen enables you to add and edit site locations, and to manage the settings for a specific location. Use this screen to enter information about the store location, such as the physical address, the store hours, delivery hours, site messaging, mobile settings, and other settings specific to the store. The Aloha Online Implementation team handles the settings related to the Submission Details tab.
To add a site location:
- In Web Admin, select Configuration > Site Setup > Sites.
- Click Add Site to add a new site location.
-
Type the store location name.
-
Type a description for the location, if desired. The description does not appear on the Locations page. Large multi-site operations may use a description to designate between corporate versus franchise store.
-
Enter the store location physical address.
-
Type the city, state and postal codefor the store location.
-
Type the external Id for the store location, if needed.
The external ID is used for direct URLs to the locations for pickup or curbside orders. This allows for URLs to be placed on the home page or locations page on the customers site, to link directly to the times page for a location. -
Type the voice phone number for the store location.
-
Type the fax phone number for the store location.
-
Select Browsable from the ‘Locator’ drop-down list to make the store visible on the Locations page of your online ordering site, or select NotBrowsable to hide the store on the Locations page.
-
Select from the ‘Live Orders’ drop-down list:
NotAcceptingOrders – A consumer can view the menu, if you set the Store Locator setting to Browsable, but the store cannot accept online orders.
PreLive – The store is in the testing phase, where you submit online orders to ensure all operational needs are satisfied. During the implementation process, it should set a store to PreLive. The Live Orders setting controls the ability of the store to take online orders,
PublicLive – The store is live and accepting online orders from consumers.
CallInOrdersOnly – Use this setting only when using Call Center Functionality.⚠️ Consult with the Aloha Online Implementation Team at support@alohaenterprise.com prior to making changes to the ‘Live Orders’ setting.
-
Select True from the ‘Ordering Enabled’ drop-down list to enable the store to receive orders, or select False to disable the store from receiving orders. Do not make changes to this setting without consulting the Aloha Online Ordering Implementation team.
-
Enter the delivery range for the store location, or do not specify a range if you want to use the delivery ranges established in company settings. The delivery range identifies the delivery radius for the site location, unless you configure a delivery zone.
-
Click Geocode at the bottom of the screen. The system determines and then fills in the ‘Latitude’ and ‘Longitude’ of the site location based on the address you entered.
-
Select True from the ‘Pickup Enabled’ drop-down list to enable the In-store and Curbside pick-up options, or select False to disable In-store and Curbside options.
-
Select True from the ‘In-store’ drop-down list to enable the costumers to pick-up orders in the store.
-
Click Curbside if you offer curbside pickup to your consumers. When you enable curbside pickup, additional options appear on the check out page of the online ordering site for the consumer to enter their car make, model, and color.
📝 By setting Curbside pickup as True and In-store pickup as False, this forces the customers to provide their car/vehicle information.
-
Select True from the ‘Delivery Enabled’ drop-down list, if the store location offers delivery of orders, or select False to disable delivery.
💡 For the order modes you select, You must set the same order modes in Menu Configurator > Web Menu > Menu Management.
-
Select True from the DineIn drop-down list to enable the Dine-in order mode.
📓 For more information on Dine-in and Required Table Number, refer to Contactless Dine-in Feature Focus Guide.
-
Check Emergency Closed to stop the ordering immediately. For more information refer to Designating a Site as Closed.
-
Select True from the OpenCheck drop-down list to enable multi-checks interactions and notifications when there are multiple checks (customers) sitting at the same table.
📝 The Dine-In order mode must be set to ‘True,’ then only it is possible for the multi-check interactions and notifications.
-
Select the web design ID from the drop-down list. The web design ID reads as the concept name and associates features within other areas of Web Admin to a particular location.
-
Select Configuration Set ID from the drop-down list, to apply the related company settings. For more information refer to Assigning Company Settings to a Site Location.
-
Select SVC Enabled, to enable gift cards for the site. This is used for API clients not for the online ordering website.
-
Check Drive-Thru to enable drive-thru as an order mode. This is only available for API clients not for the online ordering website.
-
(Optional) Enter an email address to designate an email address at the store location to receive copies of all order email messages generated by the system. To enter multiple addresses, enter a semicolon between email addresses.
-
Enter the amount of time in minutes for the pickup prep lead time for the store location. These settings should be left blank if using Aloha Takeout services and should be adjusted using the at the store level using the ATO Web Quote Time.
-
Enter the amount of time in minutes for the delivery prep lead time for the store location. These settings should be left blank if using Aloha Takeout services and should be adjusted using the at the store level using the ATO Web Quote Time.
-
Click Update at the bottom of the screen.
To define the store hours of the online ordering site for the store location:
Use the Store Hours tab to designate the times of day during which you want the online ordering site to allow consumers to submit orders to the store location.
- While still in Sites > Edit Site, select the Store Hours tab.
- Click Edit Store Hours.
- Select the Closed to prevent a consumer from submitting online orders for a particular day.
- Edit the Opening or Closing times for a selected day of week.
To change the time of a day, select the hour, minutes, and AM/PM.
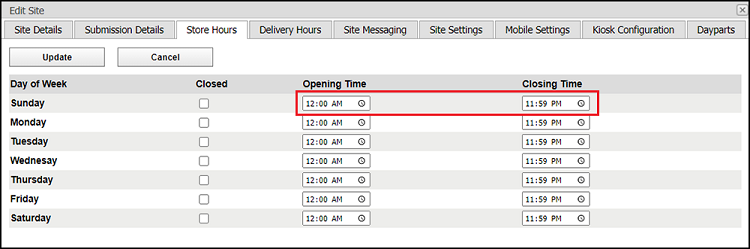
- Click Update located in the top left corner.
- Repeat steps 3 and 4 to edit other days of the week.
- Click Update located at the bottom of the screen.
To define the online order delivery hours for a store location:
Use the Delivery Hours tab to designate the time of day during which a consumer can place an online order for delivery. If necessary, you can set staggered times, if you only support delivery at specific times during the day. If your delivery hours are the same as your store hours, it is not necessary to add the information again. If you select Closed for a day of the week on the Delivery Hours tab, when a consumer attempts to place an order for delivery, they receive the following message, ‘Sorry, there are no available delivery times for this date.’
- While still in the Sites > Edit Sites function, select the Delivery Hours tab.
- Click Edit Delivery Hours.
- Select Closed to prevent a consumer from submitting a delivery order for the selected day.
- Make the desired changes to delivery hours for the required day of week.
To create a time period in which you allow delivery for online orders, enter the start time in ‘Period 1 Start’ and the end time in ‘Period 1 End.’ The system allows you to create two periods for delivery for each day.
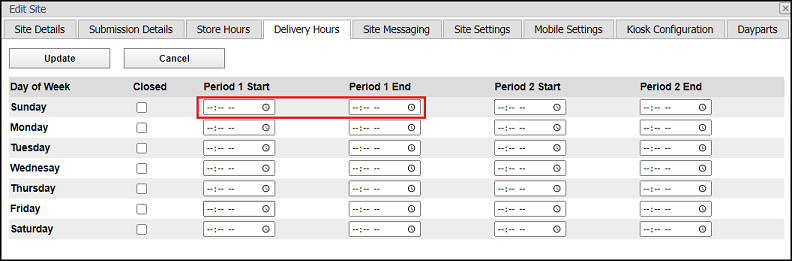
- Click Update located in the top left corner.
- Repeat steps 3 and 4 to edit other days of the week.
- Click Update located at the bottom right of the screen.
To add site-specific text to the receipt area:
Use the Site Messaging tab to specify site-specific information to appear in the receipt area on the Select a Pickup Time page of the online ordering site when the receipt area is empty. The Site-specific messaging supports the use of basic HTML tags and rich text editing. Typically, depending on the font size and box dimensions, you can display between nine hundred and a thousand characters.
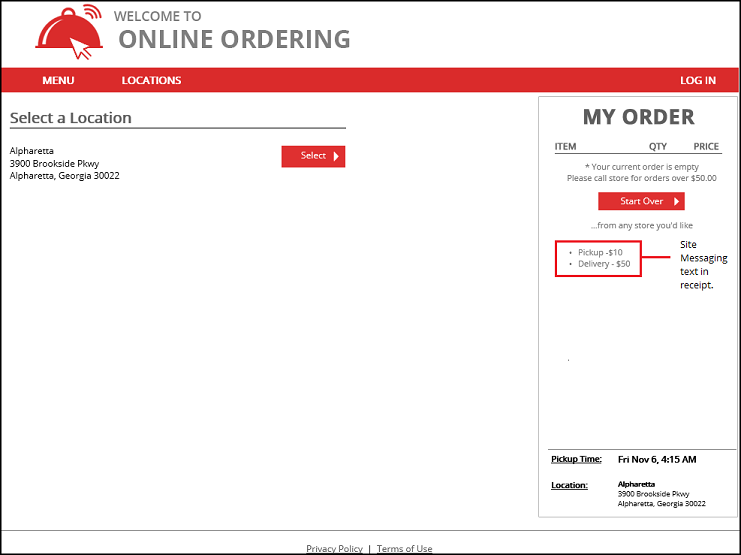
- White still in the Sites function, select the Site Messaging tab.
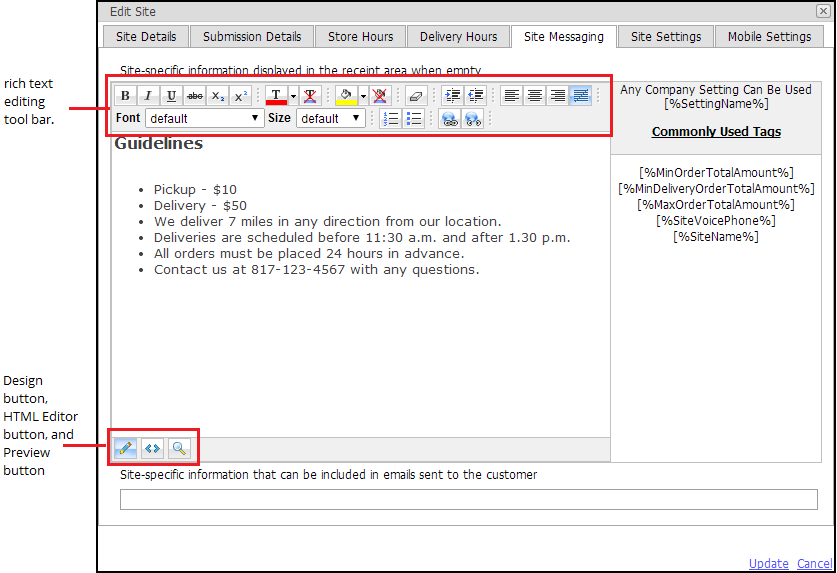
- Enter and edit the text to appear.
- Use the rich text editing tool bar at the top, as necessary.
- To use or view the HTML tags, select the HTML Editor button on the bottom left side of the screen. The system hides the editing tool bar and you can edit the text using basic HTML tags. Click the Design button to exit the HTML editor and display the editing tool bar.
- Click the preview button on the bottom left side of the screen to preview your changes.
- Click Update at the bottom of the screen.
To apply settings specific to a store location:
Use the Site Settings tab to override the company settings for a specific store location. The system only allows you to override the following settings:
- Pickup Minimum
- Delivery Minimum
- Maximum Order Total Amount
- Maximum Same Day Order Total Amount
- Maximum Line Item Quantity
- Maximum Order Line Count
- Menu Lead Time Days
- Pickup Lead Time Hours
- Delivery Lead Time Hours
- Maximum Order Future Day Count
- Hide Tax
- Third Party Credit Processing
- Buffer AM Pickup Prep Time Minutes
- Buffer AM Delivery Prep Time Minutes
📝 Refer to Company Settings for more information on the values you can enter for these settings.
- While still in the Sites function, select the Site Settings tab.
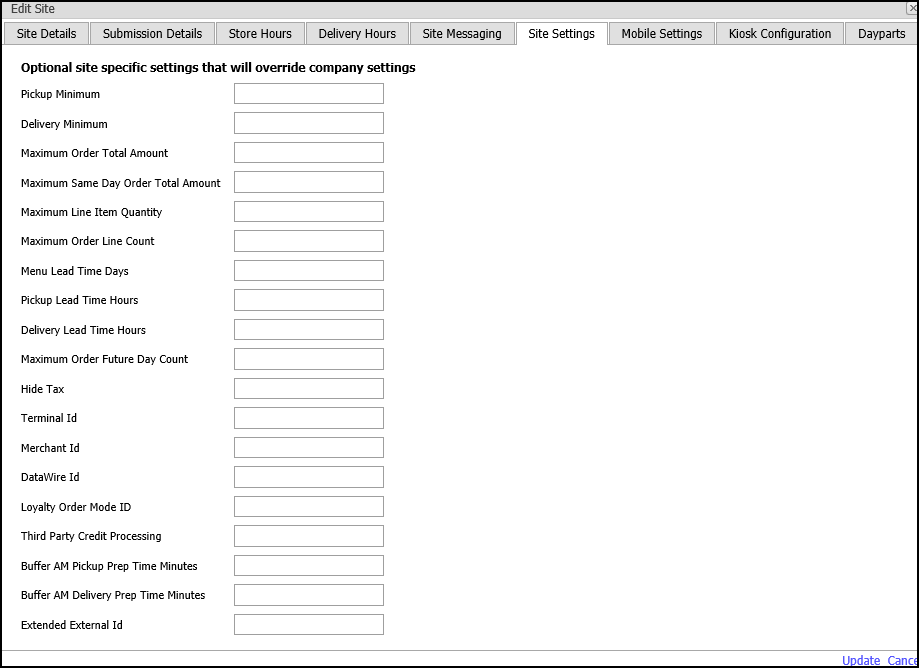
- Enter the value for the setting you want to override.
- Click Update on the bottom of the screen.
To configure mobile settings for a store location:
Use the Mobile Settings tab to override the company settings related to mobile ordering for a specific store location.
📝 These mobile settings are specific for application (website) vendors using the API and not related to the online ordering website. For any additional information contact application developers.
- While still in the Sites function, select the Site Details tab.
- Select True from the ‘Mobile Enabled’ drop-down list.
- Select the Mobile Settings tab.
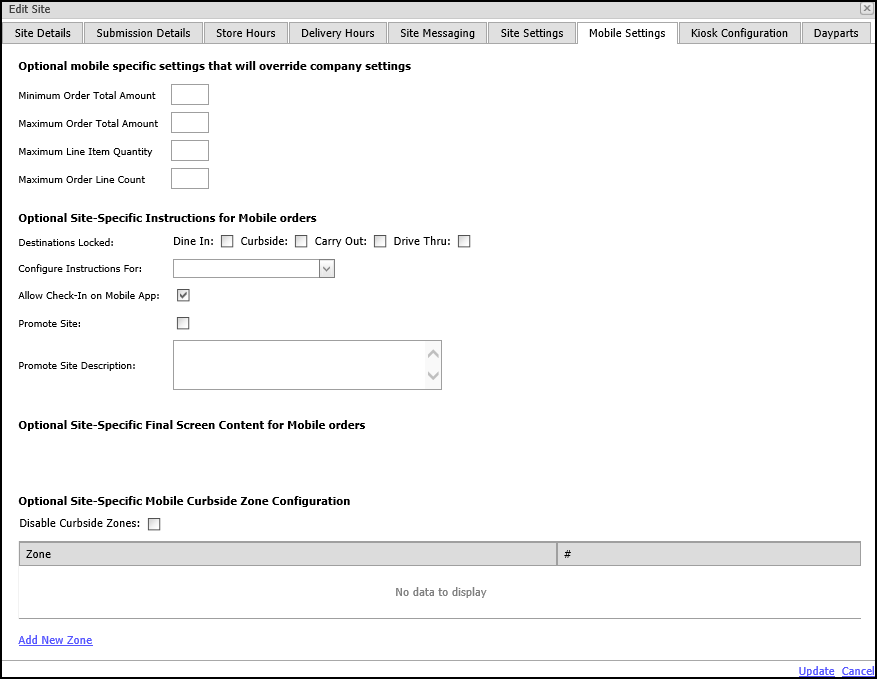
- Under ‘Optional mobile specific settings that will override company settings,’ specify the mobile settings for which to override the values in company settings. Refer to Company Settings for more information on the values you can enter for these settings. You can modify the following:
- Minimum Order Total Amount
- Maximum Order Total Amount
- Maximum Line Item Quantity
- Maximum Order Line Count
- Under ‘Optional Site-Specific Instructions for Mobile orders,’ select the destinations to lock and select the mobile setting for which to apply the destinations from the ‘Configure Instructions For’ drop-down list.
- (Optional) Under ‘Optional Site-Specific Mobile Curbside Zone Configuration,’ select Disable Curbside Zones.
- Click Update at the bottom of the screen.
To configure Dayparts settings for a store location:
The Dayparts tab lists all day parts as configured in CFC or Aloha Manager for the Aloha POS. You cannot change anything here; however, you can leverage day parts to set restrictions for when a submenu appears. While still in the Sites function, select the Dayparts tab.
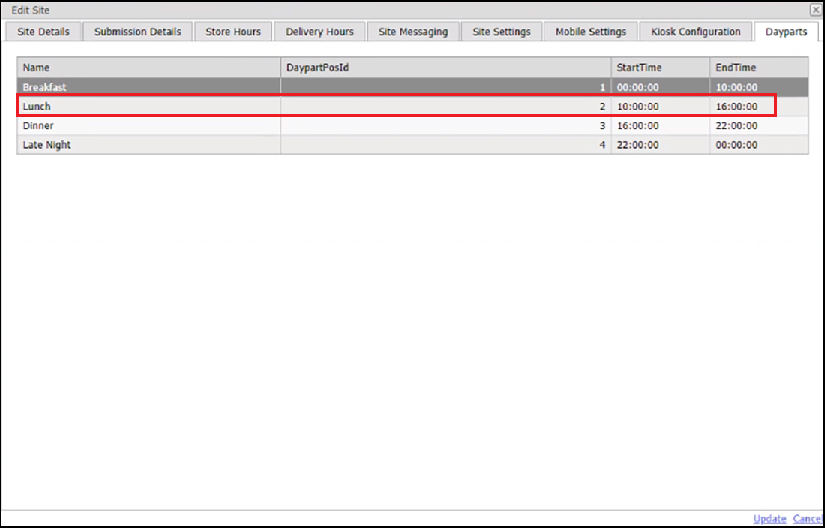
The Submenu Restrictions window appears.
- Click Add. The Submenu Restriction Window appears.
Usually, a day will be separated into four (sub menus) parts such as Breakfast, Early bird Lunch, Lunch, and Dinner. And the restrictions to the submenu are set at Aloha Configuration Center.
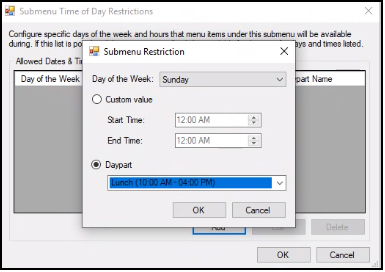
For Example: For the Lunch submenu, all the times are restricted except the timings between 10 AM to 4 PM on Sunday.
- Click OK to save the set restrictions.
To edit a site location:
You can quickly and easily edit the information and configuration for an online ordering site location.
- In Web Admin, select Configuration > Site Setup > Sites.
- Select a store location.
- Click Edit Site.
- Make the necessary changes.
- Click Update.
To clone a site location:
Use the Clone Site function to quickly add an additional location. This saves data-entry time as the system creates a new store and copies the data from the first location into the cloned location. When you click Clone Site, the system displays the Edit Site screen for you to edit the information for the additional location.
- In Web Admin, select Configuration > Site Setup > Sites.
- Select a store location to clone.
- Click Clone Site. The system duplicates the store location information and displays the Edit Site screen for the new location.
- Update the information as necessary. For example, you may need to edit the address, phone, live order status, and online ordering store hours information.
- Click Update.
Assigning Company Settings to a Site Location
By default, the system assigns the default company settings set to all site locations. If you create additional sets, use the Site Setting Assignment function to assign the set to a site location. If you plan to use the default set for all of your site locations, skip this procedure.
- In Web Admin, select Configuration > Site Setup > Site Setting Assignment.
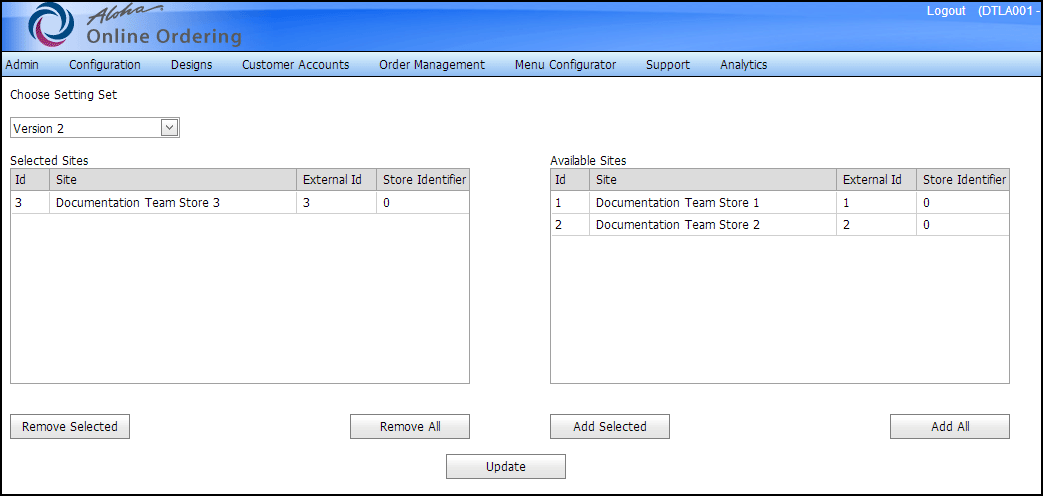
- Select a setting set from the ‘Choose Setting Set’ drop-down list. The sites assigned to the set appear under ‘Selected Sites,’ and the sites assigned to other sets appear under ‘Available Sites.’
- Under ‘Available Sites,’ select the site location to which to apply the set, and click Add Selected. The system moves the site to ‘Selected Sites.’ To remove a site location from a set, under ‘Selected Sites,’ select the site location, and click Remove Selected.
- Click Update.
📝 To check for the applied configurations, refer to To create a copy of company settings.
Using a Special Event to Override Normal Hours
Use Special Events to designate specific periods of time during which the online ordering store does not accept orders or when the online ordering store will open or close at other than normal times. Special Events temporarily override the hours listed in Site Setup > Sites. If you plan to close or operate at shortened hours for holidays, you must use the Special Events function to define those time periods. If you configure overlapping special events, the system applies the first special event in the list.
📝 Web Admin does not recognize holiday patterns, such as Christmas Day or New Year’s Day. Each year, you must enter or edit the holiday information.
To create a special event to override normal hours:
- In Web Admin, select Configuration > Site Setup > Special Events.
- Click Add Special Event.
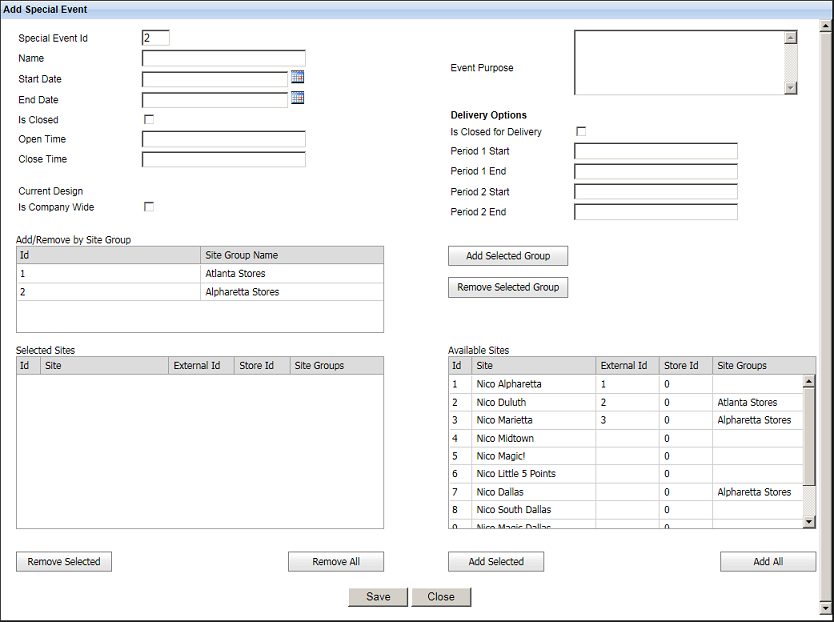
- Type a name for the special event. The name only appears in Web Admin. When a consumer selects the Time page, the date is not available for selection.
- Select a start date for the special event.
- Select an end date for the special event.
- Select Is Closed if you plan to close for the entire day for the special event. When you select ‘Is Closed,’ ‘Open Time’ and ‘Close Time’ are not available and the system automatically selects ‘Is Closed For Delivery.’
-OR-
Enter an open time and a close time for the special event. - (Optional) Type a description for the event purpose. The description only appears in Web Admin.
- Click Is Closed for Delivery, if you do not plan to offer delivery for online orders for the special event.
-OR-
Enter the start time and end time for the specific periods for which you plan to offer delivery for orders. If you configure a special event, do not select ‘Is Closed For Delivery,’ and do not enter a start and end time for delivery, the system uses the store times for the available delivery times. - To assign a special event to a site, perform one of the following:
- To assign a special event to all site locations, select Is Company Wide. The system moves all site locations from ‘Available Sites’ to ‘Selected Sites.’
- To assign a special event by adding the sites from a site group, select a site group from the ‘Add/Remove by Site Group’ list and click Add Selected Group. The sites included in the site group appear in the ‘Selected Sites’ list.
- To unassign a special event by removing the sites found in the site group, select a site group from the ‘Add/Remove by Site Group’ list and click Remove Selected Group. The sites included in the site group are removed from the ‘Selected Sites’ list.
- To assign a special event to a single site, select the site from the ‘Available Sites’ list box and click Add Selected to move the site to the ‘Selected Sites’ list box.
- To assign a special event to all sites, click Add All to move all sites to the ‘Selected Sites’ list box. Notes: This is the default behavior when you first add a special event.
- To exclude a special event from a single site, select the site from the ‘Selected Sites’ list box and click Remove Selected to move the site to the ‘Available Sites’ list box.
- To exclude a special event from all sites, click Remove All to move all sites to the ‘Available Sites’ list box.
- Click Save.
- Click Close.
To edit or delete a special event:
- Select Configuration > Site Setup > Special Events.
- Select the special event to edit or delete.
- Click Edit Special Event, make the necessary changes, click Save, and click Close.
-OR-
Click Delete Special Event to remove the special event.
⚠️ Caution: Use caution when deleting a special event as the system does not provide a warning message prior to deleting the special event.
Designating a Site as Closed
In some situations, it may be necessary to designate a site as closed for emergency purposes.
- In Web Admin, select Configuration > Site Setup > Emergency Close.
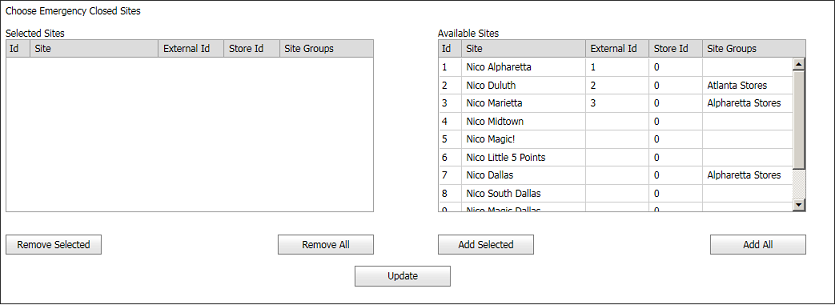
- To assign an emergency closed event to a site, perform one of the following:
- To assign an emergency closed event to a single site, select the site from the ‘Available Sites’ list box and click Add Selected to move the site to the ‘Selected Sites’ list box.
- To assign an emergency closed event to all sites, click Add All to move all sites to the ‘Selected Sites’ list box. Notes: This is the default behavior when you first add a emergency closed event.
- To exclude an emergency closed event from a single site, select the site from the ‘Selected Sites’ list box and click Remove Selected to move the site to the ‘Available Sites’ list box.
- To exclude an emergency closed event from all sites, click Remove All to move all sites to the ‘Available Sites’ list box.
- Click Update.
Adding Text About a Site to Store Locator
Site attributes enable you to add text about a site location on the Store Locator page, such as ‘Now Serving Shrimp!’ This text appears below the address, phone, and hours of operation, and the system offsets the site attribute text with an asterisk. You can add multiple lines of site attribute text and arrange the order in which they appear. After you create the site attribute text, you then assign the text to site locations.
To create the text to appear on store locator:
- In Web Admin, select Configuration > Site Setup > Site Attributes.
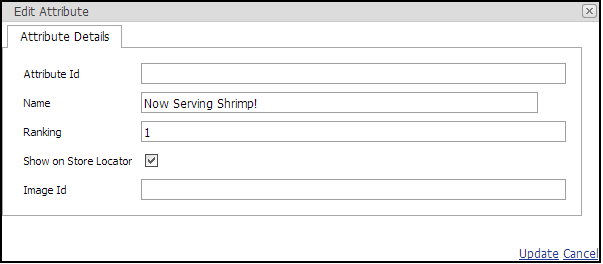
- Click Add Attribute. The Edit Attribute screen appears.
- Leave the Attribute ID blank, as the system assigns this number to the site attribute.
- Type the text to appear on the website in the name field.
- Assign a ranking to the text with a numerical value. If you assign multiple site attributes to a site location, the system displays them according to their ranking, with ‘1’ being the highest ranking.
- Click Show on Store Locator.
- (Optional) type the file name for a graphics file to display with the site attributes text.
- Click Update, and continue to the next procedure to assign the site attribute text to a site location.
To assign a site attribute to a site location:
- IN Web Admin, select Configuration > Site Setup > Site Attribute Assignment.
- Select a site location from the ‘Choose Site’ drop-down list.
- Click Add Attribute. The Add Attribute to Site screen appears.
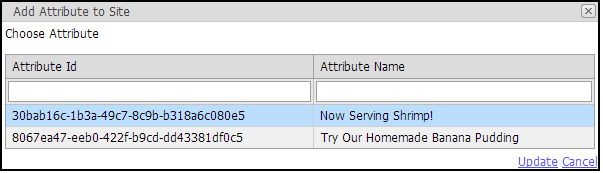
- Select the site attribute to add to the site location.
- Click Update. The system adds the site attribute to the site location.
To edit or delete a site attribute:
- Select Configuration > Site Setup > Site Attributes.
- Select the site attribute to edit or delete.
- Click Edit Attribute, make the necessary changes, and then click Update.
-OR-
Click Delete Attribute to remove the site attribute.
⚠️ Use caution when deleting a site attribute as the system does not provide a warning message prior to deleting the site attribute.
To remove a site attribute from a site location:
In some cases, you may not want to delete a site attribute, but you may want to remove it from a particular site location.
- Select Configuration > Site Setup > Site Attribute Assignment.
- Select the site location from the ‘Choose Site’ drop-down list.
- Select the site attribute to remove from the store location.
- Click Delete Attribute. The system only removes the site attribute from the store location; it does not delete the site attribute.