Aloha Online Ordering enables you to create comps and promos for you to offer on your online ordering site to your consumers. You can also prompt your consumers to add additional items when they select specific items for order, referred to as a transaction upsell. Use the Comps function to create unique incentives just for your online ordering consumers. You must create a generic comp in the Aloha POS to which you associate multiple comps from Web Admin. To also offer the promos configured in the Aloha POS to your online consumers, you must create an association between the promo you create in Web Admin with the specific promo in the Aloha POS.
Working with Comps
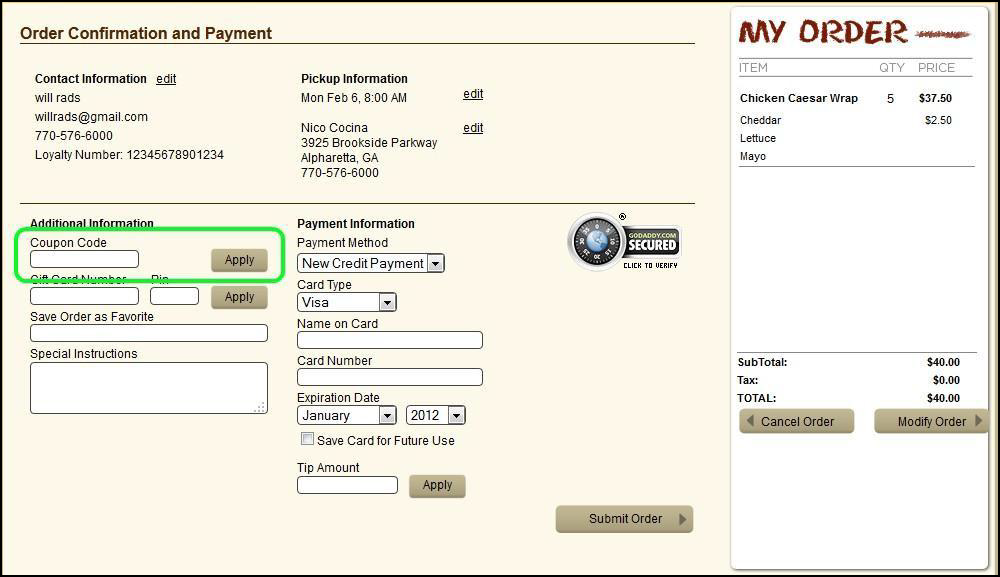
A comp allows you to offer an incentive, such as a discount, to consumers using your online ordering site. When you configure a comp, the system adds a Coupon Code field to the Order Confirmation and Payment page. The consumer enters the coupon code provided to them, clicks Apply, and the system applies the discount to the consumer order.
With a comp, you can:
- Offer a discount as an amount or a percentage.
- Limit the amount of the comp.
- Require a minimum purchase amount to receive the comp.
- Base the comp on the size of the order or on frequency of visits.
For the successful use of comps as part of your online ordering site, a comp must meet the following requirements:
- Every online ordering comp must have a corresponding comp in the POS; however, you can associate multiple online ordering comps to a single comp in the POS.
- You must define the corresponding POS comp as a ‘Prompt for amount’ comp in the POS. When you define a comp as ‘percentage off’ in Web Admin, Aloha Online Ordering performs the calculation and sends the appropriate discount to the POS.
- A consumer can add multiple non-recurring comps to their order, yet they can only add one recurring comp to their order.
Configuring a Sales Item Group for Comps
You can optionally offer a comp discount that applies only when a guest orders specific eligible items. Once you create a sales item group, you attach the group to the ‘Sales Item Group’ drop-down list for the applicable comp.
To create a sales item group for a comp:
- Select Designs > Discounts > Sales Item Groups.
- Click Add Sales Item Group. The Add Sales Item Group screen appears.
- Type a name for the sales item group.
- Type a description for the sales item group.
- Click Update. The system returns to the Sales Item Group screen.
- Select the sales item group you created from the ‘Select a Sales item Group to add or remove Sales Items from’ drop-down list. The system populates the screen with all of your sales items.

- Select a sales item to include in the sales item group.
- Click Edit.
- Click Selected.
- Click Update.
- Repeat steps 7 through 10 for each additional item to include in the sales item group.
- Exit the Sales Item Group function.
Configuring a Comp
After you configure your comps in the POS, access Web Admin to configure your comps for Aloha Online Ordering. You can configure the times of a specific day of the week for when the comp is available. For example, you can offer a comp that is available between the hours of 6:00 p.m. to 10:00 p.m. on each Friday. By default, when you configure a comp, the comp applies to all sites; however, you can assign a comp to a specific site. You may want to do this for a particular site that wants to offer a discount within a specific market in which that site resides.
📓 Refer to the NCR Aloha Table Service Reference Guide or the NCR Aloha Quick Service Reference Guide.
- In Web Admin, select Designs > Discounts > Comps.
- Select Add Comp to create a new comp.
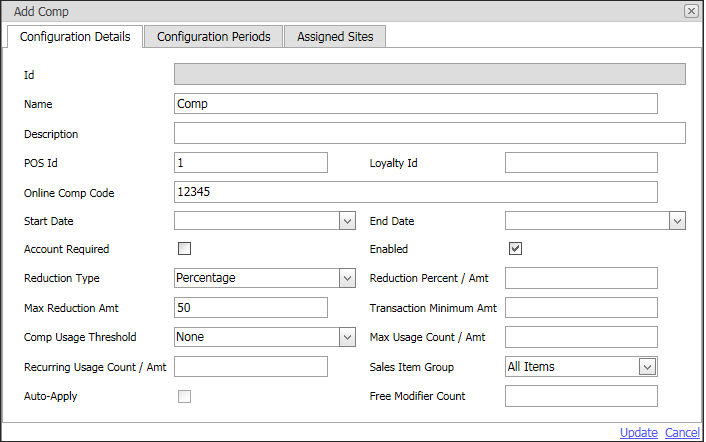
- Type the name to appear for the comp on the website virtual receipt.
- Type a description to help identify the comp.
- Enter the corresponding POS Id for the comp.
- Type the online comp code, which is the code you want consumers to enter at the Verify Payment page.
- Select a start and end date for the comp.
- Select Account Required, to restrict the comp to registered consumers.
- Select Enabled to activate the comp.
- Select one of the following comp type from the 'Reduction Type' drop-down list.
Flat Amount Reduces the check by a dollar amount.
Percentage Reduces the check by a percentage without a dollar maximum.
Capped Percentage Reduces the check by a percentage with a dollar maximum.
Goal Price Reduces the price of the item to a specified price. Applies to sales items within a specific sales group. Refer to Configuring a Goal Price Comp for more information. - Enter the amount or percentage of the discount.
- For capped percentage discounts, enter the maximum reduction amount.
- (Optional) Enter a transaction minimum amount for the comp.
- Select a comp control from the ‘Comp Usage Threshold’ drop-down list.
PerCustomerUsageCount Controls the number of times a consumer can use the comp. For example, if you set the control at ‘5,’ then each consumer can use this comp only five times.
TotalUsageCount Controls the total number of times all consumers can use the comp. For example, if you set the control at ‘1,000,’ then the system only allows the use of the comp one thousand times, regardless of the specific consumer.
PerCustomerUsageAmount Controls the maximum amount each consumer can receive from the comp. For example, if you set the control at ‘$50.00,’ then each consumer can receive a maximum of ‘$50.00’ from the comp code, regardless of the number of orders.
TotalUsageAmount Controls the maximum amount of discounts allowed by the comp. For example, if you set the control at ‘$5,000.00,’ then the system only allows the use of the comp until you provide ‘$5,000.00’ worth of discounts.
PerCustomerRecurringCount Defines the comp as available to a consumer each time they place a certain number of orders. For example, if you set the control at ‘5,’ then the consumer can use the comp after every fifth order.
PerCustomerRecurringAmount Defines the comp as available to the consumer after reaching a dollar amount threshold of orders. For example, if you set the control at ‘$200.00,’ then the consumer can use the comp for every $200 they spend. - Enter the maximum number or amount for the comp usage threshold you selected.
- Enter the recurring number for the usage threshold, if you selected a recurring threshold comp control.
- If you are using a sales item group to offer a comp discount that applies only when a guest orders specific eligible items, select the sales group you created earlier.
- For goal price comp discounts, click Auto-Apply for the system to apply the discount without the need to perform additional actions. If you clear ‘Auto-Apply,’ the consumer can use the Goal Price discount by entering a discount code at checkout. The system prevents you from selecting ‘Auto-Apply’ for any other discount type.
- Select the Configuration Periods tab.
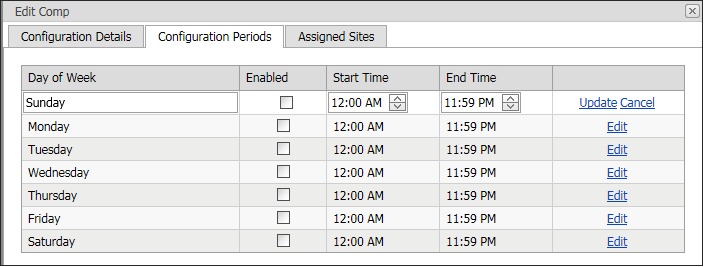
- Click Edit for the day of the week on which to make the comp available.
- Select Enabled to make the comp available for that day.
- Set the start time for the period by either typing the hour, minute, and AM or PM, or by using the up and down arrows to select the time.
- Set the end time for the period by either typing the hour, minute, and AM or PM, or by using the up and down arrows to select the time.
- Click Update to complete the configuration period for the day of the week.
- Repeat steps 20 through 24 for each day of the week on which the guest can use the comp.
- Select the Assigned Sites tab.
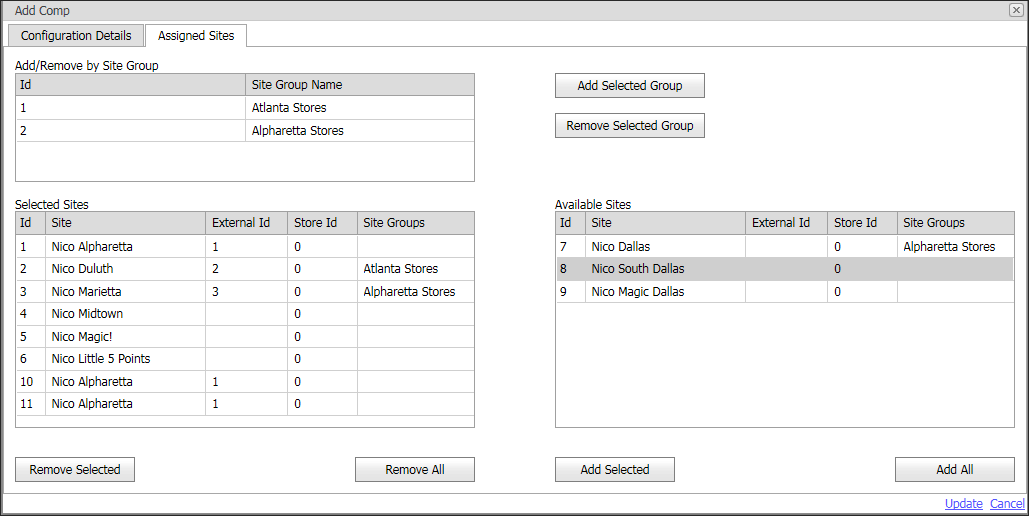
- To assign a comp to a site, perform one of the following:
- To assign a comp by adding the sites from a site group, select a site group from the ‘Add/Remove by Site Group’ list and click Add Selected Group. The sites included in the site group appear in the ‘Selected Sites’ list.
- To unassign a comp by removing the sites found in the site group, select a site group from the ‘Add/Remove by Site Group’ list and click Remove Selected Group. The sites included in the site group are removed from the ‘Selected Sites’ list.
- To assign a comp to a single site, select the site from the ‘Available Sites’ list box and click Add Selected to move the site to the ‘Selected Sites’ list box.
- To assign a comp to all sites, click Add All to move all sites to the ‘Selected Sites’ list box.
Notes: This is the default behavior when you first add a comp. - To exclude a comp from a single site, select the site from the ‘Selected Sites’ list box and click Remove Selected to move the site to the ‘Available Sites’ list box.
- To exclude a comp from all sites, click Remove All to move all sites to the ‘Available Sites’ list box.
- Click Update.
Understanding Recurring Comps
The following rules apply to the ‘PerCustomerRecurringCount’ and ‘PerCustomerRecurringAmount’ comp usage threshold controls:
- Only a consumer with a registered account can apply a recurring comp to their order.
- A consumer can only have one active recurring comp.
- The system does not automatically apply a recurring comp. The consumer must apply the comp code. The system only auto-applies goal price comps.
- When a consumer meets the conditions for a recurring comp, the system applies the comp to the next order. For example, a recurring comp provides $10 off every fifth order. After placing five orders, the consumer earns the discount to apply to their next order.
- Residual comp value does not carry over. For example, a consumer receives a reward for $10 off. On their next order, they only spend $8.00. They receive a comp for $8.00 and the system does not retain the $2.00 comp.
- When tracking order amounts for recurring comp purposes, the system carries forward the amount over the value. For example, you set a comp to give consumers $10 off for every $200 spent. A consumer has spent $190, and on their next purchase they spend $45, putting them over the threshold. On their next order, they receive the $10 comp, and the system considers them to have already accumulated $35 towards the next $200 threshold.
- A consumer can use non-recurring comps in conjunction with a recurring comp.
- When a recurring comp triggers on an order, the system hides the coupon entry field, thereby prohibiting the consumer from entering another recurring comp for the order the recurring comp is triggering. For example, you set a comp to give $10 off for every $200 in purchases. The consumer places an order giving them $230 worth of purchases. On their next order, the $10 discount automatically shows up when the consumer progresses to the Order and Payment confirmation screen without the need to enter any sort of coupon code and the system hides the coupon code entry field.
Understanding Comp Rejection Reasons
The following lists the possible reasons the system may reject the comp a consumer attempts to apply to their order.
- CompNotEnabled – The comp is not enabled for use.
- BeforeStartDate – The order date is before the comp start date.
- AfterEndDate – The order date is after the comp end date.
- TransactionMinimumNotMet – The order does not meet the minimum transaction amount for the comp.
- CustomerAccountRequired – The comp requires the user be a registered consumer.
- TotalUsageCountExceeded – The order exceeds the maximum number of usages for the comp.
- TotalUsageAmountExceeded – The order exceeds the maximum amount of redemptions for the comp.
- CustomerUsageCountExceeded – The system cannot apply the comp because the consumer previously exceeded the maximum number of usages for the comp.
- CustomerUsageAmountExceeded – The system cannot apply the comp because the consumer previously redeemed the comp for the maximum amount.
- RecurringCompAlreadyBeingTracked – The system cannot apply the comp because it is a recurring comp and the consumer is already tracking against a different recurring comp.
Configuring a Goal Price Comp
A goal price comp is a reduction type that applies a dynamic discount to each sales item within a specific sales item group. You configure the end price (goal price) and the system reduces the amount to the end price, leaving the remaining amount as the discount of the comp. Using a goal price comp, you can create a specific for a range of items that normally have a different price and reduce the price to the same flat amount. For example, you may create a comp where all large pizzas reduce to a flat price of $10.00 on Monday. Within your database, large pizzas vary in price from $13.95 to $17.95. With the goal price set at $10.00, a $13.95 pizza receives a $3.95 discount, whereas a $17.05 pizza receives a $7.95 discount.
Things to keep in mind regarding a goal price comp:
- To use a goal price comp, you must first enable the Goal Price comp functionality.
- Before creating a goal price comp, you must create a sales group for the comp.
- A goal price comp must have a corresponding comp on the POS; however, you can associate multiple goal price comps (auto-applied or discount-coded) to a single comp on the POS.
- The system allows more than one auto-applied goal price comp within the same order so the guest can receive multiple discounts.
- The ‘Account Required’ setting is not supported with the ‘Auto-Apply’ feature.
- A goal price comp does not support the following settings:
a. Max Reduction Amount
b. Transaction Minimum Amount
c. Comp Usage Threshold
d. Max Usage Count / Amt
e. Recurring Usage Count / Amt
To enable the goal price comp functionality:
- Select Company Settings Setup.
- Select UseGoalPriceComps.
- Click Edit Settings.
- Set the value to True and click Edit.
To create a goal price comp:
After you enable the Goal Price functionality and create the sales item group, you can create the goal price comp.
- Select Designs > Discounts > Comps.
- Select Add Comp.
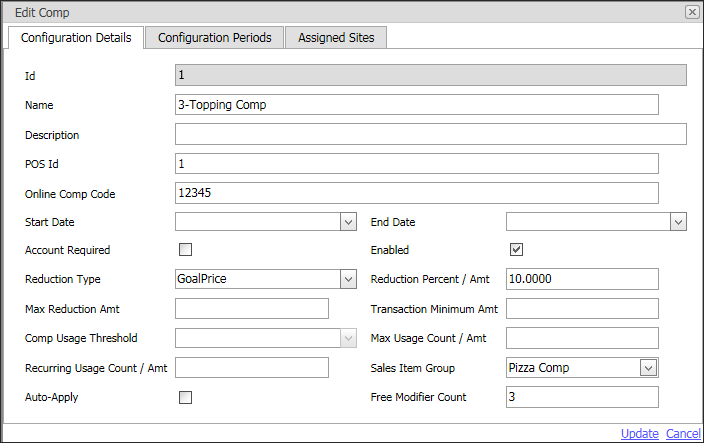
- Type a name to appear for the comp on the website virtual receipt.
- Type a description for the comp.
- Enter the POS comp ID.
- Type the online comp code, which is the code you want consumers to enter at the Order Confirmation and Payment screen.
- Select a start and end date for the comp.
- Select Enabled to activate the comp.
- Select Goal Price from the ‘Reduction Type’ drop-down list. When you select Goal Price, the system adds the Configuration Periods tab and the Assigned Sites tab.
- Enter the goal price of the item.
- Select the sales item group you created from the ‘Sales Item Group’ drop-down list.
- Select Auto-Apply.
- Type the number of modifiers you want to allow the guest to order for free from the ‘Free Modifier Count’ drop-down list. This allows the guest to add a specified number of modifiers of their choosing before the system starts charging a price. For example, on a 3-topping pizza, the guest can order onions, pepperoni, and black olives at no charge, and then add bacon for a price.
- Select the Configuration Periods tab. By default, the system enables the comp for every day of the week. If you do not configure a specific day, then the comp is valid for every day of the week. To enable the goal price comp for specific days of the week, select the day, click Edit, select Enabled, edit the start and end time, if necessary, and click Update.
- Select the Assigned Sites tab.
- Under ‘Available Sites,’ select the store to which to assign the goal price, and click Add Selected. The system moves the selected stores to ‘Selected Sites.’
- Click Update.