Configuring pizzas with fractional toppings
There are several components to configuring pizzas with fractional toppings. (1) Select advanced pizza to activate the available options; (2) the menu must contain pizzas with assorted sizes, crusts, sauces, and toppings; (3) allowing pizza topping fractions. Fractional pizza topping is a pizza topping that only covers a half, third, or quarter of a whole pizza.
Making Advanced Pizza active
You must activate Advanced Pizza so you can see and use all the Advanced Pizza options in the user interface. You cannot configure Advanced Pizza until you make it active.
To make Advanced Pizza active:
- Select Maintenance > Business > Additional Features if you are using Aloha Manager or select Maintenance > Business > Corporate Administration if you are using Aloha Configuration Center.
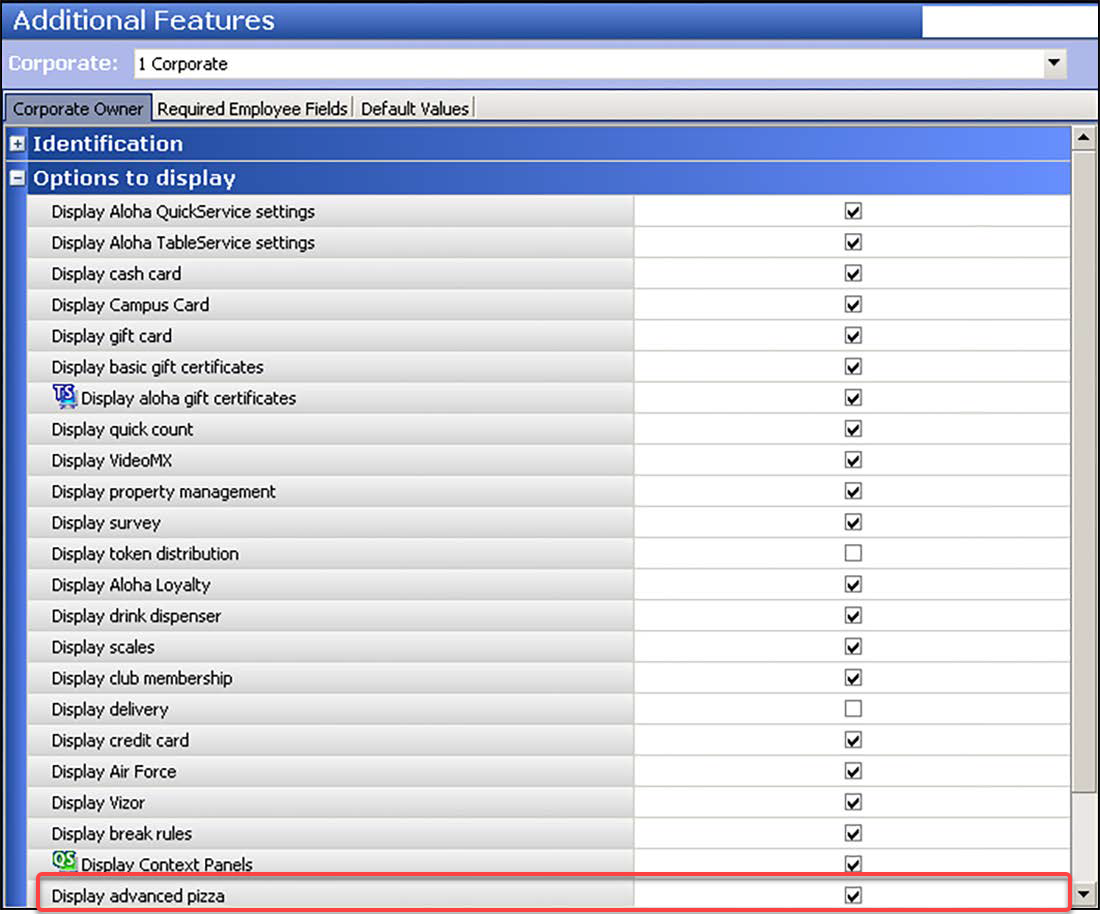
- Under the 'Options to display' group bar, select Display advanced pizza.
- Click Save and exit the Additional Features/Corporate Administration function.
- Log out of CFC/Aloha Manager and log back in to view the new options.
Creating pizza items
In Item Maintenance, create an item for each pizza menu item (e.g. Supreme, Meat Lover, BYO), each pizza topping (e.g. pepperoni, onions, black olives), each pizza crust (e.g. thin), each sauce choice (e.g. tomato), and each pizza fractional topping you support (e.g. halves, thirds, and quarters).
Create an item for each pizza item on the menu, being sure to create an item for each size of the pizza offered, instead of configuring the different sizes as modifiers. for example, if the menu has a Supreme pizza that you offer in Small, Medium, and Large, create three separate pizza menu items: 100 - Supreme Small, 101 - Supreme Medium, and 102 - Supreme Large.
You should always price pizza menu items in Item Maintenance.
To create a pizza menu item:
In keeping with the sample menu, you would create the following items:
| BYO Small ($6.00) | Meat Lovers Small ($10.00) |
| BYO Medium ($8.00) | Meat Lovers Medium ($12.00) |
| BYO Large ($10.00) | Meat Lovers Large ($14.00) |
| Supreme Small ($10.00) | 3-Topping Small ($8.00) |
| Supreme Medium ($12.00) | 3-Topping Medium ($10.00) |
| Supreme Large ($14.00) | 3-Topping Large ($12.00) |
You may need to abbreviate some names due to the number of characters available in Item Maintenance.
- Select Maintenance > Menu > Items.
- Click the New drop-down arrow, select Standard, and click OK.
- Accept the system assigned number or click the ellipsis (...) next to 'Number' to display the Number Assignment dialog box, from which you can choose an alternate number.
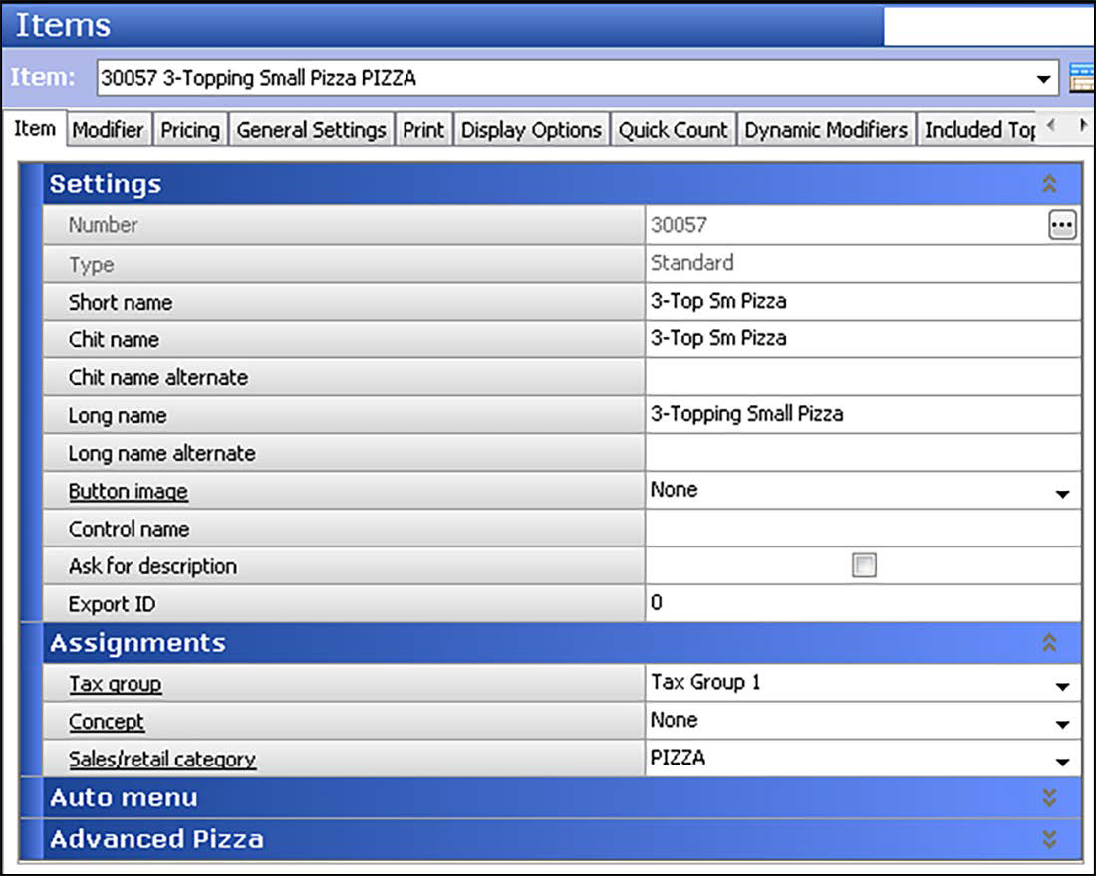
- Type a descriptive name for the pizza menu item, being sure to associate the size of the pizza item as part of the name.
- Under the 'Assignments' group bar, select a tax group to assign to the item.
- Select the category under which the pizza menu item resides, such as 'Pizza'.
- Under the 'Advanced Pizza' group bar, select Pizza to indicate this item is a pizza menu item.
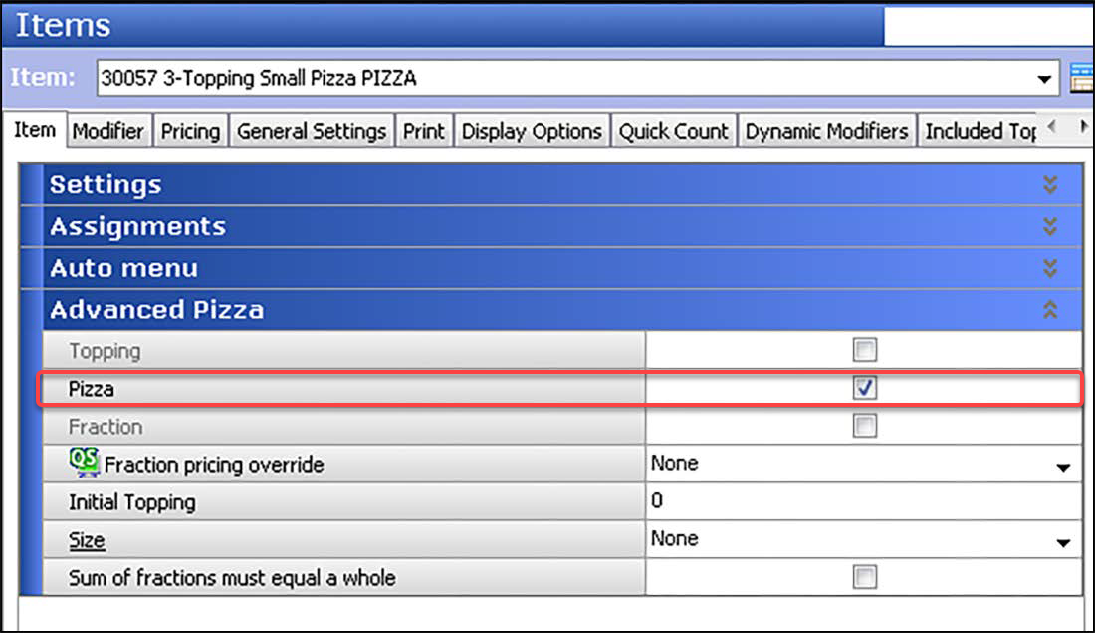
- Clear Sum of fractions must equal a whole.
- Select the Pricing tab.
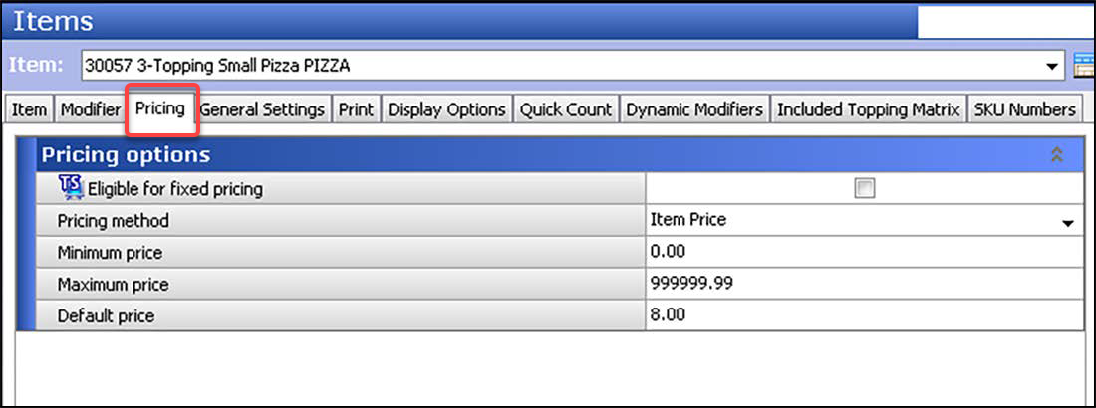
- Select Item Price from the 'Pricing method' drop-down list.
- Type the base price of the pizza in 'Default price.'
- Configure the remaining options as you would do for any other item, where available.
- Click Save.
- Repeat this procedure for any other pizza menu item you offer.
- Continue to the next procedure.
Creating pizza topping, crust, and sauce items
Create an item for each pizza topping (such as pepperoni, onions, and more), each pizza crust (such as thin, thick, and more) and each pizza sauce (tomato, Alfredo, and more).
If you do not support different priced toppings per pizza size, you can easily price toppings in Item Maintenance; however, if you support different priced toppings per pizza size (as showing in the sample pizza menu), price the pizza toppings using price levels in Price Level Maintenance. If you price the toppings in both Item Maintenance and Price Level Maintenance, the price level always take precedence, in accordance to the Aloha pricing hierarchy. Also shown in the sample pizza menu, there is a $1.00 charge for a pan crust. In this instance, add the $1.00 price in Item Maintenance.
In most pizza restaurants, the price of a topping typically does not appear separately on the check. If you want this result, select 'Combine price with parent item' for each pizza topping, crust, and sauce on the Modifier tab in Item Maintenance.
To create each pizza topping, crust, or sauce item:
In keeping with the sample menu, you would create the following pizza topping, pizza crust, and pizza sauce items:
Toppings:
| Anchovies | Beef | Canadian Bacon |
| Pepperoni | Sausage | Anchovies |
| Black Olives | Cheese | Green Peppers |
| Jalapeño | 3-Topping Small ($8.00) | Green Peppers |
| Supreme Medium ($12.00) | Mushrooms | Onions |
| Tomatoes |
Crusts:
| Thin | Thick | Pan ($1.00) |
Sauces:
| Alfredo | Pesto | Tomato Sauce |
You may need to abbreviate some names due to the number of characters available in Item Maintenance.
- While still in Item Maintenance, select the New drop-down arrow, select Standard, and click OK.
- Click New and accept the system assigned number or click the ellipsis (...) next to 'Number' to display the Number Assignment dialog box, from which you can choose an alternate number.
- Type a descriptive name for the pizza topping, crust, or sauce item, such as 'Pepperoni.'
.png)
- Under the 'Assignments' group bar, select a tax group to assign to the item.
- Select the category under which the pizza menu topping resides, such as 'PIZZA.'
- Under the 'Advanced Pizza' group bar, select Topping to indicate this item is a pizza topping, crust, or sauce item.
.png)
Tip: If you do not select 'Topping' for the pizza topping, crust, and sauce items, these items do not respect any pricing when you enter the pizza in the FOH.
.png)
- Select the Modifier tab.
- Select Combine price with parent item if you want to combine the price of the modifier item with the item being modified. If you clear this option, the price of the modifier and the price of the parent item appear separately on the order screen and the guest check.
.png)
- Complete the remaining options as you would any other item, as available.
- Click Save.
- Repeat this procedure for any other pizza topping, crust, and sauce item you offer.
- Continue to the next procedure.
Creating pizza fraction items
Create an item for each pizza fraction you support. We recommend you use fractional identifiers, such as '1/2,' '1/3,' and '1/4,' so the item stands out on the check. You can also configure the pizza fraction items to reflect the specific location on the divided pizza. For example, if you support quarter fractions, you can configure and name the pizza fraction items as 'Top Left,' 'Bottom Left,' 'Top Right,' and 'Bottom Right' to further guide the order taker as to which part of the pizza to add a topping.
Do not specify a price for a pizza fraction item.
To create pizza fraction items:
In keeping with the sample menu, you would create the following pizza fraction items.
| 1/2 | 1/3 | 1/4 |
If you do not support any or all of these fractions, do not create the pizza fraction item.
- While still in Item Maintenance, select the New drop-down arrow, select Standard, and click OK.
- Accept the system assigned number or click the ellipsis (...) next to 'Number' to display the Number Assignment dialog box, from which you can choose an alternate number.
.png)
- Type a descriptive name for the pizza fraction item, such as '1/2.'
- Under the 'Assignments' group bar, select a tax group to assign to the item.
- Select the category under which the pizza fraction resides, such as 'Food'.
.png)
- Under the 'Advanced Pizza' group bar, select Fraction to indicate this item is a pizza fraction item.
- Select the fraction type from the drop-down list to associate with the fraction item.
- Complete the remaining options as you would for any other item, as available.
- Click Save.
- Repeat this procedure for any other pizza fraction you support.
- Click Close to exit the Items function.
Creating price levels for pizza toppings
When priced, toppings add to the base price of the pizza menu item. You can price toppings in Item Maintenance; however, you provide optimal flexibility when pricing toppings with price levels. This is especially helpful when you have different priced toppings based on the size of the pizza and eliminates unnecessary database building.
A price level enables you to assign a common price to a group of items. Any time you have a group of like-priced items, you can use a price level to control prices for those items. For example, if the toppings on the medium sized pizzas are all $0.75, you an create and assign the $0.75 price level to each topping in the respective modifier group. Later, if you have to change the price of the toppings, change the price in one location and each item assigned to the price level changes accordingly.
To create a price level for a pizza topping:
In keeping with the sample menu, you would create the following price levels for the pizza toppings:
| Sm Topping ($0.50) | Med Topping ($0.75) | Large Topping ($1.00) |
If you do not support any or all of these fractions, do not create the pizza fraction item.
- Select Maintenance > Pricing > Price Levels.
- Click New and accept the system assigned number or click the ellipsis (...) next to 'Number' to display the Number Assignment dialog box, from which you can choose an alternate number.
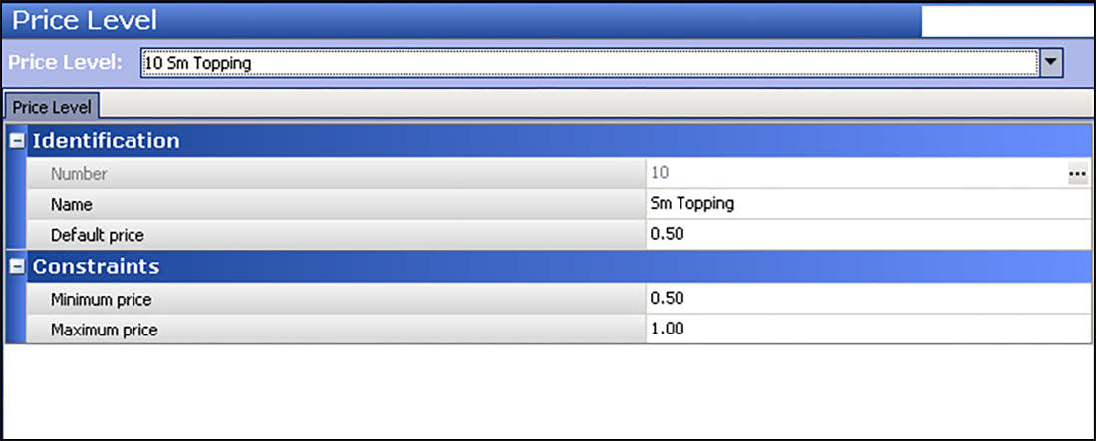
- Under the 'Identification' group bar, type a descriptive name for the price level, such as 'Sm Toppings.'
- Type a price for the price level in 'Default price'.
- Under the 'Constraints' group bar, ensure the Default price is equal to or greater than the 'Minimum price' and equal to or less than the 'Maximum price.'
- Click Save.
- Repeat this procedure for each price level.
- Click Close to exit the Price Level function.
Creating modifier groups for pizza toppings, crusts, and sauces
Once you add the required pizza topping, crust, and sauce items, and each price level, you must create one or more modifier groups. If all toppings share the same price, regardless of the size of the pizza, you can create a single modifier group containing everything; however, most restaurants for an advanced pizza environment charge a different price for a topping based on the size of the pizza. To do this, you must create a separate topping modifier group for each pizza size. For the sauce and crust choices, create a separate modifier group for each.
Minimum, maximum, and free requirements for pizza topping, crust and sauce
The minimum, maximum, and free requirements for the modifier groups depend on the number of choices on each pizza and you must create a separate modifier group for each min/max/free configuration. For example, a 3-topping pizza would have a minimum of three toppings and allow three free toppings. A Build-Your-Own pizza or Supreme pizza would have a minimum of zero. The maximum number of toppings would be to your discretion. For a crust or sauce modifier group, you would have a minimum and maximum requirement of one.
Pricing pizza topping, crust, and sauce
When you price a modifier in Modifier Maintenance, you can enter a different price at the button level or accept the price defined for the item in Item Maintenance; however, in keeping with the example, we used price levels to price each pizza topping. Price the toppings as if they are whole toppings. When you enter an order for a topping in fractions, the system automatically discounts the price, based on the pizza portion pricing method.
To create a pizza topping modifier group:
In keeping with the sample menu, you would create the following topping modifier groups:
Pizza Toppings:
| Sm Toppings | Sm Top Min3 (with 3 minimum required modifiers) |
| Med Toppings | Med Top Min3 (with 3 minimum required modifiers) |
| Large Toppings | Large Top Min3 (with 3 minimum required modifiers) |
Crusts:
| Pizza Crust (with 1 minimum required modifier) |
Sauce:
| Pizza Sauce (with 1 minimum required modifier |
- Select Maintenance > Menu > Modifier Groups.
- Select the New drop-down arrow, select Standard, and click OK.
- Accept the system assigned number or click the ellipsis (...) next to 'Number' to display the Number Assignment dialog box, from which you can choose an alternate number.
- Type a descriptive name for the modifier group in 'Short name' and 'Long name,' such as 'Sm Toppings.'
- Type the minimum number of required modifiers needed for the modifier group.
- Type the maximum number of modifiers allowed for the modifier group.
- Type the number of free modifiers you can enter from the modifier group before the system starts charging for a modifier.
- Select None in 'Substitution group.'
- Select the Layout tab.
.png)
- Select an available button on the modifier group grid.
- Under the 'Modifier item' group bar, select a pizza topping item to include in the modifier group from the 'Item' drop-down list.
- Select Price level from the 'Pricing method' drop-down list.
- Select the appropriate price level from the 'Price level' drop-down list.
- Repeat steps 9 through 12 until you include all the modifiers for the modifier group.
- Click Save.
- Repeat this procedure for any other modifier group you use for pizza.
- Click Close and exit the Modifier Groups function.
After you create the modifier groups, attach them to the pizza menu items in Item Maintenance. You should only attach modifier groups to the pizza menu items.
In keeping with the sample menu, you would attach the following modifier groups to the pizza items:
| Pizza Menu Item | Modifier 1 | Modifier 2 | Modifier 3 |
|---|---|---|---|
| BYO Small | Pizza Crust | Pizza Sauce | Sm Toppings |
| BYO Medium | Pizza Crust | Pizza Sauce | Med Toppings |
| BYO Large | Pizza Crust | Pizza Sauce | Lg Toppings |
| Supreme Small | Pizza Crust | Pizza Sauce | Sm Toppings |
| Supreme Medium | Pizza Crust | Pizza Sauce | Med Toppings |
| Supreme Large | Pizza Crust | Pizza Sauce | Lg Toppings |
| Meat Lovers Small | Pizza Crust | Pizza Sauce | Sm Toppings |
| Meat Lovers Medium | Pizza Crust | Pizza Sauce | Med Toppings |
| Meat Lovers Large | Pizza Crust | Pizza Sauce | Lg Toppings |
| Tomatoes | Pan ($1.00) | Pan ($1.00) | Pan ($1.00) |
| 3-Topping Small | Pizza Crust | Pizza Sauce | Sm Top Min3 |
| 3-Topping Medium | Pizza Crust | Pizza Sauce | Med Top Min3 |
| 3-Topping Large | Pizza Crust | Pizza Sauce | Lg Top Min3 |
To attach a modifier group to a pizza menu item:
- Select Maintenance > Menu > Items.
- Select the pizza item from the drop-down list.
- Select the Modifier tab.
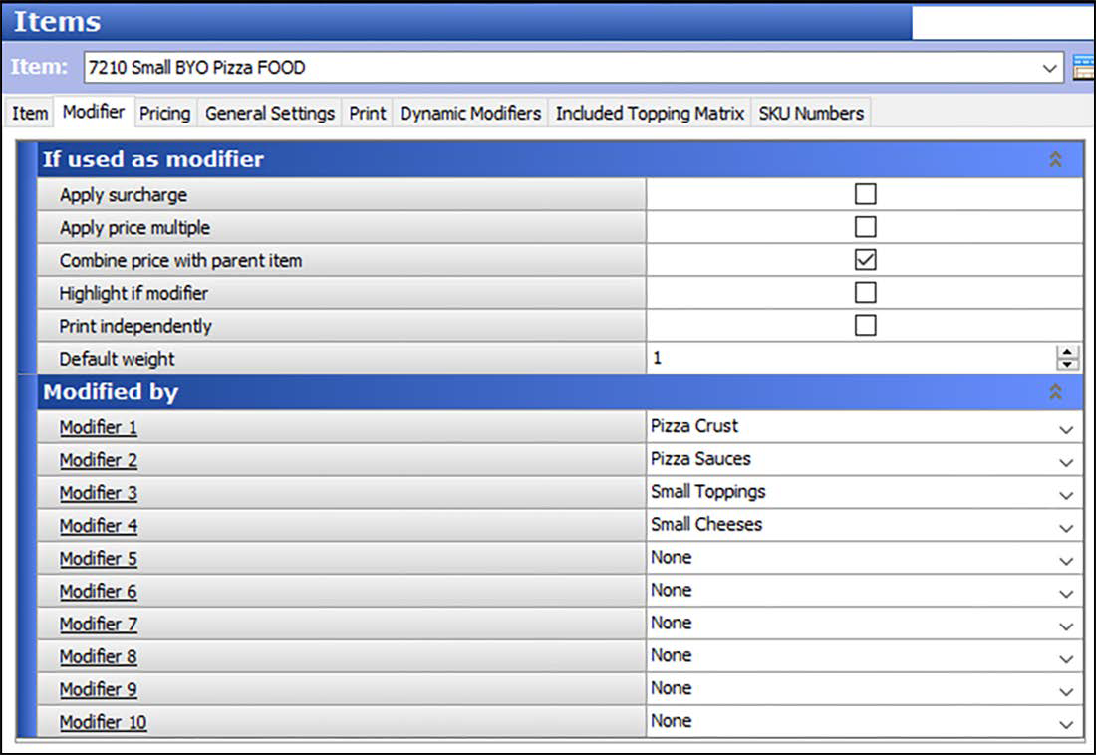
- Select the crust modifier group from the 'Modifier 1' drop-down list.
- Select the sauce modifier group from the 'Modifier 2' drop-down list.
- Select the topping modifier group that matches the size of the corresponding size of the pizza item from the 'Modifier 3' drop-down list. For example, if this is a 'BYO Pizza Sm,' then attach 'Sm Toppings.'
- Select the cheese modifier group from the 'Modifier 3' drop-down list.
- Click Save.
- Repeat this procedure until all pizza items have the correct modifier groups attached.
- Click Save and exit the Items function.
Configuring included modifiers
A powerful feature in the Aloha system is 'Included Modifiers,' which use a graphic or specific color on the modifier button to help the server easily identify the modifiers that are included with an item. This provides a visual indication of the default items that the guest can modify and also helps prevent the sending of confusing or incorrect orders to the kitchen. For example, if the guest orders a Supreme pizza with sausage, which already comes on the pizza, the server can easily see that sausage is an included modifier and determine it is unnecessary to add sausage to the pizza.
Reference: Refer to the Included Modifiers Feature Focus Guide - HKS482 for more information.
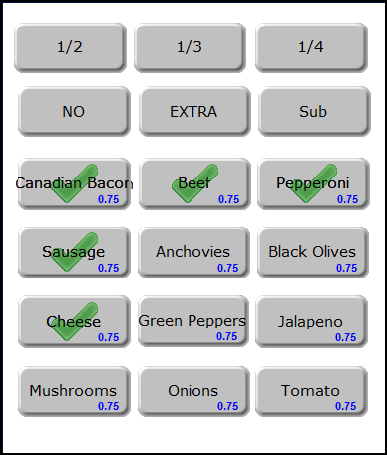
To activate the Included Modifiers functionality:
- Select Maintenance > Business > Store.
- Select the Store Settings tab.
- Select the User Interface group located at the bottom of the screen.
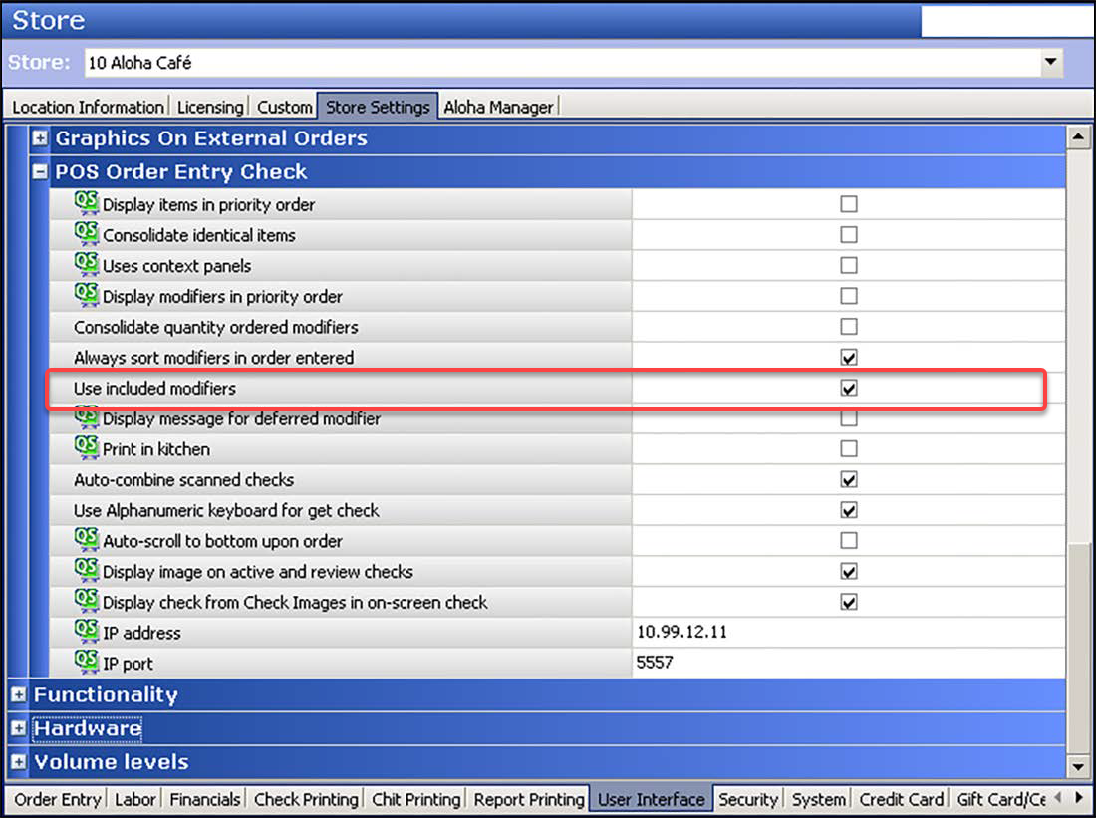
- Under the 'POS Order Entry Check' group bar, select Use included modifiers.
- Click Save and exit the Stores function.
To attach an image to the included modifier code:
- Select Maintenance > Menu > Modifier Codes.
- Select 202 Included from the drop-down list.
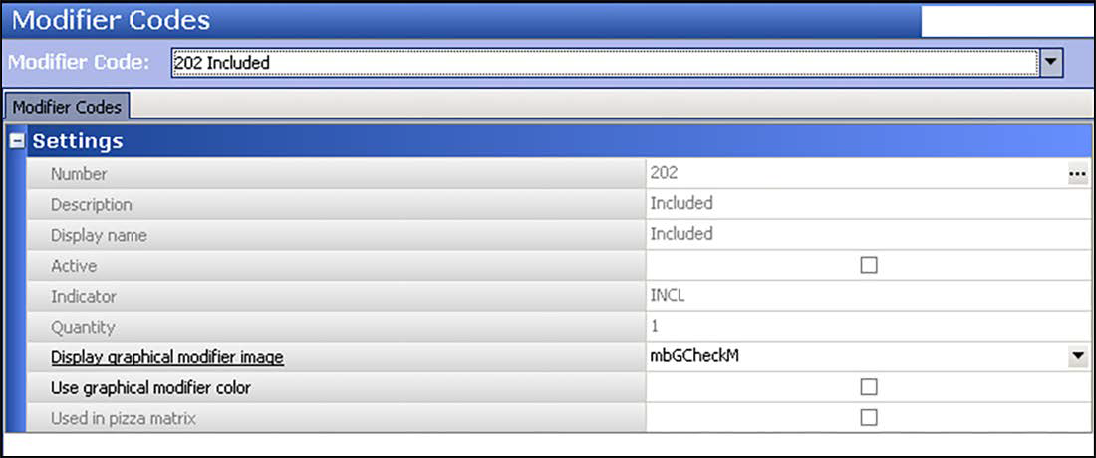
- Select the image to indicate an included modifier from the 'Display graphical modifier image' drop-down list.
- Click Save.
- Repeat this procedure for each modifier code you want to display a graphical modifier image.
- Exit the Modifier Codes function.
To configure included modifiers for a pizza item:
In keeping with the sample menu, you would configure the following pizza toppings as included modifiers for the corresponding pizza menu items:
| Pizza Menu Item | Included Modifiers |
|---|---|
| Supreme Sm | Pepperoni, Green Peppers, Black Olives, Sausage, Mushrooms, Cheese |
| Supreme Med | Pepperoni, Green Peppers, Black Olives, Sausage, Mushrooms, Cheese |
| Supreme Lg | Pepperoni, Green Peppers, Black Olives, Sausage, Mushrooms, Cheese |
| Meat Lovers Sm | Beef, Canadian Bacon, Pepperoni, Sausage, Cheese |
| Meat Lovers Med | Beef, Canadian Bacon, Pepperoni, Sausage, Cheese |
| Meat Lovers Lg | Beef, Canadian Bacon, Pepperoni, Sausage, Cheese |
- Select Maintenance > Menu > Items.
- Select a pizza item from the drop-down list.
- Select the Dynamic Modifiers tab.
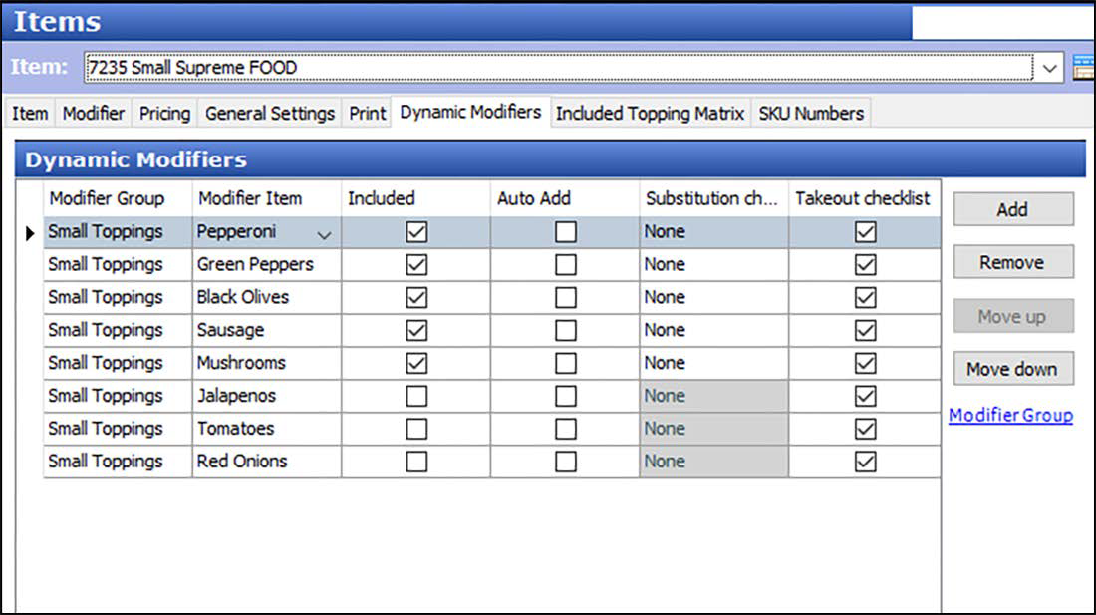
- Click Add.
- Select the topping modifier group from the 'Modifier Group' drop-down list. This is the same modifier group attached to the item on the Modifier tab.
- Select a topping that is included on the pizza from the 'Modifier Item' drop-down list.
- Select Included.
- Repeat steps 4 through 7 for each topping that is included on the pizza menu item.
- Click Save.
- Repeat this procedure for each pizza item for which to configure included modifiers.
- Exit the Items function.
You can configure the system to adjust the pricing when you replace an included topping with an add-on topping. When you remove an included topping from a pizza, and add one or more toppings, the system determines the price difference between the included topping that was removed, and the topping(s) you add, and adjusts the price accordingly. You can define if the system uses the original higher price of the included modifier or the price of the add-on topping, if lower.
To define rules regarding price differences when substituting an included modifier with another modifier:
-
Select Maintenance > Menu > Items.
-
Select a pizza menu item from the drop-down list.
-
Select the Dynamic Modifiers tab.
-
Click Add.
-
Select the topping modifier group from the 'Modifier Group' drop-down list. This is the same modifier group attached to the item on the Modifier tab.
-
Select a topping that is included on the pizza from the 'Modifier Item' drop-down list.
-
Under the 'Substitution Charge' column, select None to specify the included modifier cannot be substituted for another modifier from the same modifier group.
-OR-
Select No charge to specify the included modifier can be substituted for another modifier form the same modifier group at no charge.
-OR-
Select Charge difference to specify the included modifier can be substituted for another modifier form the same modifier group and charge the difference between the two modifiers.
-
Repeat steps 4 through 7 for each topping that is included on the pizza menu item.
-
Click Save.
-
Repeat this procedure for each pizza item for which to configure included modifiers.
-
Exit the Items function.
To configure the ability to replace an included topping with an add-on topping:
- Select Maintenance > Business > Store.
- Select the Store Settings tab.
- Select the Order Entry group located at the bottom of the screen.
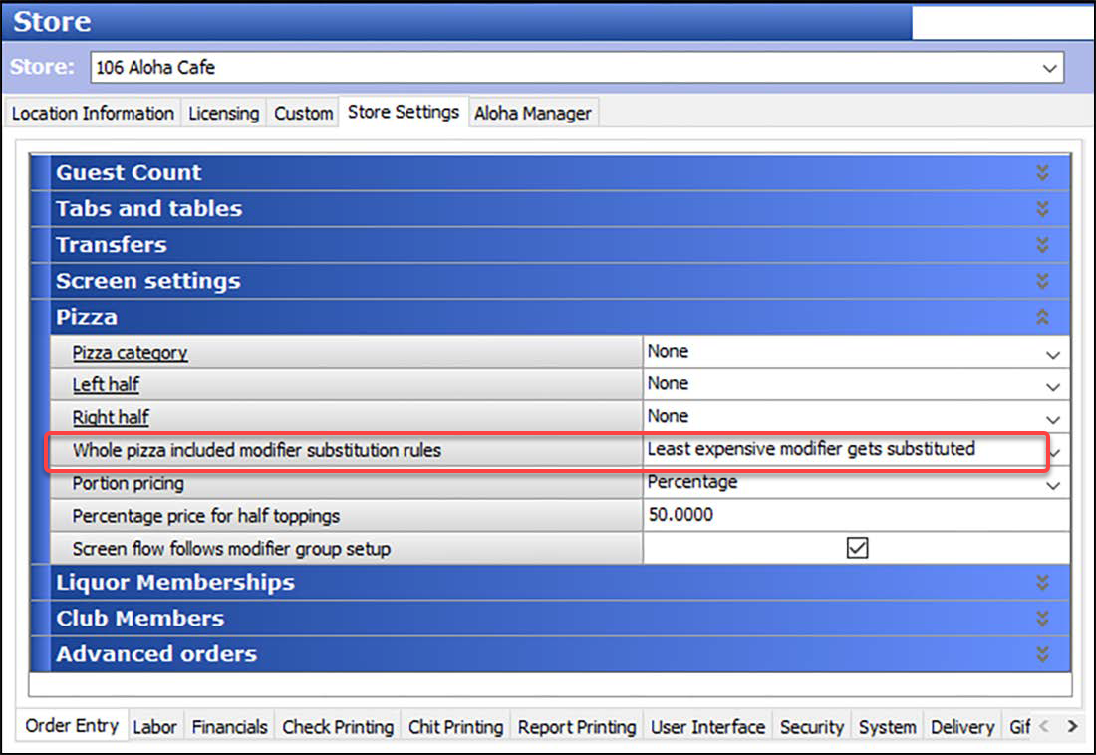
- Under the 'Pizza' group bar, select either Least expensive modifier gets substituted or Up to the value of the removed modifier from the 'Whole pizza included modifier substitution rules' drop-down list.
- Click Save and exit the Stores function.
Configuring modifier code percentages for half toppings and extra toppings
Typically, modifier codes, such as No, Extra, and more, are already set up and in use for the non-pizza items. You can leverage these modifier codes to use with Advanced Pizza. You can use up to four modifier codes. Here you also attach the graphical modifier image to the respective modifier code. For example, when you apply the No code to a modifier, you can display a separate graphic on the topping button to indicate the topping is omitted from the pizza.
In keeping with the sample pizza menu, there is a charge at 50% (half the topping price) if you apply 'Extra' to an included topping and a a charge at 150% (1 1/2 the topping price) if you apply 'Extra' to a non-included topping. If this pricing structure does not apply to the non-pizza items, you can create a copy of a modifier code specifically for pizza.
To configure a modifier code for advanced pizza:
In keeping with the sample menu, you would create or adjust the following modifier codes:
- No (with 'No' graphical modifier image).
- Extra (with 'Extra' graphical modifier image and 150% for non-included toppings and 50% for included toppings.
- Select Maintenance > Menu > Modifier Codes.
- Select a modifier code, such as 'Extra,' from the drop-down list.
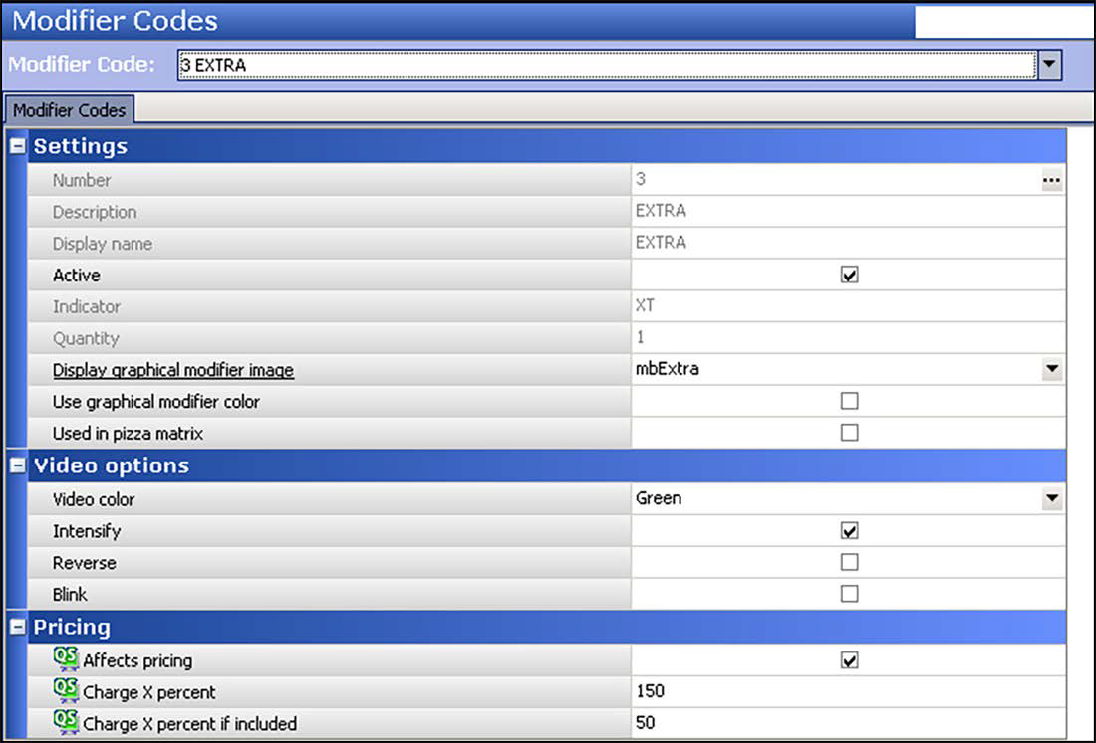
- Under the 'Settings' group bar, select the image from the 'Display graphical modifier image’ drop-down list, if needed.
- Under the 'Pricing' group bar, select Affects pricing.
- Type how much to charge when you apply this modifier code to a non-included topping in 'Charge X percent.' For example, if a pizza includes Pepperoni, but the guest wants double jalapeños, you can charge the price and plus a half; type '150.'
- Type how much to charge when you apply this modifier code to an included topping in 'Charge X percent if included.' For example, if a pizza includes red onions, and the guest wants green peppers; you can charge 50%; type '50.'
- Click Save.
- Repeat this procedure for any other modifier code you determine needs to affect the price of the modifier.
- Exit the Modifier Codes function.
Pricing pizzas with fractional toppings
When you add toppings to a pizza in fractions, the system determines how to calculate the price of each topping based on the pizza portion pricing method configured in Maintenance > Store Settings > Order Entry group > Pizza group bar. Keep in mind a base topping is not fractional. Use the following examples to understand how the system calculates the pricing for each pizza portion pricing method:
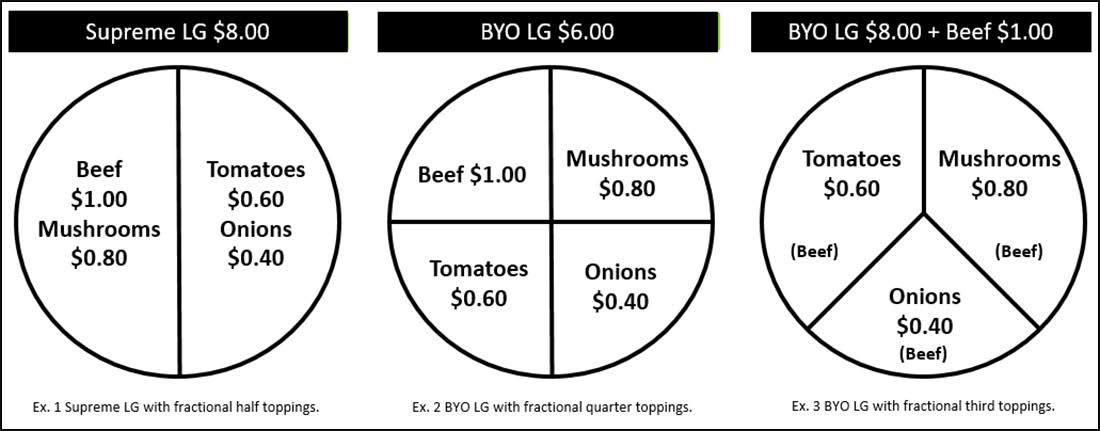
Percentage pricing
Prices each pizza fraction based on a percentage of the base topping price. Apply 50% to each of the examples:
| Examples | Calculation |
|---|---|
| Ex1: Supreme LG with fractional half toppings | Calculates $8.00 + [($1.00 + $0.80 + $0.60 + $0.40) x 0.50] = $9.40. |
| Ex2: BYO LG with fractional quarter toppings | Calculates $6.00 + [($1.00 + $0.80 + $0.60 + $0.40) x 0.50] = $7.40. |
| Ex3: BYO LG with fractional third toppings and one base topping(beef) | Calculates $6.00 + $1.00 + [($0.80 + $0.60 + $0.40) x 0.50] = $7.90. |
Average pricing
Prices pizza fractions based on the average of the combined price of the pizza fraction.
| Examples | Calculation |
|---|---|
| Ex1: Supreme LG with fractional half toppings | Calculates $8.00 + [($1.00 + $0.80 + $0.60 + $0.40) / 2] = $9.40 |
| Ex2: BYO LG with fractional quarter toppings | Calculates $6.00 + [($1.00 + $0.80 + $0.60 + $0.40) / 4] = $6.70. |
| Ex3: BYO LG with fractional third toppings and one base topping(beef) | Calculates $6.00 + $1.00 + [($0.80 + $0.60 + $0.40) / 3] = $7.60. Examples Calculation |
Higher fraction charged
Charges the price of the higher priced pizza fraction only. The remaining fractional toppings are free.
| Examples | Calculation |
|---|---|
| Ex1: Supreme LG with fractional half toppings | Calculates $8.00 + $1.00 + $0.80 = $9.80. Tomatoes and Onions are not charged. |
| Ex2: BYO LG with fractional quarter toppings | Calculates $6.00 + $1.00 = $7.00. Mushrooms, Tomatoes, and Onions are not charged |
| Ex3: BYO LG with fractional third toppings and one base topping(beef) | Calculates $6.00 + $1.00 + $0.80 = $7.80. Tomatoes and Onions are not charged |
Whole price for topping
Charges fully for each topping and gives no discount.
| Examples | Calculation |
|---|---|
| Ex1: Supreme LG with fractional half toppings | Calculates $8.00 + $1.00 + $0.80 + $0.60 + $0.40 = $10.80. |
| Ex2: BYO LG with fractional quarter toppings | Calculates $6.00 + $1.00 + $0.80 + $0.60 + $0.40= $8.80 |
| Ex3: BYO LG with fractional third toppings and one base topping(beef) | Calculates $6.00 + $1.00 + $0.80 + $0.60 + $0.40 = $8.80 |
To configure pricing for fractional toppings at the global level:
- Select Maintenance > Business > Store.
- Select the Store Settings tab.
- Select the Order Entry group at the bottom of the screen.
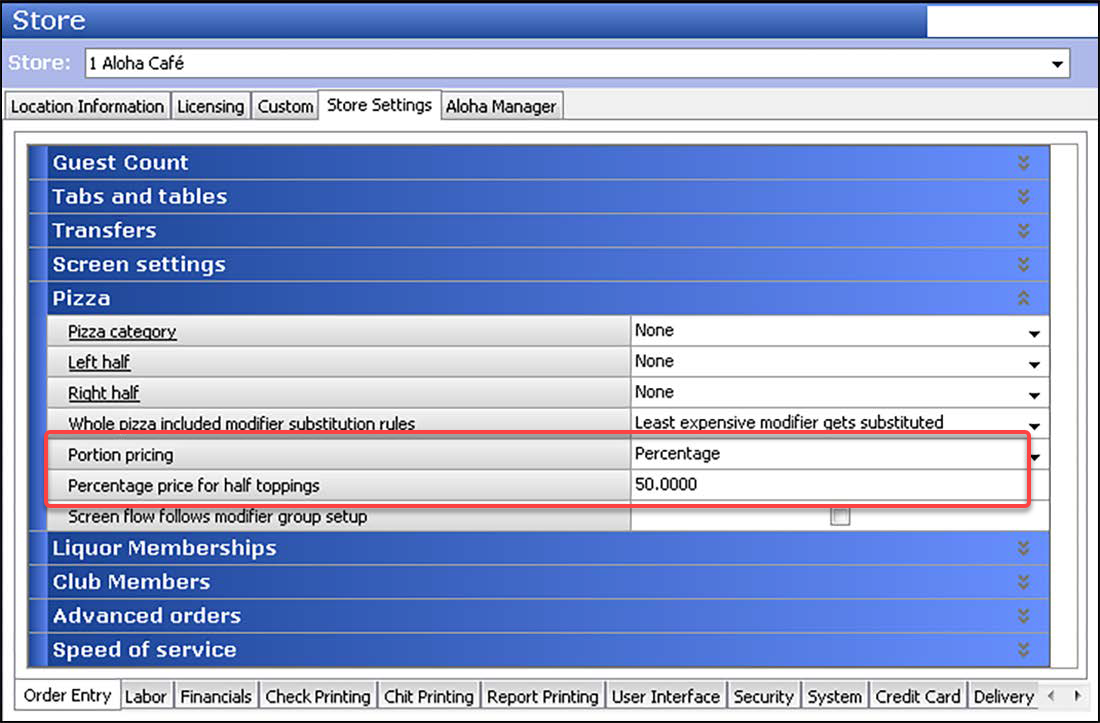
- Under the 'Pizza' group bar, select the portion pricing method from the 'Portion pricing' drop-down list.
- If you select 'Percentage' from 'Portion pricing,' type the percentage you want to charge in 'Percentage price for half toppings.'
- Click Save and exit the Stores function.
Designing front-of-house (FOH) screens for fractional toppings
For Advanced Pizza, you cannot use the classic submenu and modifier panels that come by default in the system and you must design and use custom submenu and modifier panels in Screen Designer. Once created, you then attach them to the 'classic' submenu and modifier panels, as you will learn in Attaching custom panels to submenus and modifier groups. With the proper implementation, you can design the FOH screens for advanced pizza in such a way that resembles the typical Aloha Table Service flow with the following functionality in mind:
- Ease of order entry.
- Flow and consistency.
- Alleviate pitfalls in order entry.
Here is an overview of how you should design the screens. If there is an element for which you do not offer a choice, such as a sauce choice, you do not need to create the panel.
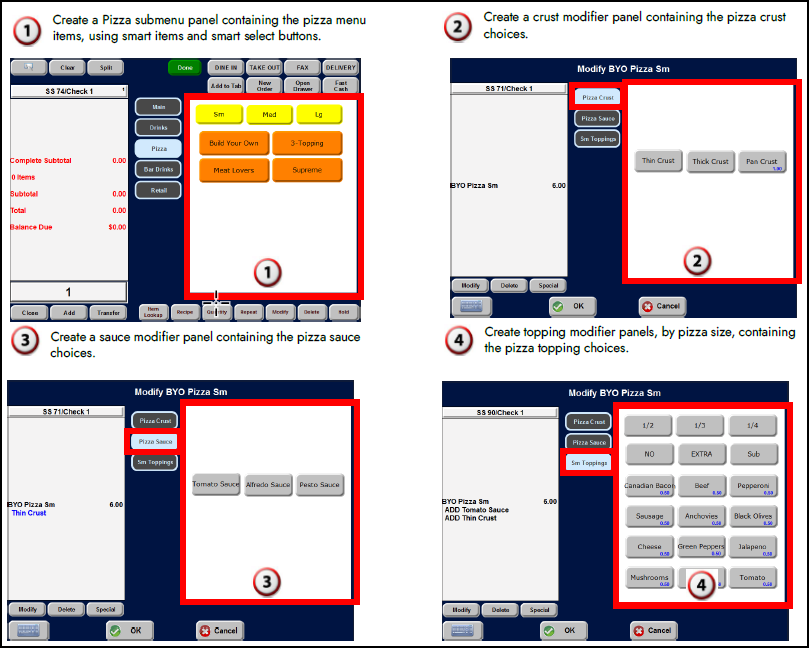
Creating a custom submenu panel for pizza items
You must place all pizza menu items on a custom submenu panel, rather than using a classic submenu. Using a custom submenu panel, you can add color to buttons, resize buttons to your liking, and also use smart item and smart select buttons for the different size pizzas. Once you create the custom submenu panel, you attach the panel to a submenu in Submenu Maintenance.
In keeping with the sample menu, you need to perform the following:
- Create a custom submenu panel for advanced pizza.
- Add smart select buttons for pizza menu items.
- Add smart item buttons for pizza menu items.
To create a custom submenu panel for advanced pizza:
- Select Maintenance > Screen Designer > Table Service Screen Designer.
- Select Work with Panels.
- Select Panel > New Submenu Panel. The Properties dialog box appears.
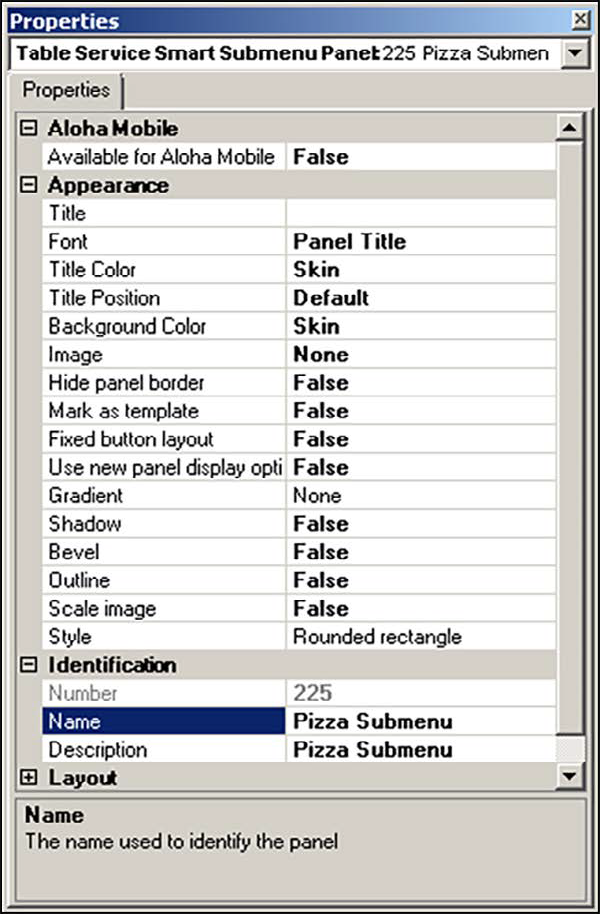
- Under the 'Identification' group bar, click the ellipses button (...) and assign a new number for the panel ID.
- Type a descriptive name for the panel, such as 'Pizza Submenu.'
- Continue to the next procedure.
To add smart select buttons to the pizza submenu panel:
- Right-click the panel and select New Button. The Properties dialog box appears.
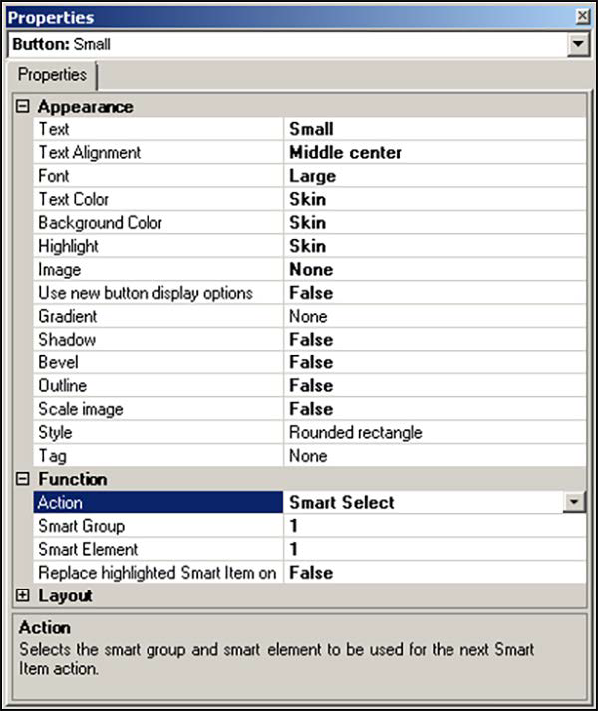
- Under the 'Function' group bar, select Smart Select from the 'Action' drop-down list.
- Type 1 in 'Smart Group.'
- Type 1 in 'Smart Element.'
- Under 'Appearance' group bar, type a descriptive name for the smart select button, such as 'Small.'
- Select Panel > New Button.
- Under the 'Function' group bar on the Properties dialog box, select Smart Select from the 'Action' drop-down list.
- Type 1 in 'Smart Group.'
- Type 2 in 'Smart Element.'
- Under the 'Appearance' group bar, type a descriptive name for the smart select button, such as 'Medium.'
- Select Panel > New Button.
- Under the 'Function' group bar on the Properties dialog box, select Smart Select from the 'Action' drop-down list.
- Type 1 in 'Smart Group.'
- Type 3 in 'Smart Element.'
- Under the 'Appearance' group bar, type a descriptive name for the smart select button, such as 'Large.'
- Continue to the next procedure.
To add smart item buttons to the pizza submenu panel:
- Right-click the panel and select New Button. The Properties dialog box appears.
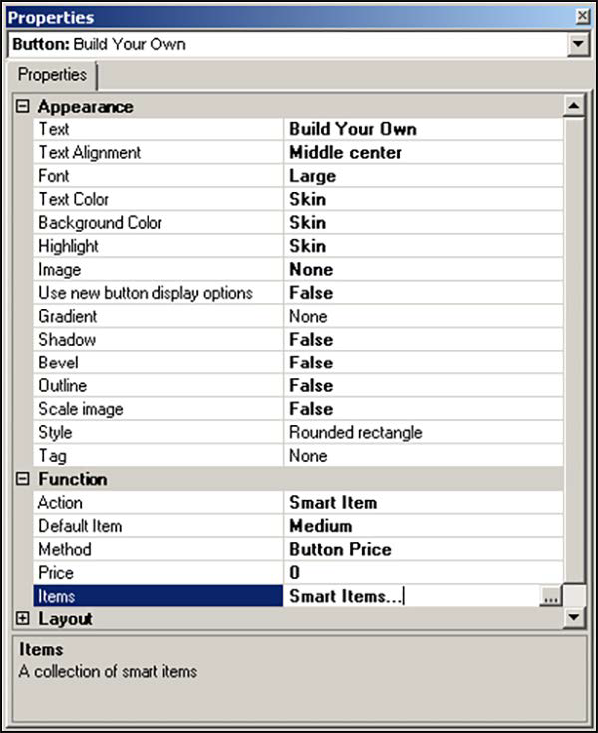
- Under the 'Function' group bar, select Smart Item from the 'Action' drop-down list.
- Select the item to use as the default when you select the pizza item without first touching a size, in 'Default item.' This is usually the most ordered size of the respective pizza item, such as 'Med.'
- Click the Ellipses button (...) in the 'Items' text box to open the Select Smart Items dialog box.
- Type 1 in the first 'Group' text box.
- Type 1 in the first 'Element' text box.
- Select the pizza item that you want to order with the corresponding smart select button from the first 'Item' drop-down list.
- Select Button Price from the 'Price Method' drop-down list.
- Type 1 in the second 'Group' text box.
- Type 2 in the second 'Element' text box.
- Select the pizza item that you want to order with the corresponding smart select button from the second 'Item' drop-down list.
- Select Button Price from the 'Price Method' drop-down list.
- Type 1 in the third 'Group' text box.
- Type 3 in the third 'Element' text box.
- Select the pizza item that you want to order with the corresponding smart select button from the third 'Item' drop-down list.
- Select Button Price from the 'Price Method' drop-down list.
- Click OK to exit the Select Smart Items dialog box.
- Under the 'Appearance' group bar, type a descriptive name for the button, such as 'Build Your Own.'
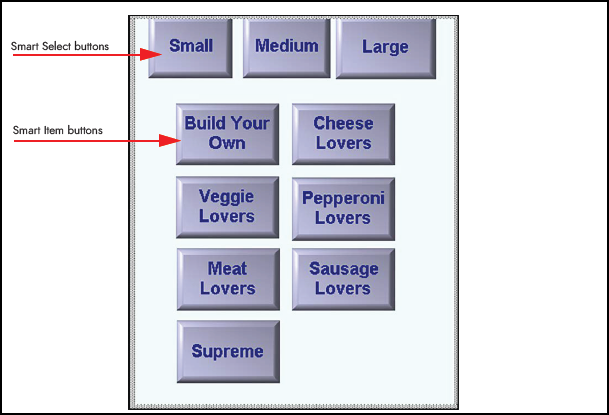
- Repeat this procedure for each pizza item you want to add to the pizza submenu panel.
- Select Panel > Save Panel and exit Table Service Screen Designer.
Creating a custom modifier panel for pizza toppings, crusts and sauces
You must place all pizza toppings, pizza crusts, and pizza sauces on a custom modifier panel, rather than using a classic modifier panel. Create a separate modifier panel for the pizza toppings, another for the pizza crusts, and another for the pizza sauces, if you offer choices for each. Using a custom modifier panel, you can add color to buttons and resize buttons to your liking. Once you create the custom modifier panels, you attach the panel to a modifier group in Modifier Group Maintenance.
In keeping with the sample menu, you need to perform the following:
- Create a custom modifier panel for pizza toppings.
- Create a custom modifier panel for pizza crusts.
- Create a custom modifier panel for pizza sauces.
Creating pizza toppings modifier panel
For the pizza toppings modifier panel, you must place all toppings and fraction buttons on the same panel. To create a pizza toppings modifier panel, perform the following:
- Create a custom modifier panel for pizza toppings.
- Add pizza fractions to pizza toppings modifier panel.
- Add modifier codes to pizza toppings modifier panel.
- Add topping buttons to pizza toppings modifier panel.
To create a custom modifier panel for pizza toppings:
- Select Panel > New Submenu Panel. The Properties dialog box appears.
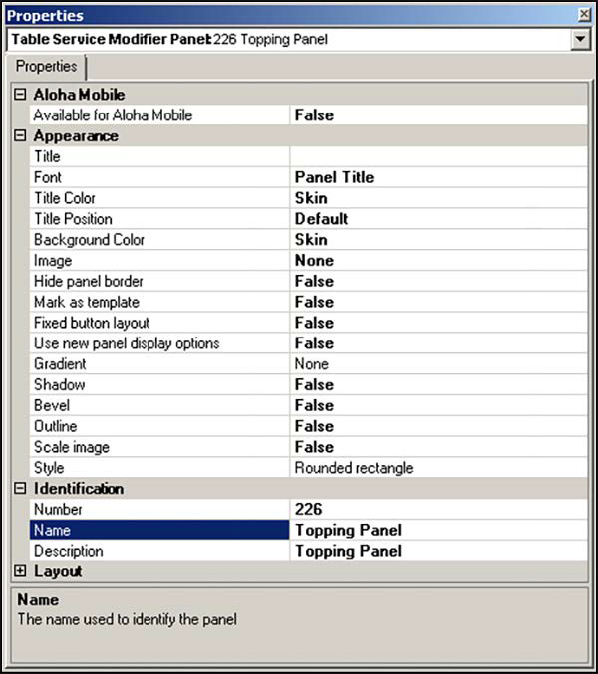
- Under the 'Identification' group bar, click the ellipses button and assign a new number for the panel ID.
- Type a descriptive name for the panel, such as 'Topping Panel.'
- Continue to the next procedure.
To add pizza fraction buttons to the topping panel:
- Right-click the panel and select New Button. The Properties dialog box appears.
- Under the 'Function' group bar, select Fraction from the 'Action' drop-down list.
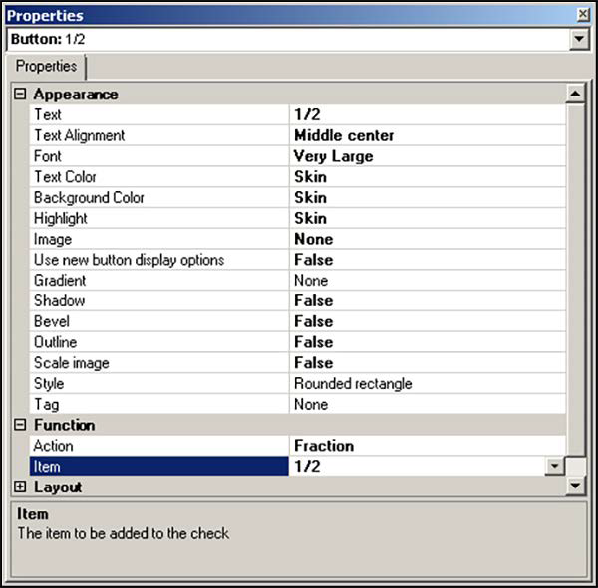
- Select the appropriate fraction, such as '1/2,' from the 'Item' drop-down list.
- Under the 'Appearance' group bar, type the name of the fraction, such as '1/2.'
- Repeat this procedure for each pizza fraction you want to add to the topping panel.
- Continue to the next procedure.
To add modifier code buttons to the topping panel:
- Right-click the panel and select New Button. The Properties dialog box appears.
- Under the 'Function' group bar, select Modifier Code from the 'Action' drop-down list.
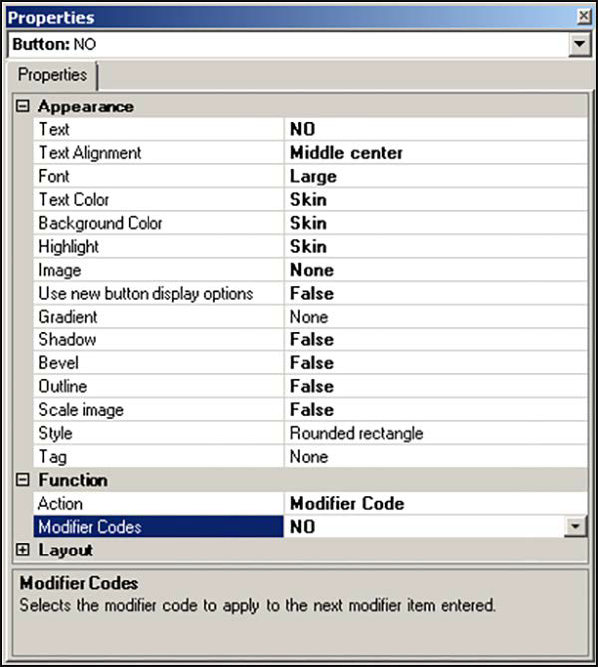
- Select the modifier code from the 'Modifier Codes' drop-down list.
- Under the 'Appearance' group bar, type the name of the modifier code, such as 'NO.'
- Repeat this procedure for each modifier code you want to add to the topping panel.
- Continue to the next procedure.
To add pizza topping buttons to the topping panel:
- Right-click the panel and select New Button. The Properties dialog box appears.
- Under the 'Function' group bar, select Order Modifier from the 'Action' drop-down list.
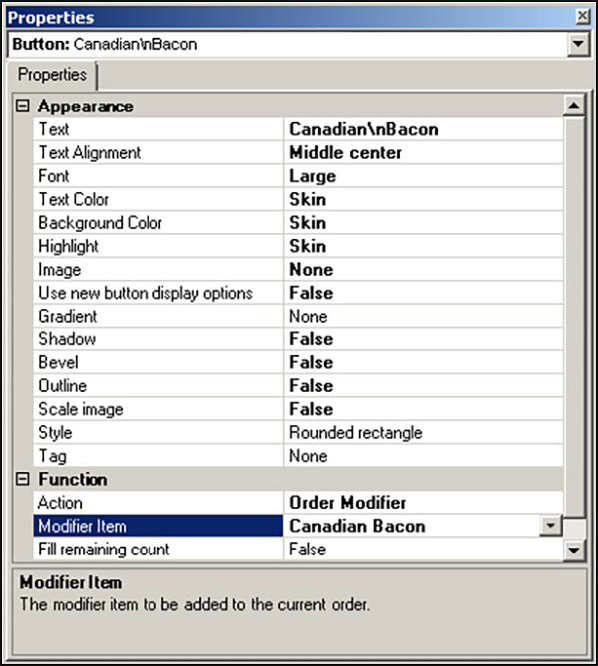
- Select the pizza topping, such as 'Canadian Bacon,' from the 'Modifier Item' drop-down list.
- Under the 'Appearance' group bar, type the name of the pizza topping.
- Repeat this procedure for each pizza topping you want to add to the topping panel.
- Continue to the next procedure.
Creating pizza crusts panel
To create the pizza crusts panel, perform the following:
- Create a custom modifier panel for pizza crusts.
- Add the pizza crusts to pizza crusts panel.
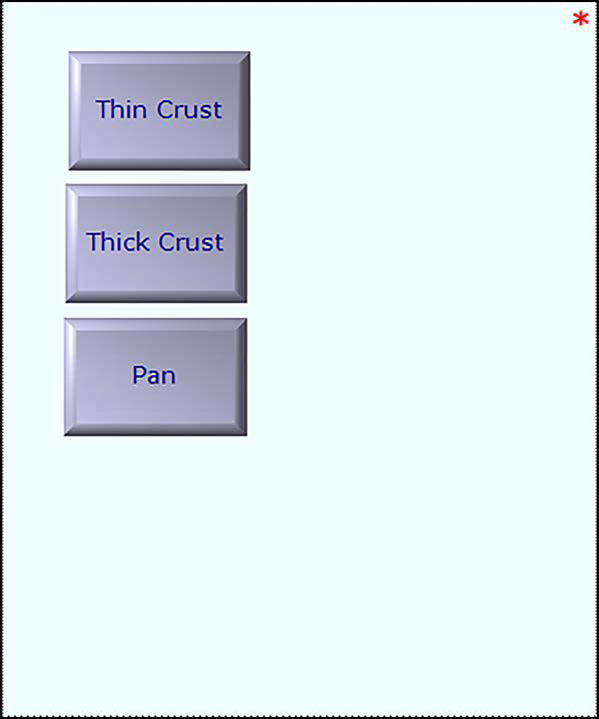
To create a custom modifier panel for pizza crusts:
- Select Panel > New Submenu Panel. The Properties dialog box appears.
.png)
- Under the 'Identification' group bar, click the ellipses button and assign a new number for the panel ID.
- Type a descriptive name for the panel, such as 'Pizza Crust Panel.'
- Continue to the next procedure.
To add pizza crust buttons to the pizza crust panel:
- Right-click the panel and select New Button. The Properties dialog box appears.
- Under the 'Function' group bar, select Order Modifier from the 'Action' drop-down list.
2.png)
- Select a pizza crust from the 'Modifier Item' drop-down list.
- Under the 'Appearance' group bar, type the name of the pizza crust.
- Repeat this procedure for each pizza crust you want to add to the pizza crust panel.
- Continue to the next procedure.
Creating a pizza sauces panel
To create a pizza sauces panel, perform the following:
- Create a custom modifier panel for pizza sauces.
- Add pizza sauces to pizza sauces panel.
To create a custom modifier panel for pizza sauces:
- Select Panel > New Submenu Panel. The Properties dialog box appears.
.png)
- Under the 'Identification' group bar, click the ellipses button and assign a new number for the panel ID.
- Type a descriptive name, such as 'Pizza Sauce Panel,' for the panel.
- Continue to the next procedure.
To add pizza sauce buttons to the pizza sauce panel:
- Right-click the panel and select New Button. The Properties dialog box appears.
- Under the 'Function' group bar, select Order Modifier from the 'Action' drop-down list.
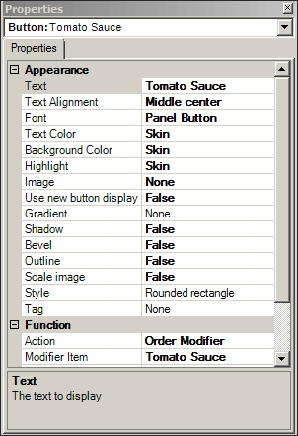
- Select a pizza sauce from the 'Modifier Item' drop-down list.
- Under the 'Appearance' group bar, type the name of the pizza sauce.
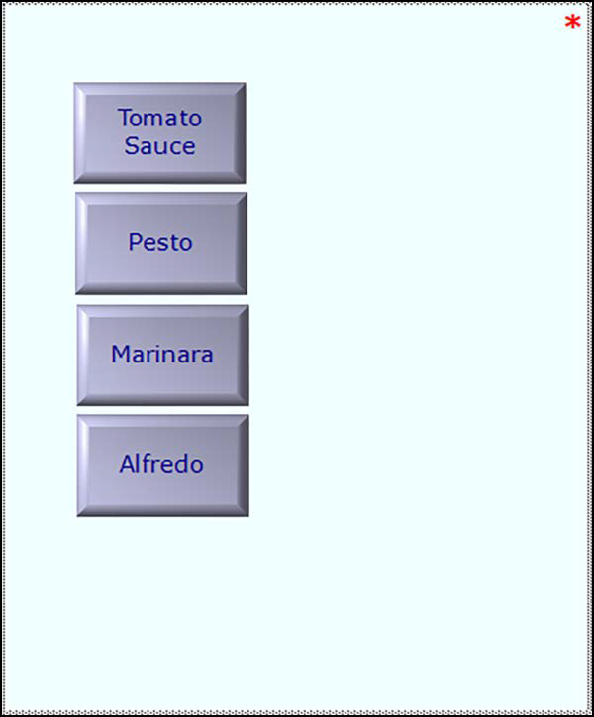
- Repeat this procedure for each pizza sauce you want to add to the pizza sauce panel.
- Click Panel > Save Panel and exit Table Service Screen Designer.
Attaching custom panels to submenus and modifier groups
After you create custom panels in Screen Designer as instructed in the previous section, you must attach the custom panels to the corresponding submenu and modifier groups so the system replaces the 'classic' look of the screens with the custom panels and the necessary functionality.
When working with a custom submenu panel, the system uses the order items you place on the custom submenu panel to override items on the ‘classic’ submenu; it is not necessary to add items to the 'classic' submenu as you do for a non-custom panel in Table Service. When working with a custom modifier panel, you must place the modifier on a modifier group in Modifier Group Maintenance.
In keeping with the sample menu, you would perform the following:
| Attach this custom Submenu or Modifier Panel... | ... to this 'Classic' Submenu or Modifier Group |
|---|---|
| Pizza Submenu panel | Pizza submenu |
| Topping panel | Sm Toppings modifier group |
| Topping panel | Med Toppings modifier group |
| Topping panel | Lg Toppings modifier group |
| Topping panel | Sm Top Min3 modifier group |
| Topping panel | Med Top Min3 modifier group |
| Topping panel | Lg Top Min3 modifier group |
| Pizza Crust panel | Pizza Crust modifier group |
| Pizza Sauce panel | Pizza Sauce modifier group |
To attach a custom submenu panel to a submenu:
- Select Maintenance > Menu > Submenu.
- Click New and accept the system assigned number or click the ellipsis (...) next to 'Number' to display the Number Assignment dialog box, from which you can choose an alternate number.
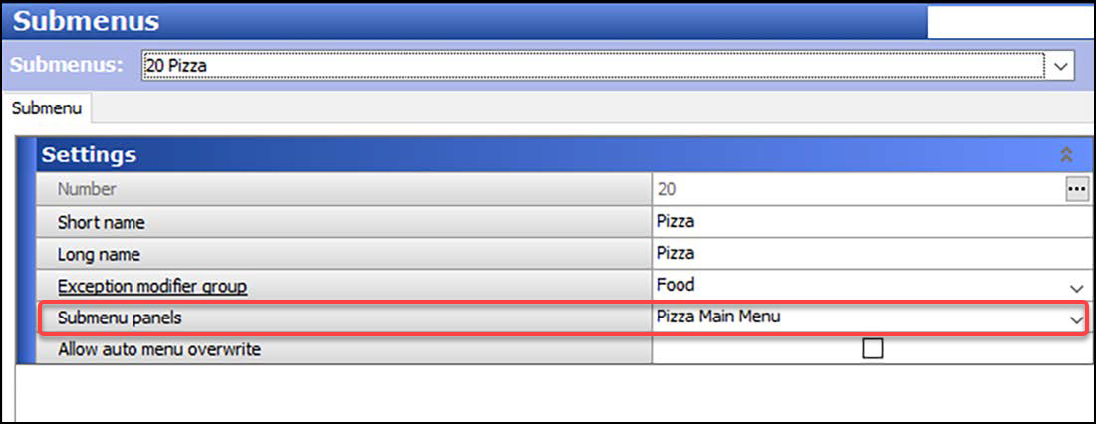
- Type a descriptive short name for the submenu, such as 'Pizza.'
- Type a descriptive long name for the submenu, such as 'Pizza.'
- Select the submenu panel you created in Screen Designer from the 'Submenu panels' drop-down list.
- Click Save and exit the Submenus function.
To attach the custom modifier panel to a modifier group:
- Select Maintenance > Menu > Modifier Groups.
- Select the modifier group you created for the toppings, crusts, or sauces from the drop-down list.
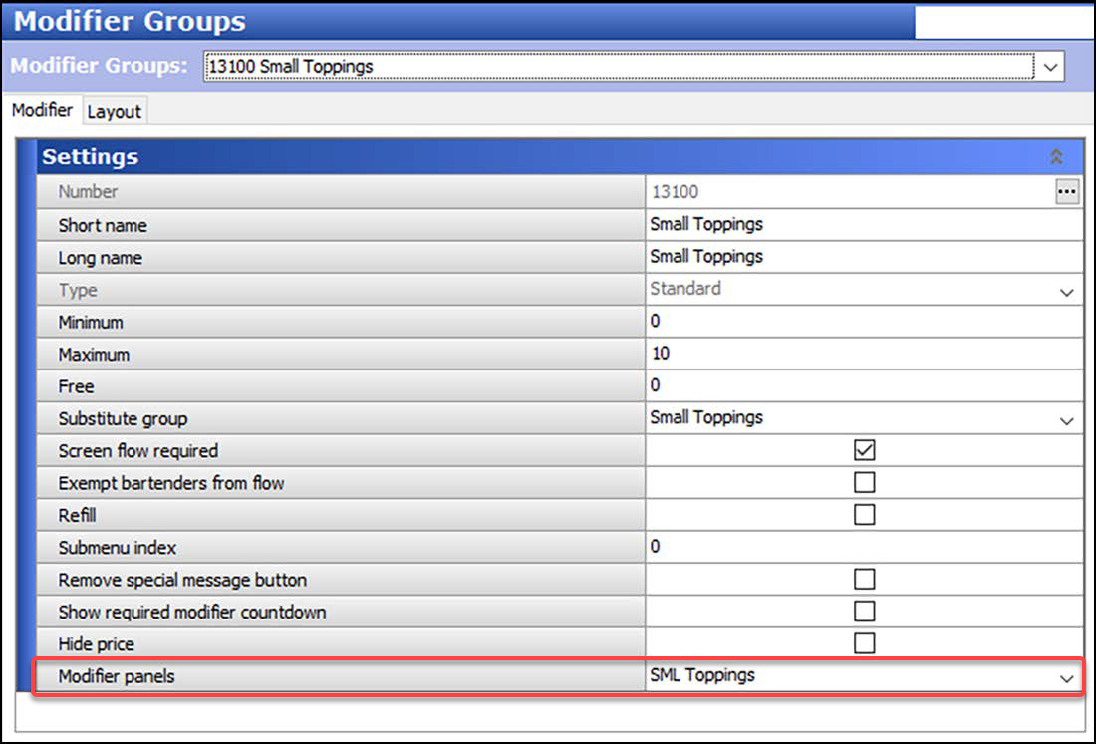
- Select the modifier panel you created in Screen Designer for the toppings from the 'Modifier panels' drop-down list.
- Click Save.
- Repeat this procedure for the crust modifier group, and then the sauce modifier groups.
- Exit the Modifier Groups function.
Configuring printing requirements for pizzas
Some pizza restaurants in a table service environment have a dedicated printer and terminal for pizza delivery orders. For these setups, you can use single-chit printing to print each item in an order on a separate chit, usually with the intent to attach a chit to each item to serve as a label. However, some delivery items do not require a separate label, such as for breadsticks and sodas. You can configure a specific printer to use a category of items to combine and append to the final single chit, saving paper and reducing clutter. You can also use sticky media printing to pull off and cling to the pizza box, if desired.
SCENARIO: A pizza restaurant wants to attach a chit to each pizza box in an order, essentially using the chit as a label for association with the order; however, the non-pizza items, such as breadsticks and beverages, are packaged together and do not require a separate chit. After creating a category of non-pizza items and designating that category as the category to combine on a single chit, the Aloha system prints each pizza on a separate chit and the items found in the non-pizza category append to the bottom of the chit. For example, for an order where the guest orders three pizzas, breadsticks, and beverages, the restaurant is able to tape a separate chit to each of the first two pizza boxes and a final combined chit on the third pizza box.

To configure a category of items to combine on the final single chit:
- Select Maintenance > Menu > Categories.
- Click the New drop-down arrow, select General, and click OK.
- Accept the system assigned number or click the ellipsis (...) next to 'Number' to display the Number Assignment dialog box, from which you can choose an alternate number.
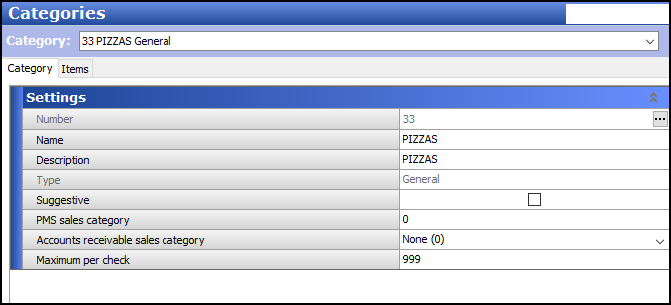
- Type a name for the category.
- Select the Items tab.
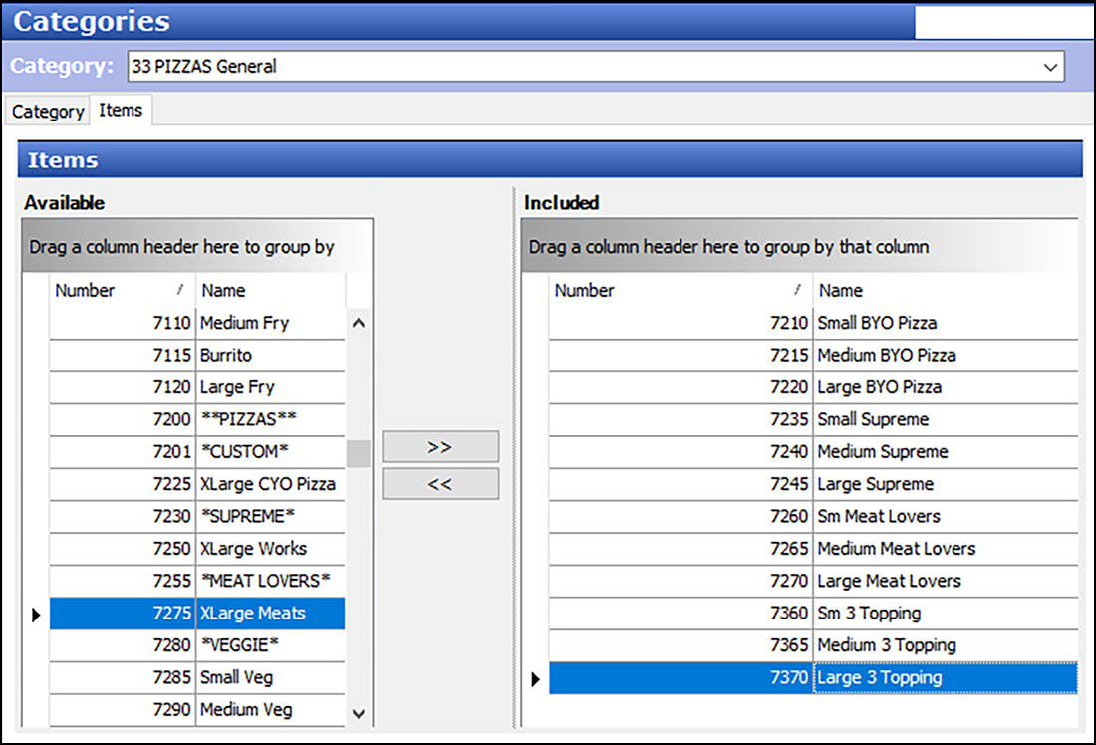
- Select an item from the 'Available' list and click >> to move the item to the 'Included' list.
- Repeat step 6 for each item to include in the combined items category.
- Click Save and exit the Categories function.
To specify the category to combine on the final single chit:
- Select Maintenance > Hardware > Printers.
- Select the printer from the drop-down list.
- Select the Options tab.
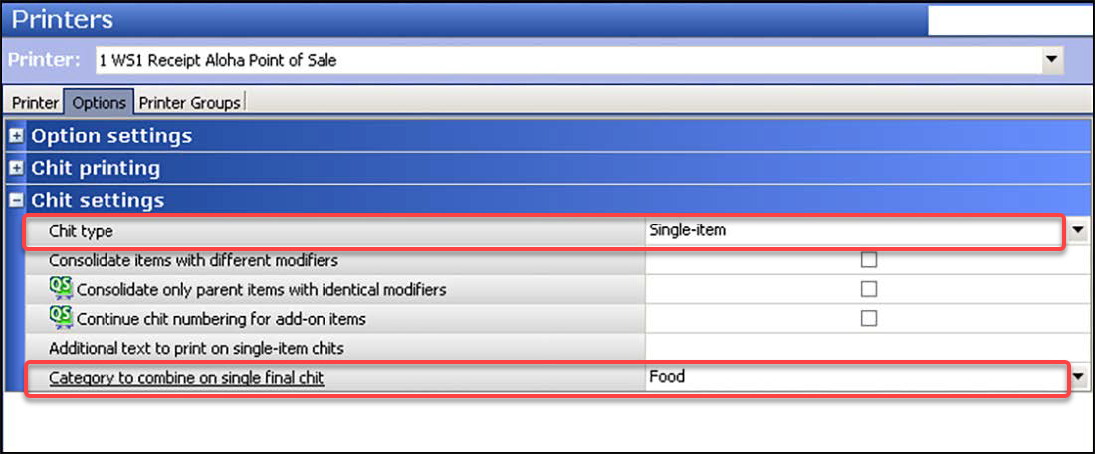
- Under the 'Chit settings' group bar, select Single-item or Both from the 'Chit type' drop-down list.
- Select a category from the 'Category to combine on single final chit' drop-down list.
- Click Save and exit the Printers function.
Continue to "Refreshing POS data."
Continue to "Using pizzas with fractional toppings."