Defining alerts in Alert Settings
Currently, the system supports four types of alerts for the Aloha POS: ‘Break rule,’ ‘Overtime,’ ‘Custom,’ and ‘Approaching workweek hours threshold.’ You define each type of alert using the Alert Settings function, but the type of alert you are creating determines the options available to you for selection. After you define the requirements of the alert, access the Jobcodes tab to assign the job codes that can receive the alert and the Subscribers tab to stipulate the products using the Alerts engine.
Note: A subscriber is the application or device to which you are sending the alert. Currently, the only subscriber available is the Aloha POS.
Break rule alerts
‘Break rule’ alerts are a great tool to help you maintain compliance in states that mandate employees take breaks. Use this type of alert to notify managers and employees when an employee has not yet taken or waived a break within the defined break time threshold. The job code under which an employee clocks in determines the break rule alerts it is possible for them to receive. You can configure a break rule alert to appear on the FOH only.
SCENARIO: You may require your kitchen staff to take a break within the first three hours of clocking in for a shift. Configure a break rule alert to appear after a kitchen employee is two hours into their shift and designate the break rule alert is for the Manager job code. The alert appears to the manager after a kitchen employee has been on the clock for two hours, letting the manager know the employee needs to take a break soon.
Reference: Refer to the Employee Breaks Feature Focus Guide - HKS315 for more information on configuring break rules.
When configuring ‘Break rule’ alerts:
- Configure your break rules using the Employee Breaks Feature Focus Guide.
- Name your break rules something meaningful that your employees will understand. A name of ‘Take a Break’ is not as meaningful as ‘Kitchen 30 Minute Shift Break.’
- Plan the times of your reminders.
- Determine which job codes apply to the different breaks. Create new job codes, if needed.
- Plan who is to receive the alert. Typically, you configure a break rule alert to remind the employee and another break rule alert to remind the manager.
To configure a 'Break rule' alert:
- Select Maintenance > Alert > Alert Settings.
- Click the New drop-down arrow, select Break rule from the ‘Type’ list box, and click OK.
- Accept the system assigned number or click the ellipsis (...)* next to ‘Number’ to display the Number Assignment dialog box, from which you can choose an alternate number.
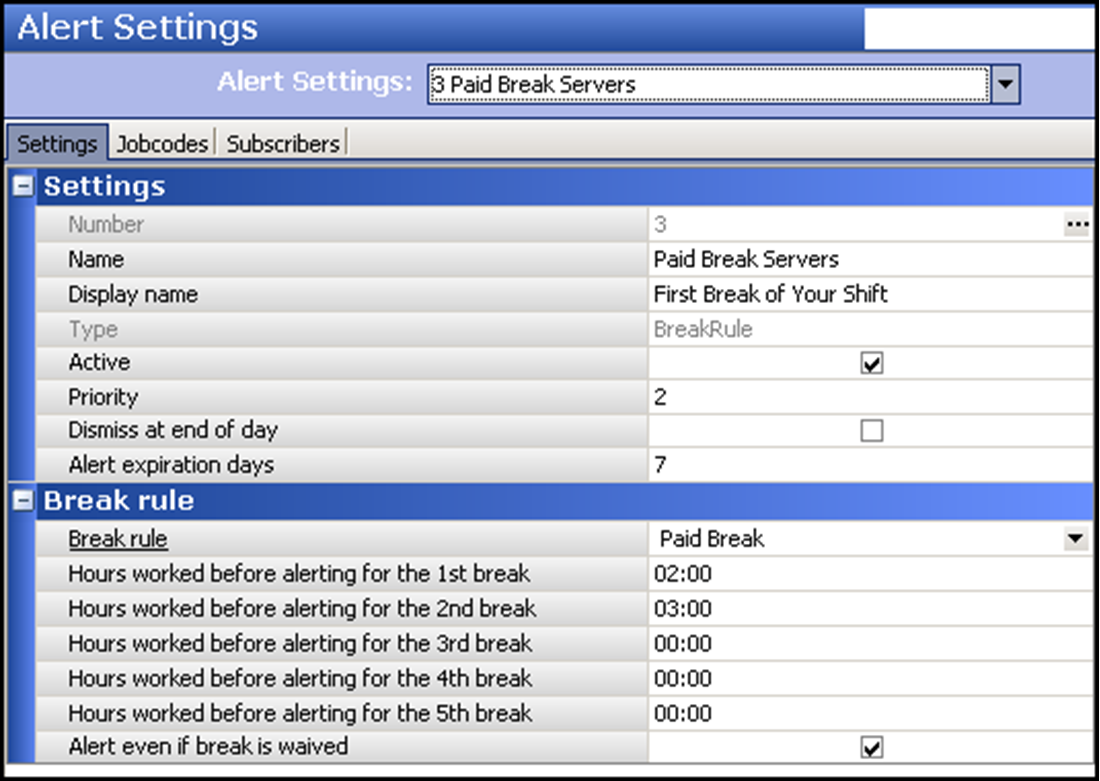
- Under the ‘Settings’ group bar, type a name, up to 40 characters, for the alert. For example, ‘Paid Break Servers’
- Type a descriptive name, up to 28 characters, to display in the Front-of-House when the alert appears on the screen. For example, ‘First Break of Your Shift.’ If you do not enter a display name, the alert type appears as the display name.
- Select Active, to indicate this alert is in use.
- Determine the order of priority in which the alert appears in the FOH. The available values are ‘1’ for first and ‘2’ for second, with ‘1’ being the default.
- Select Dismiss at end of day to prevent the alert from appearing again after EOD runs. The EOD process dismisses the alert.
- Type the number of days an alert is active and available in the FOH, before being dismissed by the Alert Engine, in ‘Alert expiration days.’ A valid entry is between ‘1’ and ‘14.’
- Under the ‘Break rule’ group bar, choose the break rule to use for establishing the criteria for this alert.
- Type the number of hours and minutes an employee must work before the first break alert appears, in HH:MM format. For example, type 02:45 if you want the first alert to appear two hours and 45 minutes after an employee begins their shift.
- Continue typing the number of hours an employee must work before the second, third, fourth, and fifth break alerts appear, if recurring break rules apply to your area.
- Select Alert even if break is waived to display the alert regardless if the employee waived the break.
- Click Save.
- Repeat this procedure for any other break rules for which you want to configure an alert.
- Continue to assigning job codes to an alert.
Overtime alerts
‘Overtime’ alerts help managers monitor employee hours on a weekly and sometimes daily basis, depending on the overtime laws for their state, to manage and reduce overtime costs. Overtime alerts remind managers in advance when an employee is approaching overtime, helping the manager avoid overtime situations. When configuring overtime alerts, take into consideration local and state laws for overtime. Some states consider when an employee works over eight hours on a shift as overtime. In this case, you may want the manager to receive an alert 45 minutes prior to the employee going into overtime; however, if your state uses weekly hours to calculate overtime, you may want to send the manager an alert eight or more hours prior to an employee approaching overtime. You can configure the alert to display on the FOH only.
SCENARIO: Employees earn overtime pay after working more than eight hours on a shift. If an employee shift spans more than one managerial shift, the second manager may be unaware of when the employee clocked in. Configure an alert to appear when an employee has been clocked in longer than six hours. The appearance of the alert provides the manager with at least two hours notice prior to the employee earning overtime pay, allowing the manager to make informed business decisions and help reduce labor costs.
When configuring ‘Overtime’ alerts:
- Determine the number of hours or minutes prior to the employee earning overtime that you want the alert sent to the POS.
- Determine which job codes need to receive the overtime alert. You can configure an overtime alert specific to each job code. For example, the alert for the kitchen staff may require a longer lead time than the alert for the wait staff.
- Plan who is to receive the alert.
To configure an ‘Overtime’ alert:
- Select Maintenance > Alert > Alert Settings.
- Click the New drop-down arrow, select Overtime from the ‘Type’ list box, and click OK.
- Accept the system assigned number or click the ellipsis (...) next to ‘Number’ to display the Number Assignment dialog box, from which you can choose an alternate number.
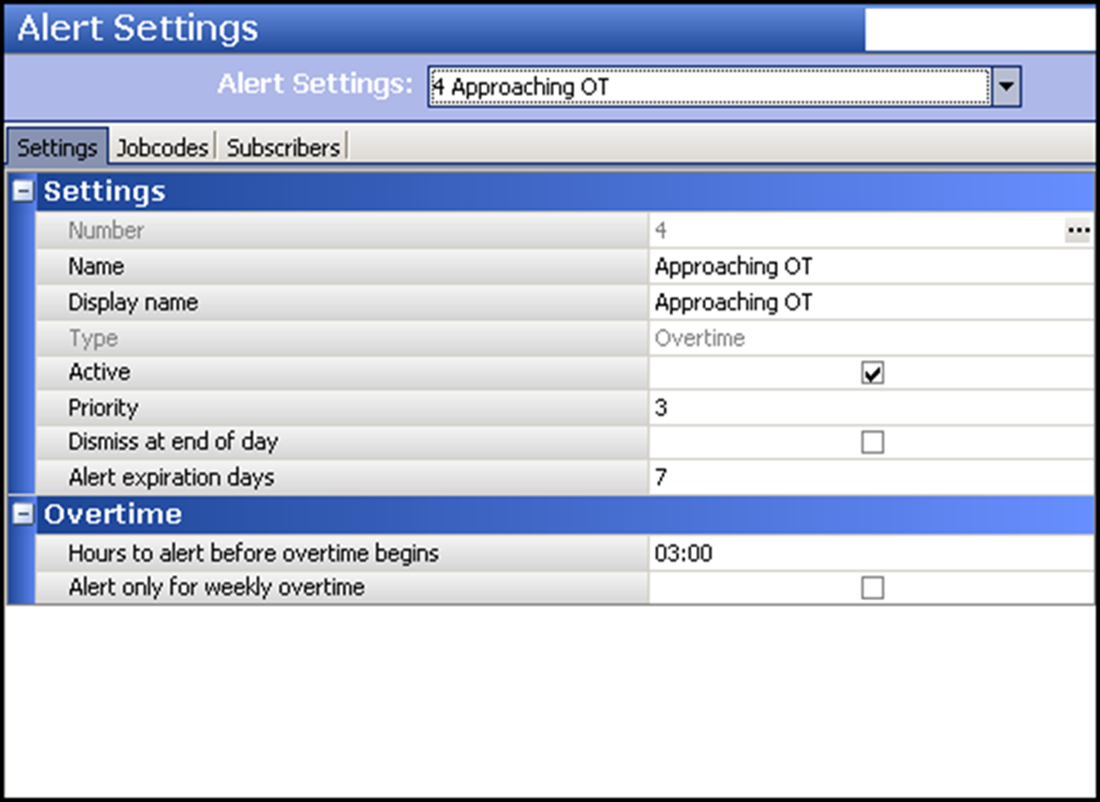
- Under the ‘Settings’ group bar, type a name, up to 40 characters, for the alert. For example, ‘Approaching OT.’
- Type a descriptive name, up to 28 characters, to display in the FOH when the alert appears on screen. For example, ‘Approaching OT.’ If you do not enter a display name, the alert type appears as the display name.
- Select Active, to indicate this alert is in use.
- Determine the order of priority in which the alert appears in the FOH. The available values are ‘1’ for first and ‘2’ for second, with ‘1’ being the default.
- Select Dismiss at end of day to prevent the alert from appearing again after EOD runs. The EOD process dismisses the alert.
- Type the number of days an alert that has not been manually dismissed should remain available to the subscriber, in ‘Alert expiration days.’ After the time expires, the Alert engine dismisses the alert. A valid entry is between ‘1’ and ‘14.’
- Under the ‘Overtime’ group bar, type the number of hours and minutes, from 00:00 to 24:00, to display the alert before the employee reaches overtime hours. The default is 00:00.
- Select Alert only for weekly overtime, if you want the alert to appear only when an employee is approaching overtime based on hours worked for the week, not daily.
- Click Save.
- Repeat this procedure for any other overtime method for which you want to configure an alert.
- Continue to assigning job codes to an alert.
Custom alerts
Use ‘Custom’ alerts for a variety of reasons, such as sending a recurring reminder to check the bathrooms, or to send a message to the kitchen manager to place a food order. For each custom alert, you must include explanatory text to describe the message of the alert. You can configure the alert to appear on a FOH terminal, print to a local printer, or both. With the ability to send to a printer, you can target employees in areas where a terminal is usually not located.
SCENARIO 1: A restaurant must place an order to their distributor every Friday. Failure to place an order runs the risk of no product for the following week. Configure an alert to appear each Wednesday. The appearance of the alert gives the kitchen manager notice one day prior to placing the order. Use an existing activation schedule, or create a new activation schedule to meet your business needs.
SCENARIO 2: A restaurant wants to remind employees to check the bathrooms on a timely basis. Configure an alert for employees to receive every hour to check the bathrooms. Additionally, you can configure a separate alert to alert employees to check the bathrooms more frequently during the day shift and weekends. Use an existing activation schedule, or create a new activation schedule to meet your business needs.
To configure a ‘Custom’ alert:
- Select Maintenance > Alert > Alert Settings.
- Click the New drop-down arrow, select Custom from the ‘Type’ list box, and click OK.
- Accept the system assigned number or click the ellipsis (...) next to ‘Number’ to display the Number Assignment dialog box, from which you can choose an alternate number.
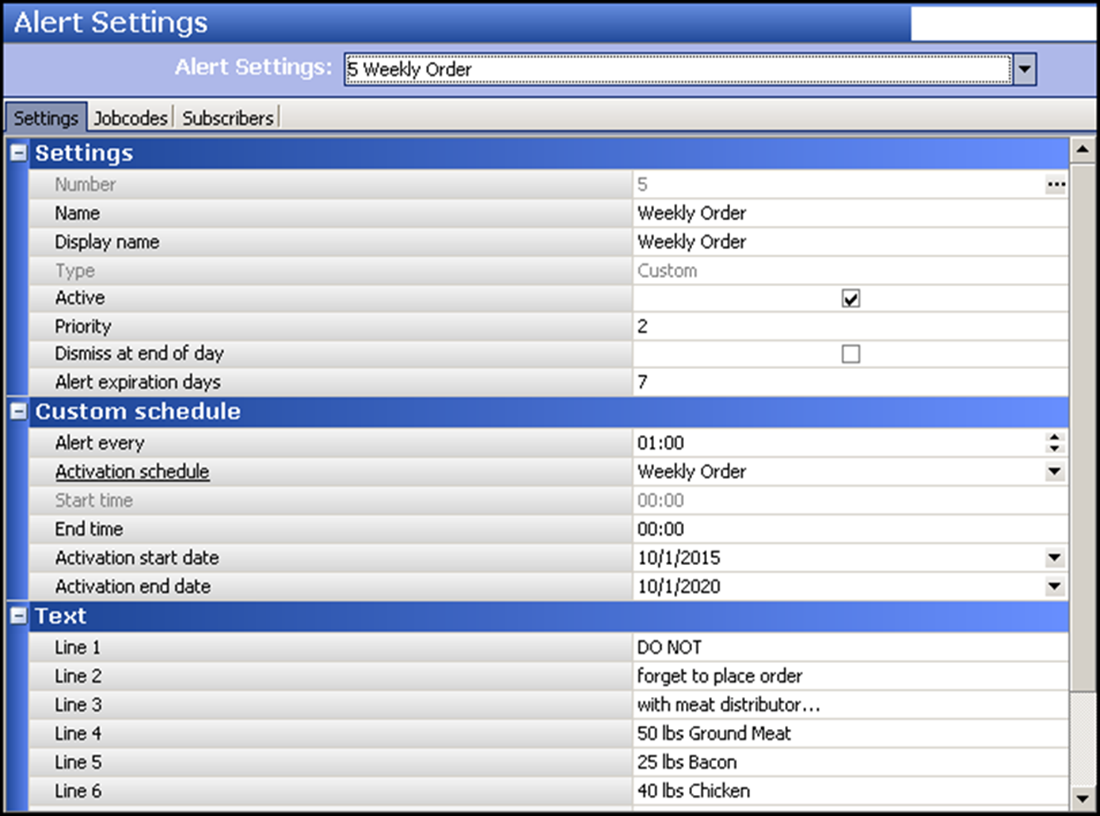
- Under the ‘Settings’ group bar, type a name, up to 40 characters, for the alert. For example, ‘Weekly Order.’
- Type a descriptive name, up to 28 characters, to display in the FOH when the alert appears on the screen. For example, ‘Weekly Order.’ If you do not enter a display name, the alert type appears as the display name.
- Select Active, to indicate this alert is in use.
- Determine the order of priority in which the alert appears in the FOH or prints to a local terminal. The available values are ‘1’ for first and ‘2’ for second, with ‘1’ being the default.
- Select Dismiss at end of day to prevent the alert from appearing again after EOD runs. The EOD process dismisses the alert.
- Type the number of days an alert that has not been manually dismissed should remain available to the subscriber, in ‘Alert expiration days.’ After the time expires, the Alert engine dismisses the alert. A valid entry is between ‘1’ and ‘14.’
- Under the ‘Custom schedule’ group bar, define the interval at which the alert is to reappear or print, in ‘Alerts every.’ For example, an alert reminding an employee to place a weekly order should appear every 20 minutes after its first appearance. Type ‘00:20’ for 20 minutes.
- Select an activation schedule to specify the frequency, such as daily, weekly, or monthly, for the system to send the alert. Selecting an activation schedule disables ‘Start time,’ as the system uses the time designated in the activation schedule.
- Type the time to end the alert. For example, an alert reminding an employee to place a weekly order should end at 4:00 p.m. Type ‘16:00’ for 4:00 p.m.
- Select the date on which you want the alert to become active in ‘Activation start date.’
- Select the date on which you no longer want the alert to be active in ‘Activation end date.’
- Under the ‘Text’ group bar, type the text to appear for the custom message in ‘Line 1’ through ‘Line 10.’ Each line allows 25 characters of text. For example, ‘DO NOT forget to place order with meat distributor...50 lbs Ground Meat, 25 lbs Bacon, 40 lbs Chicken.’
- Click Save.
- Repeat this procedure for any other custom message for which you want to configure an alert.
- Continue to assigning job codes to an alert.
POS approaching workweek hours threshold
The new Patient Protection and Affordable Care Act, also known as ‘Obamacare,’ requires firms with 50 or more ‘full-time equivalent workers’ to offer health plans to employees who work more than 30 hours a week. Employers review the last six to 12 month period to determine how many employees averaged 30 or more hours a week to reach the ‘full-time equivalent’ status. Stores require the ability to proactively track employees and monitor the hours worked during the business week, and to detect when an employee approaches the full-time equivalent status. Use an alert to notify your employee upon reaching the defined work hour threshold. Additionally, the Aloha POS system generates reports, with up to three configurable thresholds, that provide you a current weekly total of hours worked and scheduled for each employee.
Tip: You must use Aloha Basic Labor Scheduler or NCR Back Office to take advantage of the 'Approaching workweek hours threshold' alert type.
SCENARIO: The Aloha Café must track and monitor the hours of employees who are nearing full-time equivalent status during the business week. One employee has worked 17 hours in three days, and is scheduled for an additional 13 hours for the week. Configure an alert to appear when an employee approaches full-time equivalent status. The appearance of the alert provides the manager with advanced notice prior to the employee nearing full-time equivalency, allowing the manager to make informed business decisions._**
Configure the ‘Approaching workweek hours threshold’ alert where the system calculates the formula as: Current hours worked (17 hours) + Include hours schedule for the rest of the week (13 hours) + Hours to alert before employee reaches workweek hours threshold (eight hours) is greater than or equal to 30 hours.
The ‘Approaching workweek hours threshold’ alert appears for the manager, who adjusts the remaining hours of the employee for the week.
When configuring ‘Approaching workweek hours threshold’ alerts:
- Determine the number of hours prior to the employee approaching full-time equivalent status at which you want the alert sent to the POS.
- Determine to which job codes the approaching workweek hours threshold alert applies. You can configure more than one approaching workweek hours threshold alert that applies to different job codes.
- Plan who is to receive the alert.
To configure an 'Approaching workweek hours threshold' alert:
- Select Maintenance > Alert > Alert Settings.
- Click the New drop-down arrow, select Approaching workweek hours threshold, and click OK.
- Accept the system assigned number or click the ellipsis (...) next to ‘Number’ to display the Number Assignment dialog box, from which you can choose an alternate number.
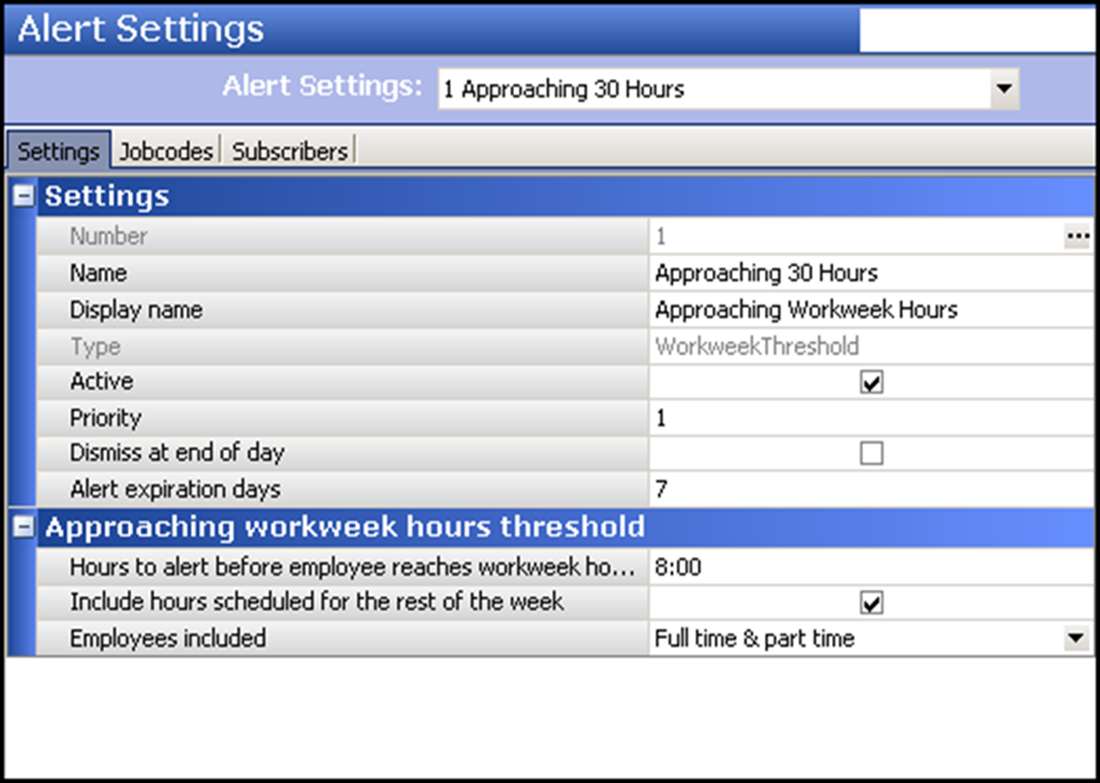
- Under the ‘Settings’ group bar, type a name, up to 40 characters, for the alert.
- Type a descriptive name, up to 28 characters, to display in the FOH when the alert appears on the screen. If you do not enter a display name, the alert type appears as the display name, such as ‘Workweek Threshold.’
- Select Active, to indicate this alert is in use.
- Type a priority number to specify the order in which the alert appears in the FOH. The default value is ‘1’ for first display, and the other valid priority value is ‘2’ for second display.
- Select Dismiss at end of day to prevent the alert from appearing again after the EOD runs. The EOD process dismisses the alert.
- Type the number of days an alert that has not been dismissed can appear on the FOH Alerts screen before being dismissed by the Alert Engine, in ‘Alert expiration days.’ A valid entry is between ‘1’ and ‘14.’ The Alert Engine dismisses the alert.
- Under the ‘Approaching workweek hours threshold’ group bar, type the number of hours allowed before the employee receives the alert. For example, if you want to alert the employee eight hours before the threshold is met, type ‘8:00.’
- Select Include hours scheduled for the rest of the week to allow the alert to appear whenever the current hours worked and the hours scheduled for the rest of the week and the hours allowed before the alert appears is greater than or equal to the workweek hours threshold. For example, Elliot has worked 17 hours this week and is scheduled a remaining 13 hours for the week; the hours to alert before the employee reaches the workweek hours threshold is 8 hours, for a total of 38 hours. As 38 is greater than 30, the system initiates the alert. If cleared, the system removes the remaining scheduled hours for the week from its calculation, and an alert appears when the threshold nears.
- Select the type of employee, such as full-time, part-time, or both, for which the alert is to appear.
- Continue to the next procedure to assign job codes to an alert.
To assign job codes to an alert:
- Continuing from the previous procedure, with the alert still active in Alert Settings, select the Jobcodes tab.
- Click Add.
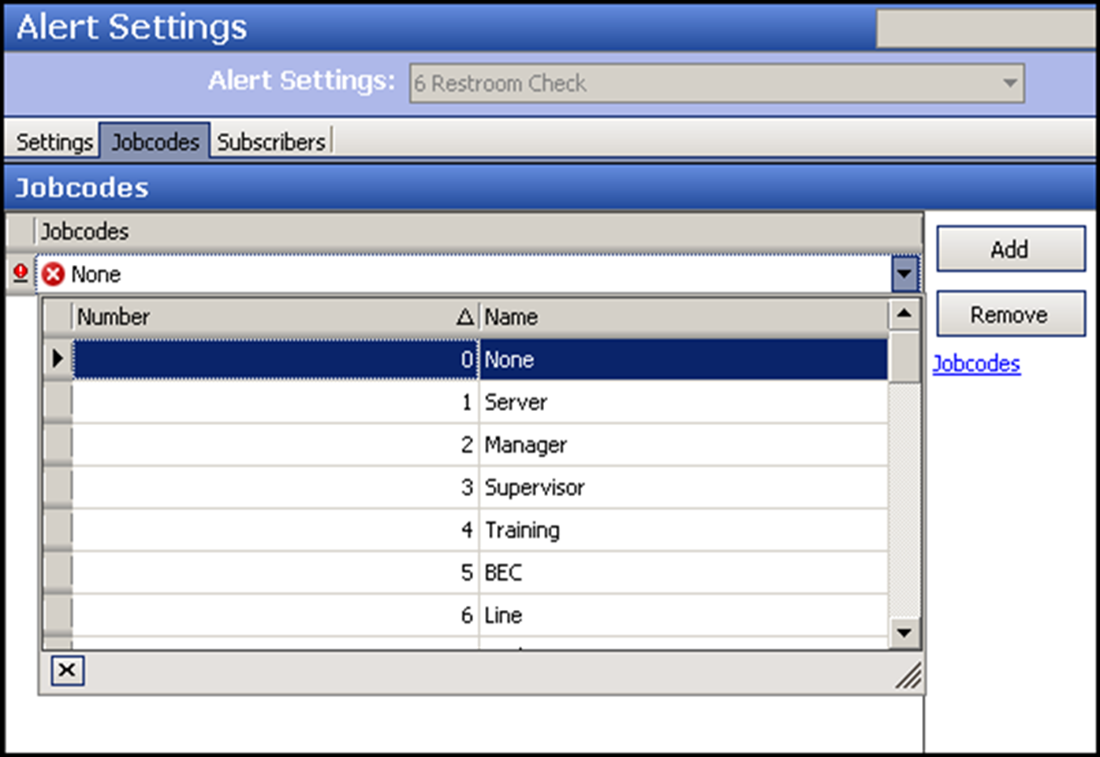
- Select a job code to receive this alert from the drop-down list.
- Repeat this procedure until you add all job codes to receive the alert.
- Click Save.
- Repeat this procedure for any other alert for which you want to assign job codes.
- Continue to the next procedure to assign subscribers to an alert and complete the configuration.
To assign subscribers to an alert:
- With the alert still active in Alert Settings, select the Subscribers tab.
- Click the Add drop-down arrow, select Aloha POS from the ‘Type’ list box, and click OK. The subscriber specifies the application to receive the alert. Aloha POS is the only available subscriber at this time.
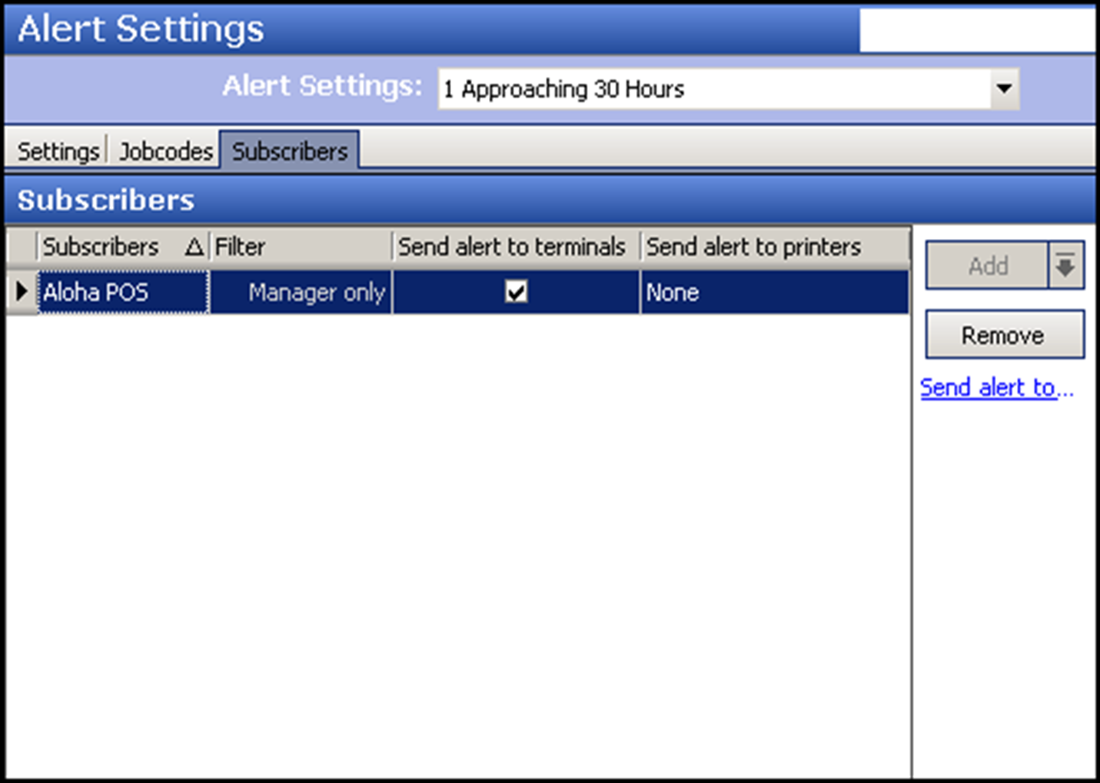
- Under the ‘Subscribers’ group bar, select Manager only from the ‘Filter’ drop-down list, if it does not already appear. The filter determines the application that receives the alert based on the selected subscriber. With the introduction of the Alerts Engine, the only subscriber option available is Aloha POS and the only subscriber filter available is ‘Manager only.’
- Select Send alert to terminals, to send the custom or approaching workweek hours threshold alerts to the POS terminals as the destination path. This option is automatically preset for you for a break rule and an overtime alert.
- Select a printer from the ‘Send alert to printers’ drop-down list, to print the custom or approaching workweek hours threshold alerts to print to a printer. This option does not appear for a break rule and an overtime alert.
- Click Save.
- Repeat this procedure for any other alert for which you want to assign subscribers.
- Click Close and exit the Alert Settings function.
Continue to "Adding an Alerts button to a panel."