Providing buttons for adding a charitable donation to guest check
When you implement Charitable Donations in QS, while not required, we recommend you:
- Create a new panel, hereafter referred to as the 'charitable donations' panel, and then add a button to this panel for each of the three types of charitable donations you support. For example, if you want to limit donations to either the change due amount or $1.00, you need only add two buttons to the charitable donations panel: Change Due and Predefined Amount.
- Add a button to the charitable donations panel that provides access back to the Tenders screen.
- Add a button to the Tenders screen that accesses the charitable donations panel. We recommend naming this button 'Donation.'
To create the charitable donations panel:
- Select Maintenance > Screen Designer > Quick Service Screen Designer.
- Select Work with Panels.
- Select Panel > New Panel. The Properties dialog box appears.
- Under the ‘Identification’ group bar, click the ellipsis (...) next to ‘Number’ to display the Number Assignment dialog box from which you can choose a number and click OK.
- Type a name, such as ‘Charitable Donations,’ to identify the panel.
- Configure the remaining options as you would for any other panel.
- Select Panel > Save Panel and continue to the next procedure.
To add a donate change button to the charitable donations panel:
-
With the charitable donations panel still active, right-click and select New Button. The Properties dialog box for buttons replaces the Properties dialog box for panels.

-
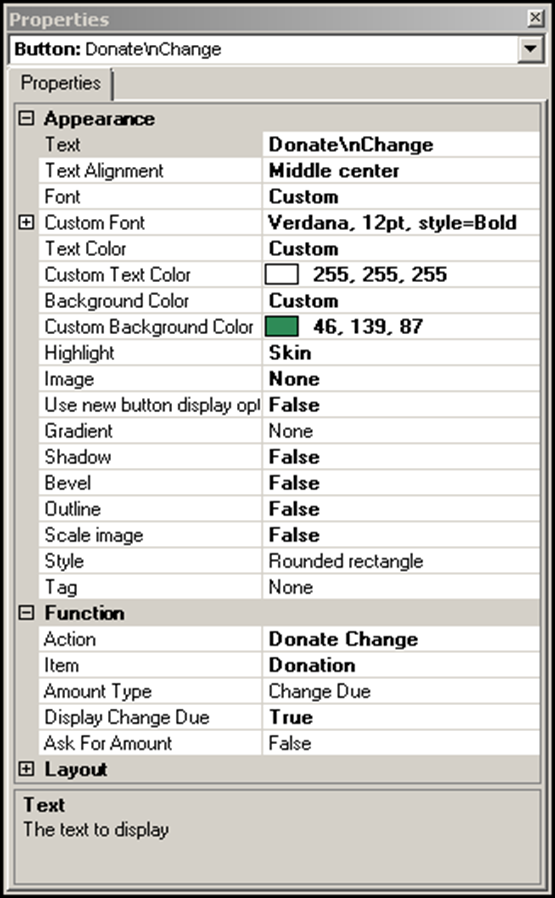
Under the ‘Function’ group bar, select Donate Change from the ‘Action’ drop-down list.
-
Select the donation item created earlier from the ‘Item’ drop-down list.
-
Select Change Due as the ‘Amount Type.’
-
Select True from the ‘Display Change Due’ drop-down list to display the change due amount on the button.
-OR-
Select False from the ‘Display Change Due’ drop-down list to hide the change due amount on the button.
-
Select False from the ‘Ask for amount’ drop-down list to suppress the amount prompt and apply the change due with one button touch.
-
Under the ‘Appearance’ group bar, change the default text to ‘Donate Change.’ To display text on multiple lines, insert '\n' without spaces for line breaks. For example, ‘Donate\nChange.’
-
Configure the remaining options as you would for any other button.
-
Continue to the next procedure.
To add a predefined amount button to the charitable donations panel:
- With the charitable donations panel still active, right-click and select New Button.

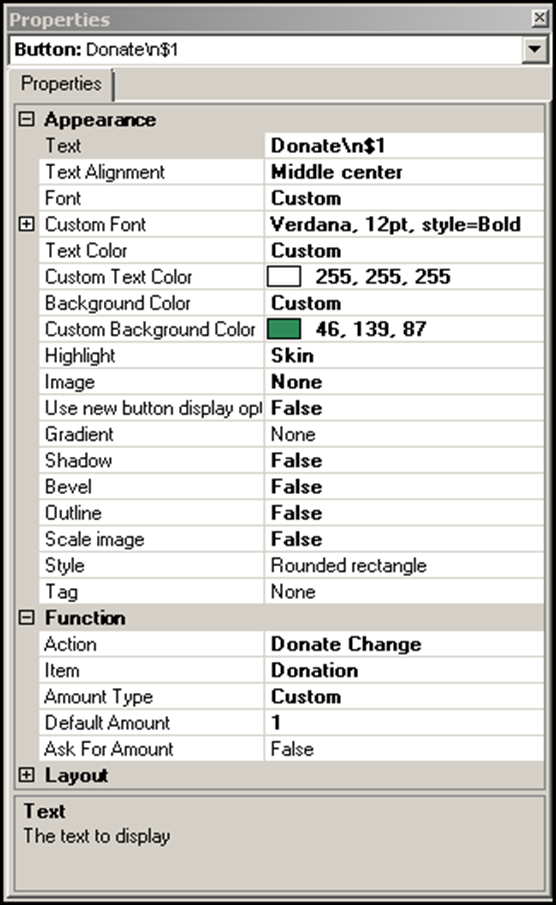
- Under the ‘Function’ group bar, select Donate Change from the ‘Action’ drop-down list.
- Select the donation item created earlier from the ‘Item’ drop-down list.
- Select Custom as the ‘Amount Type.’
- Type a dollar amount, such as 1.00, in ‘Default Amount.’
- Select False from the ‘Ask for Amount’ drop-down list to suppress the amount prompt and prevent the entry of an amount different than the predefined value.
- Under the ‘Appearance’ group bar, change the default text to ‘Donate x’ where ‘x’ is the dollar amount. To display text on multiple lines, insert '\n' without spaces for line breaks. For example, ‘Donate\n $1.’
- Configure the remaining options as you would for any other button.
- Repeat this procedure to add additional predefined amount buttons to this panel.
- Continue to the next procedure.
To add an open amount button to the charitable donations panel:
- With the charitable donations panel still active, right-click and select New Button.

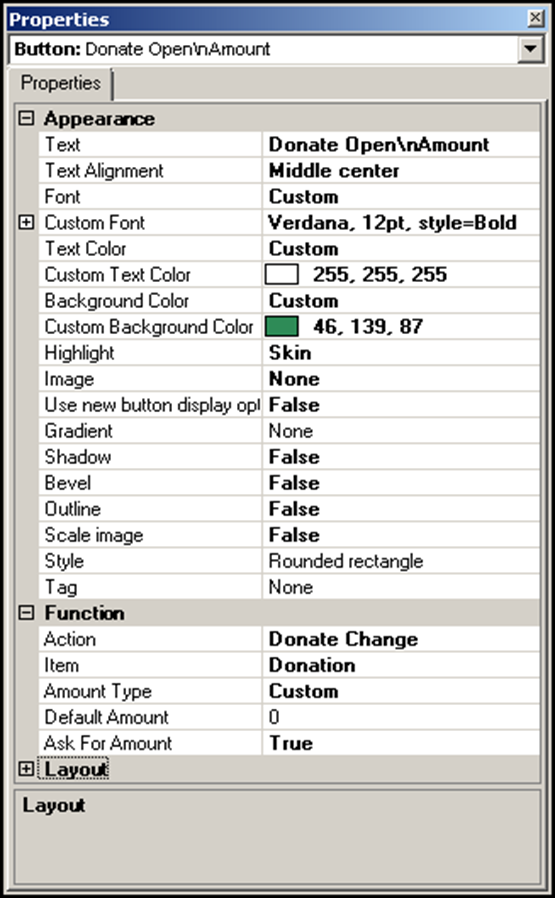
- Under the ‘Function’ group bar, select Donate Change from the ‘Action’ drop-down list.
- Select the donation item created earlier from the ‘Item’ drop-down list.
- Select Custom as the ‘Amount Type.’
- Leave the default amount at 0 (zero).
- Select True from the ‘Ask for Amount’ drop-down list. The Open Item screen appears when you touch this button in the FOH, allowing you to type the amount your guest offers as a donation.
- Under the ‘Appearance’ group bar, change the default text to ‘Donate Open Amount.’ To display text on multiple lines, insert '\n' without spaces for line breaks. For example, ‘Donate Open\nAmount.’
- Configure the remaining options as you would for any other button.
- Continue to the next procedure.
To add a navigation button to the charitable donations panel that returns to the Tender screen:
- With the charitable donations panel still active, right-click and select New Button.
- Under the ‘Function’ group bar, select Chain from the ‘Action’ drop-down list.
- Click the ellipsis (...) next to ‘Panels to display’ to display the Select Panels screen.
- Select the Tenders screen from the ‘Available Panels’ list box and click > to move the screen to the ‘Selected Panels’ list box.
- Click OK.
- Under the ‘Appearance’ group bar, type Return to Tenders. To display text on multiple lines, insert '\n' without spaces for line breaks. For example, ‘Return\n to\nTenders.’
- Configure the remaining options as you would for any other button.
- Continue to the next procedure.
To add a navigation button to the Tenders screen that accesses the charitable donations panel:
- Select Panel > Open Panel.
- Select the Tenders panel.
- Right-click and select New Button. The Properties dialog box for buttons replaces the Properties dialog box for panels.
- Under the ‘Function’ group bar, select Chain.
- Click the ellipsis (...) next to ‘Panels to display’ to display the Select Panels screen.
- Select the Donation Panel from the ‘Available Panels’ list box and click > to move the screen to the ‘Selected Panels’ list box.
- Click OK.
- Under the ‘Appearance’ group bar, type Donation. To display text on multiple lines, insert '\n' without spaces for line breaks.
- Configure the remaining options as you would for any other button.
- Select Panel > Save Panel.
- Exit the Screen Designer function.
Continue to "Printing a thank you message on the guest check."