Creating a Dashboard panel
Regardless of the method you choose for displaying a dashboard, you must create a panel of the 'Dashboard' type and add the desired widgets to the panel. It is possible to create multiple dashboards for your store. For example, configure one to focus on sales, another to focus on guest check counts, and another on which all available widgets are present and provide data for the business day.
To create a Dashboard panel:
- Select Maintenance > Screen Designer > Table Service Screen Designer or Quick Service Screen Designer. The screen designer function opens in a new window.
- Select Work with Panels.
- Select Panel > New Dashboard Panel.
- Resize the panel to the appropriate dimensions. If you use Quick Service and want to reserve an area of the screen on which to display a dashboard, size and position the panel to fit in the reserved area.
- In the Properties dialog box, under the ‘Appearance’ group bar, configure the appearance you want for the panel.
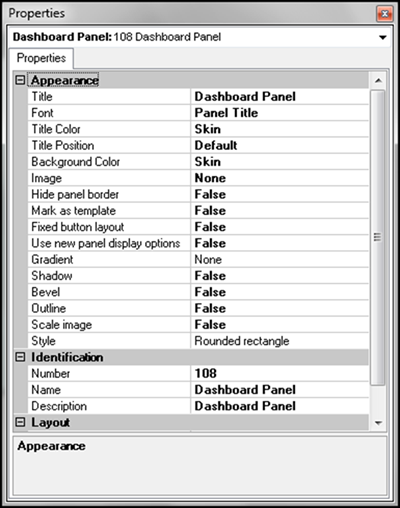
- Under the ‘Identification’ group bar, click the ellipsis button (...) next to ‘Number’ to display the Number Assignment dialog box, from which you can choose a number, and click OK.
- Type a name to identify the dashboard panel.
- Type a description of the dashboard panel.
- Continue to the next procedure.
To add the desired widgets to a Dashboard panel:
- Click inside a Dashboard panel.
- Select Panel > New Widget. A widget of the 'Guest check count' type appears on the panel as the default selection. The Properties dialog box also reflects settings for the 'Guest check count' widget.
- To choose a widget of a different type, make a selection from the Type drop-down list. You can resize, move, and configure any dashboard widget to suit your needs.
- Refer to the appropriate procedure for specific instructions on configuring each type of widget.
Creating a date widget
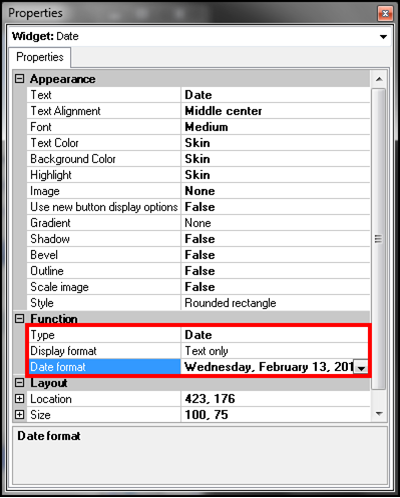
A 'Date' widget displays the current date of business on the dashboard. You can configure the date to appear in one of the following formats:
- MM/DD/YY
- Day, Month and Date, Year
- Month and Date, Year
To add a 'Date' widget to a dashboard panel:
-
With a Dashboard panel selected, select Panel > New Widget.
-
Under the 'Function' group bar, select Date from the 'Type' drop-down list.
Note: 'Text only' is the only option that appears for the 'Date' widget in 'Display format.'
-
Select the date format in which you want the date to appear on the dashboard.
-
Under the 'Appearance' group bar, configure the remaining options to determine the appearance of the widget.
-
Save the panel and exit the Screen Designer function, or continue to the next procedure to add another widget.
Creating a time widget
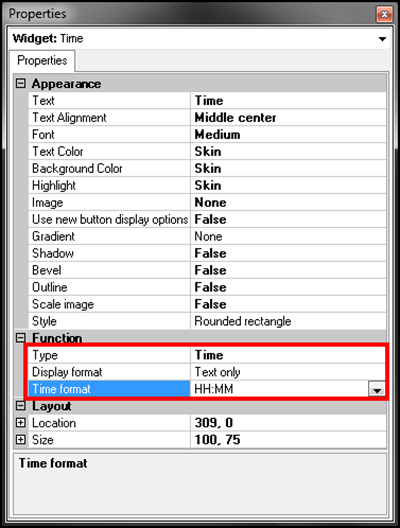
A 'Time' widget displays the current time on the dashboard. You can configure the time to appear in one of the following formats:
- HH:MM
- HH:MM:SS
- 24-hour clock
To add a 'Time' widget to a Dashboard panel:
-
With a Dashboard panel selected, select Panel > New Widget.
-
Under the 'Function' group bar, select Time from the 'Type' drop-down list.
Note: 'Text only' is the only option that appears for the 'Time' widget in 'Display format.'
-
Select the time format in which you want the time to appear on the dashboard.
-
Under the 'Appearance' group bar, configure the remaining options to determine the appearance of the widget.
-
Save the panel and exit the Screen Designer function, or continue to the next procedure to add another widget.
Creating a current day part widget
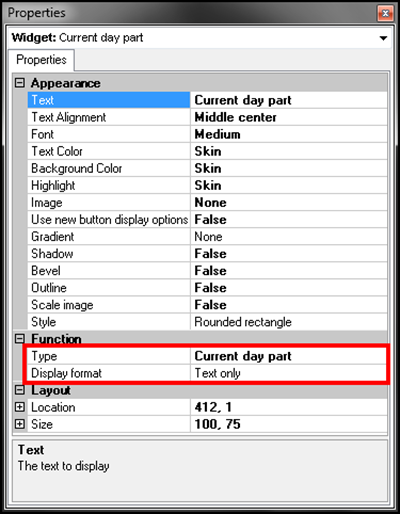
The 'Current day part' widget displays the name of the active day part, if you pre-configure your day parts in Maintenance > System Settings > Day Part. Be advised that the 'Current day part' widget appears as 'Text only.'
To add a 'Current day part' widget to a Dashboard panel:
-
With a Dashboard panel selected, select Panel > New Widget.
-
Under the 'Function' group bar, select Current day part from the 'Type' drop-down list.
Note: 'Text only' is the only option that appears for the 'Current day part' widget in 'Display format.'
-
Under the 'Appearance' group bar in the Properties dialog box, configure the appearance you want for the widget.
-
Save the panel and exit the Screen Designer function, or continue to the next procedure to add another widget.
Creating a guest check count widget
The 'Guest Check Count' widget displays a running guest check count, which you can reset between each day part. Configure your minimum and maximum thresholds, including threshold colors, for easy identification of alerts. You can also configure this widget to alert you in ascending or descending order. Choose the method that best suits your requirements. Choose between 'Text only' or 'Gauge' for displaying the widget.
To add a 'Guest Check Count' widget to a Dashboard panel:
- With a Dashboard panel selected, select Panel > New Widget.
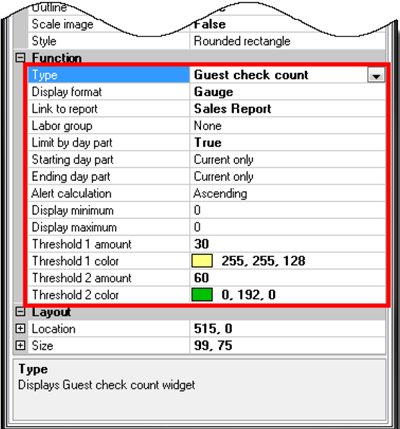
- Under the 'Function' group bar, select Guest check count from the 'Type' drop-down list.
- Select whether you want the widget to appear as text, a graph, or a gauge from the 'Display format' drop-down list.
- Select a report to appear on the screen when you touch the widget.
- Select Hourly or Salary from the 'Labor group' drop-down list.
- Select True from the 'Limit by day part' drop-down list if you want to view the sales by day parts.
- Select Current only or a specific day part at which to start the guest check count calculation from the drop-down list.
- Select Current only or a specific day part at which to end the guest check count calculation from the drop-down list.
- Select Ascending or Descending from the 'Alert calculation' drop-down list. This determines if the alert for the widget occurs when the calculation is greater than or when it is less than each threshold.
- Type the number at which to begin incrementing and displaying the guest check count calculation in the widget.
- Type the number at which to stop incrementing and displaying the guest check count calculation in the widget.
- Select the color to indicate the widget calculation is within normal parameters.
- Type the threshold at which the warning alert for the widget is to appear.
- Select the color to indicate you have met the first threshold form the 'Warning threshold color' drop-down list.
- Type the threshold at which the critical alert for the widget is to appear.
- Select the color to indicate you have met the critical threshold from the 'Critical threshold color' drop-down list.
- Under the 'Appearance' group bar in the Properties dialog box, configure the appearance you want for the widget.
- Save the panel and exit the Screen Designer function, or continue to the next procedure to add another widget.
Creating a sales widget
The 'Sales' widget displays the current sales, which you can reset between day parts. Configure your minimum and maximum thresholds, including threshold colors, for easy identification of alerts. You can also configure this widget to alert you in ascending or descending order. Choose the method that best suits your requirements. Choose between 'Text only' or 'Gauge' for displaying the widget.
To add a 'Sales' widget to a Dashboard panel:
- With a Dashboard panel selected, select Panel > New Widget.
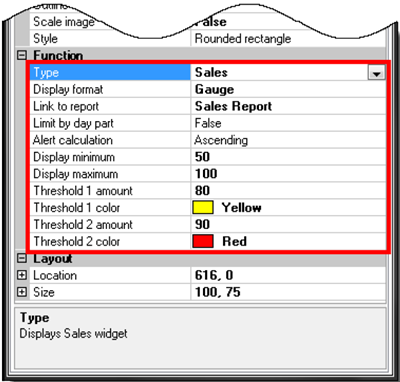
- Under the 'Function' group bar, select Sales from the 'Type' drop-down list.
- Select whether you want the widget to appear as text, a graph, or a gauge from the 'Display format’ drop-down list.
- Select the report to appear on the Front-of-House (FOH) screen when you touch the widget on the dashboard, if desired.
- Select True from the 'Limit by day part' drop-down list, if you want to view sales by day part and reset the sales when a new day part begins.
- Select Current only or a specific day part at which to start the sales calculation from the drop-down list.
- Select Current only or a specific day part at which to end the sales calculation from the drop-down list.
- Select Ascending or Descending from the 'Alert calculation' drop-down list. This determines if the alert for the widget occurs when the calculation is greater than or when it is less than each threshold.
- Type the number at which to begin incrementing and displaying the sales calculation in the widget.
- Type the number at which to stop incrementing and displaying the sales calculation in the widget.
- Select the color to indicate the widget calculation is within normal parameters.
- Type the threshold at which the warning alert for the widget calculation is to appear.
- Select the color to indicate you have met the first threshold from the 'Warning threshold color' drop-down list.
- Type the threshold at which the critical alert for the widget is to appear.
- Select the color to indicate you have met the critical threshold from the 'Critical threshold color' drop-down list.
- Under the 'Appearance' group bar in the Properties dialog box, configure the appearance you want for the widget.
- Save the panel and exit the Screen Designer function.
Continue to "Adding the Dashboard panel to a dashboard."