Configuring visual indicators to appear for Included Modifiers

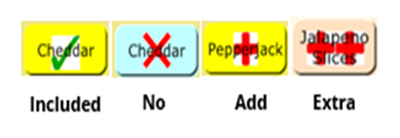
Modifier codes play an important role with included modifiers and you can designate a single image, color, or both, with a modifier code as a visual representation of the different states of the modifier, in relation to the present order. The visual indicator appears on any modifier designated as 'Included,' or applied with the modifier code, when the modifier appears on the Front-of-House (FOH).
The following are the common modifier codes, their purpose, and the suggested image to use. You can use any image or color that is visually appealing to your color scheme and concept. Be aware that, with the exception of modifier code 202, you can also create a copy of a modifier code for use on your menu. If you do this, you must configure the visual indicators for the copies of these modifier codes.
Included (modifier code 202) — Appears on the FOH for all included modifiers configured for the selected item so the employee can easily identify the modifiers that come standard with the menu item. The visual indicator appears by default prior to selecting a modifier code. Suggested Image: Check mark.
Tip: In Aloha POS v12.3 and earlier, you select the modifier image for indicating an included modifier in Maintenance > Business > Store > Store Settings tab > User Interface group.
No (modifier code 2) — Appears on the FOH when you remove an included modifier indicating it should not be prepared with the menu item. You must first select the No modifier code and then the modifier item to which it applies. Suggested Image: A red 'X,'
Add (modifier code 19) — Appears on the FOH when you add a non-included modifier to an item by itself, or when you substitute an included modifier for a non-included modifier. You must first select the Add modifier code and then the modifier item to which it applies. Suggested Image: A plus sign.
Extra (modifier code 3) — Appears on the FOH when you apply an extra amount of a modifier to an item. You must first select the Extra modifier code and then the modifier item to which it applies. Suggested Image: Two plus signs.
Heavy (modifier code 15) — Appears on the FOH when you add a heavier amount of a modifier to an item. You must first select the Heavy modifier code and then the modifier item to which it applies. This modifier code is supported in Aloha Quick Service only. Suggested Image: None.
Light (modifier code 14) — Appears on the FOH when you apply a lighter amount of a modifier to an item. You must first select the Light modifier code and then the modifier item to which it applies. This modifier code is supported in Aloha Quick Service only. Suggested Image: None.
Half (modifier code 17) — Appears on the FOH when you apply a half portion of the modifier to an item. You must first select the Half modifier code and then the modifier item to which it applies. This modifier code is supported in Aloha Quick Service only. Suggested Image: None.
Quarter (modifier code 18) — Appears on the FOH when you apply a quarter portion of the modifier to an item. You must first select the Quarter modifier code and then the modifier item to which it applies. This modifier code is supported in Aloha Quick Service only. Suggested Image: None.
To make an image available for use with included modifiers:
To make an image file available for use in the system, you must save the file as a supported file type in the Bmp folder and then upload the image using the Media Files function. You can search the Internet for clip art, if you do not have images available. We recommend you size your images to 48 x 48 pixels; however, you may need to change the pixel size of the image to fit correctly on your configured buttons.
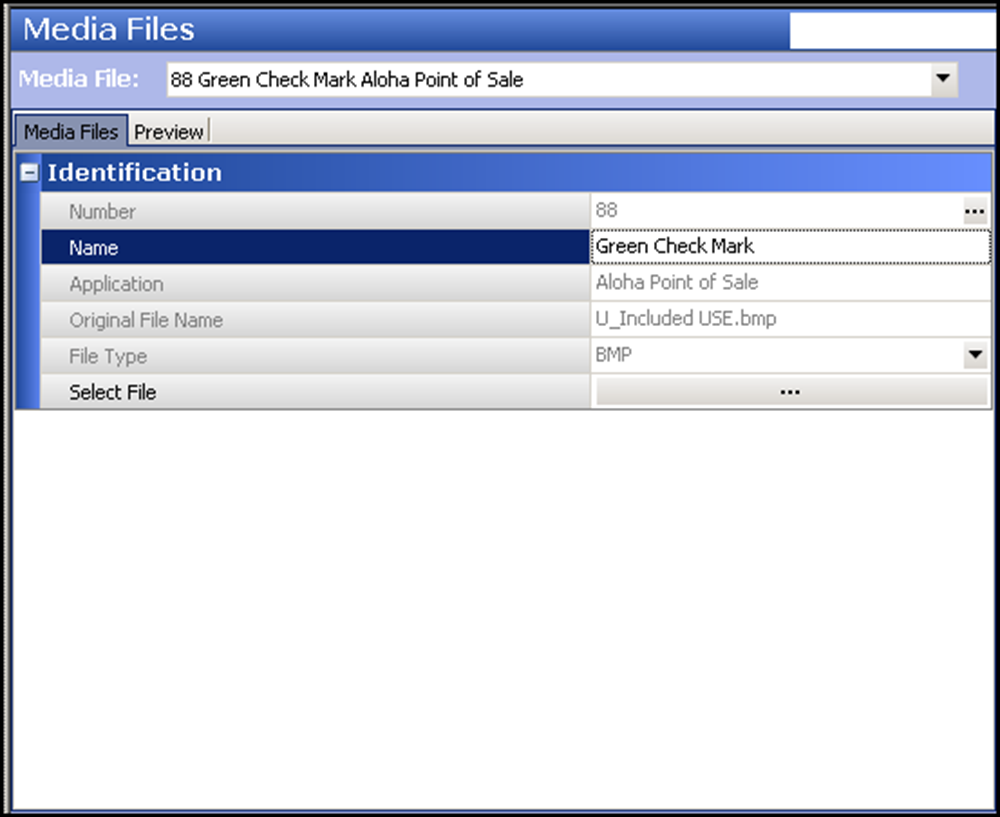
- Select Maintenance > System Settings > Media Files.
- Click the New drop-down arrow, select Aloha Point-of-Sale, and click OK.
- Accept the system assigned number or click the ellipsis (...) next to 'Number' to display the Number Assignment dialog box, from which you can choose an alternate number.

- Type a name, such as 'Green Check Mark,' to help you identify the image file.
- Select the file type, such as 'BMP,' from the drop-down list.
- Click the ellipsis (...) to browse to and select the image file for the included modifier from the directory in which you have it saved. The system defaults to the BMP directory.
- Select the Preview tab to preview the image, if necessary.<img alt="Select the Preview tab"src="https://docs.ncrvoyix.com/images/aloha-pos/IncludedModifiers_MediaFilesPreview.png">
- Click Save.
- Repeat this procedure for each image file to add as a media file.
- Exit the Media Files function.
To configure an image and color to use with included modifiers:
Once you make images available for use in the Media Files function, attach them to the applicable modifier code. Some sites only use the Included Modifier code, which is hard-coded to use ID 202, and the No modifier code, but you might also want to use other modifier codes, such as Extra, Light. or Heavy. You can also assign a color to appear on the button when the modifier code is applied.
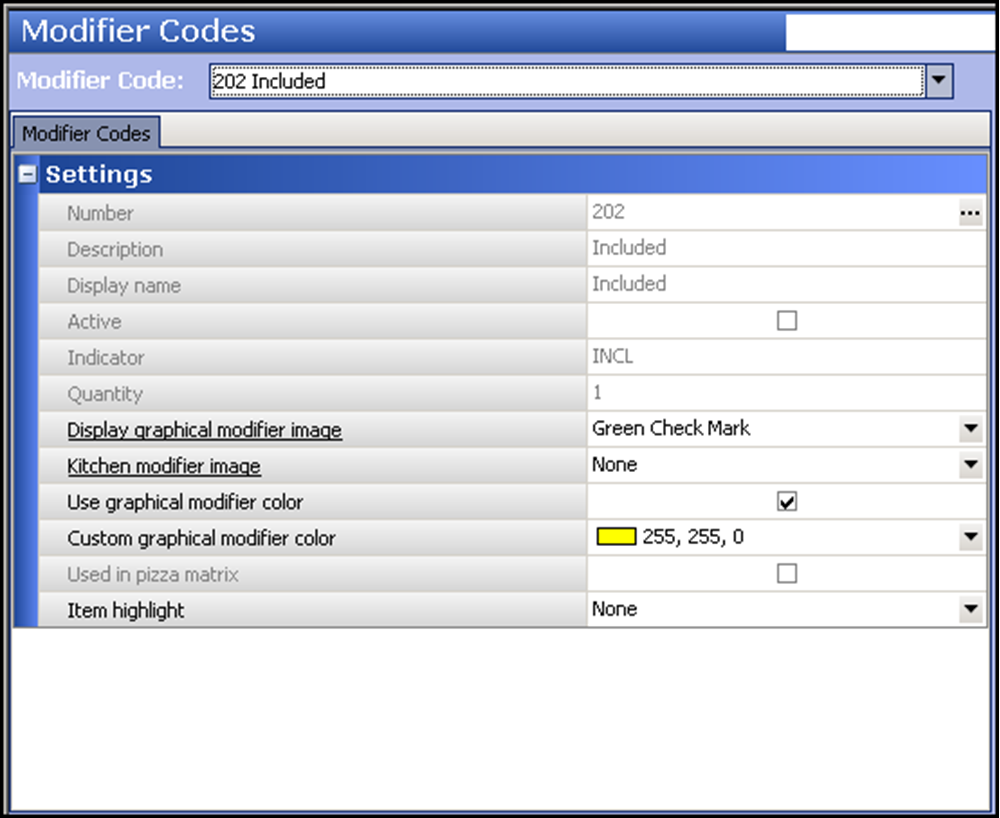
- Select Maintenance > Menu > Modifier Codes.
- Select a modifier code, such as '202 Included,' from the drop-down list.

- To attach an image, select the bitmap to associate with the modifier code, such as 'Green Check Mark,' from the 'Display graphical modifier image' drop-down list.
- To assign a color, select Use graphical modifier color and select a color from the 'Custom graphical modifier color' drop-down list.
- Click Save.
- Repeat this procedure to add an image or color to other modifier codes, such as 'No.'
- Click Save and exit the Modifier Codes function.
Continue to "Refreshing POS data."
After running a data refresh, return to the main "Included Modifiers" page.