Modifying quick combo components using context panels
In most cases, you will modify a component of a quick combo. The most common way is to use context panels that appear at the time you add an item to the guest check, and again if you select the item from the guest check window. This allows you to make additional selections at that moment, or you can let the guest continue placing their order without interruption, and address their selections on demand later in the order entry process. Simply select the item requiring additional selections from the guest check window and the associated context panel reappears on the screen, allowing you to enter guest selections at your convenience.
You must analyze your order entry needs and make some determinations before implementing context panels with quick combo promotions. The Quick Combos promotions type offers three choices when associating a context panel with a quick combo:
- 'QC default' associates the context panel you specify at the quick combo level in this same function on the 'Quick combo QS' tab.
- 'Item's context panel' associates the context panel you specify at the item level.
- 'Custom context panel' associates a custom panel designed specifically for this component.
Once you complete the analysis, you are ready to begin the configuration. As a best practice, we recommend reserving an area of the order entry screen for displaying your context panels. Each time you select an item with an associated context panel, the new context panel replaces the prior context panel, allowing you to make selections for the currently selected item. After configuring the context panels, associate the panels with a quick combo.
Reference: This section assumes you already created your context panels. Refer to the Context Panels Feature Focus Guide for more information.
'QC default'
In Promotions maintenance, use the 'Quick combo QS' tab to select the context panel designed for use as the 'QC default' context panel for the quick combo. Then use the 'Components QS' tab to stipulate the components in the quick combo for which the 'QC default' context panel is to appear. Whether you select hamburger, side, or drink, the 'QC default' panel shows the same modifier buttons for each component.
To select the 'QC default' context panel to associate with a quick combo:
- Select Maintenance > Payments > Promotions.
- Select the quick combo from the drop-down list.
- Select the Quick combo QS tab.
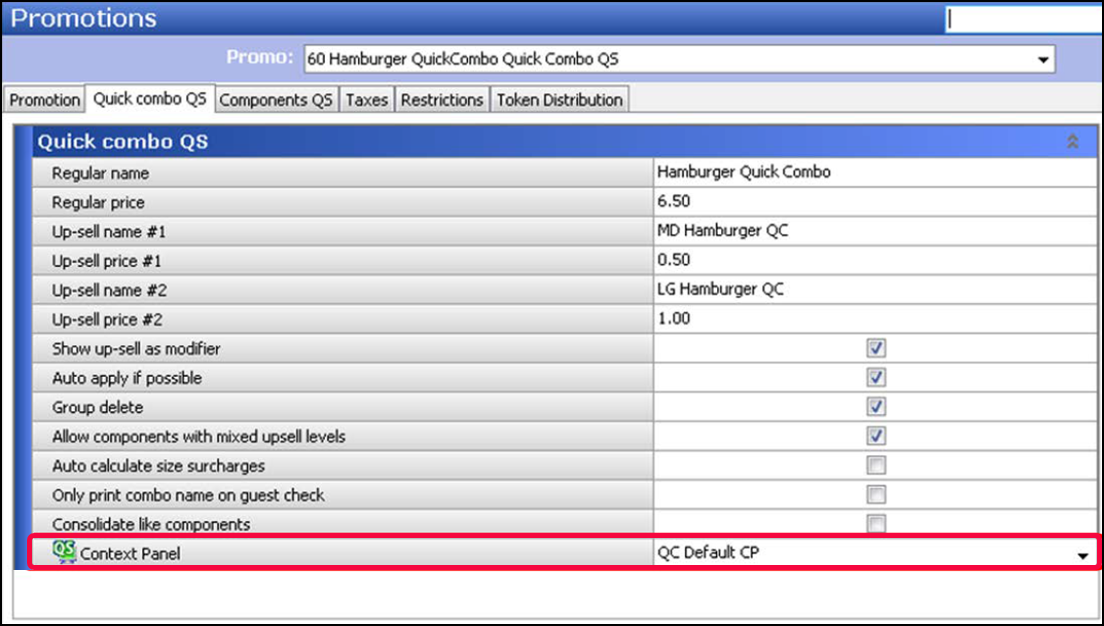
- Select the context panel you created. For example, 'QC Default CP.'
- Select the Components QS tab.

- Under the 'Components' group bar, select Hamburger.
- Select QC default from the 'Context option' drop-down list.
- Select Sides.
- Verify QC default is selected from the 'Context option' drop-down list.
- Select Drinks.
- Verify QC default is selected from the 'Context option' drop-down list.
- Click Save.
- Repeat this procedure for any other quick combo promotions for which to use the 'QC default' modifier panel.
- Exit the Promotions function.
Item's context panel
Assign a context panel to any item for which to display a modifier panel specific to that item. For example, create a 'Sides' context panel, and assign it to every item you classify as a 'Side' for one of the components in a quick combo, such as 'SM Fries.' Every time you add this item to a guest check, regardless if you add it as an a la carte item or adding a quick combo promotion, the 'Sides' context panel assigned to SM Fries appears.
To assign a context panel to a menu item:
- Select Maintenance > Menu > Items.
- Select the menu item (component) from the drop-down list. For example, 'Small Fries Sides.'
- Select the Display Options tab.
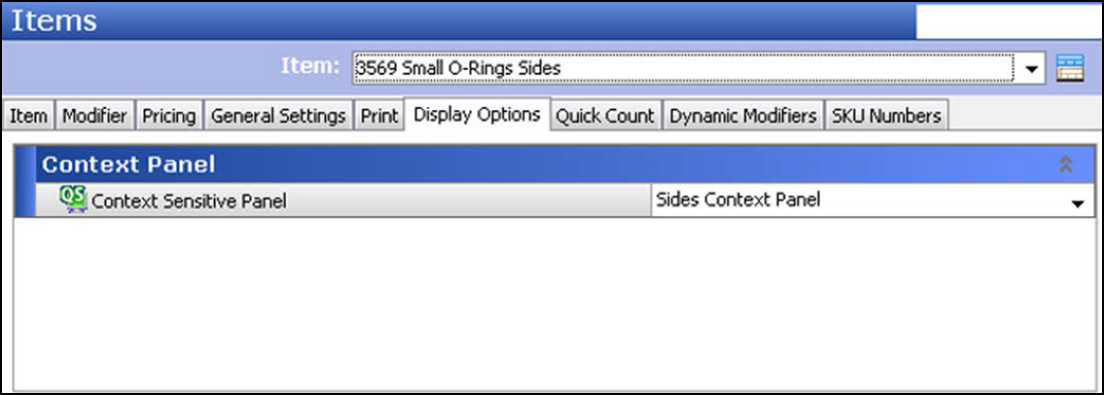
- Under the 'Context Panel' group bar, select the context panel containing the modifiers for this item. For example, 'Sides Context Panel.'
- Click Save.
- Repeat this procedure for any other menu items to which to assign a context panel. For example, 'Small O-Rings.'
- Exit the Items function.
- Continue to the next procedure.
To designate you want to use the 'Item's context panel' for a component of a quick combo:
- Select Maintenance > Payments > Promotions.
- Select the quick combo from the drop-down list.

- Select Sides.
- Select Item's context panel from the 'Context option' drop-down list.
- Click Save.
- Repeat this procedure for any other components for which the context panel should appear.
- Exit the Promotions function.
Custom context panel
Use 'Custom context panel' to assign a context panel created specifically for a component of a quick combo to that component. For example, you create a custom context panel for your drinks; the panel contains ice, as well as the modifier codes of lite, extra, heavy, and no.
Note: Custom context panels are helpful if a component of one quick combo exists in other quick combos. The custom context panel appears solely for the component in the quick combo to which it is assigned.
To assign a 'Custom context panel' to a component of a quick combo:
- Select Maintenance > Payments > Promotions.
- Select the quick combo from the drop-down list.

- Select Drinks.
- Select Custom context panel from the 'Context option' drop-down list.
- Select the custom context panel, such as 'Drinks Context Panel,' from the 'Custom panels' drop-down list.
- Click Save.
- Repeat this procedure for any other components requiring a custom context panel.
- Exit the Promotions function.
Displaying a context panel with a component button
The POS system also provides another method for modifying items in a quick combo. You can now create a component button, such as 'Drinks,' that, when touched, selects the drink component of the quick combo in the guest check window, and the context panel associated with the drink item appears. Similarly, you can create a button for each component of the quick combo.
To create a button that supports quick combo component selection:
- Select Maintenance > Screen Designer > Quick Service Screen Designer.
- Select Work with Panels.
- Select Panel > Open Panel, select a panel to edit, and click OK.
- Select an available button or create a new button. The Properties dialog box appears.
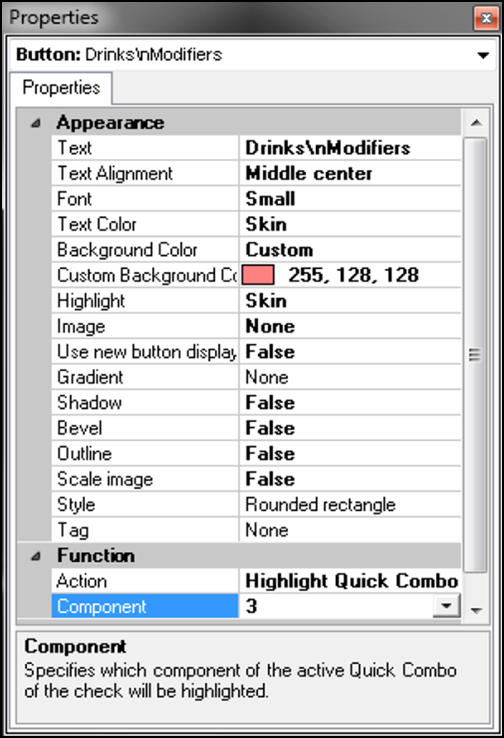
- Under the 'Function' group bar, select Highlight Quick Combo Component from the 'Action' drop-down list to select a specific component of an active quick combo in the on-screen guest check.
- Select the component number from the 'Component' drop-down list to enable the system to select the associated component of the quick combo in the on-screen guest check window and display the context panel associated with the item. Typically, you configure components of a quick combo in a specific order. For example, the main item of the quick combo is usually the first component, the side is the second component, and the drink is the third component. In keeping with this scenario, select 3 from the 'Component' drop-down list, for the Drinks button.
- Under the 'Appearance' group bar, type a name for the button, such as 'Drinks\nModifier.' To display text on multiple lines, insert '\n' without spaces for line breaks.
- Configure the remaining options as you would for any other button function.
- Select Panel > Save Panel.
- Select File > Exit to exit Quick Service Screen Designer.
Using context panels
The following section uses the three types of available context panels for quick combos. Remember:
- The 'QC default' context panel remains stationary and appears for every component in the quick combo.
- The 'Item's context panel' appears every time you add the item to the guest check, regardless if it is part of a quick combo or not.
- The 'Custom context panel' appears for the component to which it is assigned.
To use context panels:
- Add a Hamburger quick combo to the guest check. The 'QC default' context panel appears. The guest asks for a Sesame bun instead of a plain bun.
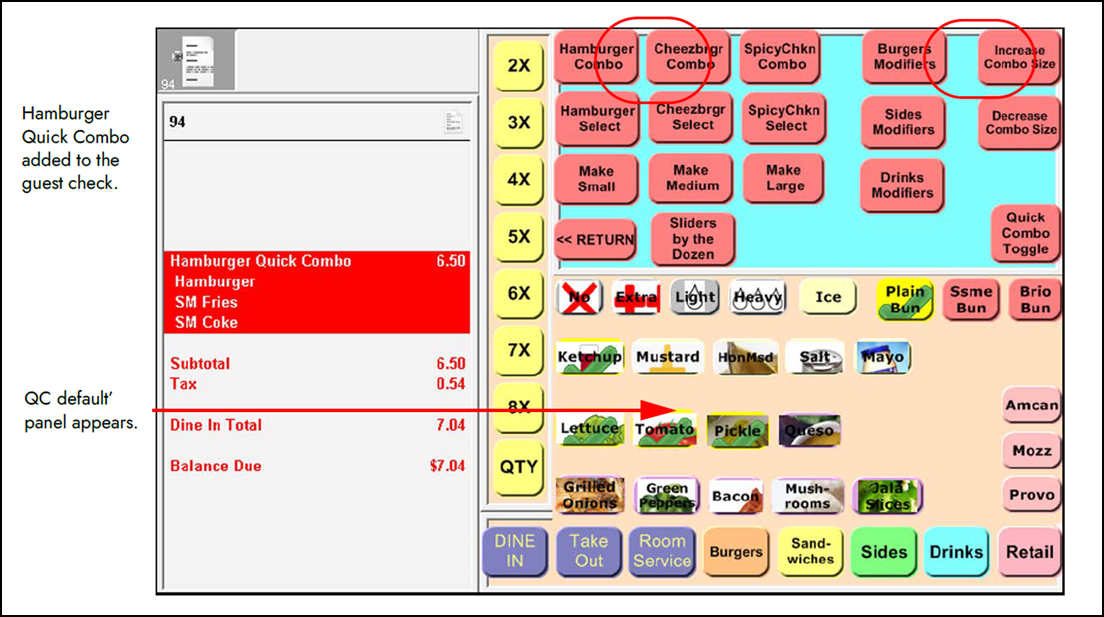
- Touch Hamburger in the guest check window, or touch the Burger Modifiers button.
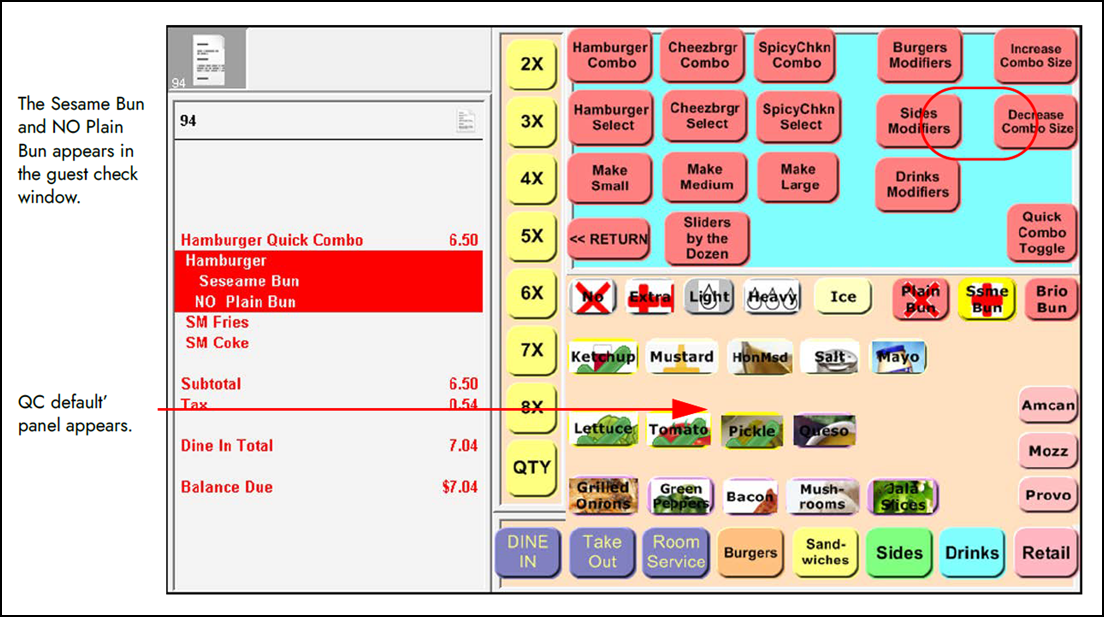
- Touch Sesame bun. The Hamburger Quick Combo replaces the Plain bun with a Sesame bun. The guest requests extra ketchup for the fries.
- Touch SM Fries in the guest check window, or touch the Sides Modifiers button.
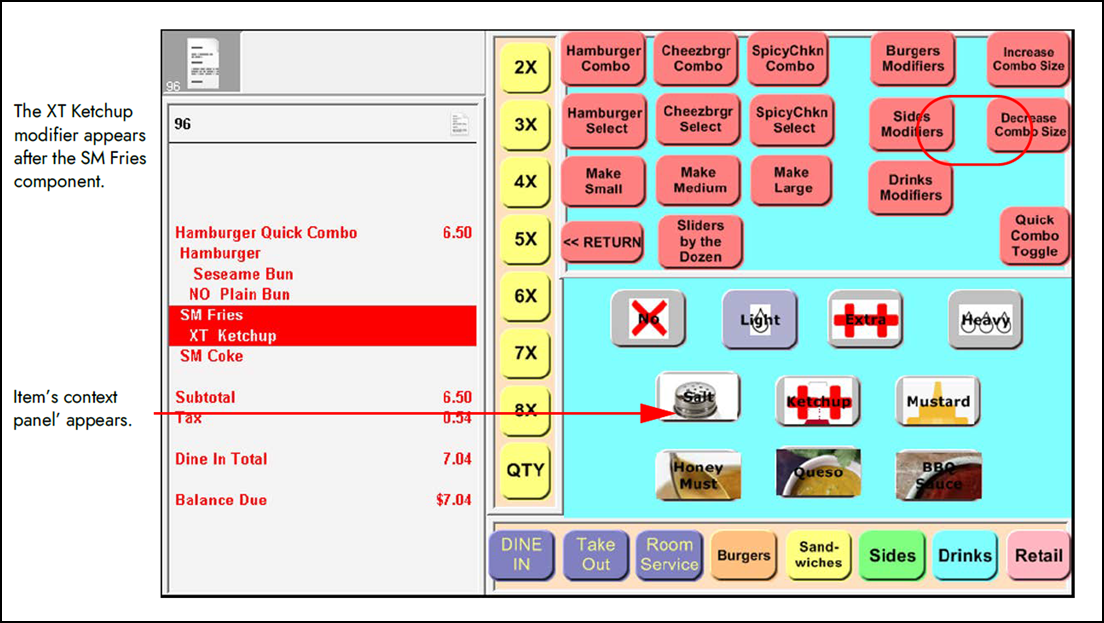
- Touch Extra in the 'Item's context' panel, and then touch Ketchup. The XT Ketchup modifier appears after the SM Fries component. The guest wants lite ice for their soda.
- Touch SM Coke in the guest check window, or touch the Drinks Modifiers button.
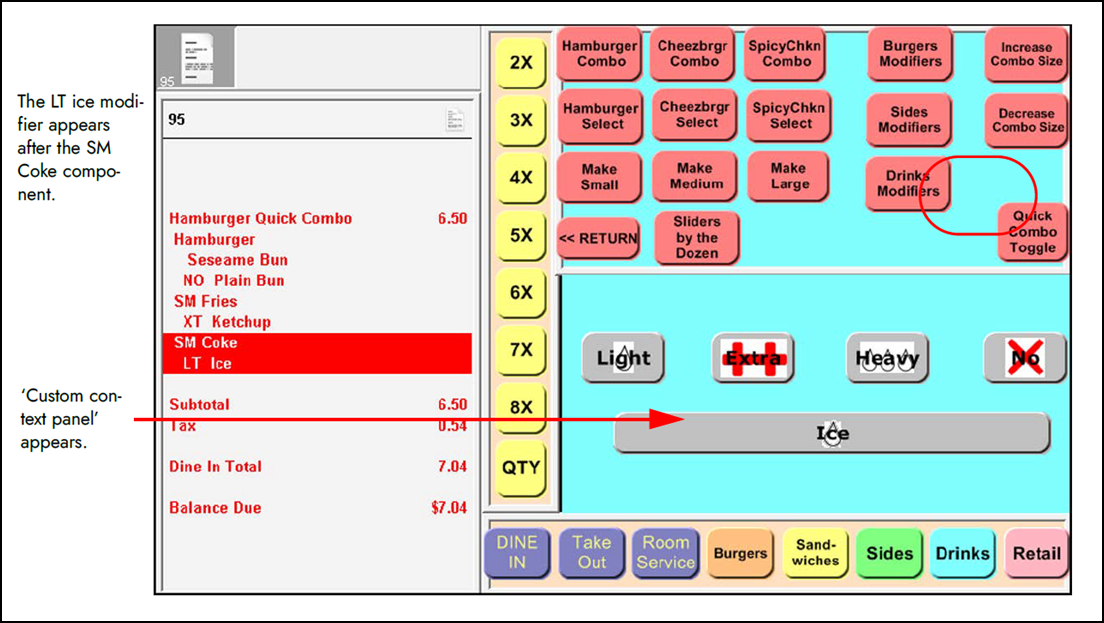
- Touch Light in the 'Custom context' panel and then touch Ice. The LT Ice modifier appears after the SM Coke component.
- Tender and close the check.
Continue to "Substituting quick combo components."