Configuring a package deal
If you offer other services, such as catering, you may also need to configure the system to provide a means for entering the sale of a package deal. A sale is considered a package deal when you include a meal with a service. For example, if your establishment is a dinner theatre, the price of the meal is included in the cost of the theatre ticket, qualifying this sale as a package deal. A package deal receipt must include each food item or beverage included in the package, with or without the price, and the adjusted total of zero. Please note the only configuration available in the Aloha POS system includes the price of each item with an adjusted total of zero. In addition, you must also include the price of each food or beverage item not included in the package deal and adjust the total accordingly. To avoid having the sale recorded in both the accounting system and the Aloha POS system, you must configure:
- A comp that brings the total of the items included in the package deal to a zero total.
- A Package Deal button that, when pressed, sends an identifier to the SRM device.
To configure a comp for adjusting the package deal price to zero:
- Select Maintenance > Payments > Comps.
- Click New and accept the system assigned number or click the ellipsis button (...) next to 'Number' to display the Number Assignment dialog box, from which you can choose an alternate number.
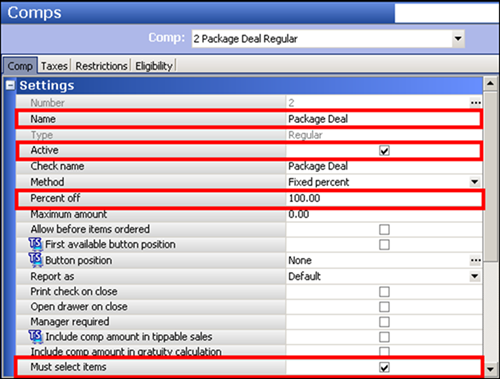
- Under the 'Settings' group bar, type a descriptive name for the comp, such as 'Package Deal.'
- Select Active.
- Type 100.00 in 'Percent off.'
- Select 'Must select items.'
- Make other selections as you normally would.
- Click Save and exit the Comps function.
To create a button for sending a package deal identifier to the SRM device:
- Select Maintenance > Screen Designer > Table Service Screen Designer or Quick Service Screen Designer.
- Select Work with Panels.
- Select Panel > Open Panel, select an available order screen panel (TS) or button functions panel (QS) to which to add the button, and click OK.
- Select an available button or create a new button. The Properties dialog box appears.
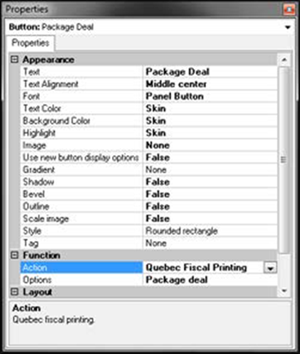
- Under the 'Function' group bar, select Quebec Fiscal Printing from the 'Action' drop-down list.
- Select Package deal from the 'Options' drop-down list.
- Under the 'Appearance' group bar, type Package Deal in place of the default text Quebec Fiscal Printing in 'Text.'
- Configure the remaining options as you would for any other button function.
- Select Panel > Save Panel.
- Select File > Exit to exit Table Service Screen Designer or Quick Service Screen Designer.
Continue to "Refreshing the data" or "Using Revenu Quebec Fiscal Requirements"