Configuring a delivery area using the configuration management tool
This section details the configuration requirements for defining your delivery area using a data source such as Zone.txt, MelissaData, or one you create, and the configuration management tool. If you are using a Map Pack file and the delivery area configuration tool, for more information, see "Configuring a delivery area using the delivery area configuration tool."
Importing and installing a data file
You can use a number of data sources for the creation of your delivery area, such as Zone.txt, MelissaData, or one you manually create.
Using Zone.txt
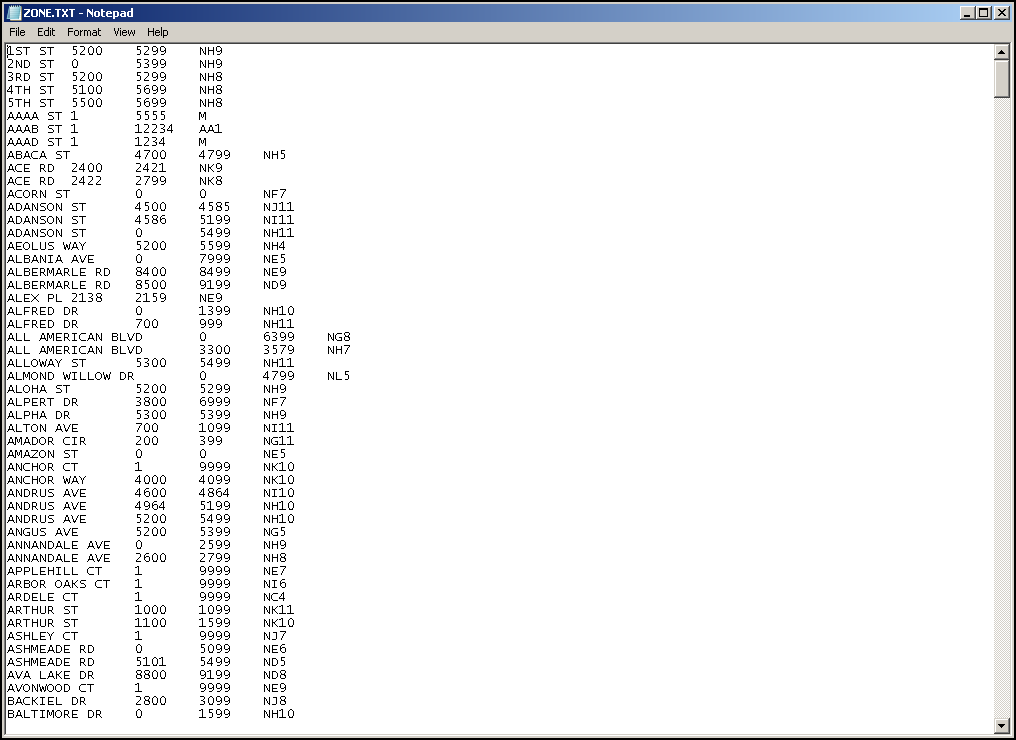
If you are upgrading from Aloha Delivery/Frequent Buyer to ATO and you have an existing Zone.txt file, you can choose to import the data in this file into ATO; however, if you do not already have an existing Zone.txt from using Delivery/Frequent Buyer, you can manually create this file using Notepad.exe.

This section defines the fields and procedure to manually create Zone.txt, which is a tab-delimited text file.
| Zone.txt Field | Required? |
|---|---|
| Street name | Yes |
| Starting address | Yes |
| Ending address | Yes |
| Zone | Yes |
Note: Column headers are not required in Zone.txt.
To manually create and enter data into Zone.txt:
- Launch Notepad.exe.
- Select File > New.
- Type in a street name.
- Press the space bar, then enter the street type. (St, Rd, Ave, etc.)
- Press Tab.
- Type the lowest address number to which you deliver on that street.
- Press Tab.
- Type the highest address number to which you deliver on that street.
- Press Tab.
- Type the Zone for the address range.
- Press Enter to begin entering the next record.
- Repeat the above steps for all streets within your delivery area.
- Save the file as "Zone.txt."
- Close the file and exit Notepad.
Note: A street range may have more than one entry, if the street is long and crosses zones. This is similar to sub-dividing a street in the Delivery Areas function.
Once you have a Zone.txt file, you can import it for use with ATO.
To import Zone.txt:
- With Takeout selected in the product panel, select Utilities > Takeout > Import Delivery Area Data.
- Select a store from the 'Owner' drop-down list.
- Select Zone.txt from the 'File Type' drop-down list.
- Click the ellipsis (...) to browse to the folder where you saved Zone.txt.
- Click Open.
- Click Next.
- Click Commit to finalize the import.
Using MelissaData or a file you create
You can choose to purchase and download delivery area data from MelissaData (www.MelissaData.com) or use the StreetAddress.csv file format to create this file, even if you do not purchase a dataset from MelissaData.

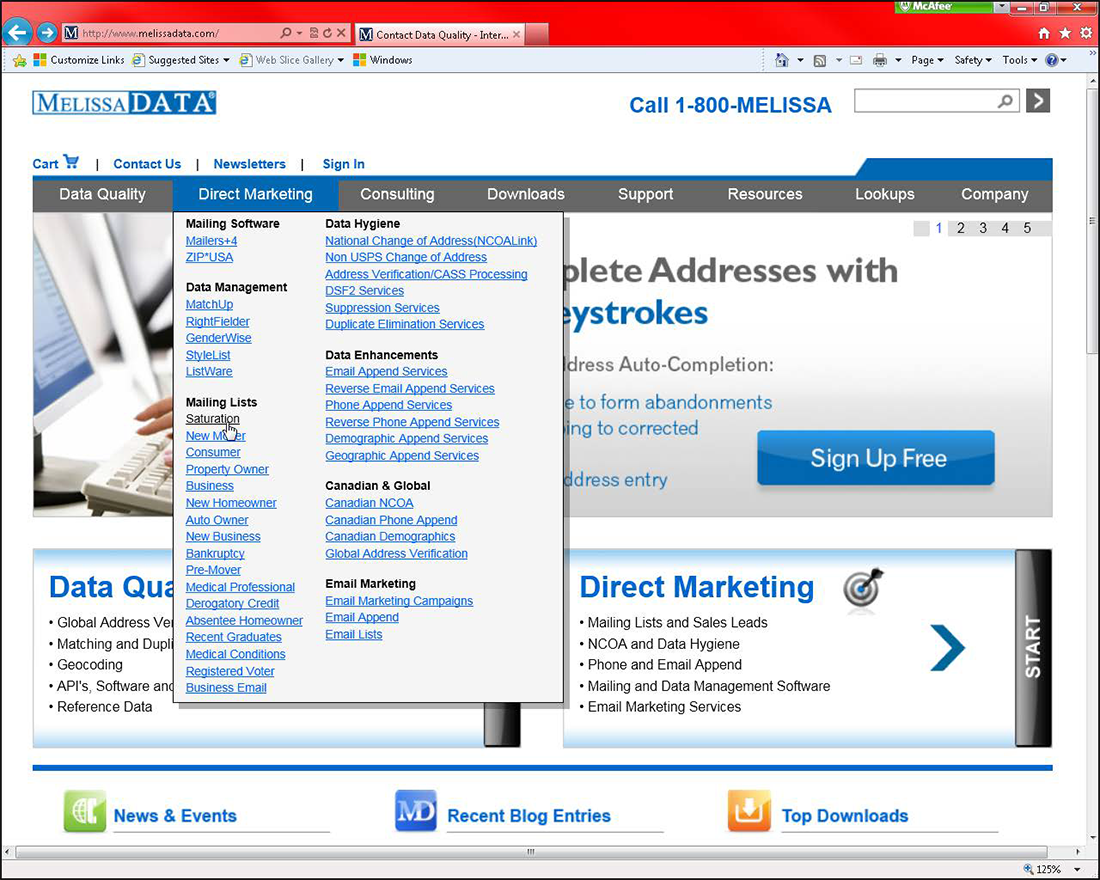
- Navigate to www.MelissaData.com in your Web browser.
- Select the Direct Marketing menu.
- Select Saturation in the 'Mailing Lists' group.
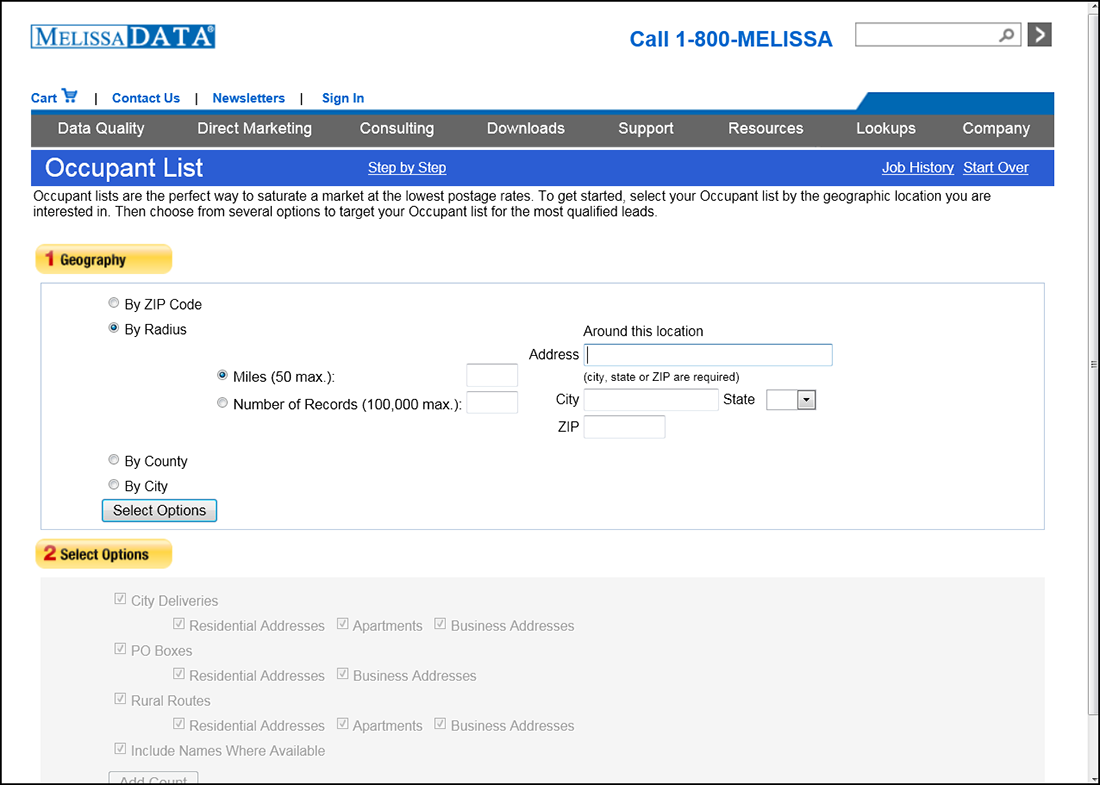
- Click Get Started.

- Select By Radius.
- Type your address, city, state, and ZIP code.
- Select Miles or Number of Records.
- Click Select Options.
- Clear PO Boxes and other options that are not viable delivery addresses for your operation.
- Click Add Count.
- Click Next Step to continue, if you are satisfied with the number of records.
- Select Comma Delimited (.csv).
- Click Next Step and follow the prompts to check out and download the purchased StreetAddresses.csv file.
Creating a StreetAddresses.csv File
If you choose to manually create your own street addresses file, you can use Excel to enter the data then import the completed file into ATO, instead of entering the delivery area information using the Delivery Areas function. You need a list of streets to reference.
| Field | Required |
|---|---|
| RBDI | No |
| Title | No |
| Address | Yes |
| City | Yes |
| State | Yes |
| Zip | Yes |
| Plus4 | No |
| Walkseq | No |
| Crrt | No |
| Endose | No |
| City_rural | No |
| Dpb | No |
| Dpbc | No |
| PrimaryPreName | No |
| PrimaryFirstName | No |
| PrimaryMiddleName | No |
| PrimaryLastName | No |
| PrimaryPostName | No |
| UpdateDate | No |
To create a StreetAddresses.csv file:
- Download StreetAddresses_Blank.csv from Aloha Update.
- Open the file in Excel.
- Copy or type the data into the required fields.
- Select File > Save as and save the file as StreetAddresses.csv.
- Close the file and exit Excel.
To import a street addresses file, for use with ATO:
- With Takeout selected in the Product panel, select Utilities > Takeout > Import Delivery Area Data.
- Select a store from the 'Owner' drop-down list.
- Select Melissa Data from the 'File Type' drop-down list.
- Click the ellipsis (...) to browse to the folder where you saved StreetAddresses.csv.
- Click Open.
- Click Next.
- Click Commit to finalize the import.
Note: Starting with the first record, ATO reads the address, city, state, and ZIP code fields. ATO sets the starting and ending address for a street. The system continues to read through the remaining records in the import file and:
- If the city, state or ZIP code is different for the same street, the system creates a new street record.
- If the starting address is lower than an existing record, the system updates the starting address with the new lower street number.
- If the ending address is higher than an existing record, the system updates the ending address with the higher street number.
Editing a delivery area
Whether you start from scratch or import street data, in most cases you need to edit your delivery area. Use the Delivery Areas function to create and edit your delivery area, including streets, street sections, neighborhoods, and zones.
Distance is not a required field. The system uses the distance defined for a street as a default in the event that the ATO mapping feature cannot calculate the distance to an address. Distance may also be defined at a lower level. ATO determines the distance based on the following hierarchy, from highest to lowest:
- Calculated by the ATO mapping feature.
- Defined for a street.
- Defined for a neighborhood.
- Defined for a zone.
- Defined for the delivery area.
City, state, and ZIP code information may come from other sources.
- The Melissa Data import contains city, state, and ZIP code information for each street. This information is imported as part of the 'Import Delivery Area Data' process at the street level.
- Zone.txt does not contain city, state, and ZIP code information; therefore, this data is not imported as part of the Import Delivery Area Data process. You can manually add this information in each street, neighborhood, zone, or delivery area following an import.
- The system uses 'Default city,' 'Default state,' and 'Default zip code' in the Takeout Settings > Customer Information tab, when this information is not imported or entered at the street, neighborhood, or zone level.
Similar to the distance hierarchy, the system determines the city, state, and ZIP code information based on the following hierarchy, from highest to lowest:
- Defined for a street.
- Defined for a neighborhood.
- Defined for a zone.
- Defined for a delivery area.
- Defined under the 'Customer information' group bar in Takeout Settings > Customer Information tab.
To edit a delivery area:
- With Takeout selected in the product panel, select Maintenance > Takeout Configuration > Delivery Areas.

- Right-click Delivery area, Neighborhood, or Zone and select Add street from the drop-down list.
- Type the name of the street.
- Type the lowest street number to which you deliver on that street in 'Lower street range.'
- Type the highest street number to which you deliver on that street in 'Upper street range.'
- Accept Both, or select Odd or Even from the 'Side of street' drop-down list, if you deliver to only one side of the street.
- Type the number of miles or kilometers from your store to the street in 'Distance,' if you charge a delivery fee by distance.
- Optionally, type a city, state, and ZIP code.
- Repeat this procedure for all streets in your delivery area.
- Click Save.
- Exit the Delivery Areas function or continue to the next procedure.
Defining a street section
Long streets may cross zone boundaries. In this case, you can sub-divide a street into multiple sections, then drag the street section to the zone in which it is located.
To define a street section:
- Right-click a street and select Add street section from the drop-down list.
- Type the lowest street number to which you deliver in 'Lower street range' for that street section.
- Type the highest street number to which you deliver in 'Upper street range' for that street section.
- Accept Both, or select Odd or Even from the 'Side of street' drop-down list, if you only deliver to one side of this street.
- If you charge a delivery fee by distance, type the number of miles or kilometers from your store to the street in 'Distance.'
- Optionally, type a city, state, and ZIP code.
- Repeat the steps above for additional street sections.
- Click Save.
- Exit the Delivery Areas function or continue to the next procedure.
Defining neighborhoods
Neighborhoods are not a required configuration, but can help group streets, if necessary. ATO does not support delivery fees or other functionality tied to neighborhoods. Skip this procedure, if you are not using neighborhood grouping.
To define a neighborhood:
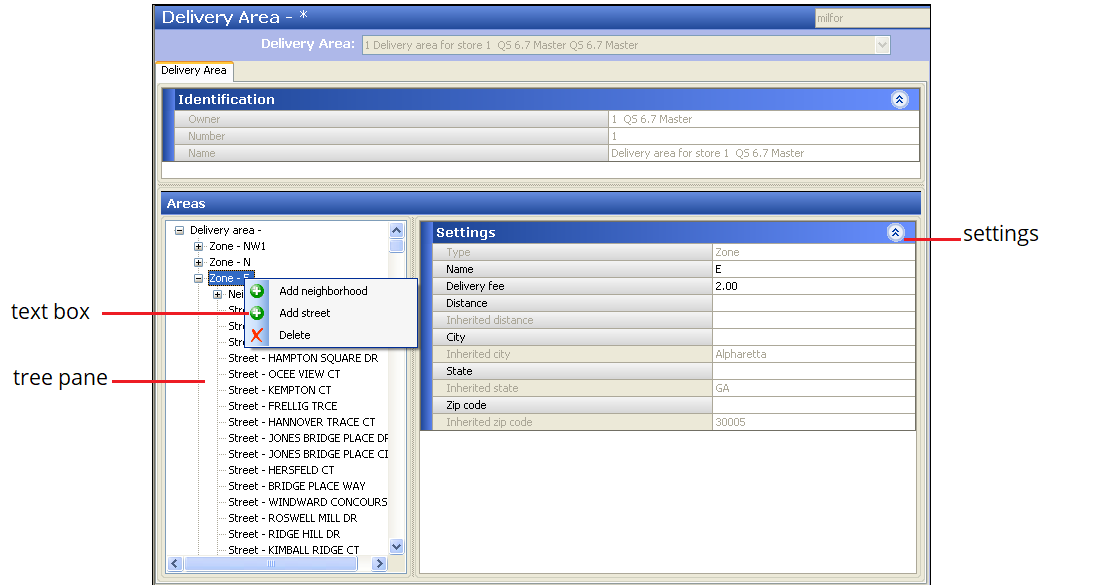
- Right-click a Zone, and select Add neighborhood from the drop-down list.
- Type a name for the neighborhood.
- Type the number of miles or kilometers from your store to the neighborhood in 'Distance,' if you charge a delivery fee by distance.
- Type a city, state, and ZIP code, if necessary.
- Right-click each street and drag it to its respective neighborhood.
- Repeat this procedure for all neighborhoods.
- Click Save.
- Exit the Delivery Areas function or continue to the next procedure.
Defining delivery zones
Use this section to define zone information for a delivery area. Skip this procedure, if you are not using zones. We recommend you use three or less characters to name a zone, such as "N," "A1," or "SE3." Typically a zone name aligns with the compass direction from the store; however, it is up to you to determine your zone naming scheme. The zone name appears on the delivery order, when configured, to help you efficiently assign orders going to the same vicinity.

To define a delivery zone:
-
Right-click the delivery area and select Add zone from the drop-down list.
-
Type a name for the zone.
-
If you use delivery fees by zone, type the delivery fee amount in 'Delivery fee.'
-
If you charge a delivery fee by distance, type the number of miles or kilometers from your store to the zone in 'Distance.'
-
Type a city, state, and ZIP code, if necessary.
-
Left-click each street or neighborhood and drag it to its respective zone.
Note: You can move multiple streets into a neighborhood. Left-click the first street, hold down the Shift key, and left click the last street to include. This includes all streets in the range. To select multiple different addresses, left-click the mouse, hold down the Ctrl key, and left-click each individual street you want to include.
-
Repeat this procedure for all remaining zones.
-
Click Save.
-
Exit the Delivery Areas function.