Configuring a delivery area using the delivery area configuration tool
This section details the configuration requirements for defining your delivery area using a Map Pack file and the new delivery area configuration tool. The MapPack data and the delivery area configuration tool work in conjunction with the Map screen to enable you to visualize delivery orders on a map. If you plan on using Zone.txt, MelissaData, or some other data source, or if you do not plan to use the Map screen, for more information, see "Configuring a delivery area using the configuration management tool."
Downloading and installing the prerequisites for the delivery area configuration tool
This section contains a list of the prerequisites you must accomplish on the BOH file server prior to using the delivery area configuration tool.
- Install .NET 4.5.2 on the BOH file server and .NET 4.0 on each terminal from which to access the Map screen.
- Install the latest version of Geobase Installer.
- Download the latest Map Pack for your area. (Note: Only download the file pertinent to your region.)
- Ensure your Aloha POS is version v13.1 or later.
- Acquire the Aloha Takeout Delivery Mapping license.
Note: Download the latest version of Geobase Installer, the Map Pack for your region, and the latest version of Aloha POS at www.radiantupdate.com.
Installing and importing the map pack file
Because Map Pack files are so large, you only need to download the file specific to your region, which contains more address and street information than necessary for your delivery area. For example, a store in Fort Worth, Texas downloads the Map Pack file for Texas, which includes address and street information for the entire state. After you download the file, you use the delivery area configuration tool to define the delivery area for your specific operation.
| File Name | Release Date | File Size (MB) | Includes |
|---|---|---|---|
| ATOGeobaseMapPack_MidWest_2010Q2.msi | 10/14/2010 | 264.00 | North & South Dakota, Nebraska, Kansas, Oklahoma, Minnesota, Iowa, Missouri, Arkansas |
| ATOGeobaseMapPack_NorthEast_2010Q2.msi | 10/14/2010 | 268.00 | Maine, New Hampshire,Vermont, Massachusetts, Connecticut, Rhode Island, New York, New Jersey, Pennsylvania |
| ATOGeobaseMapPack_SouthEast_2010Q@.msi | 03/29/2012 | 477.00 | Louisiana, Kentucky, Tennessee, Mississippi, Alabama, West Virginia, Maryland, Delaware, District of Columbia, Virginia, North & South Carolina, Georgia, Florida |
| ATOGeobaseMapPack_GreatLakes_2010Q2.msi | 10/14/2010 | 264.00 | Wisconsin, Illinois, Michigan, Indiana, Ohio |
| ATOGeobaseMapPack_MountainWest_2010Q2.msi | 10/14/2010 | 220.00 | Montana, Idaho, Wyoming, Nevada, Utah, Colorado, Arizona, New Mexico |
| ATOGeobaseMapPack_Texas_2010Q2.msi | 10/14/2010 | 188.00 | Texas |
| ATOGeobaseMapPack_PacWest_2010Q2.msi | 10/14/2010 | 279.00 | Alaska, Washington, Oregon, California, Hawaii |
| ATOGeobaseMapPack_Territories_2010Q2.msi | 10/14/2010 | 106.00 | Puerto Rico, US Virgin Islands |
Note: Only include one Map Pack file per region.
You must place the Map Pack file in the MapData directly; however, the configuration is different with the Aloha POS version you use. If you use Aloha POS v14.1 or earlier, you place the Map Pack file in the MapData folder on the BOH site controller and define the data path to point to that location.
Aloha POS v15.1 or later requires least privilege mode. For this reason, you place the Map Pack file in the MapData folder on each the FOH terminal and define the data path to point to that location for each respective terminal. Make sure the MapData folder is in the same location across all FOH terminals.
To store the Map Pack file and define the data path:
-
Request the appropriate Map Pack from your NCR representative.
-
If you use Aloha POS v14.1 and earlier, use a portable device to save the Map Pack file in the MapData folder on the BOH site controller.
-OR-
If you use Aloha POS v15 and later, use a portable device to save the Map Pack in the MapData folder on each FOH terminal.
To define the path on which the Map Pack file is stored:
- With Takeout selected in the product panel, select Maintenance > Takeout Configuration > System Parameters. If you use Aloha POS v14.1 and earlier, this is done on the BOH site controller. If you use Aloha POS 15.1 or later, this is done on each FOH terminal.
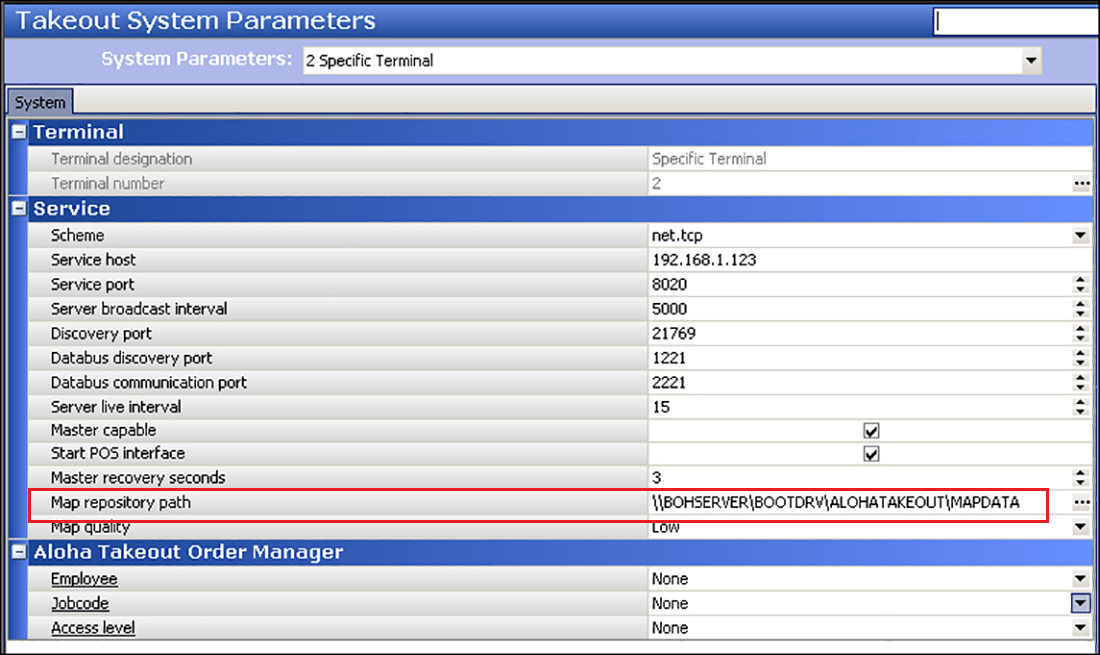
- Under the 'Service' group bar, type the data path in 'Map repository path' for your MapData folder or click the ellipsis (...) button to navigate to the data path. The system defaults to Z:\Bootdrv\Aloha Takeout\MapData.
- Click Save.
- If you use Aloha POS 15.1 and later, repeat this procedure on each FOH terminal.
- Exit the System Parameters function.
To import the Map Pack file for use with the delivery area configuration tool:
-
Navigate to the AlohaTakeout\Bin directory.
-
Locate and select Ncr.Hospitality.DeliveryArea.Configurator.UI.exe. The Select a Delivery File to Edit screen appears. The system pre-populates the file name as 'DeliveryArea.xml.'
-
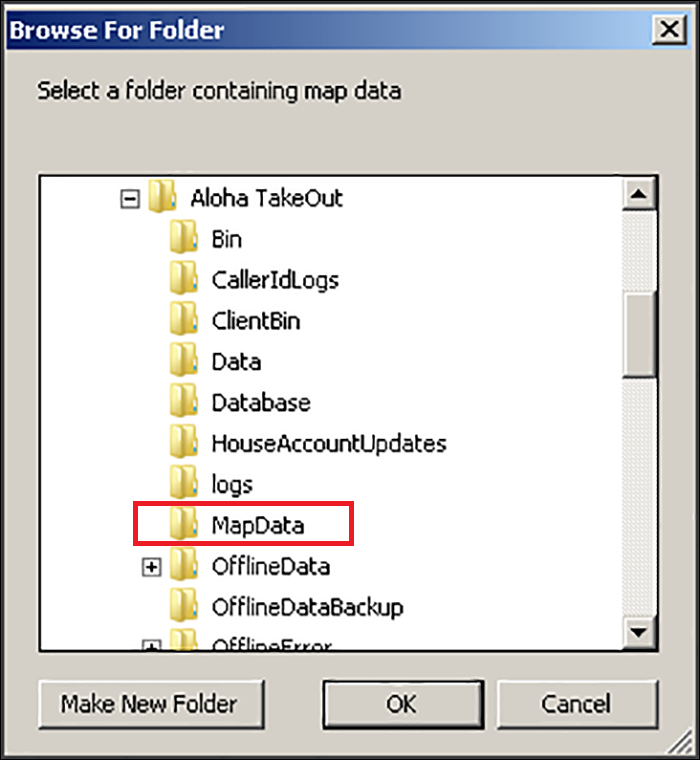
Click Open. A Browse For Folder screen appears.
-
Select the MapData folder, which is located within the Aloha Takeout folder tree.
-
Click OK. The MainWindow screen appears.
-
Click Switch to Map View at the bottom of the screen.
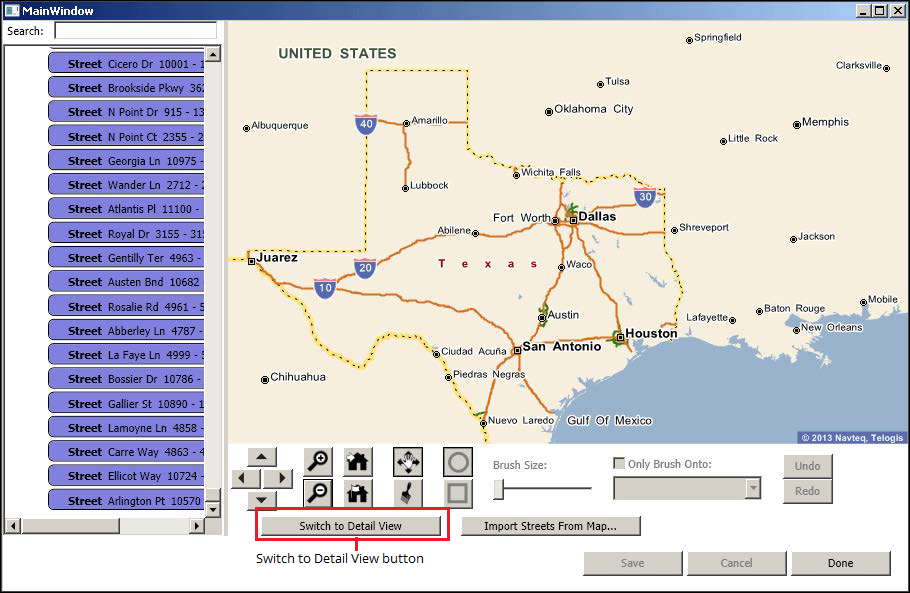
Note: Switch to Map View displays the Map Viewer. The Switch To Map View button appears when viewing the Properties screen. Conversely, the Switch to Detail View button appears when viewing the Map screen.
-
Click Save.
Defining the delivery area
The delivery area configuration tool enables you to easily define your delivery area. Prior to defining your delivery area, you set your Home View which is the map area you see on the ATO FOH Map screen. The delivery area configuration tool contains tools to assist you with the navigating the map and creating your delivery area.
Delivery area configuration tools
The MainWindow screen contains tools for you to navigate and create your delivery area.
| Button | Description |
|---|---|
| Moves the map view up. | |
| Moves the map view to the right. | |
| Moves the map view down. | |
| Moves the map view to the left. | |
| Zooms in one level on the map view. | |
| Zooms out one level on the map view. | |
| Navigates to Home View. Note: You must have already set a Home View. | |
| Sets Current View to Home View. | |
| Moves the map tool in any direction using the hand tool. | |
| Selects the paint brush to begin defining your delivery area. After selecting the brush, choose a brush style and size. | |
| Changes your brush to paint as a circle. Use the 'brush size' bar to increase or decrease the size of your paint brush circle. | |
| Changes your brush to paint as a square. Use the 'brush size' bar to increase or decrease the size of your paint brush square. | |
| Reverses the most recent action. | |
| Restores the most recent action. |
Note: The 'Only Brush Onto' selection assists you in defining your delivery zones. Clear the tool to paint anywhere on your map. Select the tool and an area or a zone from the drop-down list to constrain your brushing. To erase a paint action, clear 'Only Brush Onto' and drag the mouse over the area while holding down the right mouse button. Right-clicking the mouse also functions as an Undo action.
Setting the home view
Setting the Home View identifies the area for which you view your Map in the delivery area configuration tool and the Map screen on the ATO FOH. Setting the Home View does not define your delivery area.
Note: As you navigate away from your Home View or out of your delivery area, you can use the Navigate to Home View to return to the Home View screen.
To set the home view:
- Use the right, left, up, and down arrows or the hand tool to navigate to the center of your delivery area. Use zoom in or zoom out, as necessary.
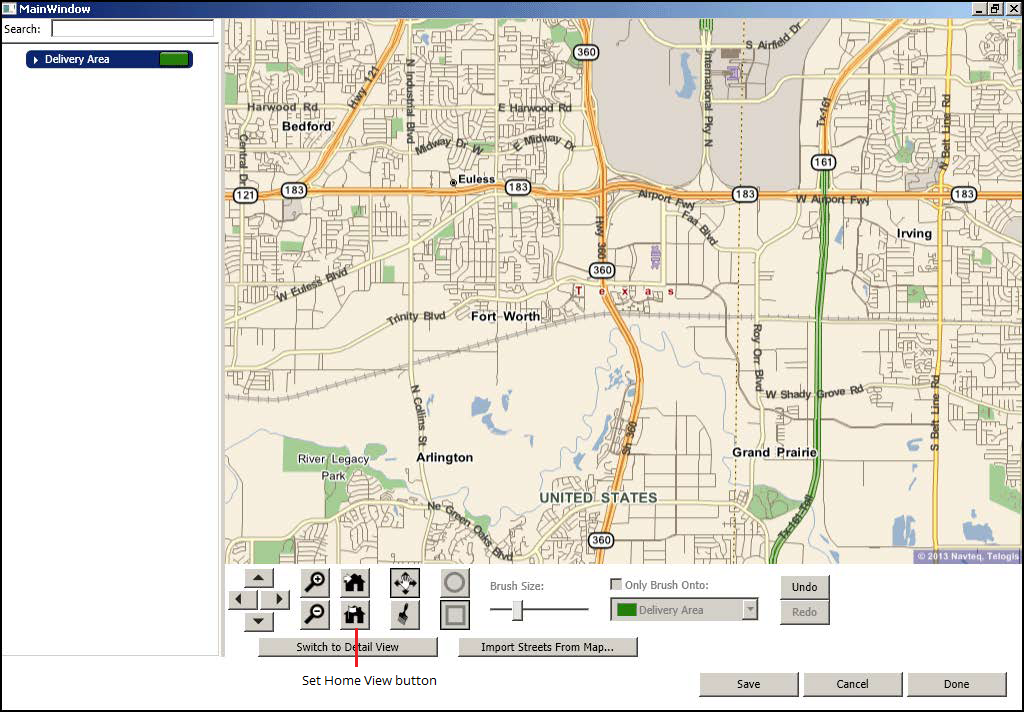
- Click Set Home View to Current View once you identify your area. The area should be slightly larger than your delivery area.
- Click Save.
Configuring the delivery area
The delivery area configuration tool allows you to define your delivery area and then import the street and address information into your delivery area. It is necessary to set your delivery area before you set your delivery zones.
To configure the delivery area:
- Click Navigate to Home View.
- Click the Paint brush.
- Choose either the circle or square as your paint brush style.
- Use the 'Brush Size' slider to adjust the size of the paint brush, if necessary.
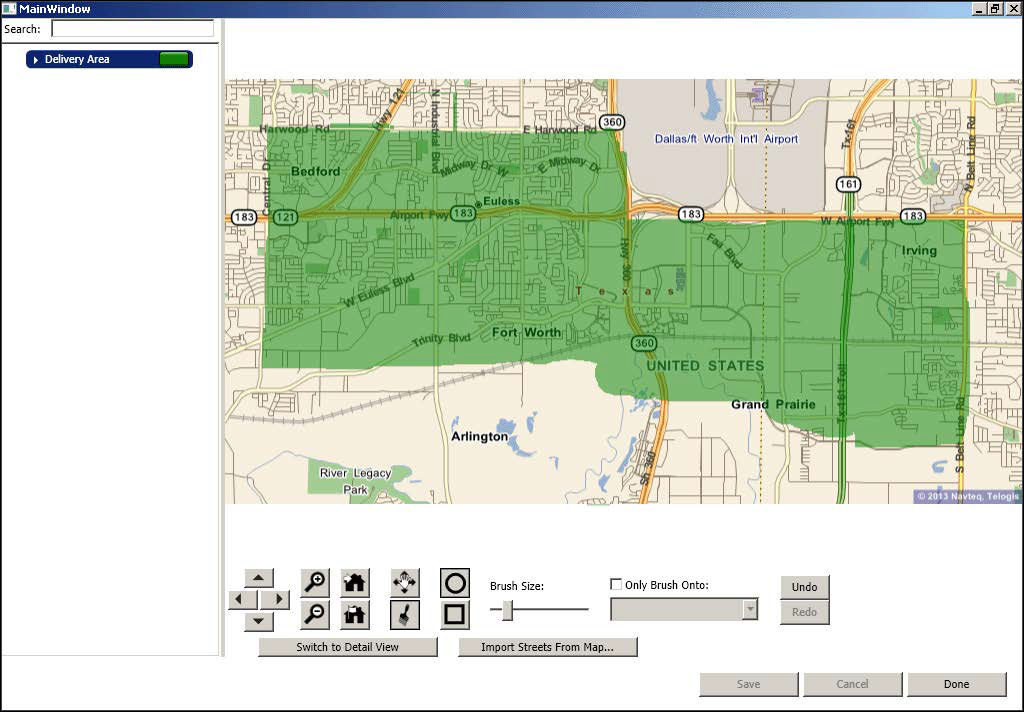
- Use the mouse to place the paint brush on the map in the starting location, press and hold the left mouse button, drag the paint brush across the screen, and release the left mouse button, to draw your delivery area.
- When you finish defining your delivery area on the map, click Import Streets From Map. A Replace Existing Streets screen appears.
- Click Yes to replace any pre-existing delivery street information with the highlighted delivery area (recommended) or click No to merge the map import with any existing streets in the delivery area.
- Click Save.
Changing the background color
The background color of the delivery area defaults to green, which you can change to a color of your choosing. You can follow the same procedure to change the background color for delivery zones. Select the delivery zone for which you wish to change the background color and follow the remaining instructions.
To change the background color:
- On the left side of the screen, click Delivery Area.
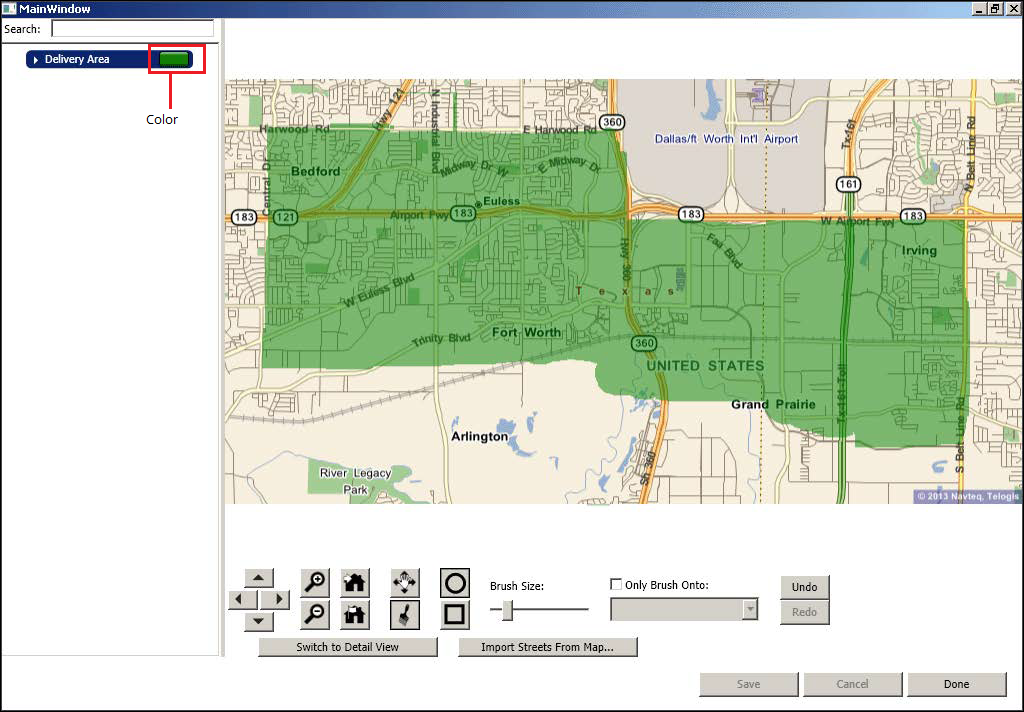
- Click the color next to the delivery area. A color palette window appears.
- Select a new color.
- Click OK.
Defining delivery zones
If you want to include delivery zones within your defined delivery area, you must create a delivery area first, then you define a delivery zone. You can then input delivery zone properties, such as a name for the delivery zone or delivery fees for a particular delivery zone. Delivery zones are not required for using the Map screen and you can skip this section if you do not use delivery zones.
To define delivery zones:
-
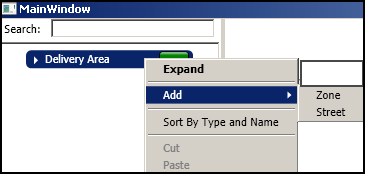
On the left side of the screen, right-click Delivery Area and select Add from the drop-down menu that appears.
-
Select Zone.
Note: The first time you select Zone, the system creates two zones. One delivery zone contains all the addresses within the delivery area and the second delivery zone contains no information.
-
Repeat this procedure for each delivery zone you need to create.
Note: To change the background color for a zone, for more information, refer to "Changing the background color.".
-
Click a Zone on the left side of the screen.
-
Select the brush tool at the bottom of the screen.
-
Choose the circle or square as your paint brush style and use the slider to change the brush size, if necessary.

-
Select Only Brush Onto.
-
Select Delivery Area from the drop-down list. This confines the defining of your delivery zones to your delivery area.
-
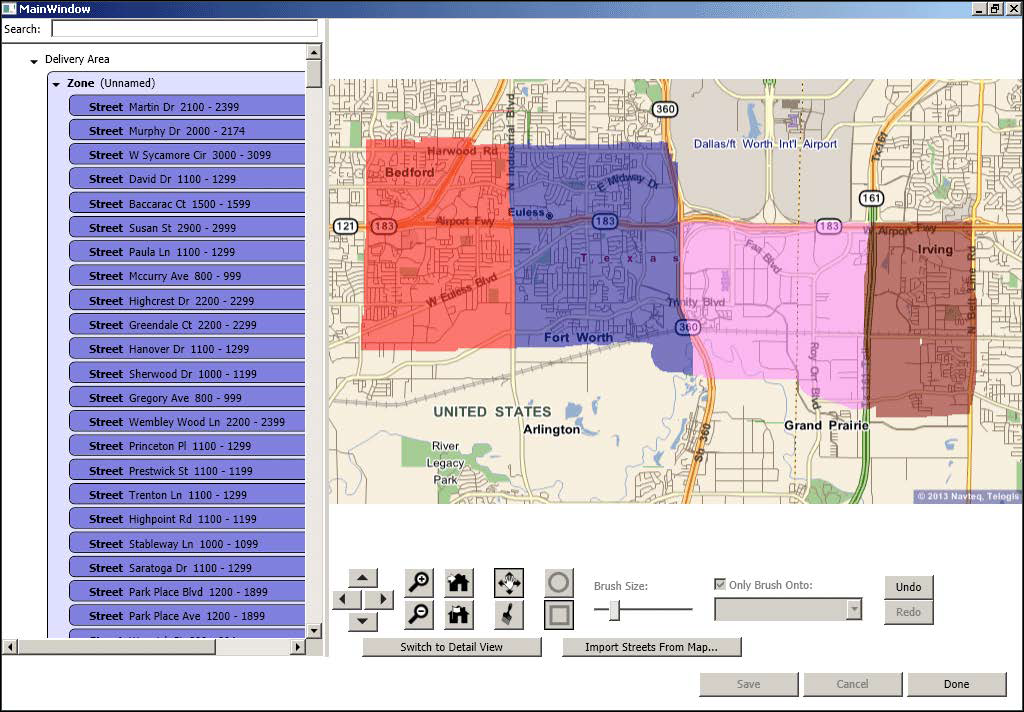
Use the mouse to place the paint brush on the map in the starting location, press and hold the left mouse button, drag the paint brush across the screen, and release the left mouse button, to draw your delivery area.
-
After defining each of the delivery zones, click Import Streets From Map at the bottom of the screen. A Replace Existing Streets screen appears.
-
Click Yes to replace any pre-existing delivery street information with the indicated map regions (recommended) or click No to merge the map import with any existing streets in the zones. The utility adds the street and address information to each delivery zone.
-
Click Save.
To define delivery zone properties:
-
Click Switch to Detail View.
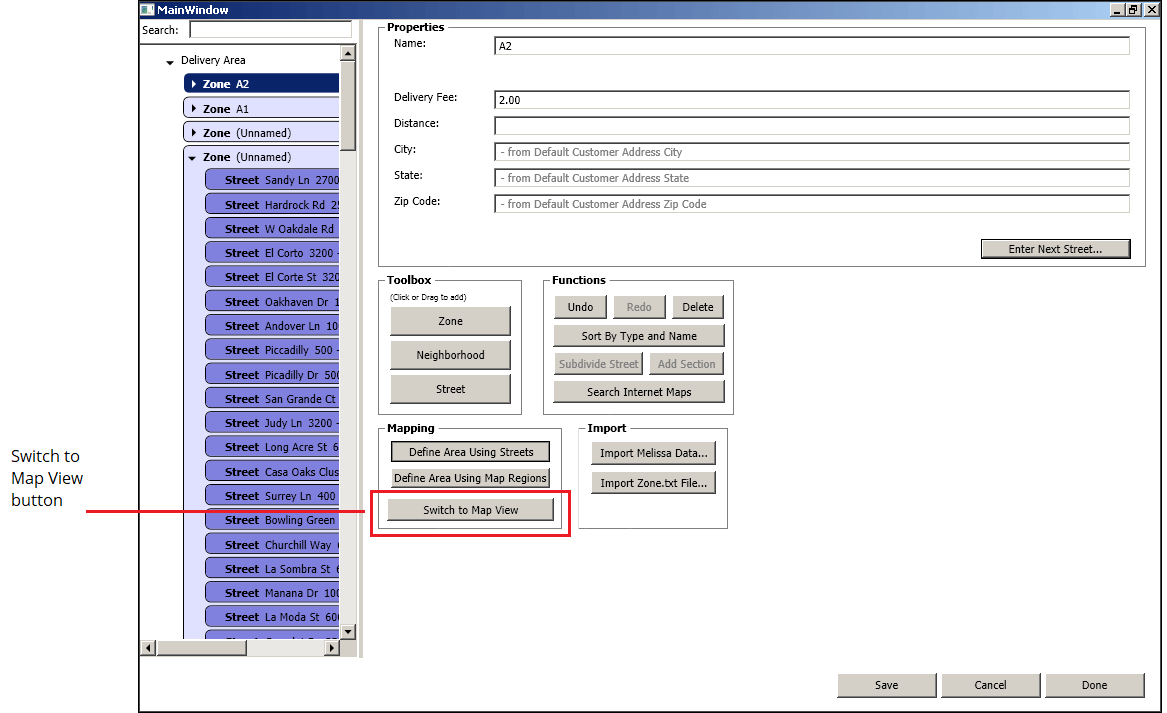
-
Select a delivery zone on the left side of the screen.
-
Type a name for the zone.
Note: We recommend you use three or less characters to name a zone, such as "N," "A1," or "SE#." Typically a zone name aligns with the compass direction from the store; however, it is up to you to determine your zone naming scheme. The zone name appears on the delivery order, when configured, to help you efficiently assign delivery orders going to the same vicinity.
-
If you use delivery fees by zone, type the delivery fee amount in 'Delivery Fee.'
-
If you charge a delivery fee by distance, type the number of miles or kilometers from your store to the zone in 'Distance.'
-
Repeat this procedure for all remaining zones.
-
Click Save.
Defining neighborhoods
Neighborhoods are not a required configuration, but can help group streets, if necessary. ATO does not support delivery fees or other functionality tied to neighborhoods. Skip this procedure, if you are not using neighborhood grouping.
Note: You cannot use the paint brush utility tool to create neighborhoods nor can you view them on the ATO FOH Map screen.
To define neighborhoods:
- Right-click a zone, and select Add neighborhood from the drop-down list.
- Type a name for the neighborhood.
- Type the number of miles or kilometers from your store to the neighborhood in 'Distance,' if you charge a delivery fee by distance.
- Type a city, state, and ZIP code, if necessary.
- Left-click each street and drag it to its respective neighborhood.
- Repeat this procedure for all neighborhoods.
- Click Save.