Configuring the forecast reports
A forecast report is a planning tool that allows you to visually see the bin quantities for the upcoming forecasted intervals for the day. Aloha Kitchen offers two forecast reports, Forecast report and Forecast Estimate report. Both reports read sales information from four previous weeks of subdirectories, or from NCR BackOffice, to predict the quantity of items needed in the bin for a specific time interval. They both compares the projected quantity against the items sold.
If you established a forecast minimum quantity, as instructed in Establishing a forecast minimum quantity per bin, we recommend you implement and use the Forecast Estimate report as this report displays the Min column. This allows you to compare the historical sales data against the overridden forecast quantity. You would not implement both reports.
Reference: Refer to Operating the forecast reports for an example of the forecast reports.
You configure the forecast report in two steps. First you configure the layout of the forecast report in Kitchen Settings. Then you add a bump bar command for bump bar users to access the report or a touch screen command for touch screen users to access the report.
Activating and configuring the layout of the forecast reports
You must access Kitchen Settings to activate the forecast bin feature, enable the forecast reports, the amount of space on a kitchen screen for which to display the reports, the interval on which you want to report, and the rows and columns on the reports.
To configure the layout of the forecast reports:
-
With Kitchen selected in the product panel, select Maintenance > Kitchen Configuration > Kitchen Settings.

-
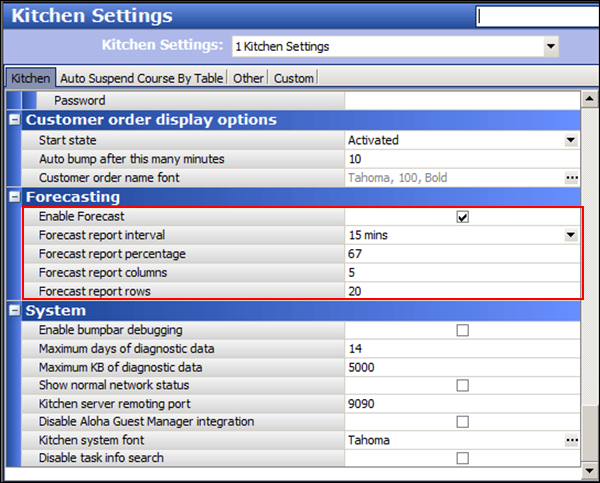
Under the 'Forecasting' group bar, select Enable Forecast to activate the forecast generation engine and enable the system to calculate forecasted bin quantities. Selecting this option exposes all other forecast report options.
Note: The 'Enable Forecast' option activates the Forecast Bins feature. If you clear this option, the system does not generate forecasted bin quantities or populate the 'Start' section of the bin.
-
Select the interval for which you want Aloha Kitchen to generate default quantities in 'Forecast report interval.' The intervals separate the forecast reports, using 15 minutes as the default.
-
Type the percentage of the screen to reserve for the forecast reports. The default percentage is 67 percent of the screen.
-
Type the number of columns to always appear on the forecast report. The default number is 6.
-
Type the number of rows to always appear on the forecast report. The default number is 24.
Note: Unless otherwise instructed, leave the 'Forecast report interval,' 'Forecast report percentage,' 'Forecast report columns,' and 'Forecast report rows' as their defaults to ensure optimal visibility.
-
Click Save and exit the Kitchen Settings function.
Providing access to a forecast report with command buttons
Most sites access a forecast report with command buttons, either from a bump bar or a touch screen. This allows you to use the kitchen screen for your normal functions.
If you use a bump bar, ensure your bump bar layout includes a 'Show Forecast Estimate' or 'Show Forecast Report' command in the Bumpbar Layout function.
To configure a bump bar command to access a forecast report:
- With Kitchen selected in the product panel, select Maintenance > Hardware > Bumpbar Layout.
- Select a bump bar layout in use from the drop-down list.
- Select the Design tab.
- Under the 'Setting' group bar, select Show Forecast Estimate or Show Forecast Report from the 'Command' drop-down list.
- Complete the remaining options, such as text, button color, font, and others, as you would for any other bump bar command.
- Repeat this procedure for any other bump bar layout on which to include a forecast report command.
- Exit the Bumpbar Layout function.
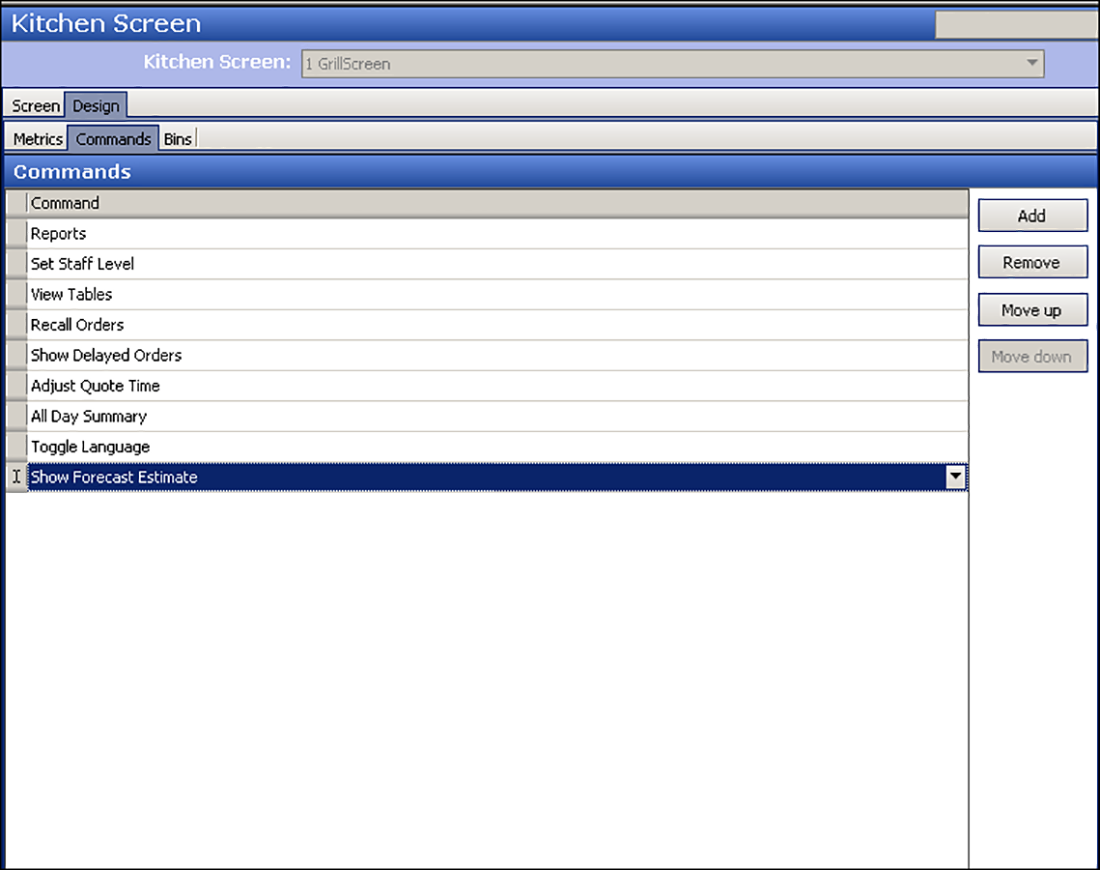
If you use a touch screen, you must add a 'Show Forecast Estimate' or 'View Forecast Report' command in the Kitchen Screen function.
To configure a touch screen command to display a forecast report:
- With Kitchen selected in the product panel, select Maintenance > Hardware > Kitchen Screen.
- Select the kitchen screen to which you added your bins from the drop-down list.
- Select the Design tab.
- Select the Commands tab.

- Under the 'Commands' group bar, click Add. A new row appears.
- Select Show Forecast Estimate or View Forecast Report from the drop-down list.
- Click Move up or Move down to organize the commands from left to right on the screen.
- Click Save.
- Repeat this procedure for any other kitchen screen on which to include a forecast report command.
- Exit the Kitchen Screen function.
Configuring a forecast report on dedicated screen
Alternatively, you can use a dedicated kitchen screen to always display a forecast report. This scenario is for sites that want a report to always be visible on-screen and you cannot use the kitchen screen for any other function. Note: You cannot toggle away from the report.
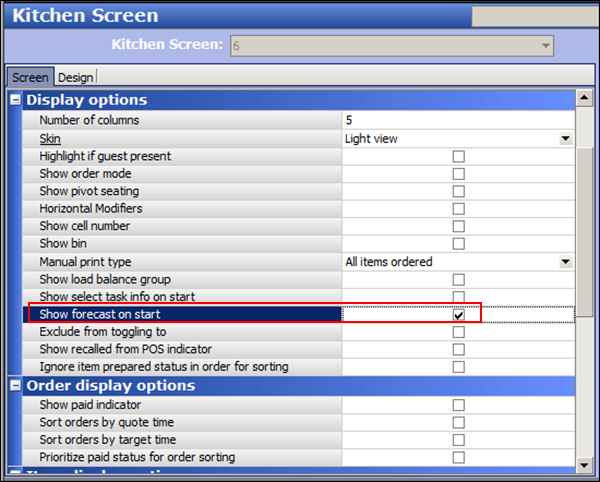
Even though you dedicate the screen to the forecast report, it is important to add all forecast bins in use for the entire restaurant to the screen in the same way you added them to a bin area. This ensures an association between the report and all existing forecast bins, as explained in Defining a forecast bin. You must also select 'Show forecast on start.'
To configure a forecast report to appear on a dedicated screen:
- With Kitchen selected in the product panel, select Maintenance > Hardware > Kitchen Screen.
- Select a kitchen screen in use from the drop-down list.

- Under the 'Display options; group bar, select Show forecast on start to always display the forecast report.
- Click Save.
- Repeat this procedure for any other kitchen screens on which to configure a forecast report on a dedicated screen.
- Exit the Kitchen Screen function.