Creating a custom FOH report
You use the Custom FOH Reports function to create your report and the content within the report. Before you start, you need to be aware of the variables to use in the report and the rules to follow the correct syntax for the report. If you do not know these, the report may not operate correctly or will not generate data at all. Once you understand the variables and the configuration rules, you can use the expression builder inside the configuration tool to build your report.
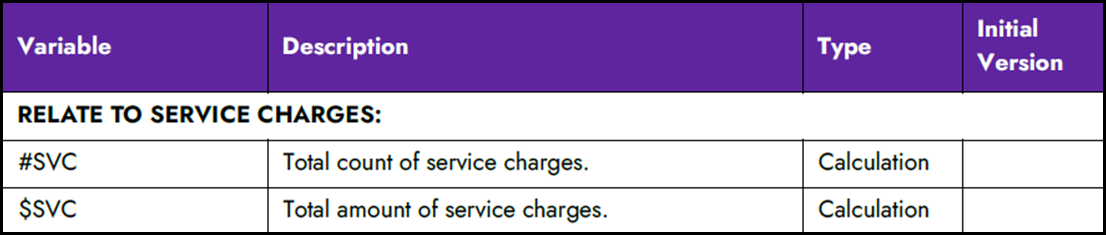
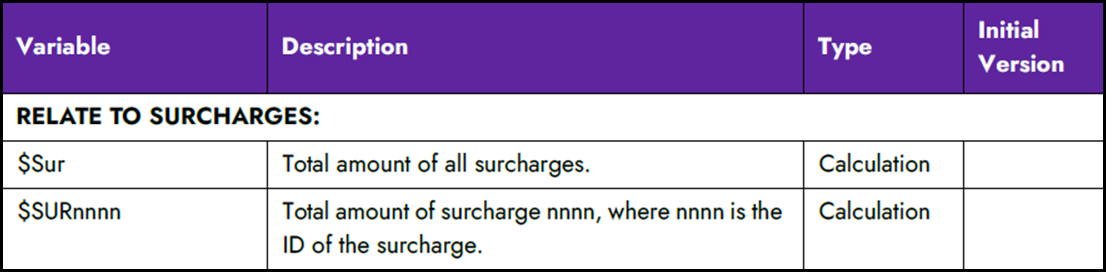
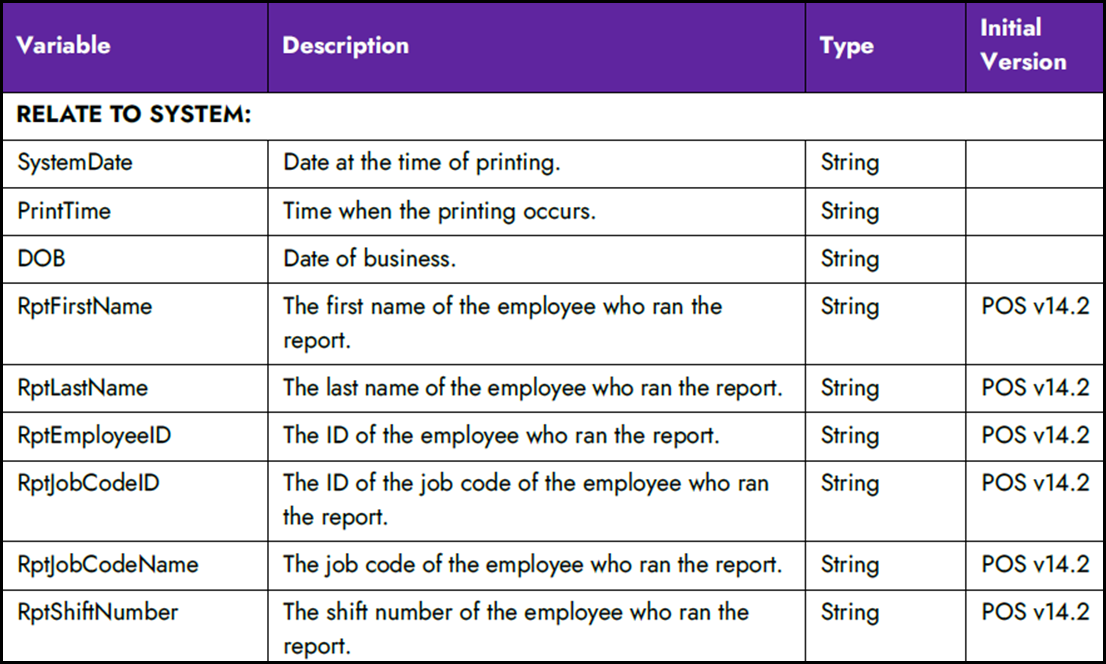
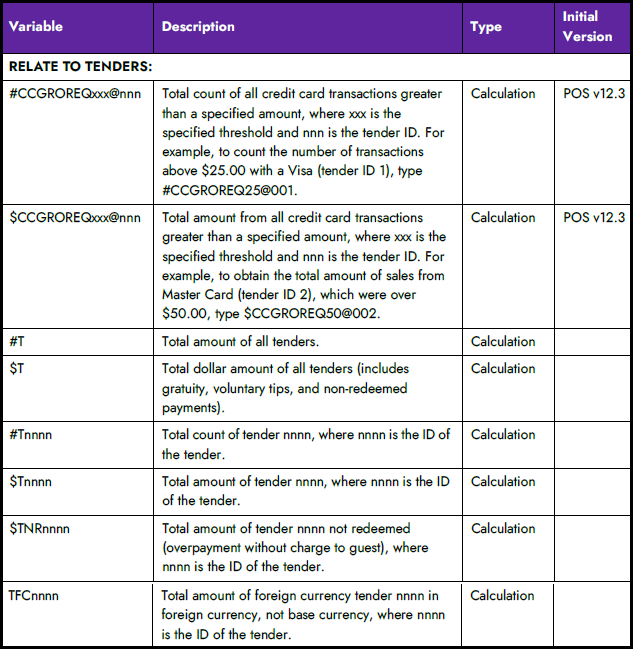
Understanding configuration variables
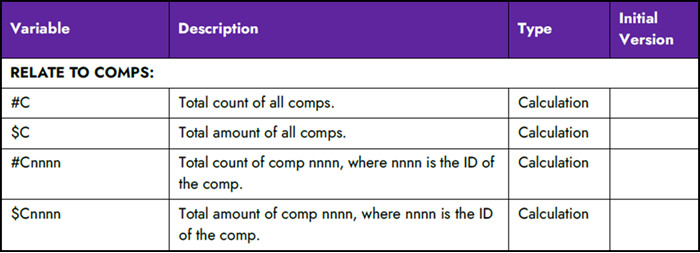
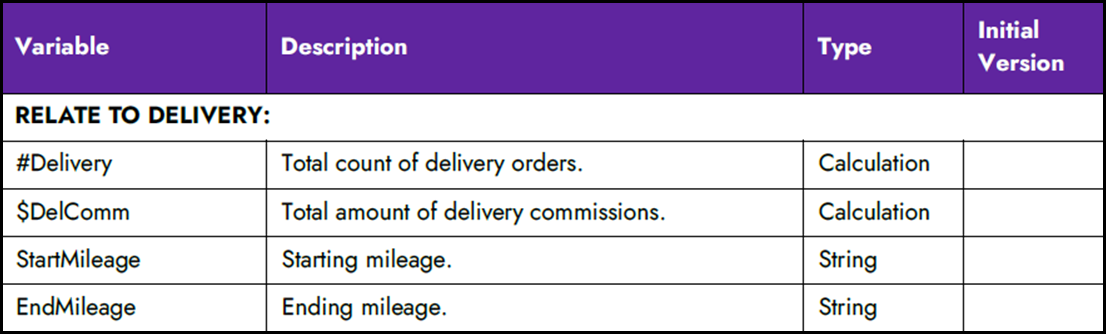
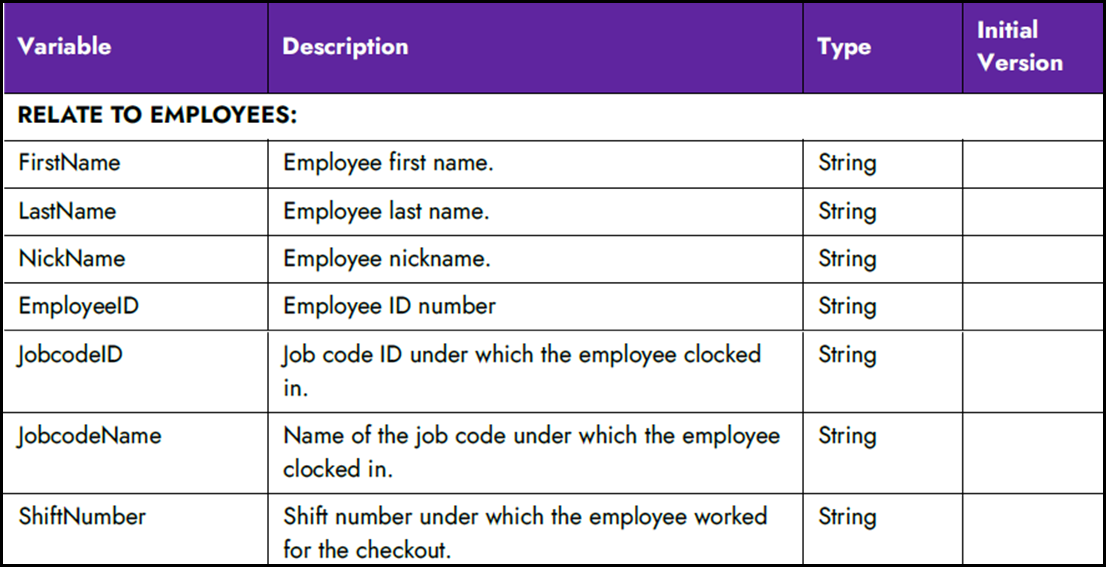
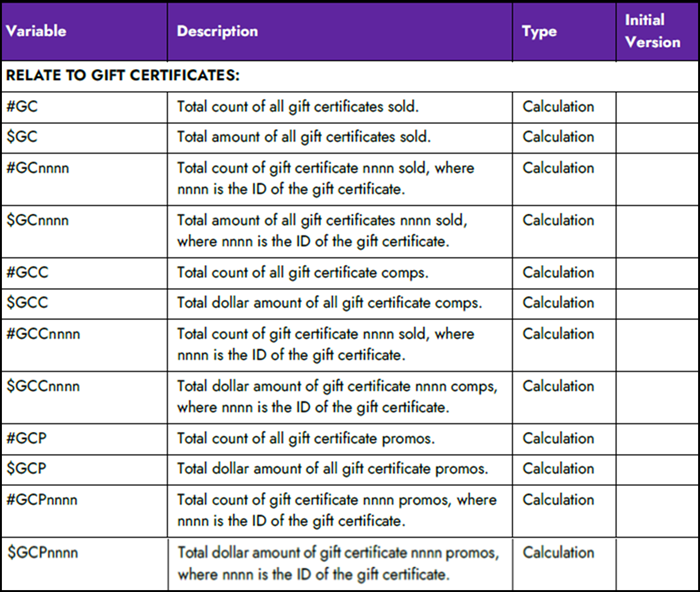
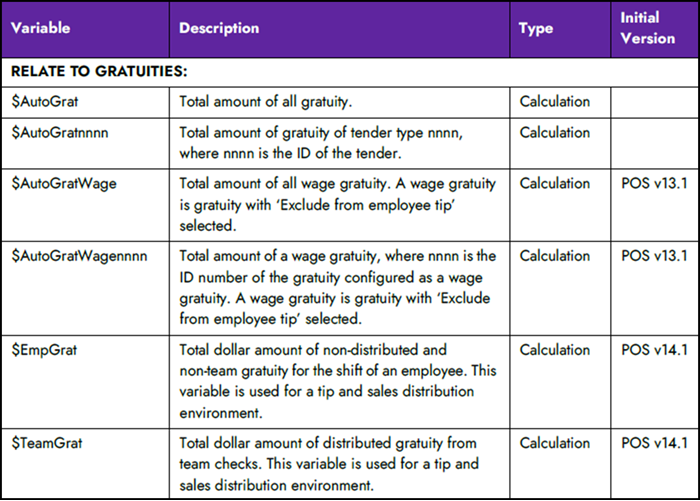
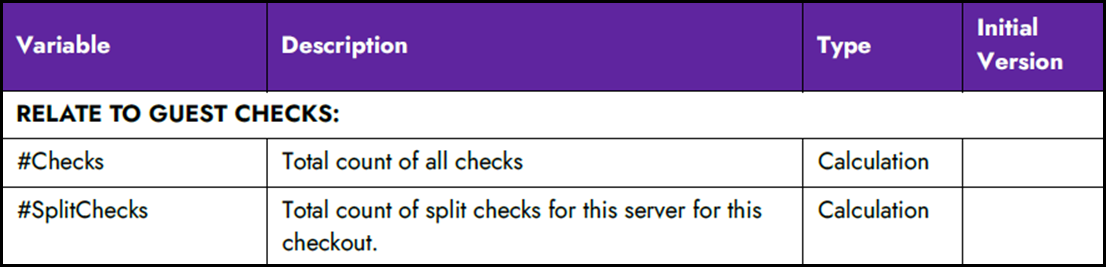
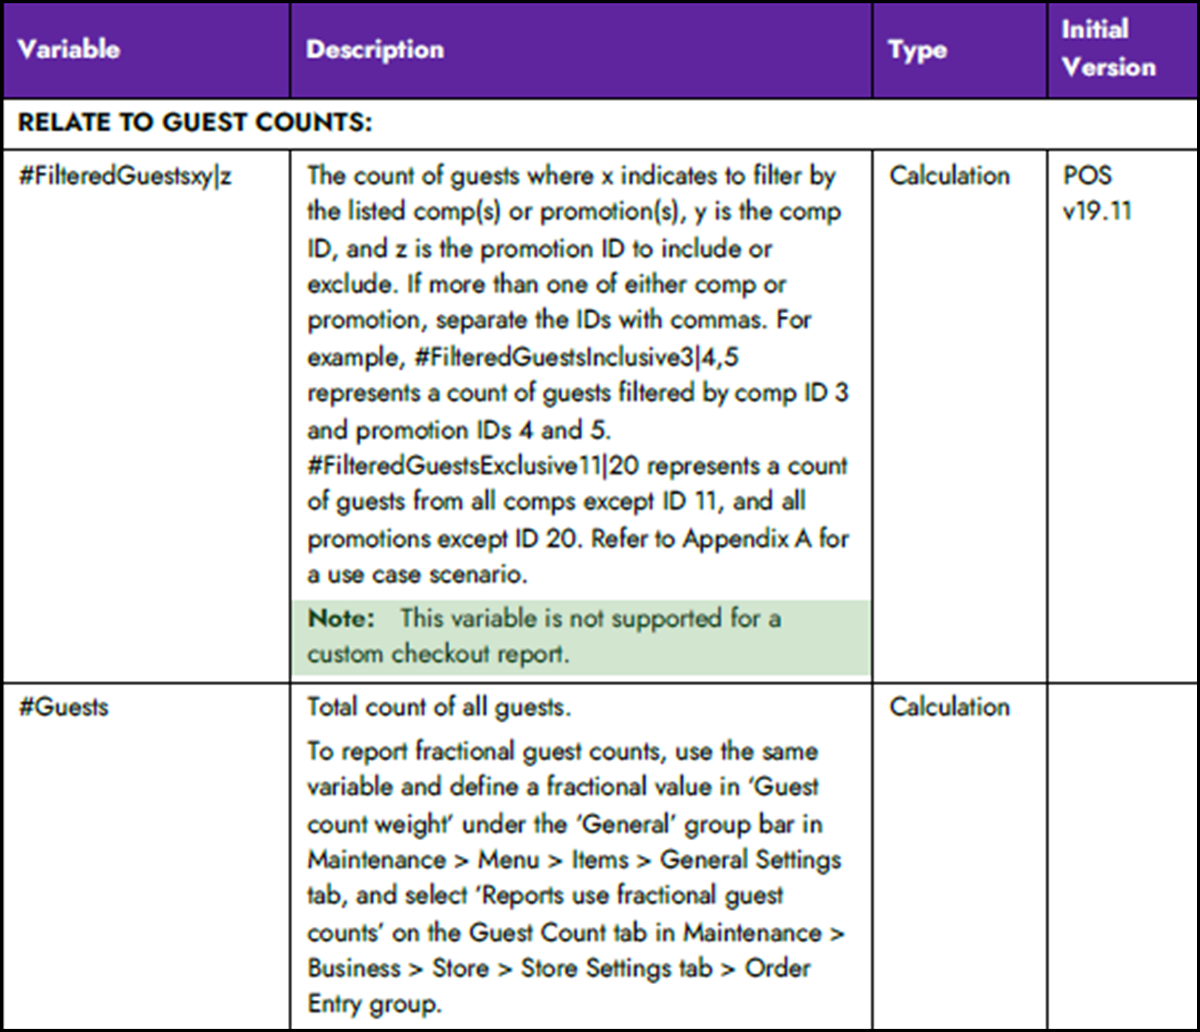
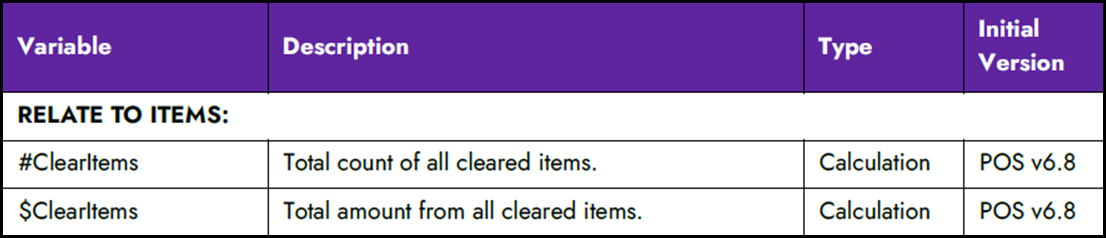
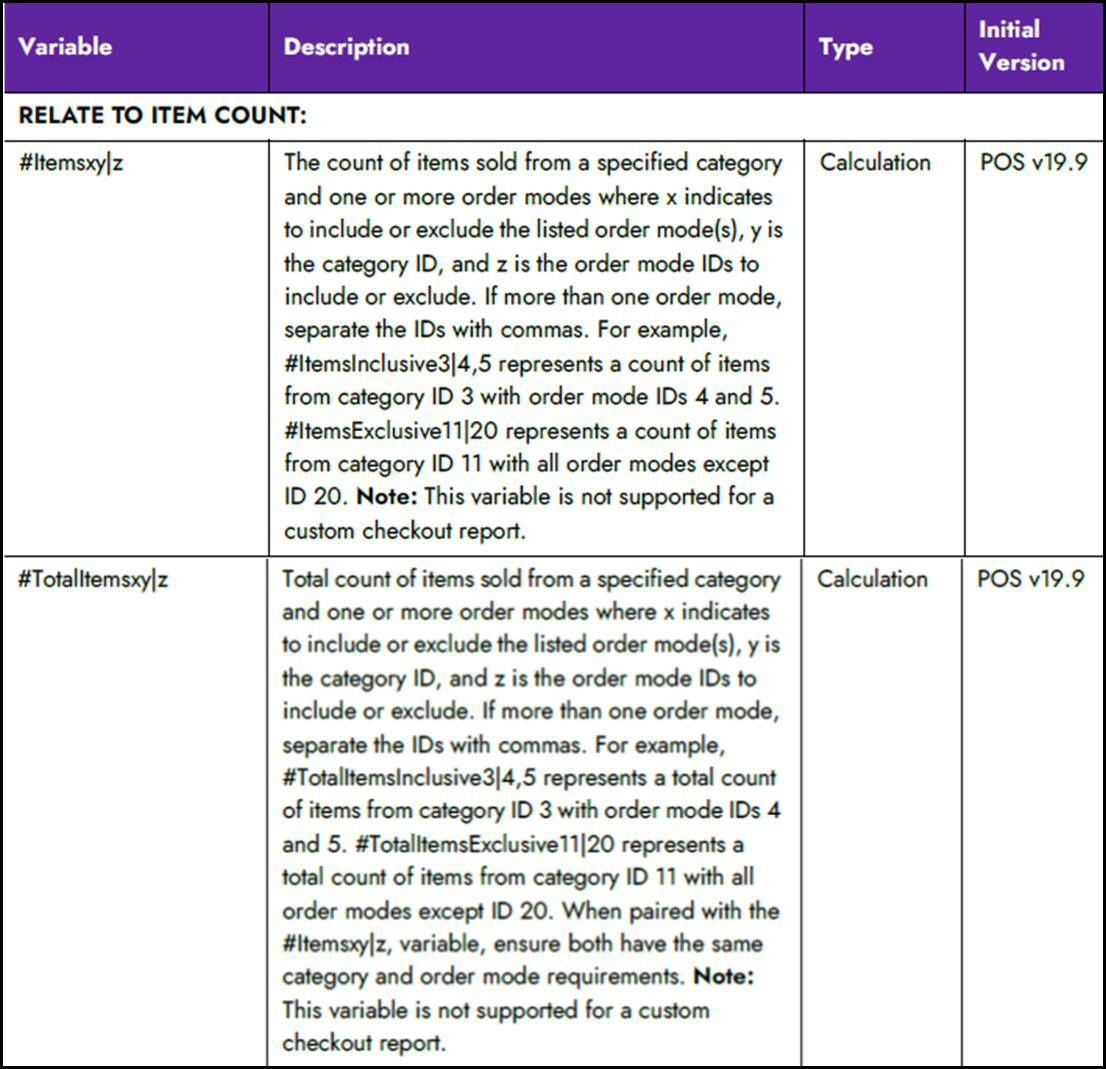
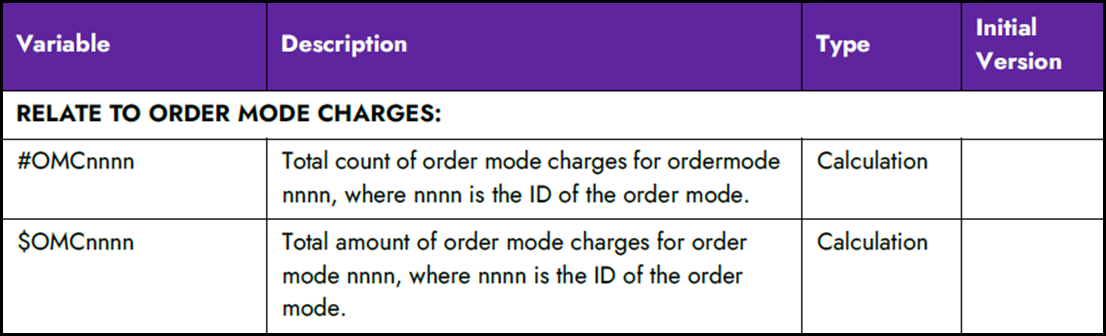
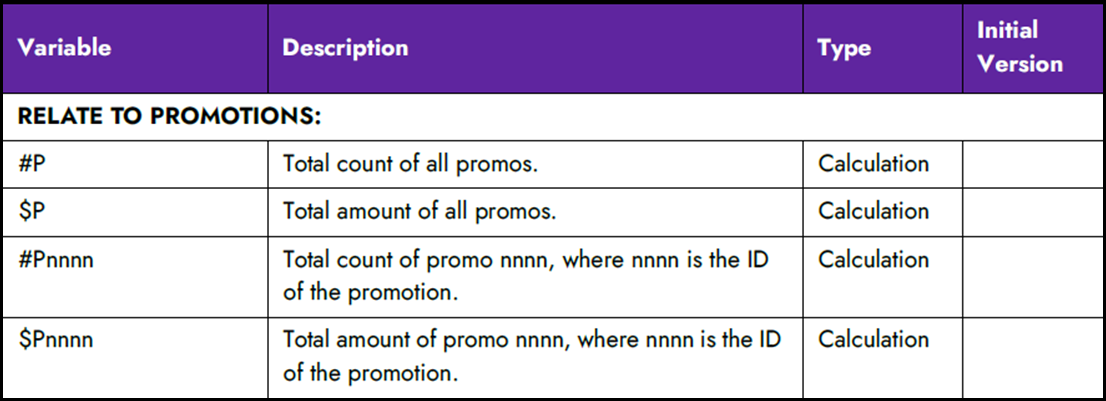
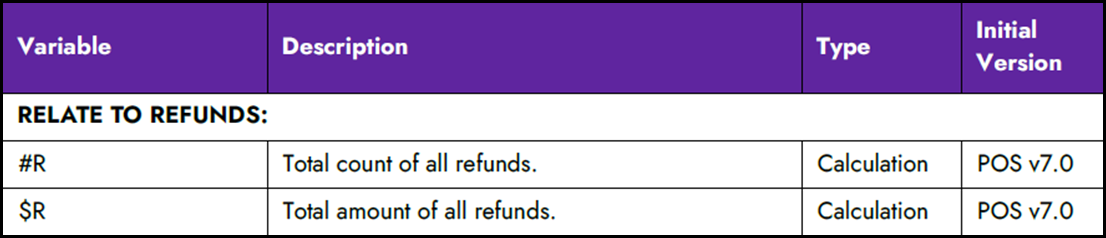
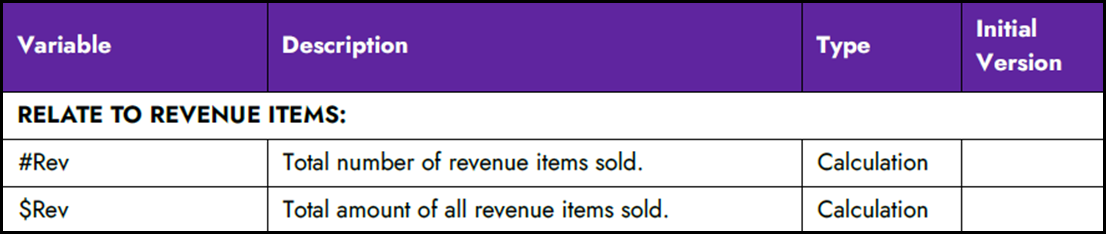
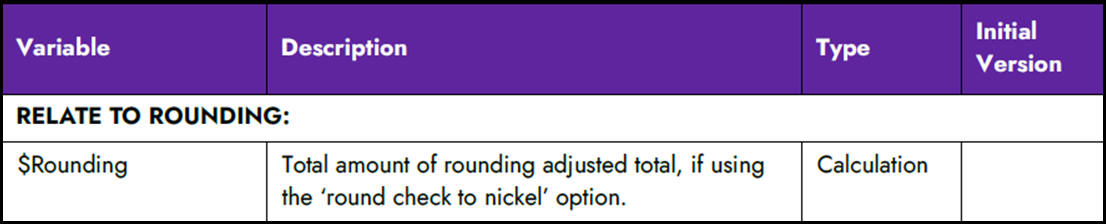
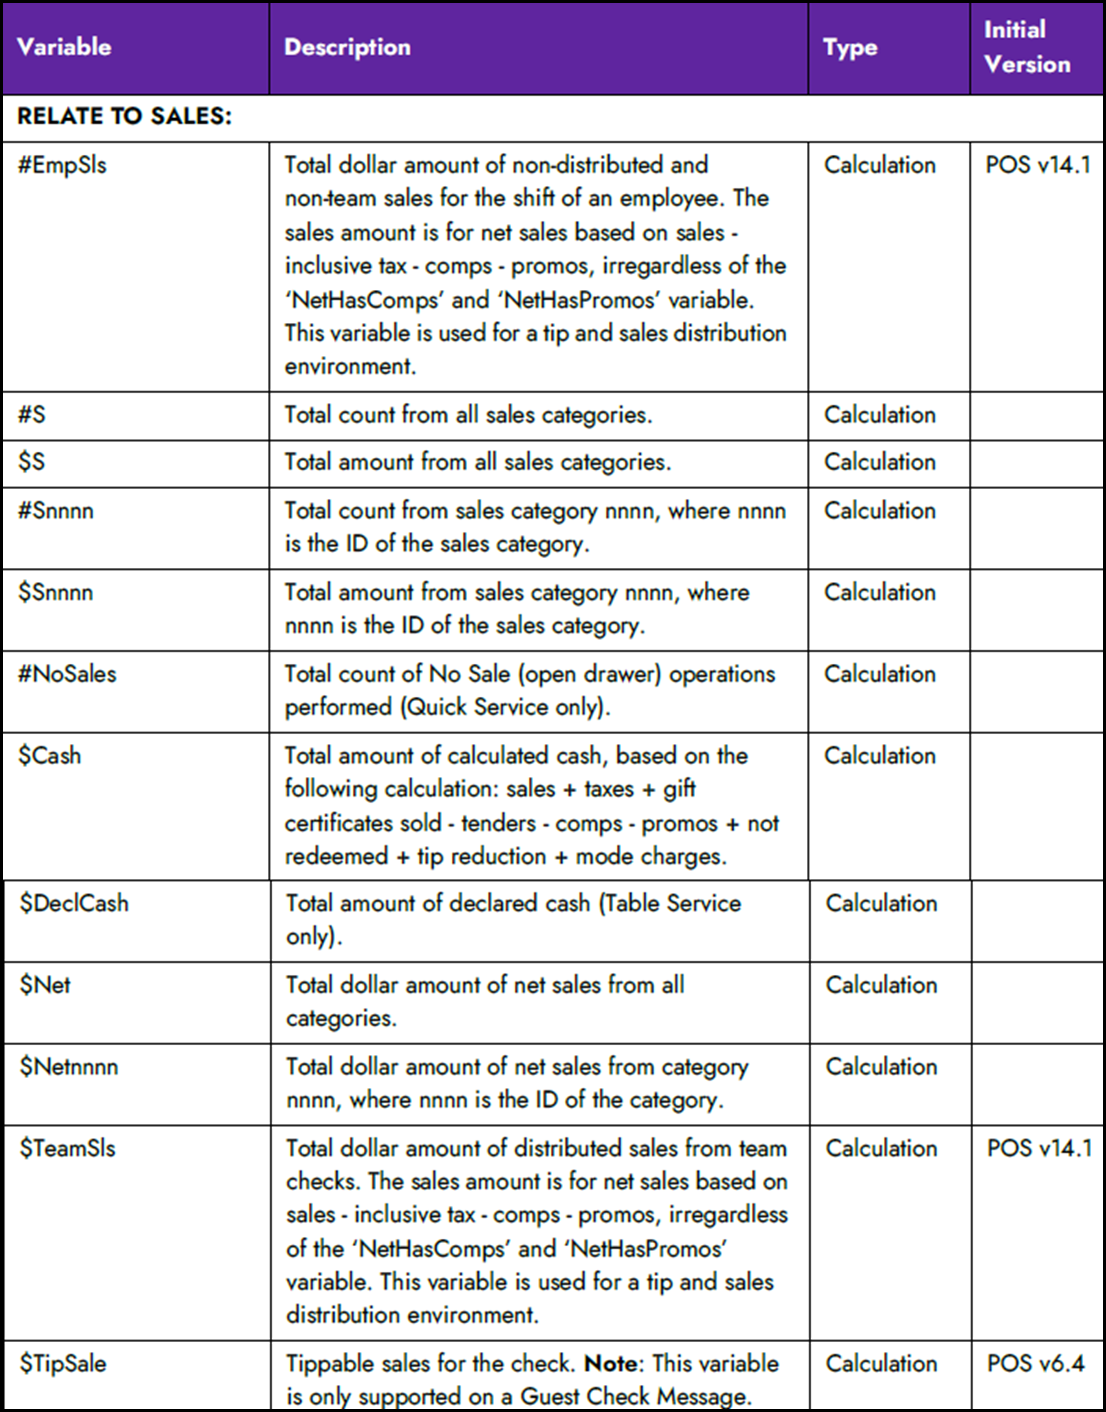
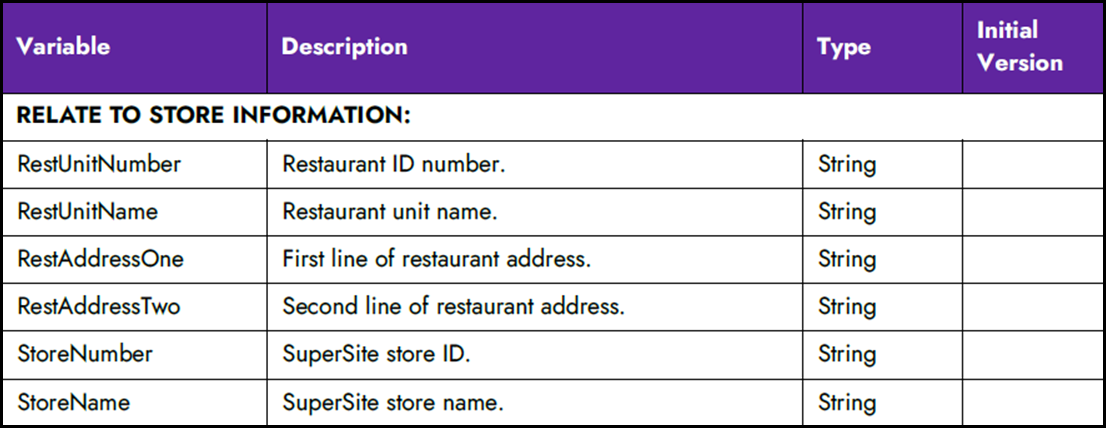
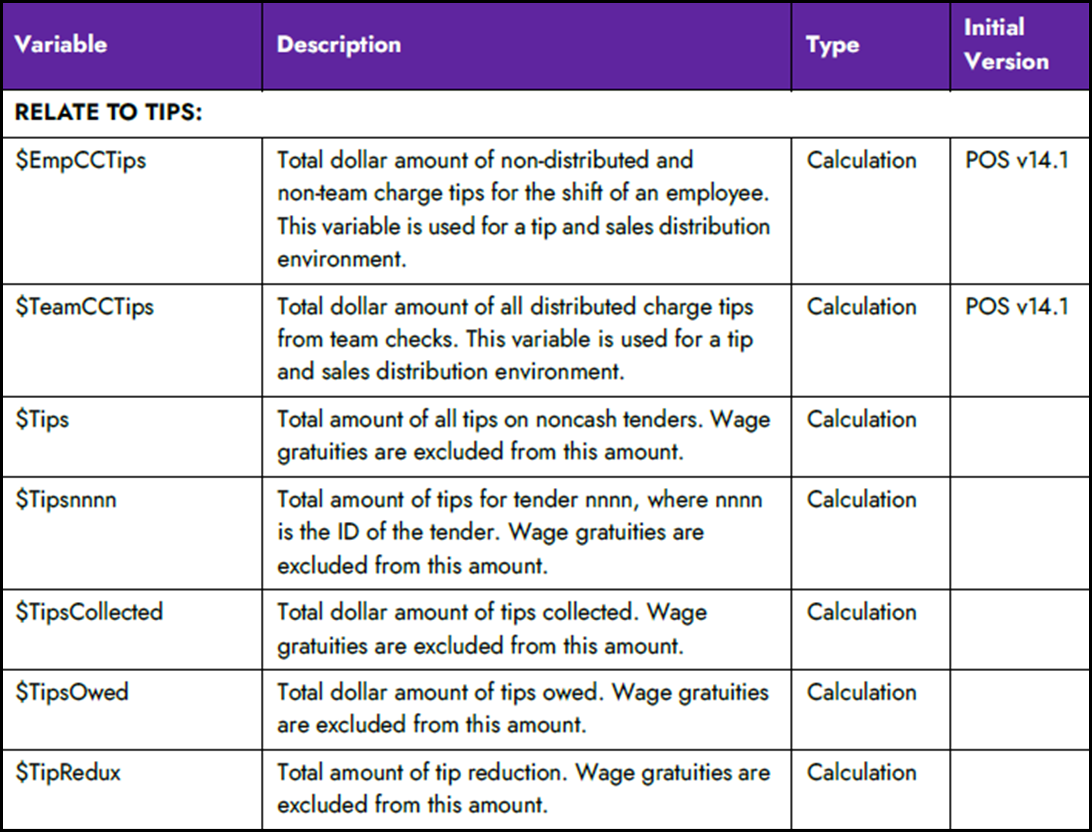
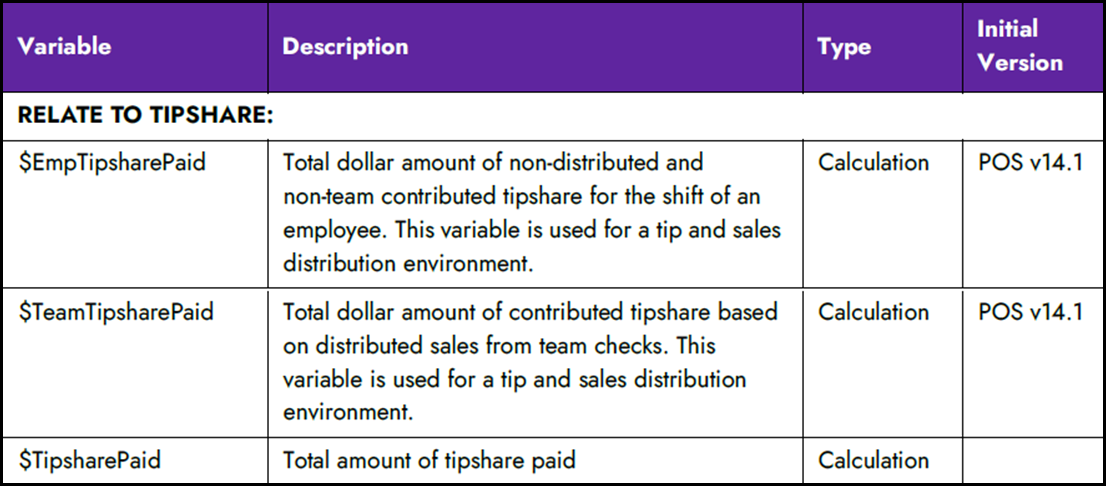
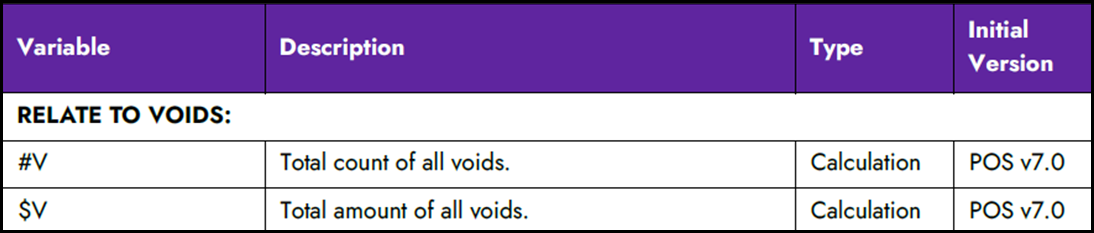
The following tables contain the variables you can use.


Understanding configuration rules
It is necessary to follow certain rules when creating your configuration file.
Print for all employee or by job code
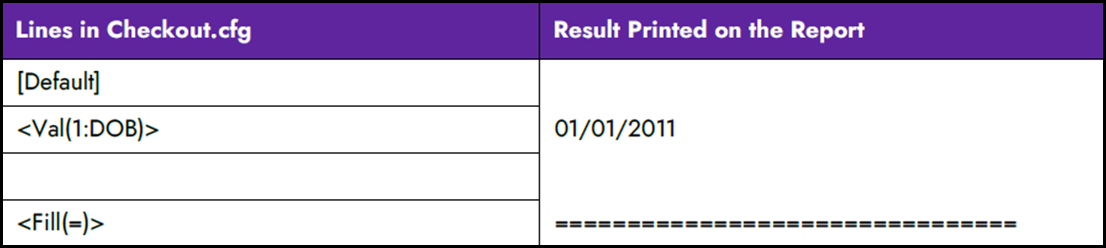
Use a header to tell the system to print the custom information. You must dedicate the first line to a header; otherwise, anything placed before the header does not print. If the custom information is to print for all employees, use Default, as shown below. If the custom information is to print for a specific job code, or job codes, use a ‘jobcode’ header. The information prints until you insert another header to tell the system to print differently.
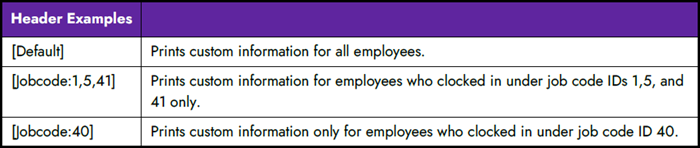
Tip: The first line of your custom information must be a header.
Fill a line with a single character
For readability and dividing sections, you can insert a line composed entirely of a single character. You must use the ‘Fill’ command, enclosed inside greater and less than brackets. Common characters are -, *, or =.

Insert free text
You can insert free text for such things as section headings, labels for calculations, and more. Do not use closing and ending greater and less than brackets (<>) around any free text. These characters are reserved for a dynamic calculation or string.

Insert blank lines
Each line in the custom configuration file equals to a line printed for your custom information. If you want a blank line to print, insert a blank line in the configuration file. A line for a header is ignored.
Insert dynamic calculations and strings
Dynamic calculations and strings are the main components of your custom information. A calculation is a count or equation of a value on which you want to report, such as the number of all comps, or the calculated total of all comp amounts. A string is the name of a supported variable pulled from within the system, such as the last name of an employee, or the date of business.
To configure, you must include three required elements, all inside of beginning and closing greater and less than brackets, as shown in the following:
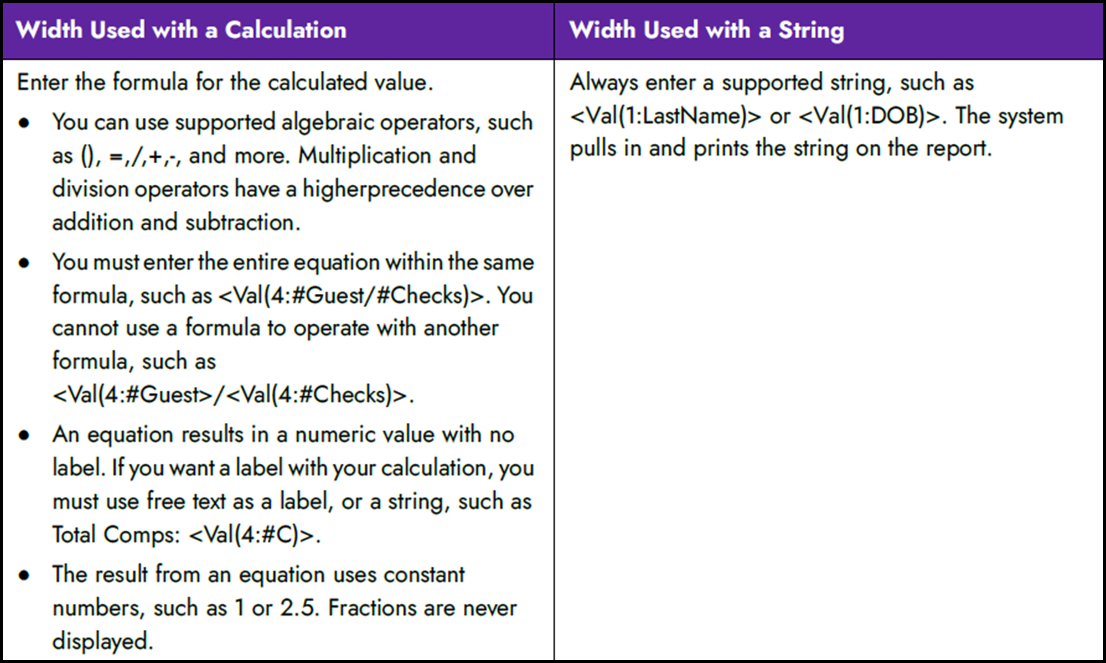
<Val(width:formula)>
Val – Indicates the result will be a dynamic calculation or string.
Width - Specifies the number of spaces to use for the value, depending on if you are inserting a dynamic calculation or a string.
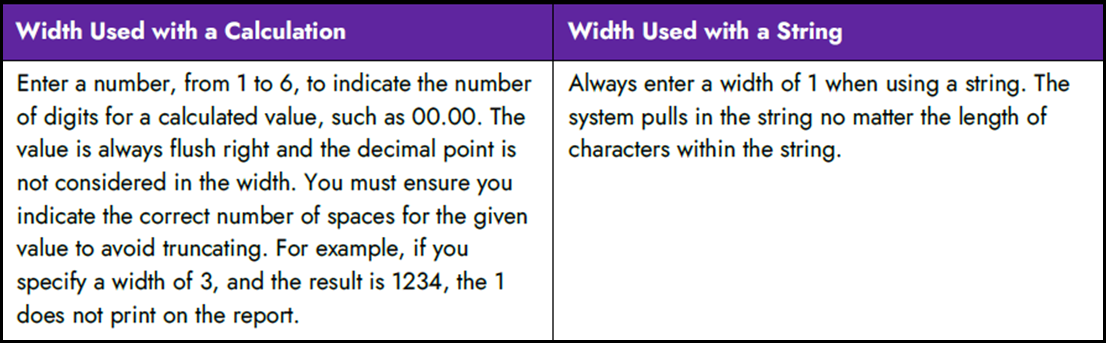
Formula – Specifies the equation of the calculation or the name of the string.
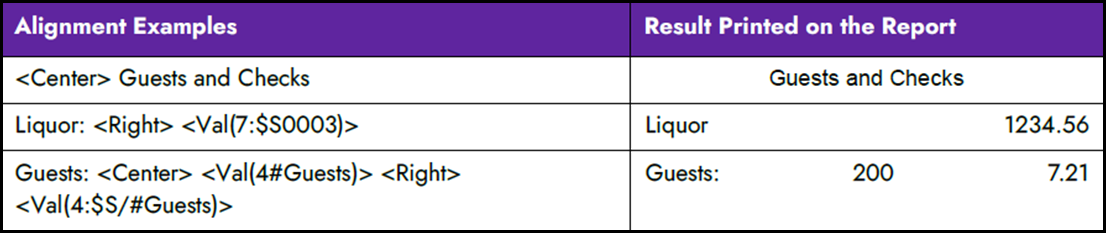
Align text and values on a line
Whether you use free text, a dynamic calculation, or a string, you can align all or individual attributes on a line. Each line is left aligned, by default, but you can change the positioning with the Center and Right commands, as shown below. Given this, there is no need to use a Left command for a line. The attributes start left aligned again on the following line.
Designing a custom FOH report
Once you become familiar with the variables and configuration rules, you can design your FOH report. You can format and use as many variables as needed, while designing the report.
Tip: Custom FOH reports were initially supported in POS v7.0 using a manual method. If you created a custom FOH report this way, you can still use the report. Refer to "Appendix B: Upgrading custom FOH reports."
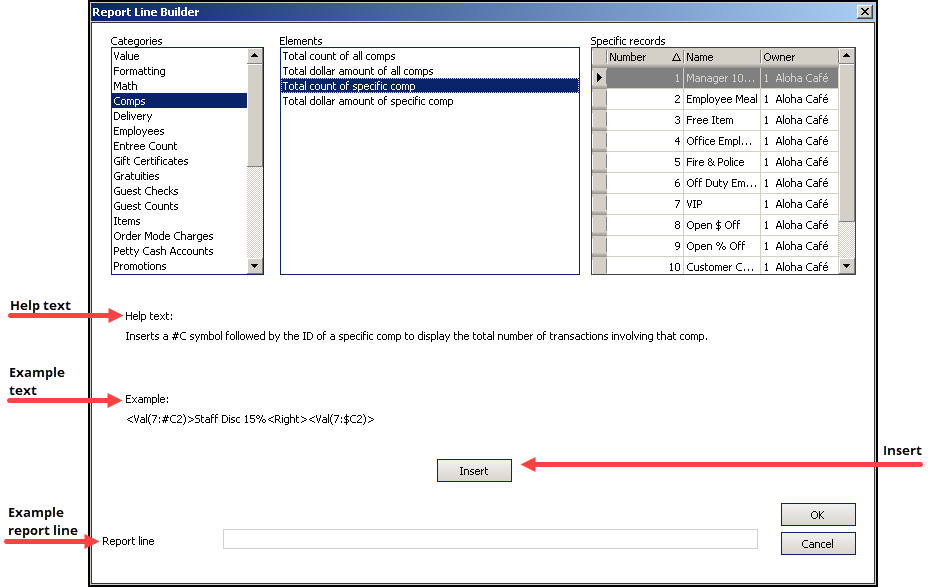
For ease of creating a custom FOH report, use the Report Line Builder dialog box to insert any dynamic calculations and strings in the report. For each line that contains a dynamic calculation, you must click the ellipses (...) for the corresponding variable line in the report to access the dialog box. You can also type the dynamic calculations and strings manually into the ‘Report line’ column without using the Report Line Builder, if desired.
To create a custom FOH report:
- Select Maintenance > Business > Custom FOH Reports.
- Click New. The configuration management tool, either Aloha Manager or Aloha Configuration Center, creates a configuration file named CustomFOHReportNumberx, where x is the sequential number of the report, in the NewData directory.
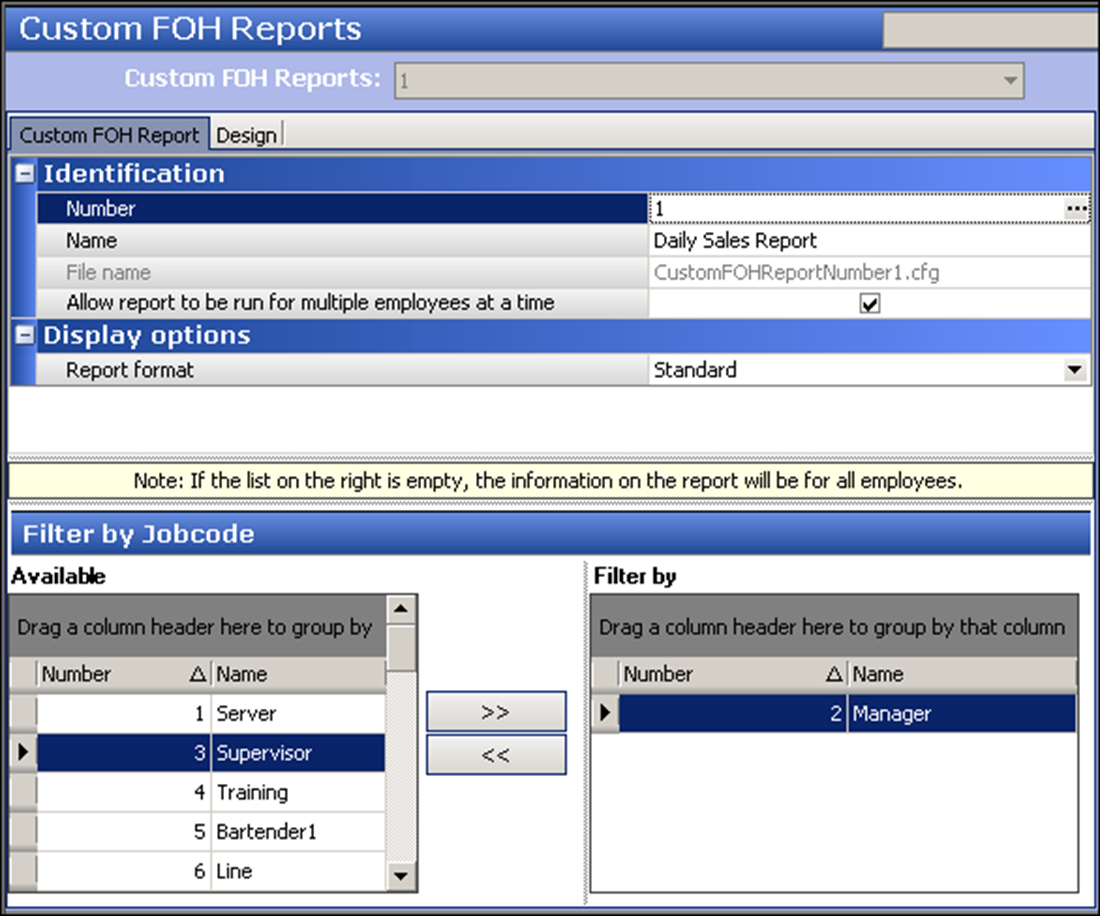
- Under the ‘Identification’ group bar, type a name to identify the report.
- Select Allow report to be run for multiple employees at a time to enable you to select and generate data in the report on more than one employee at a time. If you clear this option and select more than one employee, the report appears blank and with no data.
- Under the ‘Display options’ group bar, select how you wish to sort and display the data from the ‘Report format’ drop-down list. Your choices are:
- Standard — Displays values for the entire day for the line item. This is the default behavior.
- Sort data in 15 minute increments — Displays the total value of each line item in 15 minute increments, for the entire day. Zero (0) appears for time increments for which data is not present.
- Sort data in 30 minute increments — Displays the total value of each line item in 30 minute increments, for the entire day. Zero (0) appears for time increments for which data is not present.
- Sort data in 60 minute increments — Displays the total value of each line item in 60 minute increments, for the entire day. Zero (0) appears for time increments for which data is not present.
- Sort by Day Part — Displays the total value for each line item for each configured day part. Zero (0) appears for day parts for which data is not present.
- Sort by Revenue Center — Displays the total value for each line item for each configured revenue center. Zero (0) appears for revenue centers for which data is not present.
- If you want to report on a specific job code, or group of job codes, select a job code from the ‘Available’ list and click >> to move the job code to the ‘Filter by’ list.
- Select the Design tab.
- Click Add.
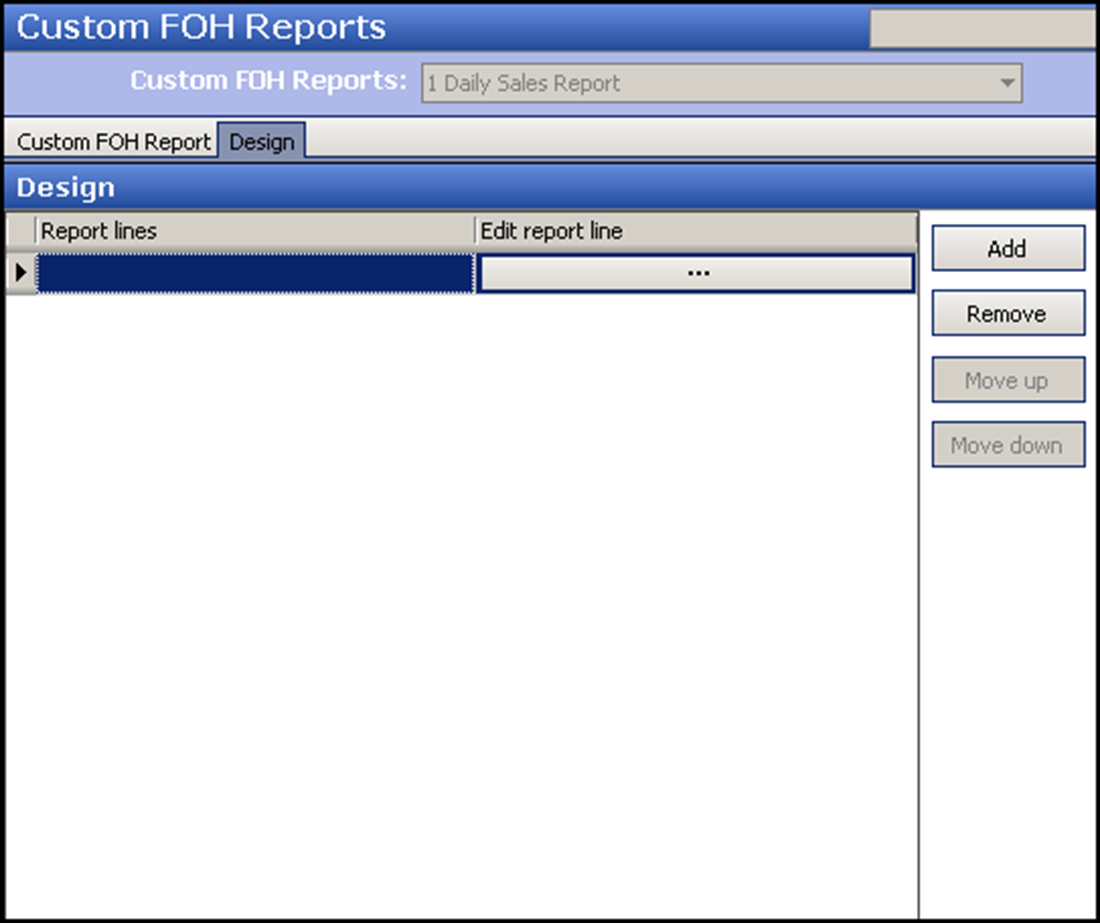
- To insert free text, type text directly in ‘Report lines.’
- To insert a blank line, leave the line as blank.
- To insert a line of characters to indicate a separation in text, type the line of characters.
- To insert a dynamic calculation, click the ellipses (...) to display the Report Line Builder dialog box. Using the help text, example, and report line as a guide, build the specific line of the report, and click Insert.
- Click OK to return to the Custom FOH Reports function.
- Repeat steps 6 and 7 until you complete the content of the custom FOH report.
- Click Save.
- Repeat this procedure for any other custom FOH report you want to configure.
- Click Close to exit the Custom FOH Report function.
A sample configuration file and the resulting report is as follows:

Continue to "Adding a custom report button to a panel."