Appendix B: Upgrading Custom FOH Reports
We introduced custom FOH reports in POS v7.0 as an external configuration file that you create using MS Notepad and then place it in the Data directory. When you tie the file to a button function, the system uses the file to generate the report in the FOH. Since the configuration file is external, the data is not housed in either Aloha Configuration Center or new Aloha Manager. To compound the problem, in a hosted multi-store environment, you had to send the external configuration files to your stores separately. Additionally, creating the configuration file manually required a certain level of programming knowledge that increased the margin of error when typing a syntax string.
In POS v12.3, we added the Custom FOH Report function in Aloha Configuration Center and new Aloha Manager to alleviate these issues. Using the configuration management tool, you create an ID record for each custom FOH report so you do not need separate external configuration files and store the data in the database. Additionally, we provide a user interface for building the syntax strings when creating your report.
If you implemented custom FOH reports prior to POS v12.3, you can upgrade the reports to the configuration management tool or choose to keep your current implementation. As the preferred solution, we recommend you upgrade your custom FOH reports to use the configuration management tool, either Aloha Configuration Center or new Aloha Manager. Provided you already followed the steps depicted in the body of this guide, you need to modify a couple of areas in your configuration.
If you created custom FOH reports prior to v15.1 and configured Print Intercept to view a custom report on-screen versus automatically printing a report, when you upgrade to v15.1, you must select a new option called ‘Display custom reports on the FOH’ under the ‘Report settings’ group bar in the Report Printing group on the Store Settings tab in Maintenance > Business > Store to continue this behavior. If you do not, all custom FOH reports automatically print to the local receipt printer by default.
Upgrading your custom FOH report to the configuration management tool
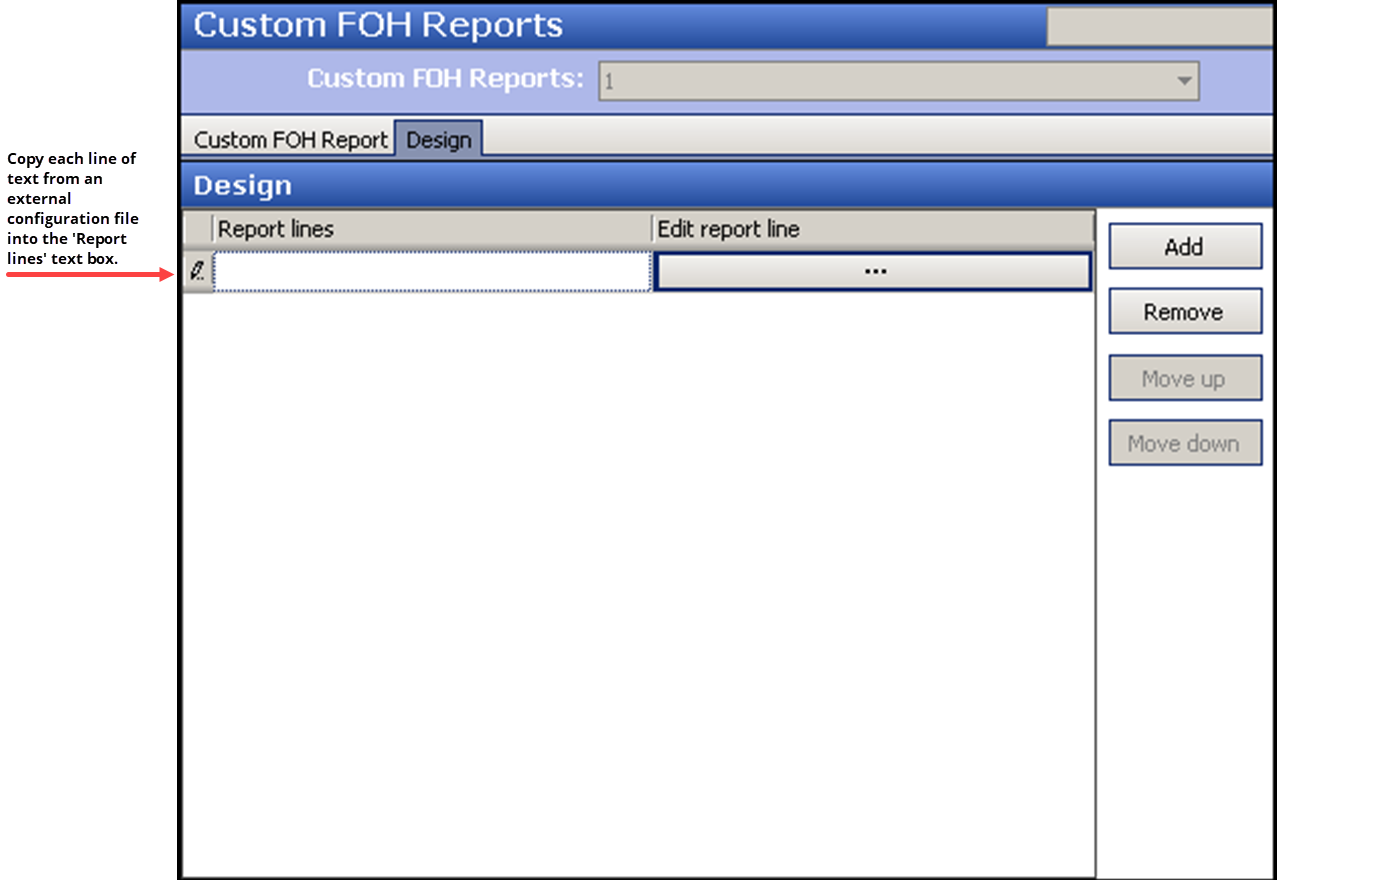
The first step is to enter the content of your existing report into the Custom FOH Report function so the report is housed in the database. Instead of retyping each line into the function, you simply need to create a Custom FOH Report record and manually copy and paste each line in the ‘Report line’ text boxes. Refer to "Creating a custom FOH report" for additional information.
To enter the content of your existing report into the Custom FOH Report function:
-
Select Maintenance > Business > Custom FOH Reports.
-
Click New.
-
Type a name to identify the report. You can use the same name as the external configuration file you are replacing.
-
If you want to report on a specific job code, or group of job codes, select a job code from the ‘Available’ list and click >> to move the job code to the ‘Filter by’ list.
-
Select the Design tab.
-
Click Add.

-
Copy a line of text from the external configuration file and paste it into the ‘Report line’ text box.
Note: You can use this opportunity to adapt or change the content to your specific needs relating to the report.
-
Repeat step 7 until you paste each line into the Custom FOH Reports function.
-
Click OK to return to the Custom FOH Reports function.
-
Click Save.
-
Repeat this procedure for any other custom FOH report you want to upgrade.
-
Click Close to exit the Custom FOH Reports function.
The second step is tying the FOH button to the custom FOH report that is now housed in your configuration management tool. To do this, please follow the instructions provided in "Adding a custom report button to a panel."
Keeping your current custom FOH report implementation
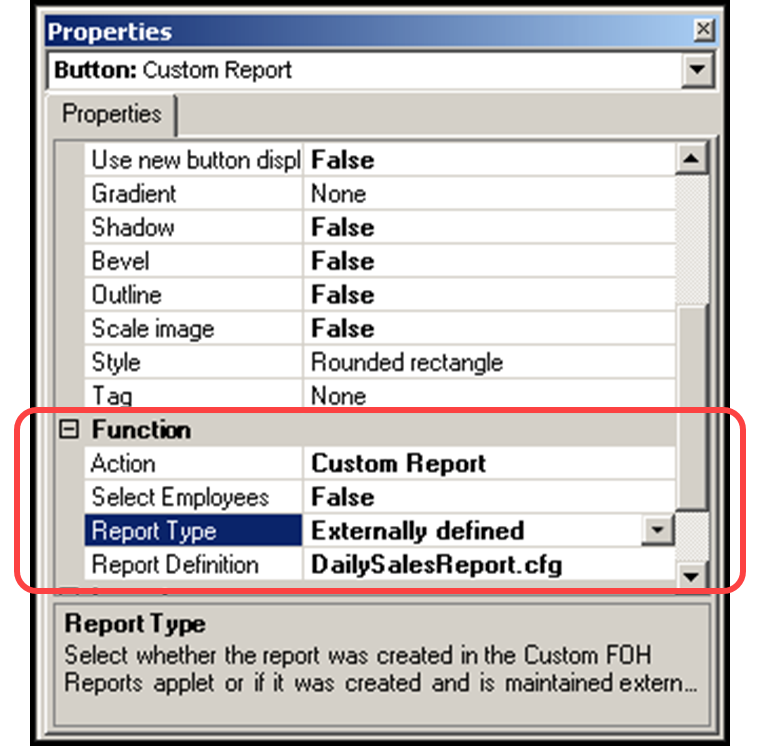
If you want to keep your current custom FOH report implementation, using external configuration files, the system performs the upgrade path for you. The button function configuration for each report changes to point to an externally defined report. If you notice a problem with your report, you can verify this configuration in Screen Designer.
Note: This is not the preferred solution and we recommend you upgrade your custom FOH reports to the configuration management tool.
To verify your button configuration points to an external custom FOH report:
- Select Maintenance > Screen Designer > Quick Service (or Table Service) Screen Designer.
- Select Work with Panels.
- Select Panel > Open Panel. The open Panels dialog box appears.
- Select a panel to edit, such as ‘Manager Reports,’ and click OK. The panel appears.
- Select Panel > New Button. The Properties dialog box appears.

- Under the ‘Function’ group bar, select Custom Report from the ‘Action’ drop-down list.
- Select Externally defined to indicate the system uses a manually created external configuration file.
- Type the name of the configuration file (with a .cfg extension), located in the Data directory, to link to this button. If you do not link the button to a report configuration file, the button does not generate a report.
- Type the text to identify the specific report you want to generate in ‘Name.’ The text appears on the button.
- Complete the remaining options for the button, such as font, background color, and text alignment.
- Repeat this procedure for each custom report you want to add to the panel.
- Select Panel > Save Panel and exit the Screen Designer function.
Return to the main "Custom FOH Reports" page.