Adding preset hold buttons to a custom panel
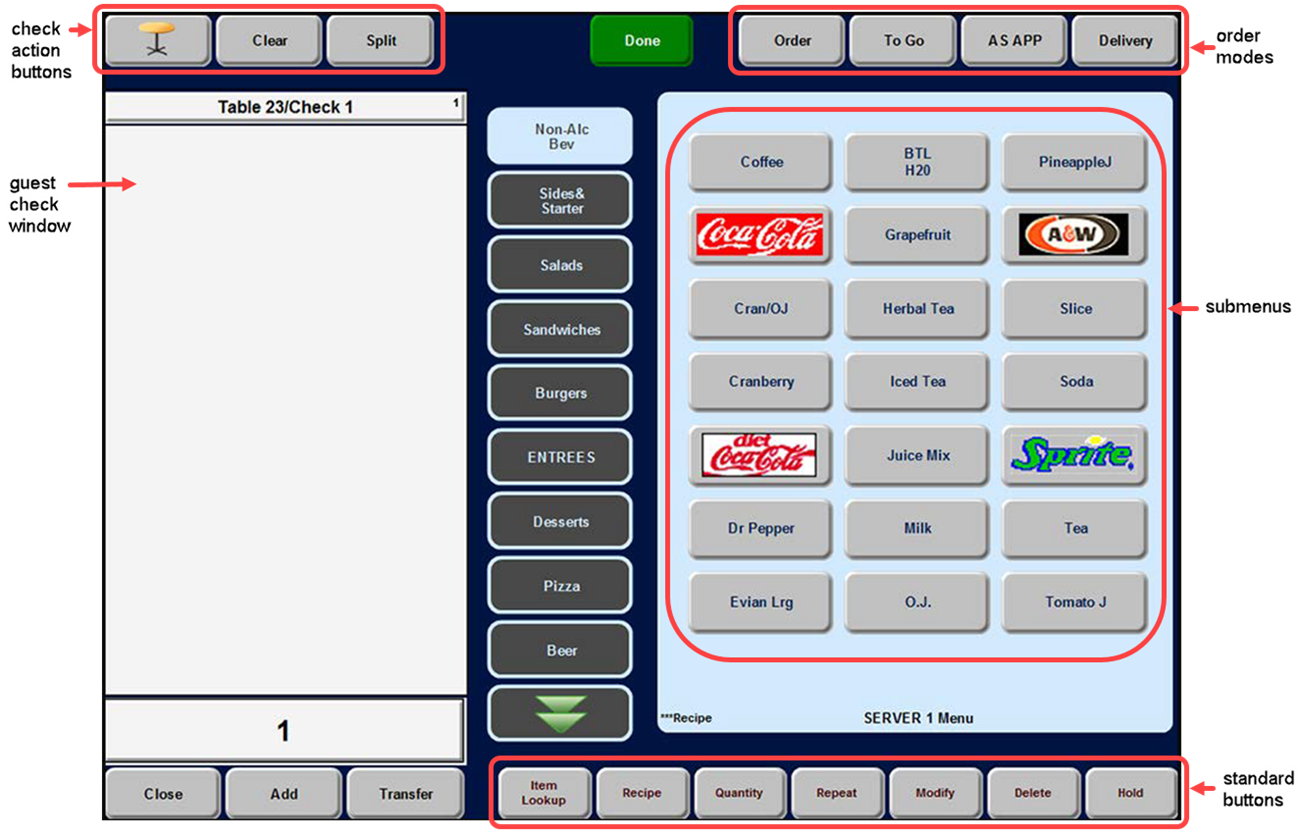
Aloha Table Service uses hard-coded screens to maintain familiarity and a consistent screen flow. The hard-coded design of the Table Service order entry screen includes the following areas:

The area located on the lower right side of the order entry screen, labeled 'standard buttons,' typically contains the following buttons: Item Lookup, Recipe, Quantity, Repeat, Modify, Delete, and Hold; however, it is possible to have an optional fifth order mode in place of the Hold button. Some of these buttons are available at all times, and some depend on the configuration of the Back-of-House (BOH).
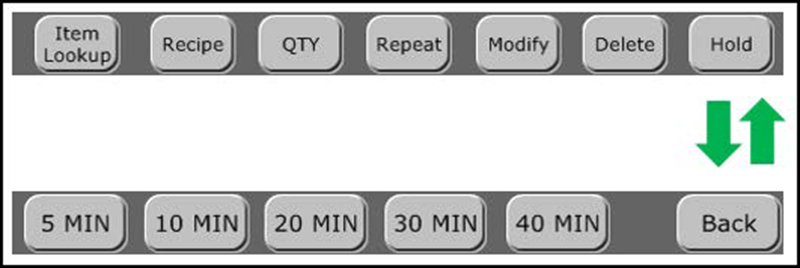
The enhanced Hold button allows you automatically release held items, but you can establish the hold time using only one minute increments of time. For more advanced functionality, such as providing a Hold button with a preset increment of time for releasing held items, or providing multiple Hold buttons configured with different increments of time (10 Minutes, 20 Minutes, 30 Minutes), such as what you would use for Course Ordering, you can replace the standard Hold button with one or more custom Hold buttons configured to meet your needs; however, this requires you to create a custom panel of the Order Entry type to replace the standard buttons located on the lower right side of the screen. If you need more buttons than what can fit on one custom panel, including the standard buttons you want to retain, create more than one custom panel and use ‘Chain’ buttons to navigate between the custom panels.
To add Hold buttons that use preset increments of time requires you to create a custom panel to replace the standard buttons located on the lower right side of the screen. If you need more buttons than what can fit on one custom panel, including the standard buttons you want to retain, create more than one custom panel and use ‘Chain’ buttons to navigate between the custom panels.
For example, we created two custom panels. On the first panel, the Hold button uses the Chain function to access a second custom panel onto which we added multiple Hold buttons using different preset increments of time. We then added a chain button to the second custom panel for navigation back to the first custom panel.

Teaching you how to create a custom panel to replace the hard-coded buttons that appear on the lower right side of the order entry screen is covered in the "Custom Table Service Order Entry Screen Feature Focus Guide." We suggest you create at least one custom panel, add a button for each of the standard buttons, including the standard Hold button, so that the two panels are identical, and then return here in this document to learn how to add preset Hold buttons to the custom panel.
To change the standard Hold button you placed on the custom panel to a preset Hold button:
-
Select Maintenance > Screen Designer > Table Service Screen Designer.
-
Select Work with Panels.
-
Select Panel > Open Panel, select the custom panel created per the instructions in the TS Custom Order Entry Screen Feature Focus Guide, and click OK.
-
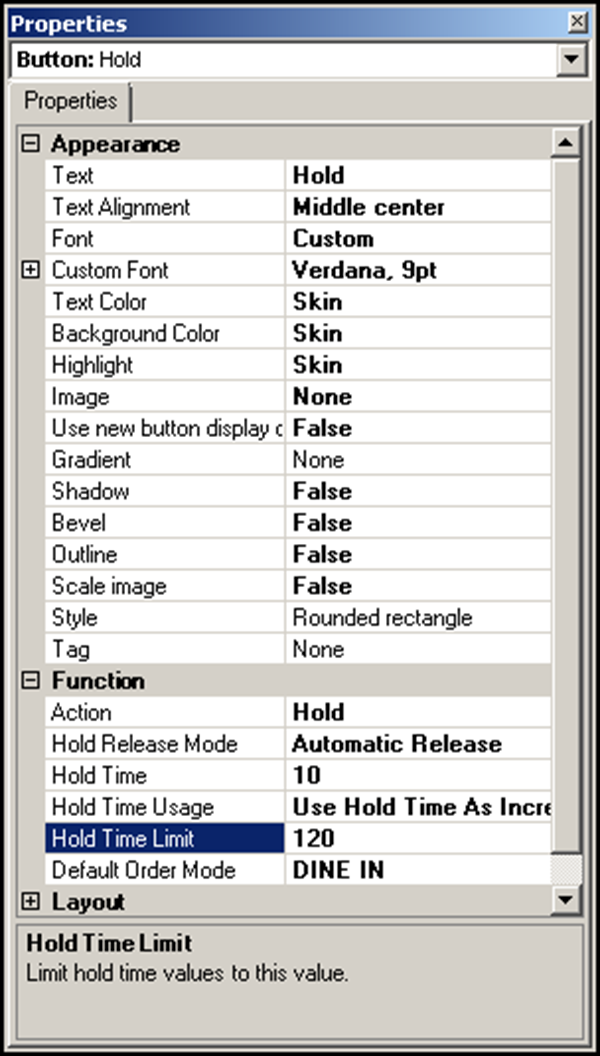
Select the standard Hold button. The Properties dialog box appears. Under the ‘Function’ group bar, Hold is selected in the ‘Action’ drop-down list.

-
Select Automatic Release as the ‘Hold Release Mode’ to make this a Hold button that uses the Delay Send functionality. Additional options appear.
-
Type the number of minutes to hold one or more selected items before releasing them to the kitchen. Select between one and 20 minutes, then five-minute intervals between 25 and 60. The default is one minute.
-
Select Use Hold Time As Increment in ‘Hold Time Usage’ to use the value in ‘Hold Time’ as an increment of time by which to increase or decrease the length of time to hold an item. The Enter Release Information screen that appears provides up and down arrows that allow you to increase or decrease the hold time by the designated increment of time only. For example, if ‘Hold Time’ is 10, you can press the up arrow once to increase the hold time from 10 to 20 minutes, press it twice to increase the hold time to 30 minutes. The system calculates the release time by adding the value on the screen to the current system time. To increase or decrease the hold time, you must reselect the held items in the guest check window and touch Hold again; however, if only one minute has passed since you last put the item on hold, the release time increases only by one minute. You cannot exceed the number of minutes you define for ‘Hold Time Limit.’ You also cannot exceed the number of resets specified in ‘Maximum number of hold time extensions resets.’
-OR-
Select Use Hold Time As Default in ‘Hold Time Usage’ to use the value in ‘Hold Time’ as a hard value at which to set the length of time to hold an item. For example, if ‘Hold Time’ is 10, when you touch Hold, the system sets the release time by adding ten minutes to the current system time. To increase or decrease the hold time, you must reselect the held item in the guest check window and touch Hold again; however, if only one minute has passed since you last time you put the item on hold, the release time increases only by one minute. You cannot exceed the number of resets specified in ‘Maximum number of hold time extensions resets.’
Note: The Enter Release Information screen appears, for order mode selection only, for hold buttons for which you select 'Use Hold Time As Default' and leave the 'Default Order Mode' at None; the up and down arrows for increasing or decreasing the hold time are not available on this screen.
-
If you select ‘Use Hold Time As Increment,’ type the maximum number of minutes you can keep items on hold in ‘Hold Time Limit.’ The minimum value is 60 minutes; the maximum value is 480 minutes (eight hours).
-
Select the default order mode to which to commit held items when the system automatically releases the items from hold. If you do not select a default order mode, the Enter Release Information screen requires the selection of an order mode before you can continue.
-
Under the ‘Appearance’ group bar, replace the word Hold with the name to appear on the button, such as ‘Hold\n10 Min.’ To display text on multiple lines, insert ‘\n’ without spaces for line breaks.
-
Configure the remaining options as you would for any other button.
-
Repeat this procedure for each preset Hold button you need with a different increment of time, such as twenty minutes and thirty minutes. You may need to create more than one custom panel to accommodate the buttons you need. If so, instead of making the standard Hold button a preset Hold button, convert it to a button that chains to the second panel, and add all Hold buttons to the second panel. Do not forget to add a button on the second panel that chains back to the first panel.
-
Select Panel > Save All Panels.
-
Exit the Screen Designer function.
Continue to "Activating a custom panel."