Adding Email Receipt and Text Receipt buttons
You must add Email Receipt and Text Receipt buttons to allow an employee to send a digital receipt. You can place the buttons in the following areas:
Quick Service panel — A panel, typically containing your tenders, anywhere on the user interface that is easily accessible. You must use the Screen Designer tool to add digital receipt buttons to a panel.
Table Service close screen — The area on the close screen reserved for tender buttons. Use this solution to access digital receipt buttons when you are tendering the check. You must configure TSButton.cfg to utilize unused tender button positions for digital receipt buttons to this area of the screen.
Table Service order entry panel — The customizable area located in the lower right portion of the order entry screen. Use this solution when you need to recall a check to print digital receipt buttons without having to access the close screen. You must use the Screen Designer tool to add digital receipt buttons to this area of the screen.
Reference: Refer to the "Custom TS Order Entry Screen Feature Focus Guide - HKS349" for more information. Refer to the "Quick Service Screen Designer Guide" or "Table Service Screen Designer Guide" for more information.
To add digital receipt buttons to a Quick Service panel or Table Service order entry panel:
- Select Screen Designer > Quick Service Screen Designer if you are working with Aloha Quick Service or Screen Designer > Table Service Screen Designer if you are working with Aloha Table Service.
- Select Work with Panels.
- Select Panel > Open Panel and select a panel to edit for Aloha Quick Service or select an order entry panel for Aloha Table Service.
- Select Panel > New Button to add an ‘Email Receipt’ button.

- Under the ‘Appearance’ group bar, type Email\nReceipt in ‘Text.’
- Under the ‘Function’ group bar, select Custom Activity from the ‘Action’ drop-down list.
- Type ASSIGN_EMAIL_TO_CHECK in ‘Custom Text.’
- Leave all other options as their default.
- Select Panel > New Button to add a ‘Text Receipt’ button.
- Under the ‘Appearance’ group bar, type Text\nReceipt in ‘Text.’
- Under the ‘Function’ group bar, select Custom Activity from the ‘Action’ drop-down list.
- Type ASSIGN_TEXT_TO_CHECK in ‘Custom Text.’
- Leave all other options as their default.
- Click and drag each button on the panel to align the buttons, being careful not to overlap any buttons.
- Click Panel > Save Panel and exit the Screen Designer function.
To add digital receipt buttons on a Table Service tender screen:
- On the BOH file server, navigate to the BootDvr > Aloha > Data folder using File Explorer®.
- Right-click TSButton.cfg, and select Open With > Notepad® from the menu that appears.
- On a separate line, type 2,0,15,E-mail\nReceipt,C:\BootDrv\Aloha\BIN\AtgCustomCall.exe /Custom ASSIGN_EMAIL_TO_CHECK,1 to add the Email Receipt button to the FOH tender screen.
- On a separate line, type 2,0,16,Text\nCheck,C:\BootDrv\Aloha\BIN\AtgCustomCall.exe /Custom ASSIGN_TEXT_TO_CHECK,1 to add the Text Receipt button to the FOH tender screen.
- Select File > Save and exit TSButton.cfg.
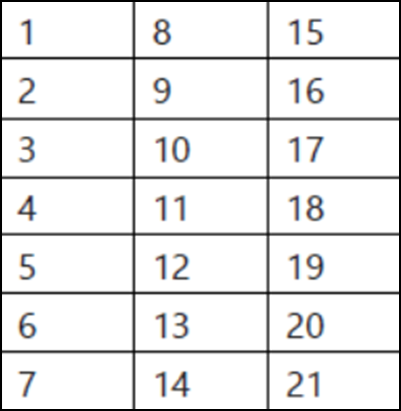
For the third comma separated number (15 or 16 respectively in this example) in TSButton.cfg, you need to change the value to align with the button positioning grid used at the site. The number represents the position placement on the FOH Payment screen. The positioning is always numbered vertically and is based on the grid dimensions configured in CFC Store Settings function. For example, if you use a 3 x 7 grid, the buttons number 1 through 7 down the first column and the top button in the second column is 8, as shown in the example. Conversely, if you use a 3 x 8 grid, the buttons number 1 though 8 down the first column and the top button in the second column is 9. The numbering continues when you have a second or third page of buttons.
Continue to "Refreshing POS data."
After running a data refresh, return to the main "Digital Receipts" page.