Configuring unrestricted employee breaks
This section discusses the configuration requirements of the unrestricted employee breaks pre-loaded in the system. You must complete the steps in this section to implement an unrestricted break setup. If your jurisdiction has more stringent labor laws requiring your employees to take breaks under very specific guidelines, complete this section, then refer to "Configuring and using employee breaks with restrictions" for how to build on the unrestricted configuration to meet your requirements.
Providing access to break rules
With the addition of the Break Rules function to Aloha Manager, you must have a sufficient security role to access the Break Rules function on the Labor menu; otherwise the Break Rules function does not appear when you log in to the BOH. The default command options for Break Rules are:

To provide access to the Break Rules option:
- Select Maintenance > Labor > Security Roles.
- Select a security level from the drop-down list.
- Select the POS tab.
- Scroll down the list of functions and select Break Rules.
- Select View, Edit, Add, and Delete, where applicable.
- Click Save.
- Repeat this procedure for any other security roles needing access to break rules.
- Exit the Security Roles function.
Allowing employees to take breaks
You control the break types you allow employees to take by the job code an employee uses when they clock in to the Aloha FOH.
To allow employees to take breaks:
-
Select Maintenance > Labor > Jobcodes.
-
Select the job code from the drop-down list.

-
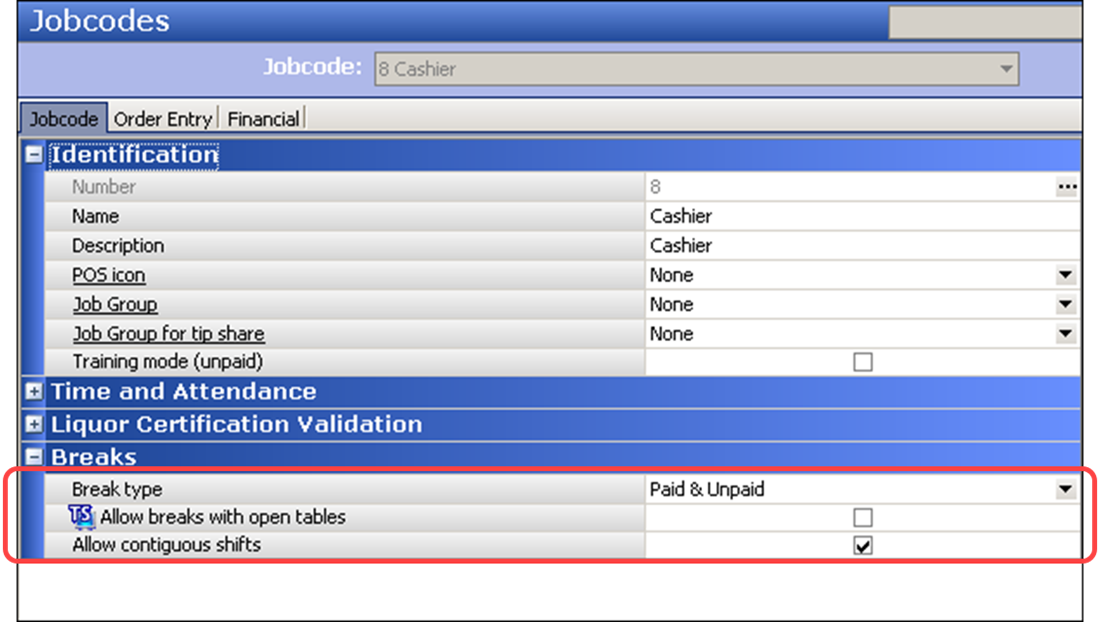
Under the ‘Breaks’ group bar, select one of the following options from the ‘Break type’ drop-down list.
Select None to indicate employees clocked in with this job code cannot take paid or unpaid breaks.
Select Paid to indicate employees clocked in with this job code can take paid breaks only.
Select Unpaid to indicate employees clocked in with this job code can take unpaid breaks only.
Select Paid & Unpaid to indicate employees clocked in with this job code can take paid and unpaid breaks.
-
For Table Service, select Allow breaks with open tables, if you want to allow an employee to take a break even if they have open tables.
-
Click Save.
-
Repeat this procedure for any other job code you want to configure breaks.
-
Exit the Jobcodes function.
Adding an unrestricted paid and unpaid break to the default break rules
The Break Rule function is the key element for developing the requirements for your breaks. In this section, we introduce you to the Break Rule function and the changes you can make to the default unrestricted break rules, such as renaming a break rule, making a break rule inactive, or configuring a break rule to count toward overtime. You may opt to leave the default break rules as they are. The system comes preloaded with the following two default break rules you can use:
- 001 Paid
- 002 Unpaid
Although these default break rules are in the system, you must still add at least one break to each break rule; otherwise, the system offers no break for the employee to take. For an unrestricted break, leave zero hours needed to earn a break in the ‘Minimum hours worked for a break’ and ‘Maximum hours worked for a break’ columns on the Rules tab. This ensures these breaks are always available and the employee does not need to work a specified number of hours to earn the break. In Section 3: Placing restrictions on Employee Breaks, you will learn how to build a more restrictive break rule, if needed.
To modify the default break rules:
- Select Maintenance > Labor > Break Rules.

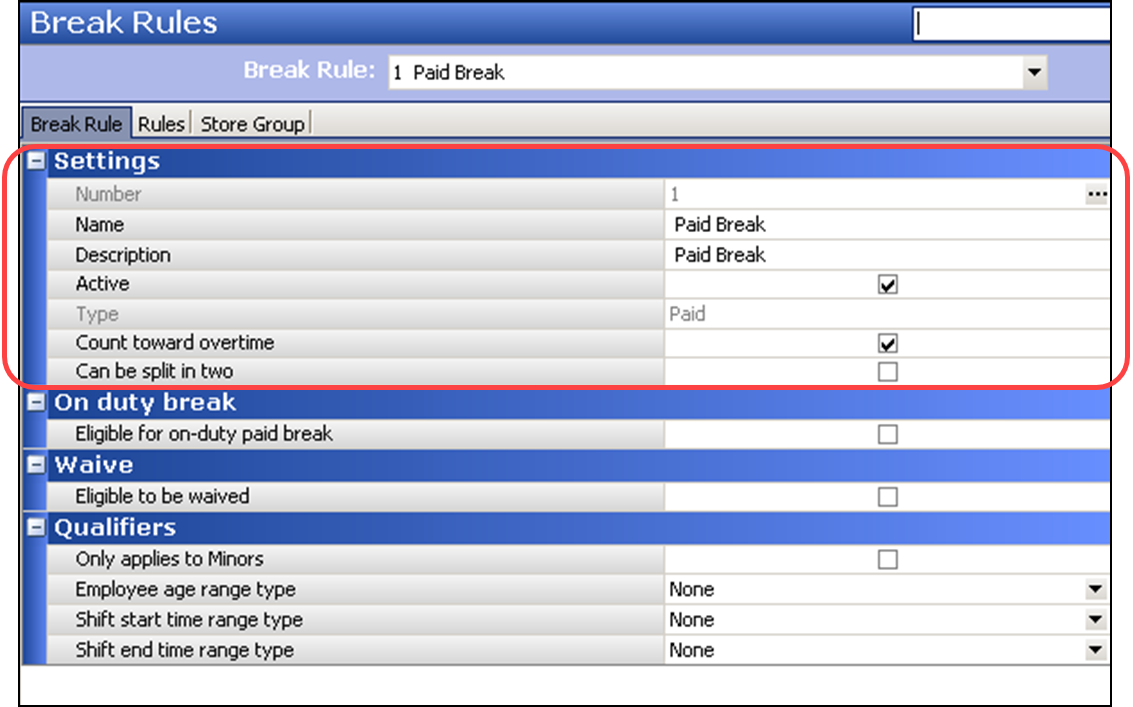
- Select a Paid Break or Unpaid Break from the 'Break Rule' drop-down list.
- Under the ‘Settings’ group bar, type a name, up to 20 characters, for the break rule, if needed. The name appears on all applicable reports and FOH messages.
- Type a description, up to 25 characters, for the break rule, if needed. The name appears on the FOH screens and printed reports.
- Select Active to indicate the break rule is active, if needed.
- If this is a paid break, select Count Toward Overtime, if you want employees to receive overtime wages for break minutes they take when they reach overtime.
- Select the Rules tab.
- Click Add. The system adds a break to the break rule. For an unrestricted break, leave all options at zero values.
- Click Save.
- Repeat this procedure for the remaining paid or unpaid unrestricted break rule.
- Exit the Break Rules function.
Configuring the system to print break receipts
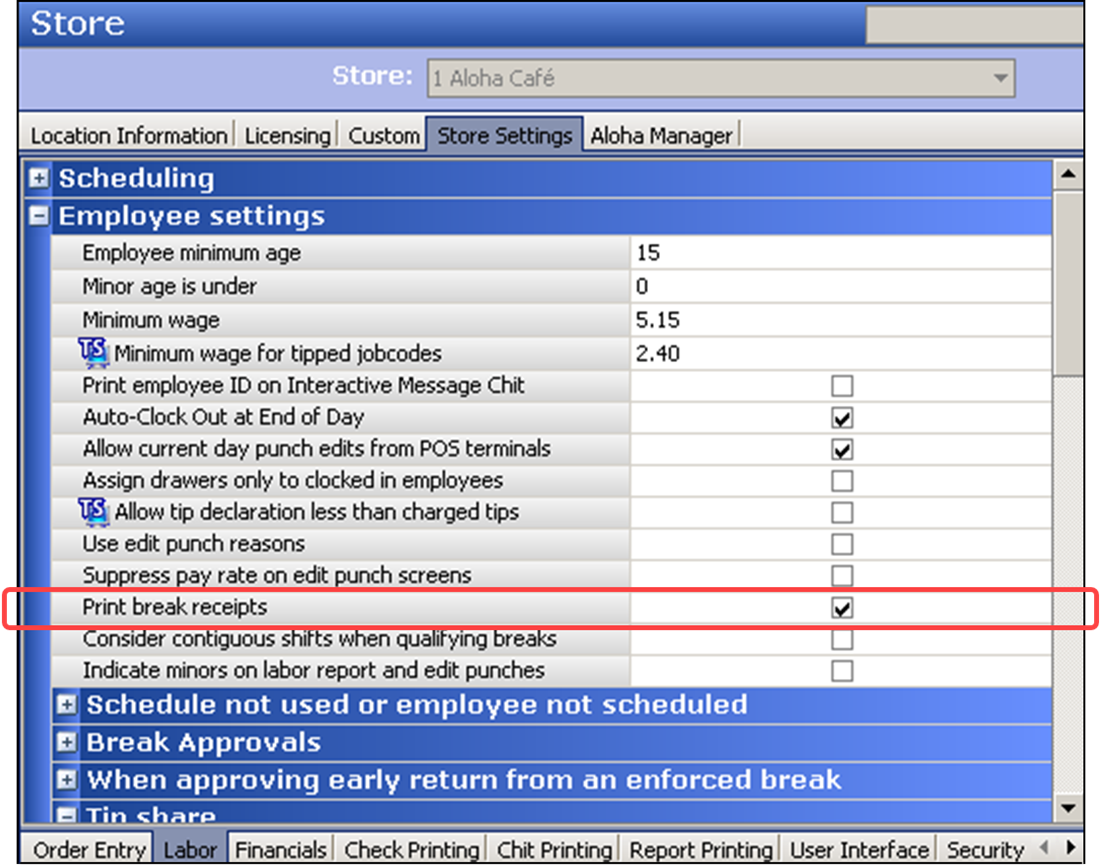
To provide proper documentation for employees who take breaks, configure the system to print a break receipt when an employee starts and ends a break. At the start of a break, the receipt prints the number of break minutes to take, the start time, and when the employee is due back. At the end of a break, the receipt prints the number of break minutes taken and the number of minutes paid, if applicable.
To configure the system to print break receipts:
- Select Maintenance > Business > Store.
- Select the Store Settings tab.
- Select the Labor group located at the bottom of the screen.

- Under the ‘Employee Settings’ group bar, select Print break receipts to print a break receipt to the local printer when an employee starts and ends a break.
- Click Save and exit the Store function.
Adding break buttons to a panel
The Start Break button is available on the Table Service FOH Working with Tables/Tabs screen, but if your order entry screens are using panels, such as a Table Service floor plan, or if you are a Quick Service operation, you must provide access to break buttons in the FOH. The Break button function, available for both Quick Service and Table Service, allows an employee to do their own break in or out. The Break In/Out button function, available for Quick Service only, enables a manager to do the break in or break out for the employee.
For Quick Service, to add the Break and Break In/Out button functions to a panel:
- Select Maintenance > Screen Designer > Quick Service Screen Designer.
- Select Work with Panels.
- Select Panel > Open Panel, select a panel to edit and click OK.
- Select Panel > New Button.
- In the Properties dialog box, select Break from the ‘Action’ drop-down list.
- Complete the available button attributes as you would do for any other button.
- Select Panel> New Button.
- In the Properties dialog box, select Break In/Out from the ‘Action’ drop-down list.
- Complete the available button attributes as you would for any other button.
- Select Panel > Save Panel and exit Screen Designer.
For Table Service, to add the Break button function to a floor plan in use:
- Select Maintenance > Screen Designer > Table Service Screen Designer.
- Select Work with Panels.
- Select Panel > Open Panel, select a panel to edit, and click OK.
- Select Panel > New Button.
- In the Properties dialog box, select Break from the ‘Action’ drop-down list.
- Complete the available button attributes as you would do for any other button.
- Select Panel > Save Panel and exit Screen Designer.
Continue to "Refreshing POS data."
If implementing unrestricted breaks only, after refresing POS data, continue to "Using unresricted employee breaks."