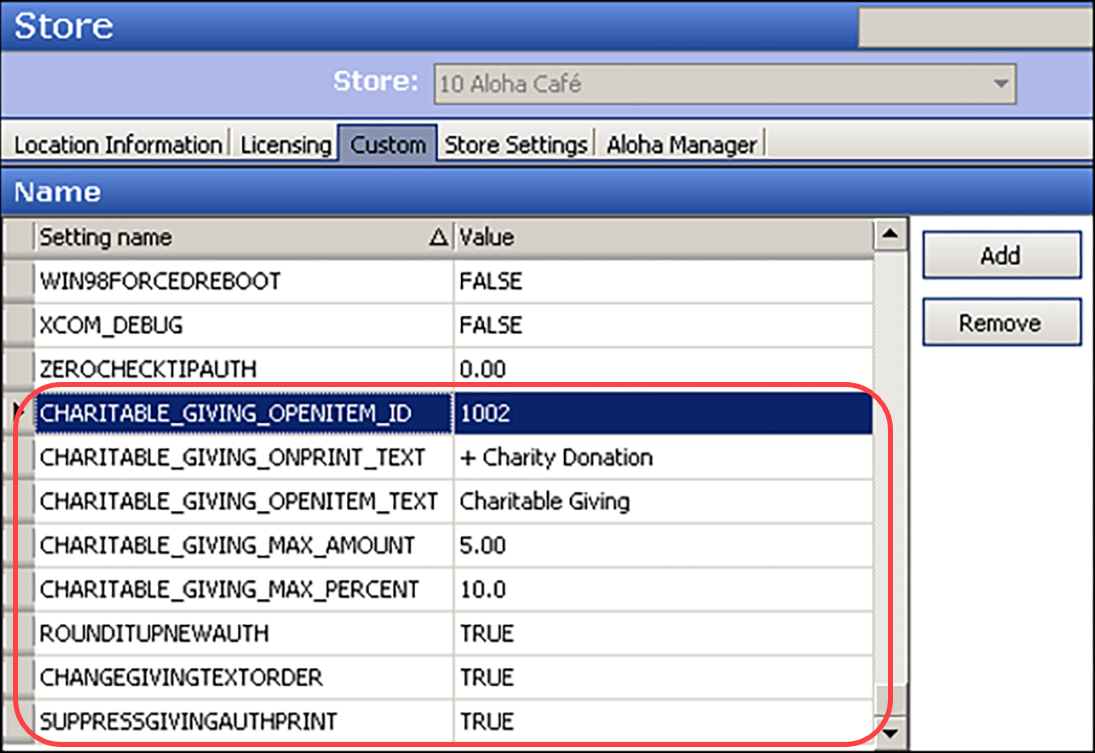
Adding custom variables for RIUA
In Aloha Manager or Aloha Configuration Center (CFC), access the Store function and add the following custom variables. The system alphabetizes the list by ‘Setting name’ once saved.
Round It Up America uses the custom variables to:
- Replace the ‘Charity $’ default text on the credit card voucher with text of your choosing.
- Define the charity item to add to the guest check.
- Define the name to use for the charity item on the guest check.
- Define the maximum amount of contribution allowed.
- Define the maximum percentage of contribution allowed.
- (Optional) Designate how you want to process authorizations for Round It Up transactions. You have two choices. 1) Create two authorizations, one for the original amount plus the tip, the other for the original amount plus the tip plus the change given to charity. The processor settles the second authorization only and drops the first authorization, at their discretion. This is the default behavior. 2) Create two authorizations, one for the original amount plus the tip, the other for the change given to charity. The processor settles both authorizations.
- (Optional) Move the tip line above the charitable giving line on the printed credit card voucher.
- Allow the consumer to add the donation to the check prior to applying the payment. This is beneficial for a Quick Service environment where the cashier can select the Round It Up America button and apply the rounding before the consumer inserts their credit card. This also allows you to collect donations with a cash payment, and you are not limited to paying with a credit card.
To add the Round It Up America custom variables to the Custom tab:
- Select Maintenance > Business > Store.
- Select the Custom tab.

- Click Add and type CHARITABLE_GIVING_OPENITEM_ID in the ‘Setting name’ column, followed by the number assigned to the Charitable Giving item you created earlier in the ‘Value’ column. See “Creating a charitable giving open item.”
- If you want to replace the ‘Charity $’ default text that prints on the credit card voucher with text of your choosing, click Add and type CHARITABLE_GIVING_ONPRINT_TEXT in the ‘Setting name’ column, followed by + Charity Donation: or custom text of your choosing in the ‘Value’ column. Type no more than 15 characters or the text will not align properly on the printout.
- Click Add and type CHARITABLE_GIVING_OPENITEM_TEXT in the ‘Setting name’ column, followed by Charitable Giving or custom text of your choosing to appear on the POS terminal.
- Click Add and type CHARITABLE_GIVING_MAX_AMOUNT in the ‘Setting name’ column, followed by the maximum amount you allow consumers to contribute. For example, if you configure ‘5.00’ for the maximum allowed amount, the consumer may contribute up to $5.00 on the guest check.
- Click Add and type CHARITABLE_GIVING_MAX_PERCENT in the ‘Setting name’ column, followed by the maximum percentage you allow consumers to contribute. For example, if you configure ‘10%’ for the maximum percentage, and the check total is $21.00, the consumer may contribute up to $2.10 on the guest check.
- If you want to create two authorizations, one for the original amount plus the tip, the other for the change given to charity, and have the processor settle both authorizations, click Add and type ROUNDITUPNEWAUTH in the ‘Setting name’ column, followed by TRUE in the ‘Value’ column; otherwise, the system uses the default behavior and it is not necessary to add this variable.
- If you want to move the tip line above the charitable giving line on the credit card voucher, click Add and type CHANGEGIVINGTEXTORDER in the ‘Setting name’ column, followed by TRUE in the ‘Value’ column; otherwise, the system uses the default behavior and it is not necessary to add this variable.
- If you want to allow the consumer to add a donation to the check prior to applying a payment, click Add and type APPLYGIVINGBEFOREPAYMENT in the ‘Setting name’ column, followed by TRUE in the ‘Value’ column; otherwise, the system adds the donation after you apply the payment. This is convenient for a Quick Service environment.
- Click Save and exit the Store function.
Continue to "Adding a button to launch Round It Up America."