Configuring Web Admin for Aloha Loyalty integration
Linking promotions and comps
In Web Admin, link the loyalty promotion or loyalty comp to allow Aloha Online Ordering to discount the virtual receipt when it is sent to the Aloha POS. This configuration is the same whether you are processing loyalty at the site or above store.
Determining the type of discount being used in loyalty
You need to determine if the loyalty plan is configured to use a promotion or a comp in the Aloha Enterprise company. Once you have obtained this information, you can map the comp in Web Admin.
- Log in to Aloha Enterprise for the company.
- Select Aloha Loyalty from the left side of the screen.
- Select Bonus Plan Setup.
- Select the loyalty plan in use for Digital Ordering and click Edit Plan.
- Select the Choose the Rewards tab.
- Select Reward Settings.
- Click Edit.

- Notice the type from the 'Comp/Promo' drop-down list. The Comp/Promo option determines whether you use a comp mapping or a promo mapping in Aloha Online Ordering. The exception to this depend on if the site uses POS v12.3 or v15.1. If POS v12.3 is installed, you must create a POS comp because POS v12.3 does not work with promotions coming from Aloha Online Ordering.
- Write down the value that is selected in the 'Comp/Promo' drop-down list and find the corresponding comp ID or promotion ID in Aloha Manager/CFC. To do this you can open the Comp.dbf or Pro.dbf file to obtain the ID number. Note: If the comp or promo ID is not visible in the .dbf files or CFC, please contact the customer or their support group.
Mapping a comp loyalty type in Web Admin
Note: If you work with a multi-site customer, and any of the customers' POS versions are v12.3, you must complete this process for the v12.3 sites to work properly. If the all POS versions are v15.1, or above, and is only using the Loyalty Promo type, you can skip this step. Refer to "Creating a POS comp" for the proper POS configuration for a comp.
To map a comp loyalty type in Web Admin:
- Log in to Web Admin.
- Select Designs > Discounts > Comps.
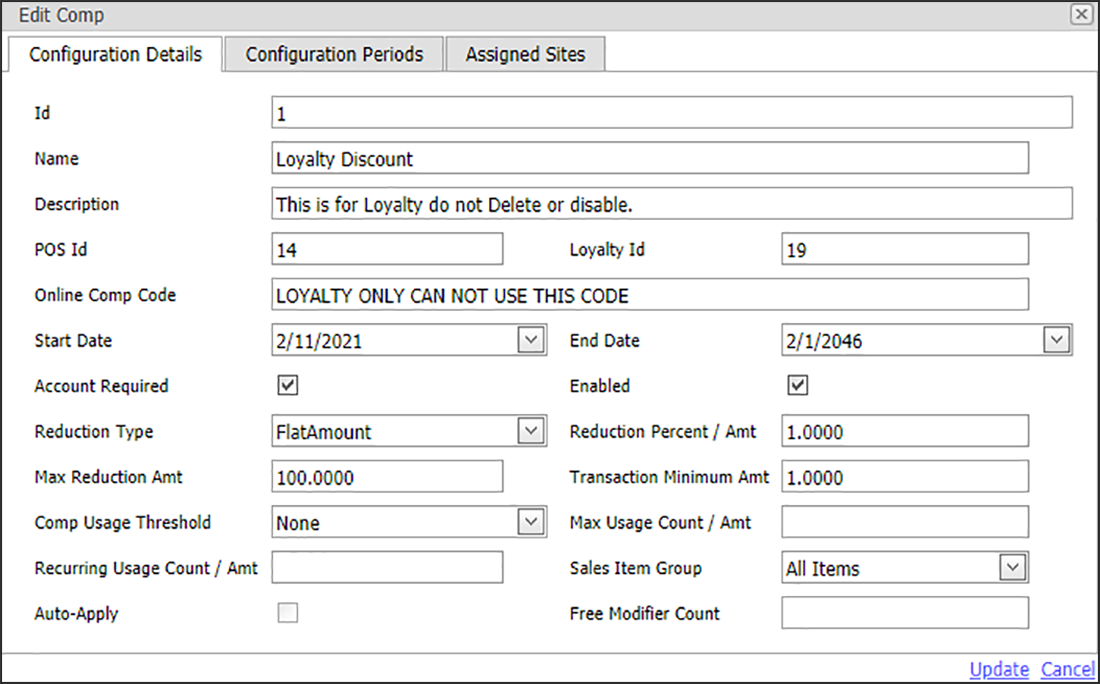
- Click Add Comp to display the Add Comp screen.

- Type the name of the comp used for online ordering. This appears on the virtual receipt during the checkout process.
- Type a description for the comp.
- Type the comp ID.
- Type the promotion or comp ID that coincides with the loyalty plan configured in Aloha Enterprise in 'Loyalty Id.' Refer to "Determining the type of discount being used in loyalty".
- Type the online comp code. You only need to enter text here so the comp saves in Web Admin. We recommend you use a long text string so nobody tries to use the Coupon Entry option on the website.
- Select the start date for the discount.
- Select the ending date for the discount. We recommend setting this to years in the future.
- Select Account Required to ensure only Digital Ordering guest accounts can enter loyalty information.
- Select Enabled to activate the discount.
- Select FlatAmount from the 'Reduction Type' drop-down list so the system determines the discount based on the loyalty plan.
- Type 1.0000 in 'Reduction Percent / Amt' so the system determines the discount based on the loyalty plan.
- Type the maximum reduction amount for the discount.
- Type 1.000 for the discount in 'Transaction Minimum Amt' to ensure customers check out with at least a $1.00 amount.
- Select None from the 'Comp Usage Threshold' drop-down list.
- Leave Max usage Count / Amt blank as this is not used for this is type of comp.
- Leave Recurring Usage Count / Amt blank as this is not used for this type of comp.
- Select All Items from the 'Sales item Group' drop-down list. This is automatically populated by the system.
- Clear Auto Apply because you want the loyalty system to apply the discount.
- Leave Free Modifier Count blank as it is not used for this type of comp.
- Click Update and exit the Comps function.
Mapping a promo loyalty type in Web Admin
If you are using a promotion loyalty type in the loyalty reward plan, you must map the promotion to the POS promotion and the POS comp. This POS comp is used to discount the reward on the virtual receipt.
To map a promotion loyalty type in Web Admin:
- Log in to Web Admin.
- Select Designs > Discounts > Loyalty Promo Mappings.
- Click Add Mapping to display the Loyalty Promo Mapping screen.

- Type a name for the loyalty promotion mapping.
- Select the promotion type that coincides with the reward plan in Aloha Enterprise. Refer to "Determining the type of discount being used in loyalty."
- Type the POS comp ID.
- Click Update and exit the Loyalty Promo Mappings function.
Configuring Company Settings Setup for Aloha Loyalty integration
You need to configure the following company settings:
- LoyaltyCompanyCode
- IntegratedWithLoyalty
- DisableAdvancedCommands
- DelayedOrderThresholdMinutes
- AssignLoyaltyAndASVAtSite
- LoyaltyCardPrefix
To add the LoyaltyCompanyCode company setting:
- In Web Admin, select Configuration > Company Settings Setup.
- Select a set from the 'Choose Settings Setup' drop-down list.
- Click Edit Setting or Add Setting.
- Type LoyaltyCompanyCode in 'Setting.'
- Type the Aloha Enterprise Company Code in 'Value.' This is the same company code as you entered in the Company Settings function.
- Click Update.

To set the IntegratedWithLoyalty company setting to True:
- Click Edit Setting or Add Setting.
- Type IntegratedWithLoyalty in 'Setting.'
- Type True in 'Value.'
- Click Update.

To set the DisableAdvancedCommand company setting to False:
- Click Edit Setting or Add Setting.
- Type DisableAdvancedCommands in 'Setting.'
- Type False in 'Value.' Always set this to False.
- Click Update.

To set the DelayedOrderThresholdMinutes company setting:
- Select Edit Setting or Add Setting.
- Type DelayedOrderThresholdMinutes in 'Setting.'
- Type 0 in 'Value.'
- Click Update.

To set the AssignLoyaltyAndASVAtSite company setting:
-
Select Edit Setting or Add Setting.
-
Type AssignLoyaltyAndASVAtSite in 'Setting' if you plan on applying loyalty and gift cards on the POS at the site. Otherwise, set this option to False if you want the loyalty and ASV to process at above-store.
Note: Always set this option to False if the site is configured for Connected Payments or the 'ATODeposits' company setting is set to True.
-
Type False in 'Value.'
-
Click Update.

To add the LoyaltyCardPrefix company setting:
- Click Edit Setting or Add Setting.
- Type LoyaltyCardPrefix in 'Setting.'
- Type the 5-digit prefix of your engage card in 'Value.' This is the virtual card series created in "Configuring a card series and bonus plan setup."
- Click Update.

Configuring Site Setup for Aloha Loyalty integration
You must add the Aloha Loyalty Store ID in Site Setup > Sites.
To add the Aloha Loyalty Store ID in site setup:
- In Web Admin, select Configuration > Site Setup > Sites.
- Select a site from the list.
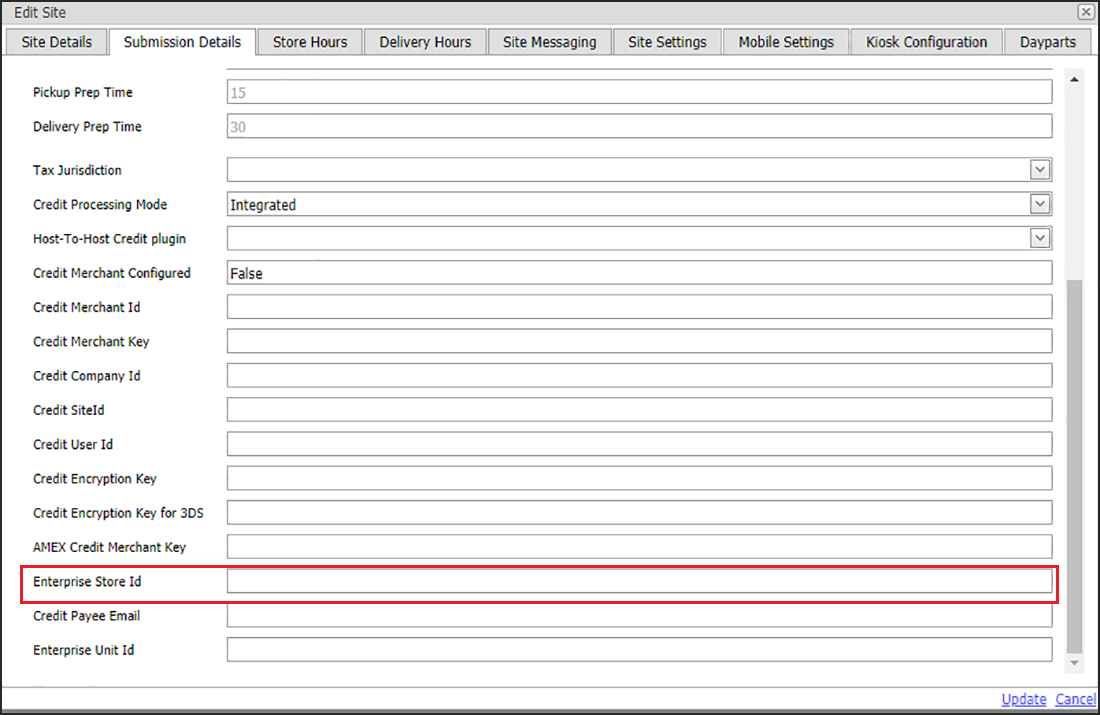
- Click Edit Site.
- Select the Submission Details tab.

- Type the Aloha Loyalty Store ID for the site in 'Enterprise Store ID.' This is from the Aloha Enterprise > Site Setup tab.
- Click Update.
- Exit the Sites function.
Return to "Integrating Digital Ordering and Aloha Stored Value/Aloha Loyalty."