Defining user roles
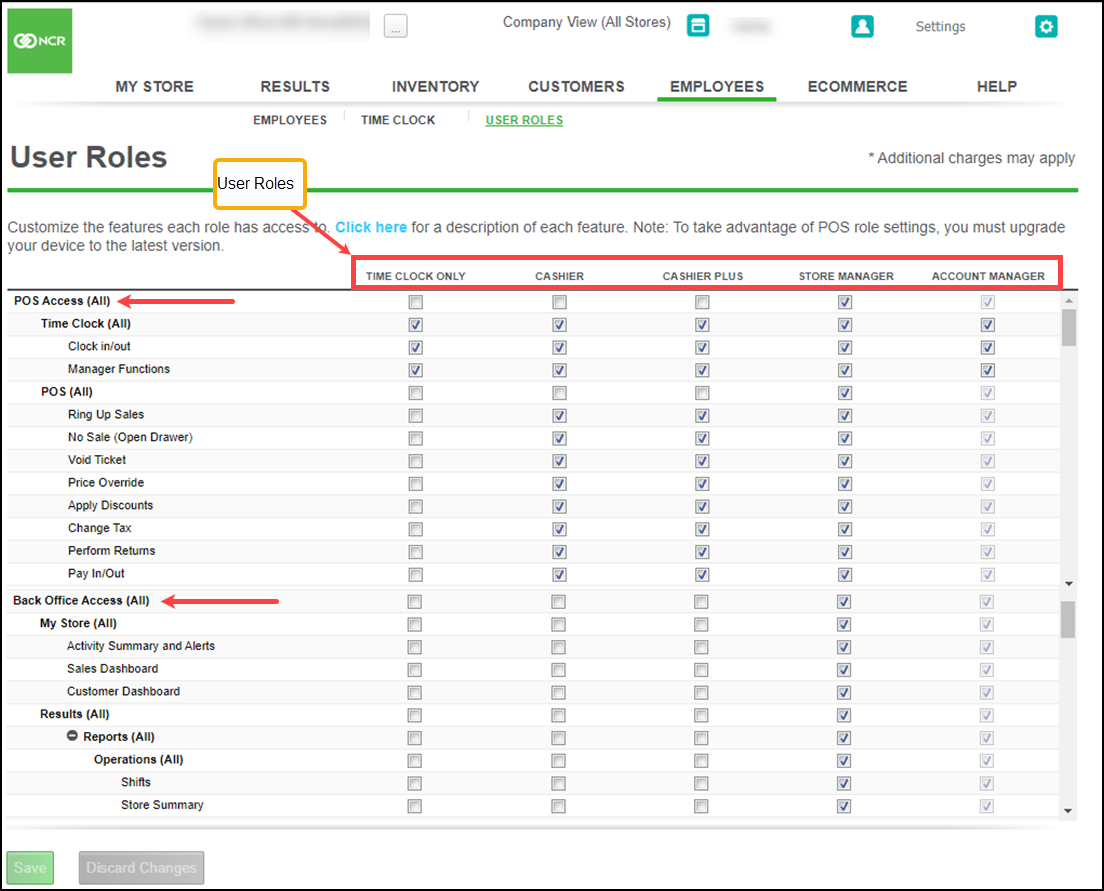
Use EMPLOYEES > USER ROLES to define the access available to each employee in both Back Office and the POS app. The size, layout, and policies of an operation, as well as the number of employees, determine the user roles you need to create and the access you need to assign to each user role.
The system provides three default user roles; however, you can add additional user roles and remove the default user roles, with the exception of Account Manager. You then assign the appropriate level of access to each user role and assign one or more user roles to each employee. Additionally, you can rank the user roles that access Back Office. This prevents an employee with a lower ranked user role from changing their user role to one with a higher ranking. User roles appear in order of ranking from lowest to highest, from left to right.
Understanding user role access
There are five predefined user roles, and each one has a set of features assigned to it by default; however, you can customize the features available to each role based on how you run your business.
- Time Clock Only – Designed for employees who will only use the POS device to clock in and out.
- Cashier – Designed for employees who ring up sales on the POS device, but do not access the Back Office.
- Cashier Plus – Designed for employees who need full access to all of the features on the POS device, as well as inventory management in the Back Office.
- Store Manager – Designed for managers who need full access to all of the features in the POS app and full access to the Back Office, with the exception of account setup, purchasing, and billing features.
- Account Manager – Designed for store owners who need full access to all of the features in the POS app and full access to the Back Office. Every account should have at least one employee assigned to this user role.
Defining user role access for Back Office features
For all of the features listed below, if a user does not have access to a feature, they will not see the link for the feature when they log in to Back Office.
| Back Office Feature | What does it allow a user to do? |
|---|---|
| My Store | |
| Activity Summary and Alerts | View the Activity Summary, view and configure alerts. |
| Sales Dashboard | View the Sales Dashboard. |
| Customer Dashboard | View the Customer Dashboard. |
| Results | |
| Reports | View and print reports; you can assign access at the report level. |
| POS Transactions | Access the POS transaction viewer. |
| Credit Settlement | Access the credit settlement page, which includes the ability to void transactions and manually settle credit batches. |
| Gift Settlement | Access the gift card settlement page. |
| Inventory | |
| Categories and Items | View, add, and edit categories and items. |
| Full Access | View, add, and edit categories and items. |
| Limited Edit Only | Edit item price and item availability for existing items. |
| Modifiers | View, add, and edit modifiers and modifier groups. |
| Discounts | View, add, and edit discounts. |
| Department | View, add, and edit departments. |
| Promotions | View, add, and edit promotions. |
| Manage | |
| Snapshot | View and print tracked inventory. |
| Count | Create and print an item count worksheet to assist in performing an inventory count; enter inventory count results. |
| Receive | Track the quantity of items being added to your inventory, as well as update the vendor, cost, and retail price for those items. |
| Customers | |
| Email Marketing | Create and send email marketing campaigns to customers. |
| Loyalty Program | Create, view, and edit your loyalty program. |
| Customers | View, add, and edit customer information. |
| Social Sharing | Set up links to your social media pages to be used in Email Marketing. |
| Employees | |
| Employees | View, add, and edit employees. |
| Time Clock | Edit and delete time clock activity. |
| User Roles | View and edit user roles. |
| Settings | |
| Company | View and edit basic information about your company. |
| Store | View and edit store contact and store receipt information. |
| Taxes | View, add, and edit tax categories and tax rates. |
| Payment Methods | View and edit accepted payment methods and credit card processing information. |
| Account Information | |
| My Account | View and update your account information, view bills, add additional stores. |
| Buy Hardware | Purchase additional hardware/accessories for your store. |
| Register Hardware | Register equipment to your account for warranty purposes. |
| Register Device | Activate a new device at a store; this is performed from the device. Note: Additional charges may apply. |
To assign the appropriate access to each user role:
- At the User Roles screen, for each user role listed across the top of the screen, select the appropriate access from the options available on the left of the screen. The first section from which you make selections controls access to the POS app, and the lower section controls access to Back Office.
- Click Save and exit the User Roles function.
Reference documentation:
Looking for resources or help with Silver? Click here.