Uploading an invoice
ASM is built with OCR (Optical Character Recognition) functionality that reads the uploaded invoices and feeds data into the system. This technology greatly reduces the time and effort of creating an invoice while retaining the integrity of the printed invoice.
A manager can upload and process an invoice from their desktop or mobile, either as a digital image file or a PDF file. ASM detects the individual elements of the uploaded invoice to process and read the uploaded image. A manager can also make changes to the resulting invoice values. When the system reads the invoice data, the invoice is ready for processing and reporting.
Tip: You can upload only one image at a time. If the invoice is in PDF format, convert the PDF into an image format and upload. You can use JPG, JPEG, IMG, and PNG.
Uploading the invoice details
To upload the invoice details:
- Select Inventory > Invoices. The 'Invoice list' screen appears.
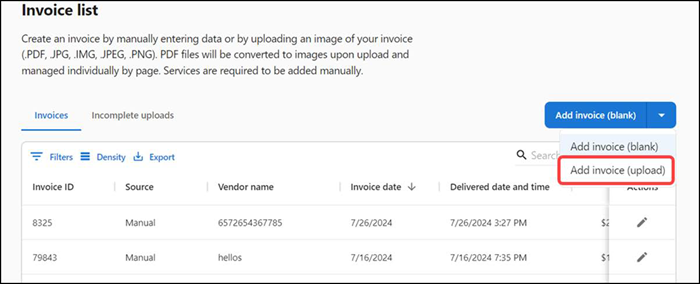
- Select Add invoice (upload) from the 'Add invoice (blank)' drop-down list.
- Browse to and select the invoice to upload. The 'Uploading invoice' screen appears.
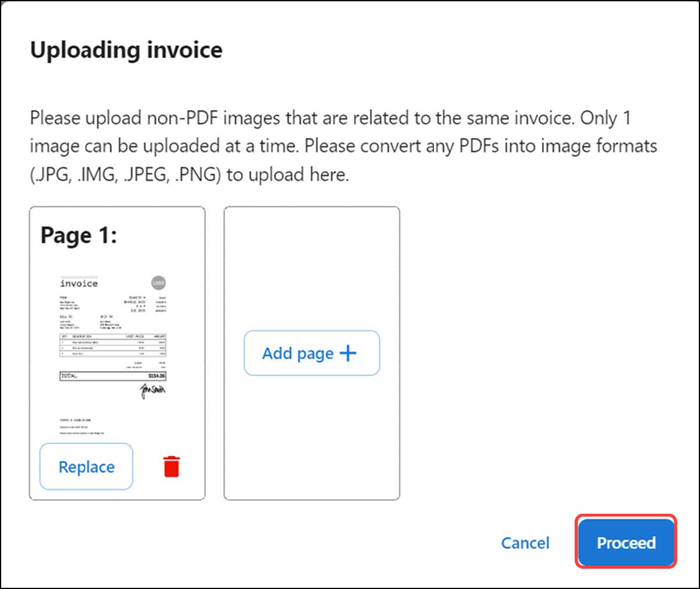
- (Optional) Click Add page + to upload multiple images related to the same invoice.
- Click Proceed. The 'Processing files' status screen appears. If your upload file meets the requirements, the 'Uploading invoice' success message appears.
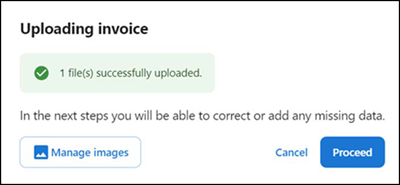
- You can use the Manage images option to upload the images again.
- Click Proceed to continue with the mapping process. The 'Invoice upload validation' screen appears.
- Continue to Mapping invoice information to begin the process of validating the uploaded invoice.
Mapping invoice information
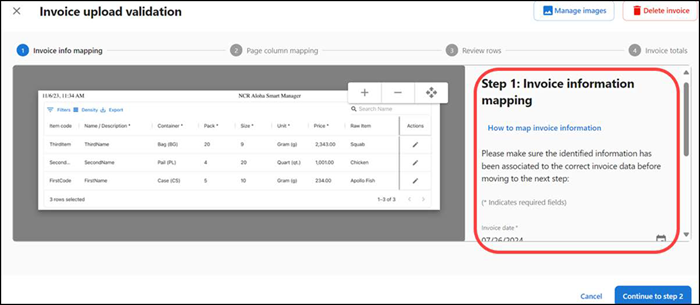
Once you successfully upload an image of an invoice, you must go through the mapping process to ensure the invoice details map to the correct value.
Step 1: Invoice information mapping
-
With the 'Invoice upload validation' screen active, verify the invoice details are mapped correctly. To make a change, re-map the invoice details to the correct value or manually type them.

a. To remap invoice details, click Map next to the data to update.
b. Select the correctly identified text box to map to and then click Apply.
c. Repeat as many times as needed to correctly map the data.
-
Enter the Invoice ID.
-
Enter the Vendor name.
-
Click Continue to step 2. The 'Page column mapping' screen appears with instructions for Step 2: Page column mapping.
-
Continue to the next procedure.
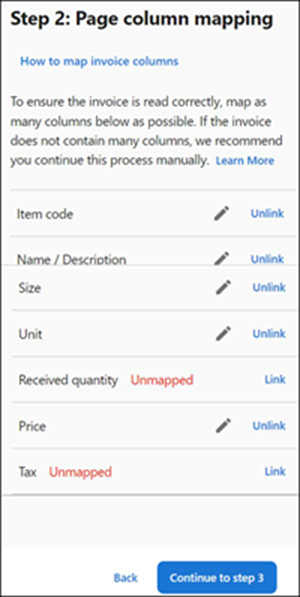
Step 2: Page column mapping
- Review the mapped values for each column in your invoice to ensure each column value mapped correctly. To make a change, click the pencil icon and manually adjust the highlighted area using the provided anchor points. You may edit, unlink, or link your data to the correct values. You can see how the value has been mapped by hovering over the highlighted rectangle on your invoice or column value.
- Click Continue to step 3. The review progresses and the 'Review row information' screen appears with instructions for Step 3: Review row information.
- Continue to the next procedure.
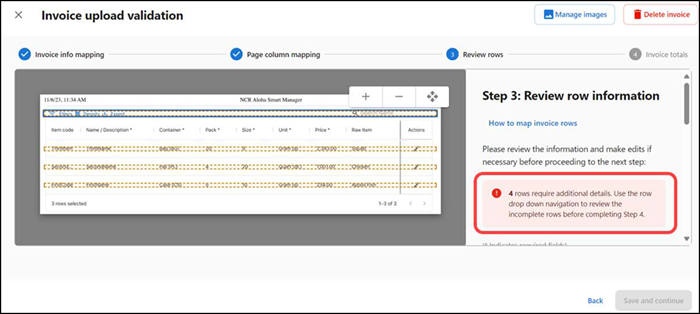
Step 3: Review row information
-
Review and correct the item details before submitting your invoice. Items that are already identified within the catalog are auto-populated with the registered details. For new items, you can edit all item details in your invoice. Based on the modifications, the system enables you to continue.
Note: For items that are recognized in the catalog, you can edit only the quantity, price, and tax of the item.
-
Click Save and continue. The 'Invoice upload validation' screen appears with instructions for Step 4: Invoice totals.
-
Continue to the next procedure.
Step 4: Invoice totals
- Click Create invoice. The 'Invoice details' screen appears. Upon the invoice creation, initially the invoice status is in Draft.
- Click Accept invoice to accept the invoice and continue to finalize the invoice details.
- Click Back to return to the 'Invoice list' screen.
Return to "About Inventory Management."