PX10 POS Terminal User Guide
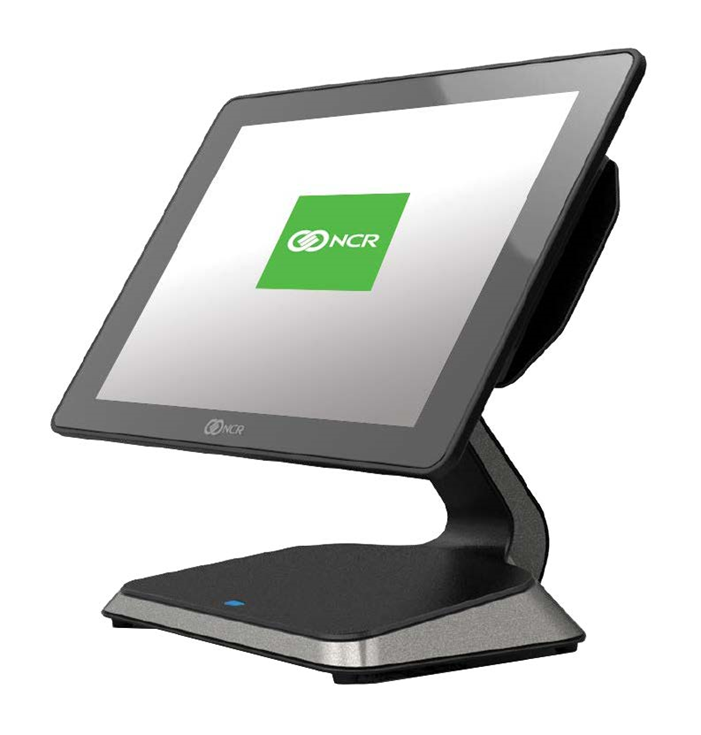
NCR PX10 is an advanced cost-effective POS terminal with the compact, sleek, and familiar look and feel of a tablet. The PX10 is built to handle today's most innovative POS solutions, and combines the stability and uncompromising quality of a fixed terminal. For a lot of leading-edge food service or retail concepts, there is just no need for larger, more rugged, higher-powered terminals. Also, many existing chains are beginning to recognize a need to deploy additional terminals at some of their sites and are looking for flexibility and a compact design.

Versatility in a compact machine:
The PX10 runs either Windows 10 or Android in a sleek chassis that anchors the 10.1-inch LED backlit LCD glass screen to deliver full HD and projected capacitive touch technology. Internally, solid-state components enable a fan less design so there are no moving parts to break. You can also mount an equally impressive 7-inch display on the back so your customers can visually keep track of their order as it is entered, ensuring a high level of order accuracy. Choose the amount of RAM and SSD space that suits your specific needs. You decide whether to include options like a magstripe reader, scanner, wi-fi capability, biometrics, or battery backup.
Simple, easy to use:
The tablet-like chassis is made of durable metal with a resilient touchscreen. A single hinge allows staff to adjust the device to the most comfortable angle based on height and/or preference. You can either mount it to a cash drawer magnetically or secure it directly to a countertop for greater security.
Connectivity:
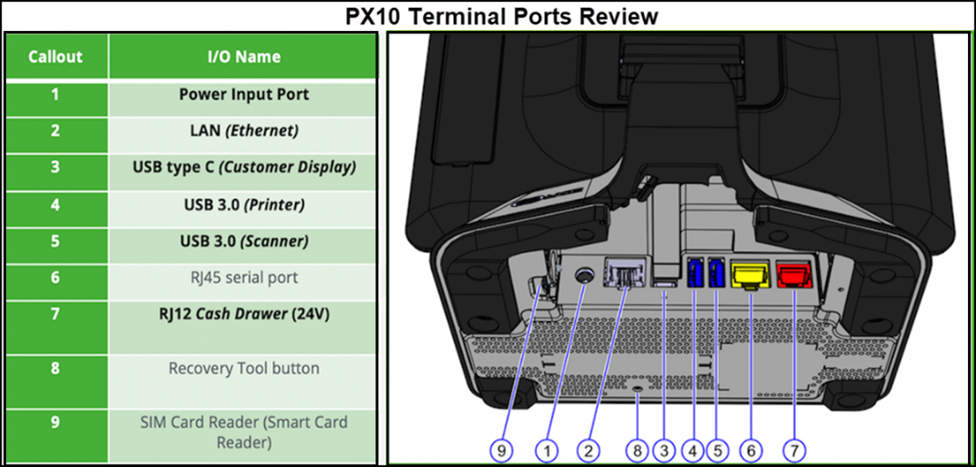
When it comes to connectivity, the PX10 has an impressive Input/Output profile. But if the onboard ports are not enough, expansion options give you even more of what you need to connect this terminal to your business. A separate battery is available that snaps directly onto the base of the terminal, so it does not compromise the clean look and feel of the device.
Key features:
- High-quality components in a compact, tablet-like design.
- Durable metal construction with resilient touchscreen technology.
- Hinge to adjust angle/height of touchscreen.
- Open Architecture.
- Secure I/O access when mounted to countertop.
Technical specifications:
| Features | Specifications |
|---|---|
| Touch Screen | 10.1-inch-wide Full HD LED LCD Projective Capacitive Touch |
| Processor | Intel CPU – Dual-core (N3350 up to 2.4 Ghz) |
| Operating Systems | Android (6.0) |
| Connectivity | Cash Drawer Ethernet 1xUSB Type C 2xUSB Type A 1xRJ45 Serial SIM Card Slot |
| Design | Fan less design with tilt hinge |
| Storage | 32GB, 64GB or 128GB SSD |
| Memory | 4GB RAM standard Option for 8GB RAM |
| Options | MSR Front or back integrated scanner I/O expansion box Battery Wi-Fi (802.11 a/b/g/n/ac) 7-inch Customer Display |
Before you set up a PX10
-
Verify there is an open device slot in Back Office by:
-
Access Silver Essentials Back Office (mystore.ncrsilver.com).
-
Log in with your credentials.
Note: You should have received an email from Silver Essentials support team. If not please contact our support team for assistance.
-
Click your name or profile icon at the top right of the screen.
-
Navigate to My Account and then on the left-hand side choose My Devices.
-
Determine if there is a Primary Device slot already open.
Note: If so and you have only purchased one device, you can skip ahead to Setting Up PX10, otherwise continue to the next step.
- Add additional device slots, if more than one device has been purchased. a. Click the blue “+” icon labelled Add a POS Device towards the right hand of the screen. b. Click OK to acknowledge that each additional slot/device after the Primary, will carry an additional monthly fee. c. Assign a STATION NAME to each slot (i.e., Station 2, Station 3, etc.) to identify it. d. Click Save Changes.
-
-
Feel free to check out training videos located at youtube.com/ncrsilveruniversity.
Setting up a PX10
-
Connect the PX10 POS terminal to a power source and turn on the device.
-
Connect to the Internet.
-
Ethernet – Ensure the ethernet cable is connected from the device and directly into your router.
Note: Ethernet is the recommended internet connection.
- Wi-Fi — Ensure you know the Wi-Fi network name and password. As a reminder, the Wi-Fi network should be a secure private connection not shared with guests and employees.
-
-
Complete the device registration. The device will already have the NCR Silver Essentials Application pre-loaded on it, so do not be surprised when the device pops up with a registration screen. a. Enter your NCR Silver Essentials Back Office username and password. b. Choose the device slot for this station (i.e. Station 1) c. Repeat steps 2 and 3 for additional devices.
-
Log in to the POS using your PIN.
- Tap the hamburger menu icon in the top left corner to display the slide out menu.
- Tap Settings and then tap System tab. a. Scroll near the bottom of the page and tap Android Settings. b. Tap Network and Internet. c. Tap Wi-Fi. d. Select the desired network. e. Tap the home icon of the device, once connected, which sends you to the POS Home screen.
-
If additional hardware is to be connected, look for the instructions later in this document.
PX10 and accessories set up


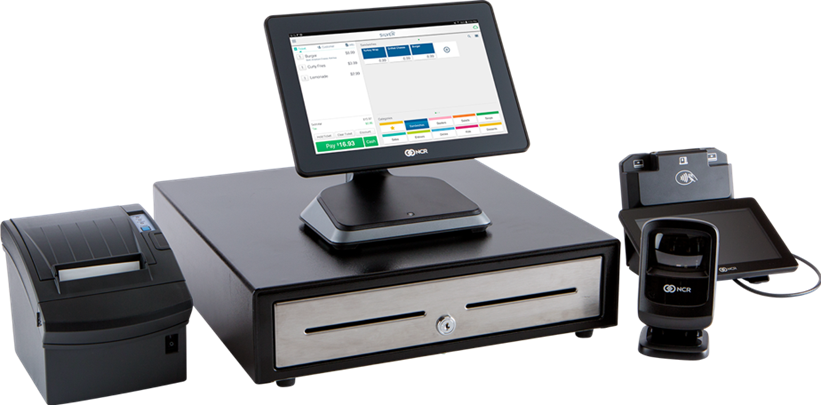
The Android-based PX10 works with the following hardware:
- Integrated card reader
- Ingenico RP457 EMV reader
- Customer-Facing Display
- Cash Drawer
- Receipt Printer (USB or Bluetooth)
- USB Scanner (R2D2 or gun)
- Scale (USB)
- Label Printer (Bixolon)
Setting up a printer
You can connect the receipt printer to a POS terminal by using an USB cable, Bluetooth, and IP network address. For more information, refer to Setting up a printer
Setting up a cash drawer
You can connect the cash drawer directly to a POS terminal or indirectly to a POS terminal through a receipt printer. For more information, refer to Setting up a cash drawer
Setting up a bar code scanner
Instructions on how to setup the Bar Code Scanner are included when a scanner is shipped. For more information, refer to Setting up a bar code scanner
Setting up a scale
The integrated scale allows you to weigh an item then automatically send the weight to the POS to calculate the price for you. Scales are now compatible with kilograms on the POS and measure to the third decimal place. For more information, refer to Setting up a scale
Setting up a credit card reader (EMV)
This device (RP457) needs to be attached to the PX10 with a bracket. For the NCR Silver Essentials Back Office terminal set up, please contact our Customer Care for further steps. Also, refer to Setting up a cash drawer
Technical support
If you have a technical/support issue, you can open a case using one of the following methods. When submitting a case, the following information helps our team resolve your issue more quickly:
To open a case:
- Call or text the support line: (877) 270-3475.
- Email customercare@ncrsilver.com you will have a case number returned to you.
To submit a case, include the following:
- Your name, phone number and/or e-mail.
- Business name and location and/or active subscription number.
- Description of issue and what has been done to troubleshoot the issue so far.
Reference documentation
Refer to the below related documents for additional information.
- Registering a device for the POS
- Setting up a printer
- Setting up a cash drawer
- Setting up a bar code scanner
- Setting up a credit card reader
Looking for resources or help with Silver? Click here.