Aloha Cloud Hardware - Handheld (Axium EX8000)
The Aloha Cloud handheld is an Android based mobile device capable of performing most Aloha Cloud POS functions. The device seamlessly runs the Aloha Cloud POS application and Back Office software. Tableside payments are also a snap enabling restaurants to offer flexible payment solutions.
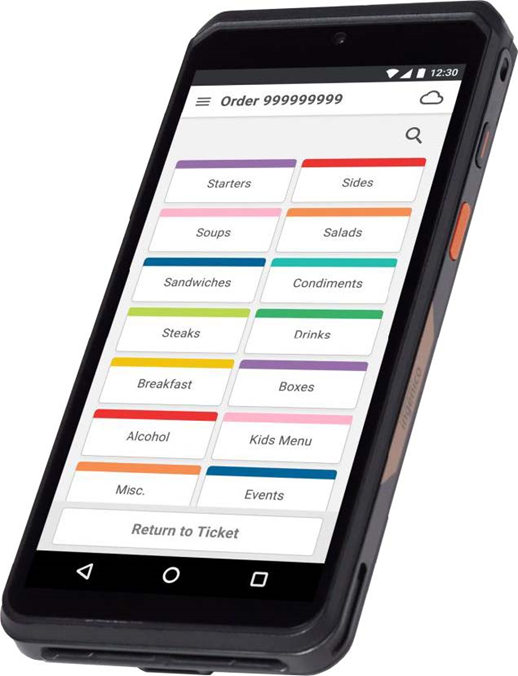
Power and versatility for optimized performance
Harnessing the power of a slim Android OS on the latest chipsets, this compact POS terminal leverages Wi-Fi to operate anywhere in your restaurant. Further, Aloha Cloud is optimized for portrait orientation. The handheld is the perfect answer for restaurant owners who want to extend their reach and increase speed of service.
The right design for the job
The sleek design mates a six-inch screen to a payment module capable of EMV chip and contactless payments resulting in a device comparable with a Samsung Galaxy 21+ or Apple iPhone 12. Working in the restaurant environment can be challenging, but the NCR handheld was designed with a four foot drop rating and when combined with the included protective case, the protection extends to six feet. Like any electronic device, take precaution near water and avoid using harsh chemicals to clean it. With Aloha Cloud, the handheld can last over eight hours on a full charge and rapidly re-charges in a few minutes on the charging base. This creates more productive team members and reduces the need for multiple spares. Accessories are available including single and five-gang rapid charging bases, cases, stands, and replacement cables/power supplies.
Security and connectivity
The handheld is certified to the PCI PTS V6 standard ensuring strong encryption, leverages a custom cut of Android requiring application, and is listed as being part of a PCI validated payment solution. With the ability to run off Wi-Fi or 4G cellular, the handheld can operate anytime and anywhere. The handheld can support cellular connectivity using a cellular network provider SIM card to process transactions online in real time.
Key features
- Large six-inch touchscreen
- Payment anywhere and anytime (4G, 3G, GPRS, Bluetooth, Wi-Fi)
- Front and rear facing cameras
- Long-lasting battery
- PCI v6 compliant
- Accepts multiple methods of payments
Technical specifications
| Features | Specifications |
|---|---|
| Product Dimensions | Length 3.17 in. (8.06cm); Width 0.75 in. (1.9cm) Height 6.69 in. (17.0cm) Weight 0.64 lb. (0.28kg) |
| Display | 6-inch HD+, 1440 x 720 px; Color, Capacitive multi touch |
| Operating System | Android 10 Security OS |
| Connectivity | IEEE8.2.11 a/b/g/n/ac 2.4Ghz and 5Ghz (Optional) WAN - 4G fallback 3G and GPRS (Optional) LAN - Bluetooth 4.2 support, Low energy |
| Processor | Application: 64-bit ARM, Cortex Quad core A53 1.3Ghz Crypto: 32-bit ARM, Security core SC300, 192Mhz |
| SAM/SIM | 4 slots, 2 SIM + 2 SAM |
| Card Readers | EMV Chip Readers Support ISO 1/2/3 track data, Bi-directional swiping EMV contactless L1 3.0 spec compliant, Support ISO/IEC 14443 Type A/B |
| Operating Temperature | 14° F – 122° F (-10° C – 50° C) |
| Storage Temperature | -4 ° F – 158° F (-20° C – 70° C) |
| Humidity | 10% to 90% Non-condensing |
| Memory | Internal – 32GB Flash, 3GB RAM External - MicroSD card slot |
| Battery | Li-ion 4040mAh/385V, 15.55 Wh |
| Data Capture | Front camera – 2MP, fixed focus, code scanning Rear camera - 8MP, autofocus, flash, code scanning Tracking GPS, GLONASS, BeiDou |
| Connections | USB-C |
| Audio | Supports audio play or headphones over USB-C |
Using handheld devices with NCR Aloha Cloud
Handhelds for Aloha Cloud help restaurateurs increase flexibility and efficiency in their operations by putting the power of the point of sale in their servers’ hands. The user interface for Aloha Cloud is consistent between the handhelds and fixed terminals, making it easy for staff to be trained and jump from one device to another.
Inside your box you should find:
- Axium handheld device
- Case
- USB-C charging cable
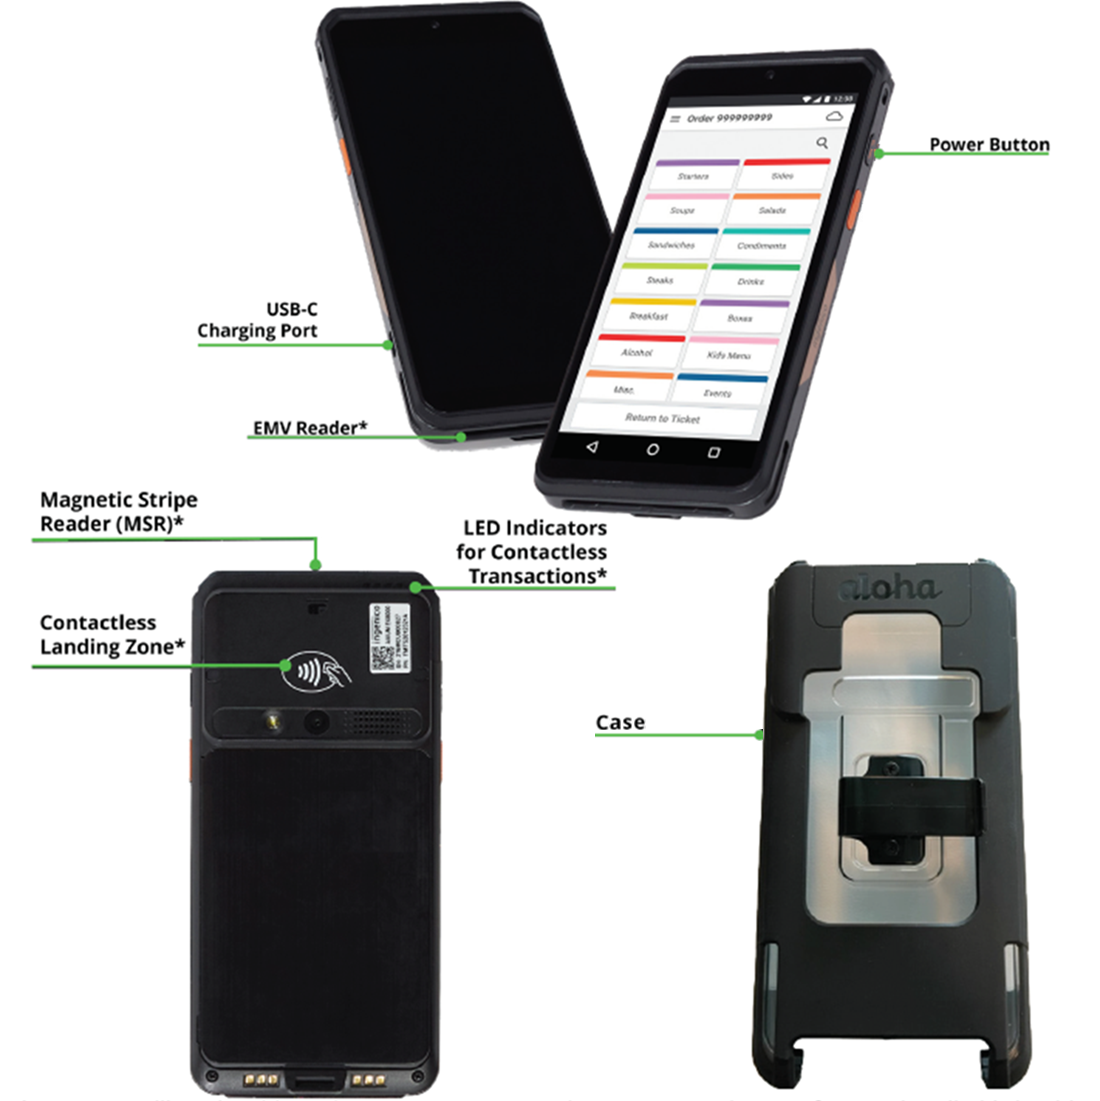
To clean and care for your device:
Although this device is durable, please do not drop or throw it. To clean it, unplug all wires from the terminal. Use an alcohol-based lens cleaner solution or just a soft damp cloth to clean the outside.
- Never clean electrical connections.
- Do not use solvents, detergents, or abrasive products.
- Avoid exposing the terminal to the direct rays of the sun.
- Do not put anything other than cards into the EMV chip reader.
To turn on the device:
-
Make sure the terminal battery is correctly installed and press the Power button for one second until the display turns on.
-
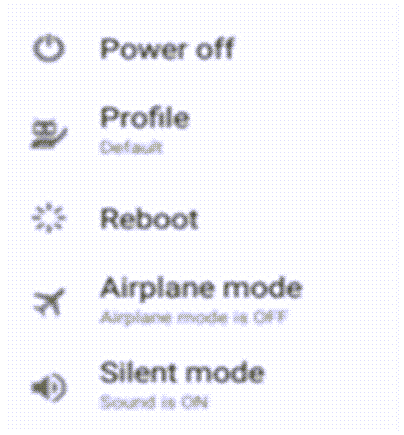
To power off, press the Power button for more than two seconds, until the display shows the options menu below. Then tap Power Off.
-
If the battery is empty, the terminal automatically shuts off.
To connect to Wi-Fi:
Once you power on your device, you will be prompted to connect to a Wi-Fi network.
- Select Wi-Fi as your connectivity option.
- Enter the password 350000 to get the network authorized.
- Tap the Wi-Fi signal on your device.
- Select your home or office network.
- Enter the network password.
To connect to cellular:
SIM cards can be purchased online or in stores and come in multiple sizes. A plethora of plans with unlimited data, or subscription plans without requiring a cell phone, are available from network providers. The handheld only supports Standard Size SIM cards. Micro and Nano SIM cards are NOT supported. A Micro or Nano standard SIM size adapter can be used, if required.
Note: If you have a standard SIM card, like the Verizon and T-Mobile, then no additional adapter is required.
-
Turn off the handheld.
-
Remove the protective case (if applicable).
-
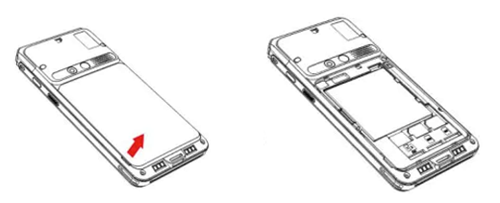
Remove the battery cover on the back. You should see a notch on the bottom side to flip it open.
-
Once the battery is removed, insert a SIM card into SIM SLOT 1 or 2. Recommended Slot 2 may be easiest.
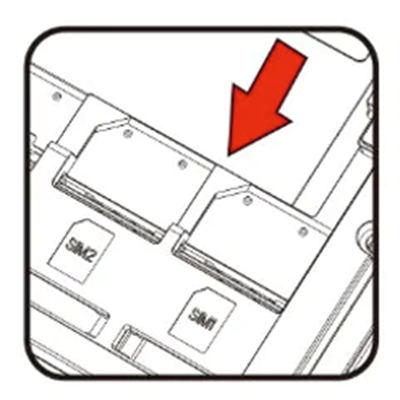
Note: SIM cards only fit one direction, and the chip must be facing down to align.
-
Once you insert the SIM card, insert the battery back into the handheld and the case.

Before you set up a handheld device
To check prerequisites for setting up a handheld device:
-
Ensure the wireless network allows access to http://temterminalsnar02.icloud.ingenico.com/.
-
Verify there is an open device slot in Back Office by:
-
Access Aloha Cloud Back Office.
-
Log in with your credentials.
Note: You should have received an email from Aloha Cloud support team. If not, please contact our support team for assistance.
-
Click your name or profile icon at the top right of the screen.
-
Navigate to My Account and then on the left-hand side choose My Devices.
-
Determine if there is a Primary Device slot already open.
Note: If so and you’ve only purchased one device, you can skip ahead to Setting up and using a handheld device section, otherwise continue to the next step.
-
Add additional device slots, if more than one device has been purchased.
-
Click the blue + icon labelled Add a POS Device towards the right hand of the screen.
-
Click OK to acknowledge that each additional slot/device after the Primary, will carry an additional monthly fee.
-
Assign a Station Name to each slot (i.e., Station 2, Station 3, etc.) to identify it.
-
Click Save Changes.
-
Setting up and using a handheld device
To set up a handheld device:
-
Allow the handheld to charge. You do not want the following operations interrupted.
-
Connect to a local network with Internet. The handheld prompts you to connect to a network. Alternately you can drag down from the top of the screen to access the settings tray and tap the wireless icon to configure.
a. Enter the secret password when prompted. Contact support if you need this system password.
b. Ensure you know the Wi-Fi network name and password. The Wi-Fi network should be a secure private connection not shared with guest or public network traffic.
-
Complete the device registration. The device will already have the NCR Aloha Cloud Application pre-loaded on it, so do not be surprised when the device pops up with the registration flow.
a. Select region and time zone.
b. Enter your NCR Aloha Cloud Back Office username and password.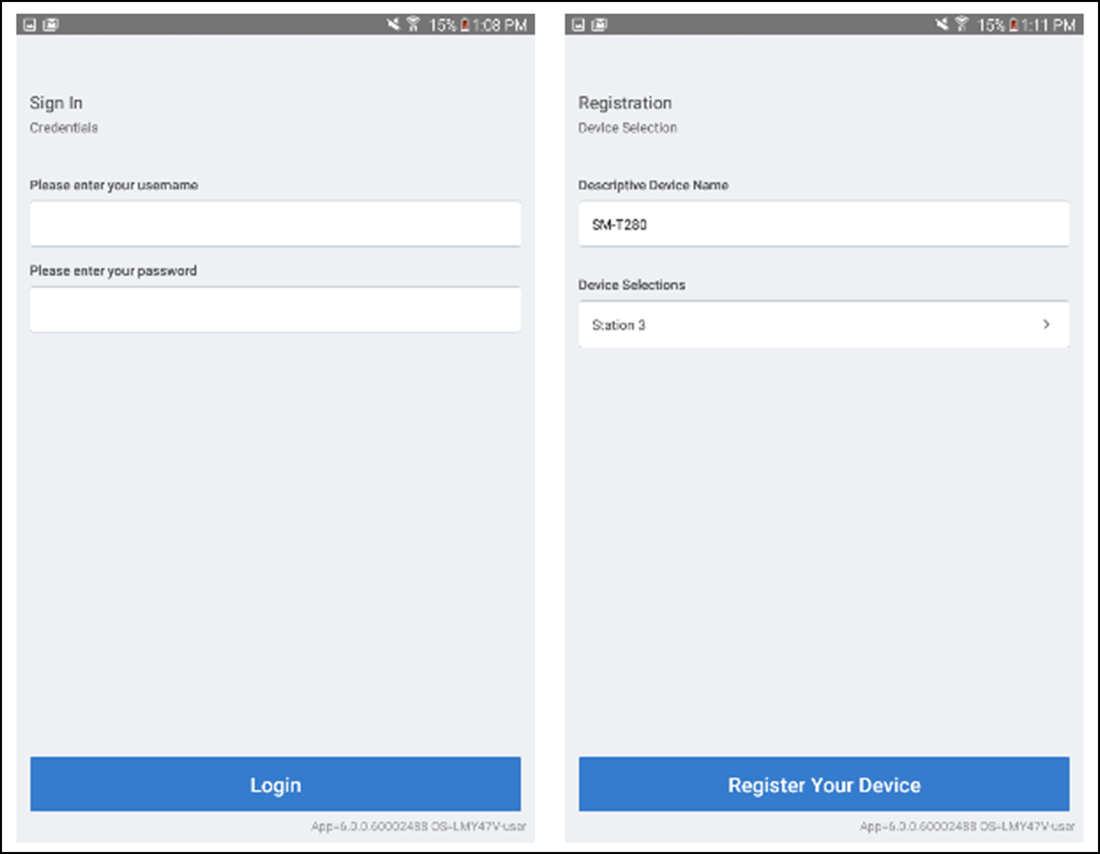
-
Select a store.
Note: If you have multiple stores set up on your account, select the required store’s database.
c. Enter a Descriptive Device Name (it should be a unique descriptive name) and select the station device slot for this device (i.e. Station 1)
d. Tap Register Your Device.
e. Select the device and tap Done to continue with the registration process.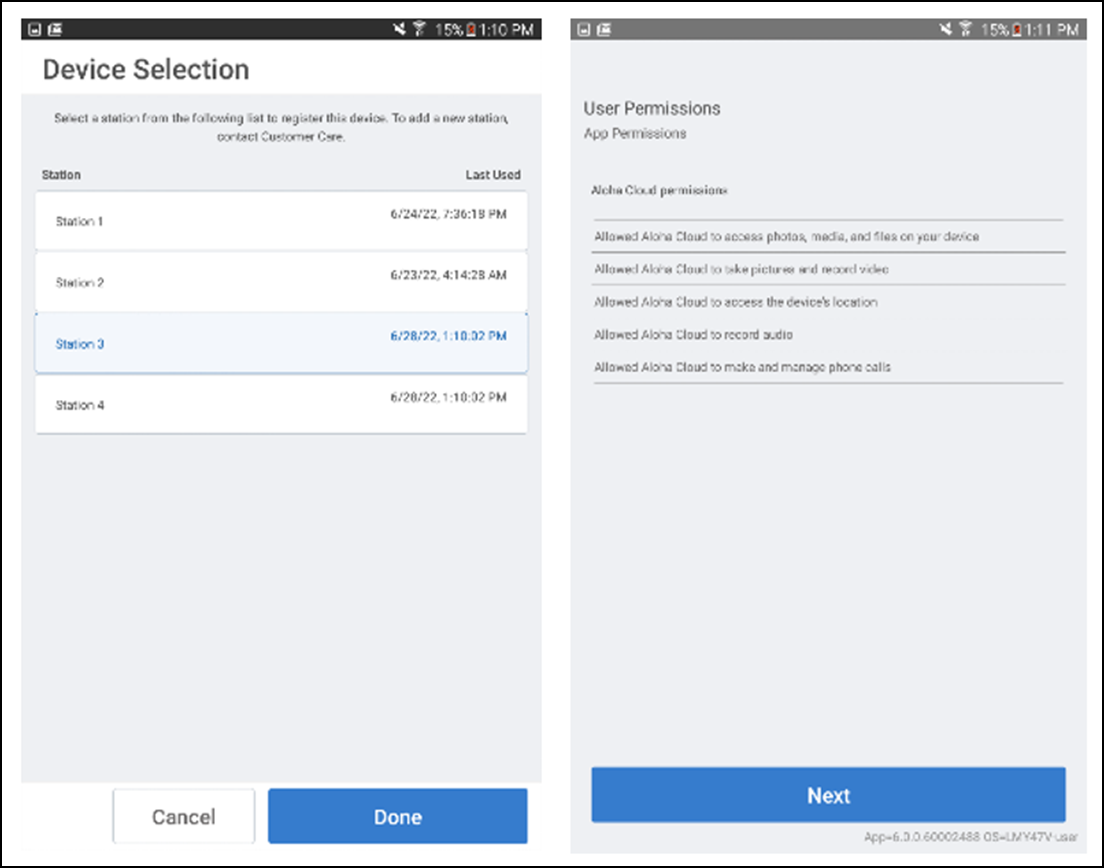
f. Accept user permissions by tapping Next through each screen.
g. Tap OK to acknowledge the software is up to date and to start the date sync. Progress bars shows the status and once the device is successfully synced, the Configuration Successful screen appears.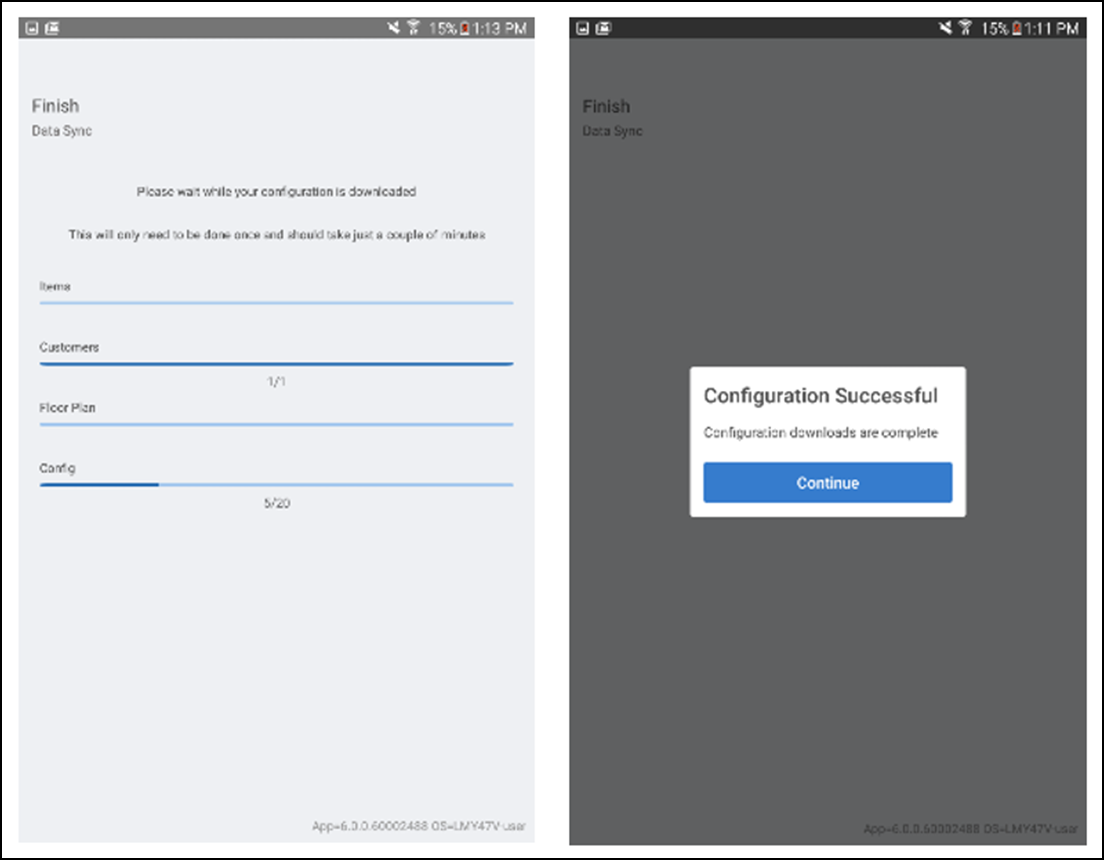
h. Tap Continue.
i. Repeat steps 2 and 3 for additional devices, if required.
-
-
Log in to the POS using your PIN.
- Enter your PIN and tap Log In.
- Tap Clock In.
- Select the Job code, if required. The POS Home screen appears.
- Tap Point of Sale in the POS Home screen.
- Tap Start a new shift.
- Select Table/Tab views as required.
Viewing device battery notifications
During an active financial shift you can view low battery notifications on the POS Axium device. Whenever the battery falls below a predefined threshold, you receive a notification prompting you to either save your progress or complete essential tasks. This allows you to take action before the application locks and the device powers down, ensuring uninterrupted financial shifts.
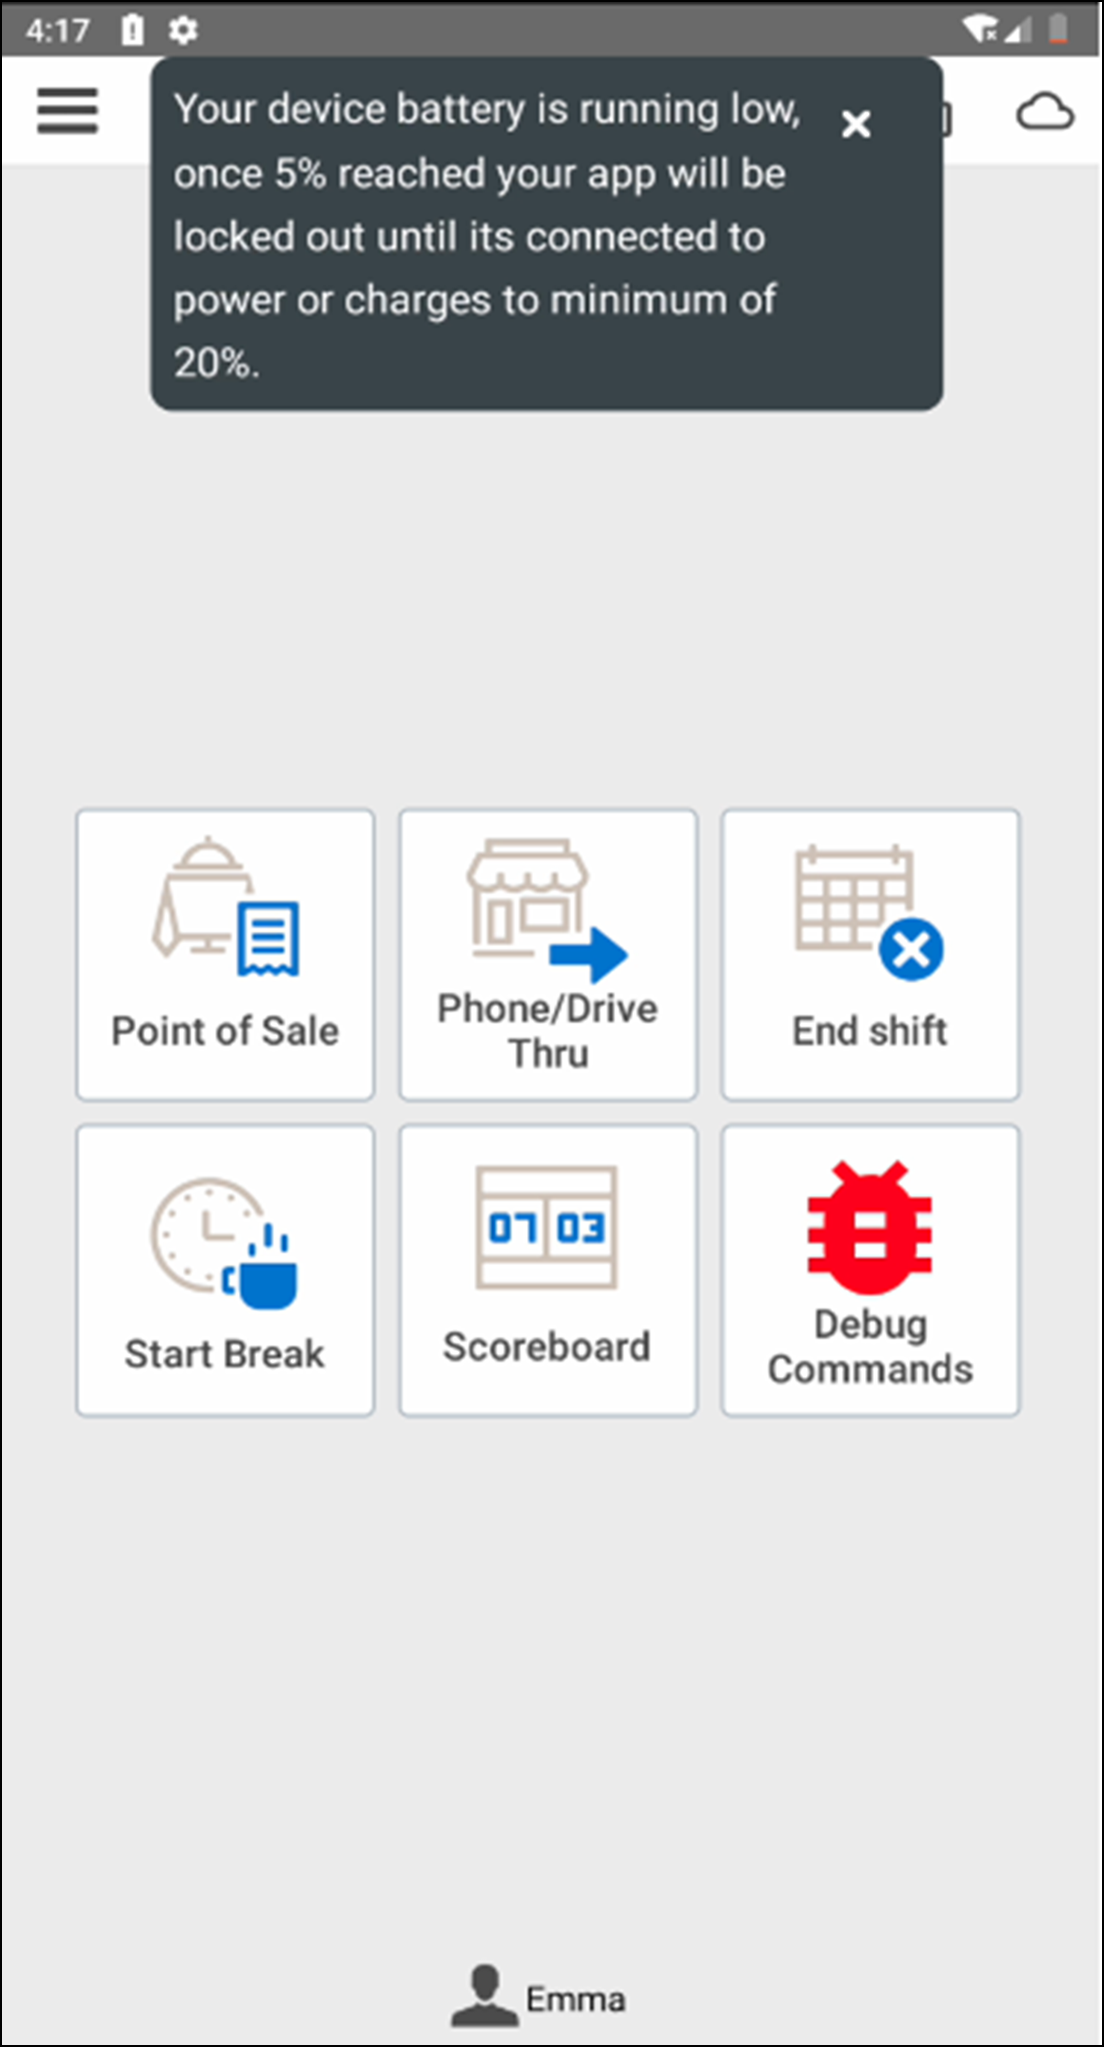
To receive battery notifications, ensure the battery level is configured correctly in the device settings. Once configured, the messages appear on the Axium device. (For example), if you are configuring the threshold limits to battery percentage at 15% and 5%, the following respective messages appear on the device.
When the device battery drops to 15%
A message appears and informs you to charge the device to a minimum of 20%.
When the device battery drops to 5%
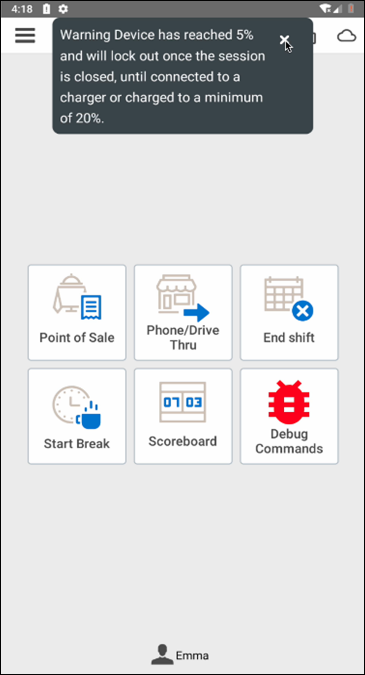
A warning message appears and informs you the device has reached 5% and will lock out once the session is closed, until connected to a charger or charged to a minimum of 20%. It is recommended to close the session and connect the device to the charger, otherwise the device will lock.
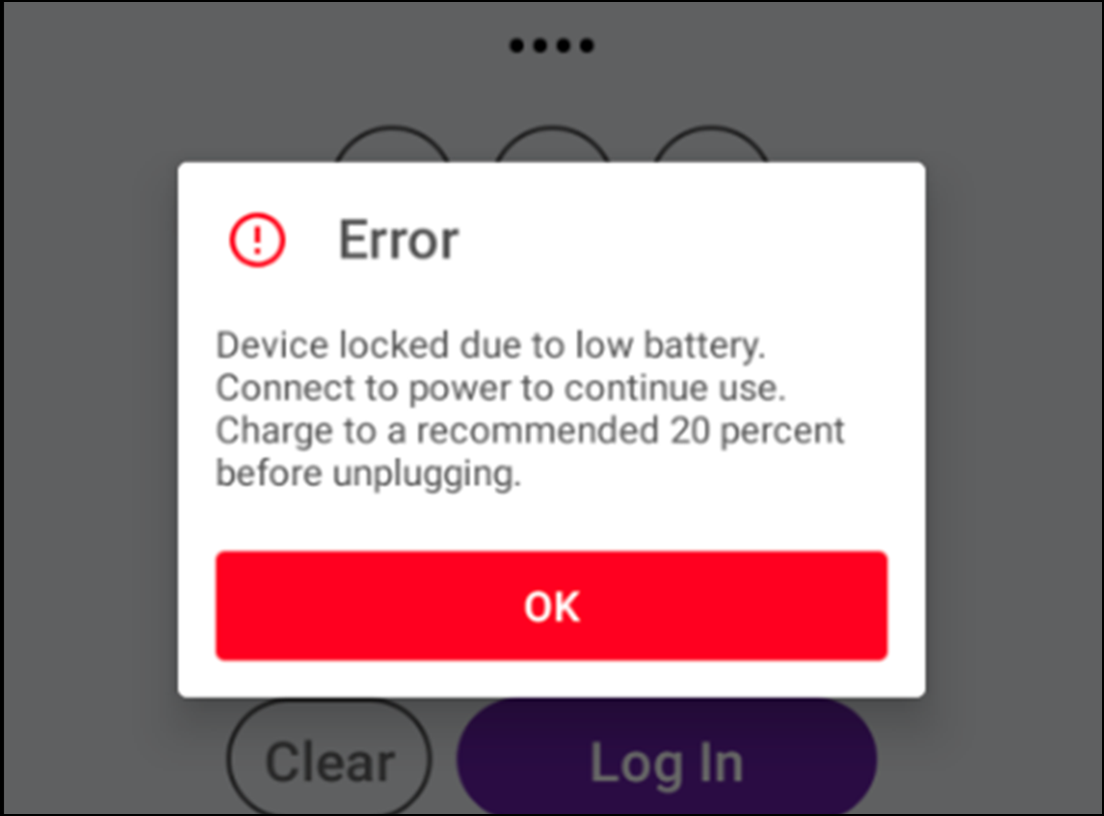
Note: You cannot log in to a different POS device when your device battery is running low. If you attempt to log in, an error message appears and restricts to log in to a different device.
Technical support
If you have a technical/support issue, open a case using one of the following methods. When submitting a case, the following information helps our team resolve your issue more quickly:
To open a case:
- Call or text the support line:
(877) 270-3475. - Email customercare@ncrsilver.com; a case number is returned to you.
To submit a case, include the following:
- Your name, phone number and/or email.
- Business name and location and/or active subscription number.
- Description of issue and what has been done to troubleshoot the issue so far.
Reference documentation
Refer to "Registering a device for the POS" for additional information.