Defining Company Information
When you first access Settings & Privacy > Company Information, it is pre-populated with the information entered when your account was created. You need to log in using Company View (All Stores) to expose options not available to you when you log in to a specific site. You cannot make any changes to Company Information when you log in to a specific site; it is read only.
This function offers two menu options (on the left): Company Information and Company Options.
Using Company Information
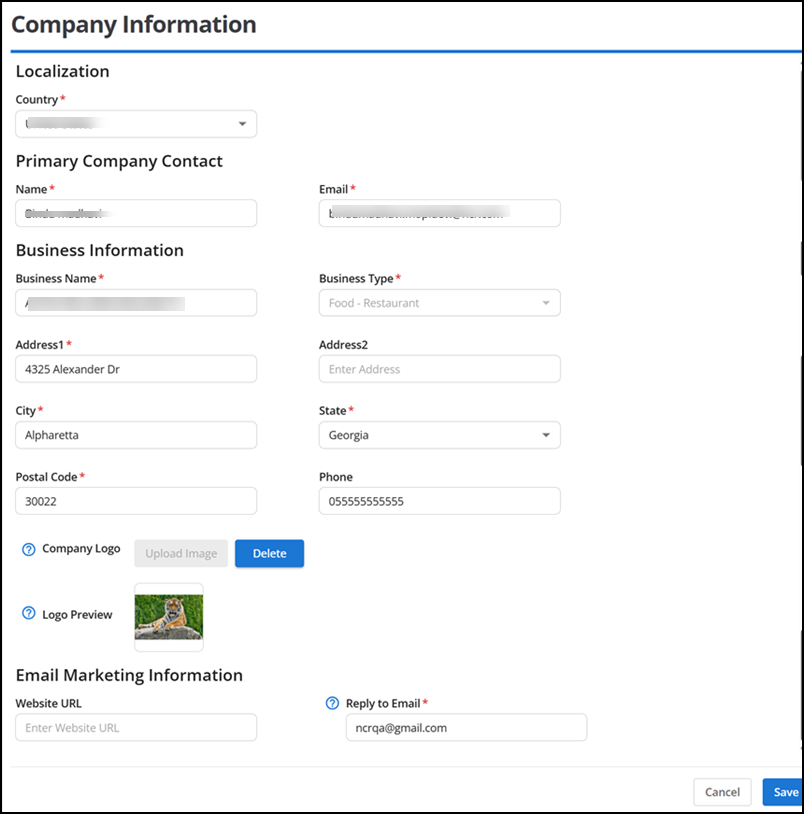
Use the Company Information menu option to designate a primary contact person, the company address, website address, and more.
-
Log in to Back Office using Company View (All Stores), or select a specific store.
-
Select Settings & Privacy > Company Information in the lower left corner of the screen. The Company Information menu option appears by default.

-
Under the 'Primary Company Contact' group bar, review and edit the name and email address for the primary contact person for your company, if necessary.
-
Under the 'Business Information' group bar, review and edit the business name, type, and address, if necessary.
- Click Upload Image to upload and assign a Company Logo. The image preview appears and synchronizes across all available POS terminals, customer facing displays (CFD), and prints on the customer receipts, once the upload is successful.
Note: Thermal printers (For example, SRP plus 350 III and SRP350+ V) use heat-sensitive paper and a heated print head to produce images. They convert high-contrast colors to black and low-contrast colors to white during printing.
-
Click Delete to review and edit if necessary.
Tip: The supported file formats are JPG, PNG, and JPEG. The recommended aspect ratio is 16:9 and the file size should not be more than 5MB.
-
Under the 'Email Marketing Information' group bar, type the Website URL for your company. The system displays the website URL on receipts you print and email.
-
Type the email address to use as the 'Reply To Email' for email marketing. The system displays this email address as the 'From' email address in any email marketing messages.
-
Click Save.
-
Continue to the next procedure.
Using Company Options
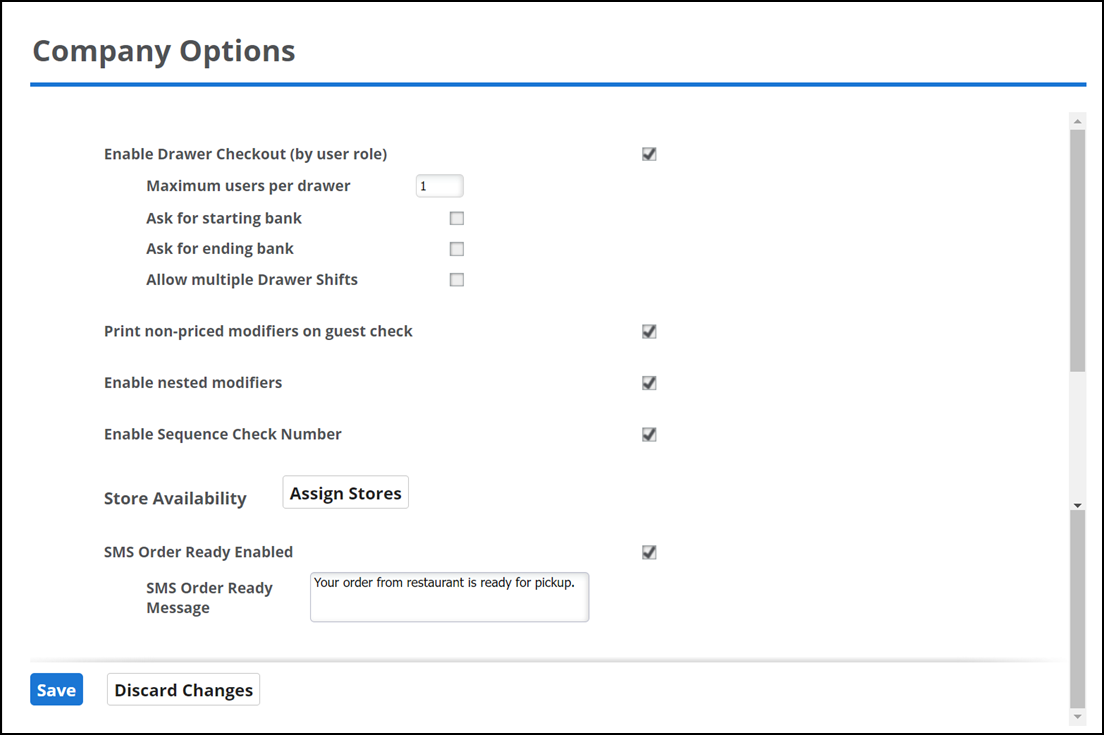
Use the Company Options menu option to define drawer checkout requirements.
-
Select Company Options from the left menu.

-
Select Enable Drawer Checkout (by user role). You must log in using Company View (All Stores) to select this option, which exposes additional options that enable you to assign multiple users to the same cash drawer and require the entry of a starting and ending bank amount. If you do not plan to use Drawer Checkout, clear this check box. Related Requirements: If you are in the Company View (All Stores) view and you select 'Enable Drawer Checkout (by user role),' you must also access Employees > User Roles and enable a user role for drawer checkout.
-
Type the maximum number of users per cash drawer.
-
Click Ask for starting bank to require the POS to prompt the employee to enter a starting bank amount.
-
Click Ask for ending bank to require the POS to prompt the employee to enter an ending bank amount.
-
Click Allow Multiple Drawer Shifts to allow cashiers to open drawer shifts on multiple cash drawers. This allows them to complete transactions from multiple devices, on multiple drawers.
-
Select Print non-priced modifiers on guest check to have non-priced modifiers not appear on customer receipts. They will only appear on kitchen chits.
-
Select Enable nested modifiers to enable nested modifiers to be applied to items in the POS. Before you can apply nested modifiers to an item in the POS, you need to enable the feature here in Company Options. Enabling the nested modifiers feature has no impact on your ability to configure nested modifiers in Back Office; however, if you do not enable the feature, you are unable to apply nested modifiers to an item in the POS. (Available in a future release.)
-
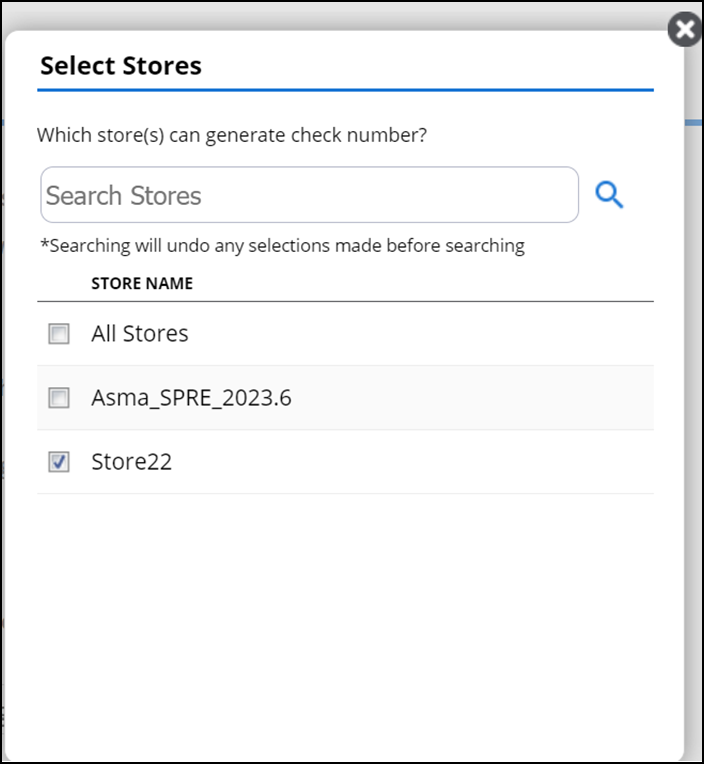
Select Enable Sequence Check Number to generate the check numbers in sequence. The check sequence number is used for tracking/identifying orders in the kitchen and at the front counter to calling out/displaying sequence numbers to guests. When selected, it exposes the Store Availability option (available for multi-store environment only).

-
Click Assign Stores to select the required stores to enable.
-
Select SMS Order Ready Enabled to enable the sending of notifications/SMS when the order is ready. When selected, it exposes the SMS Order Ready Message option (available for multi-store environment only). The maximum number of characters allowed is 150.
-
Select Enable Item Image For POS to allow the display of images for items in the POS. You upload the specific image for an item in the Extended Item Setup screen in Categories & Items function.
-
Enter the message to send when the order is ready.
Note: You are allowed to customize the order ready message only at the company level.
-
Click Save.
-
Exit Company Information.