Defining store information
Use Settings & Privacy > Store to designate the information to appear on customer receipts and to configure store specific options. You must log in to a specific site to access this function.
This function offers multiple options (on the left):
- Store Configuration (active by default)
- Store Options
- Gratuity
- Alert Management
- Menu QR Code
- Void Reason Codes
- Business Date
Working with store configuration
Use the Store Configuration menu option to designate a primary contact and control the look of customer receipts.
-
Log in to Back Office using a specific store.
-
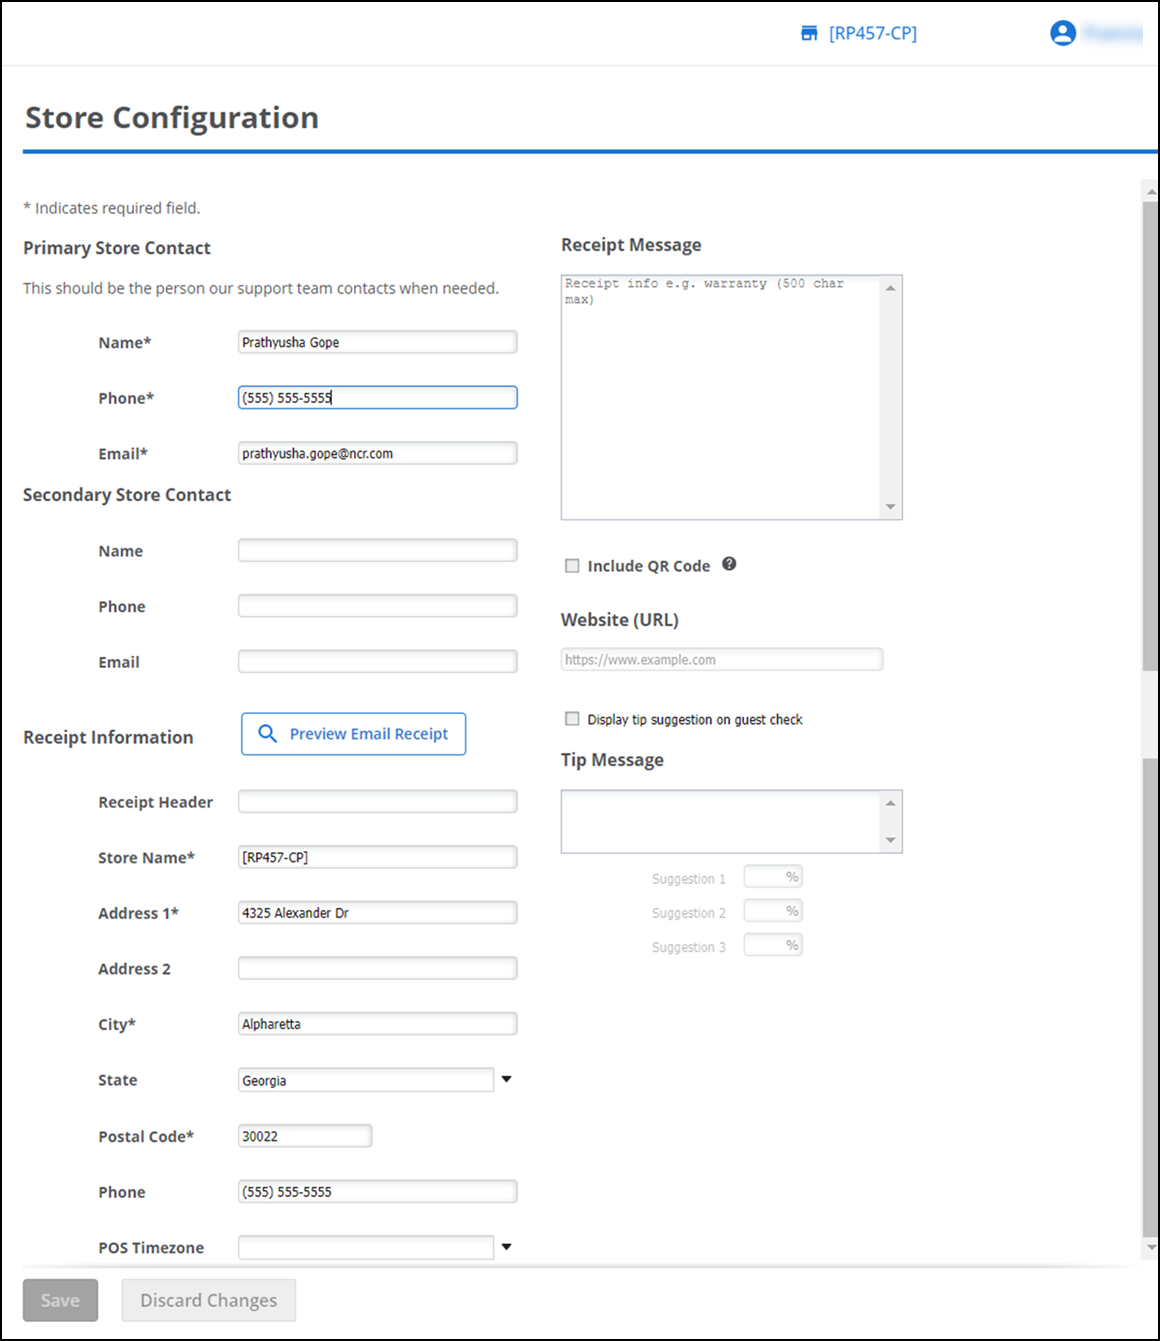
Select Settings & Privacy > Store. The Store Configuration menu option appears by default.
-
Under the 'Primary Store Contact' group bar, review and edit the name, phone number, and email address of the primary store contact for NCR support, if necessary. The system retrieves the information entered when creating your account.
-
Under the 'Receipt Information' group bar, type the text to appear as the 'Receipt Header.'
Note: Any information you enter under 'Receipt Information' appears on the receipts you provide to your customers.
-
Type the store name.
-
Type the address. You can optionally type additional address information in 'Address 2.'
-
Type the city, state, and zip code.
-
Type the store phone number.
-
In Receipt Message, type any additional information to appear on your receipts.
-
(Optional) You can create a QR code that links to a URL of your choice by selecting the Include QR Code check box and entering the URL in 'Website URL'.
-
Under the 'Tip Message' group bar, type the message to appear for tip suggestions on the check, and type the tip percentages to use for the suggested tip calculations in 'Suggestion 1, 'Suggestion 2,' and 'Suggestion 3.'
-
Click Preview Email Receipt to view a receipt on the screen.
-
Click Save.
-
Continue to the next procedure.
View video
Please allow time for the "Adding QR Codes to Receipts in Aloha Cloud" video to load.
Working with store options
Use the Store Options menu to define the requirements for your order modes.
-
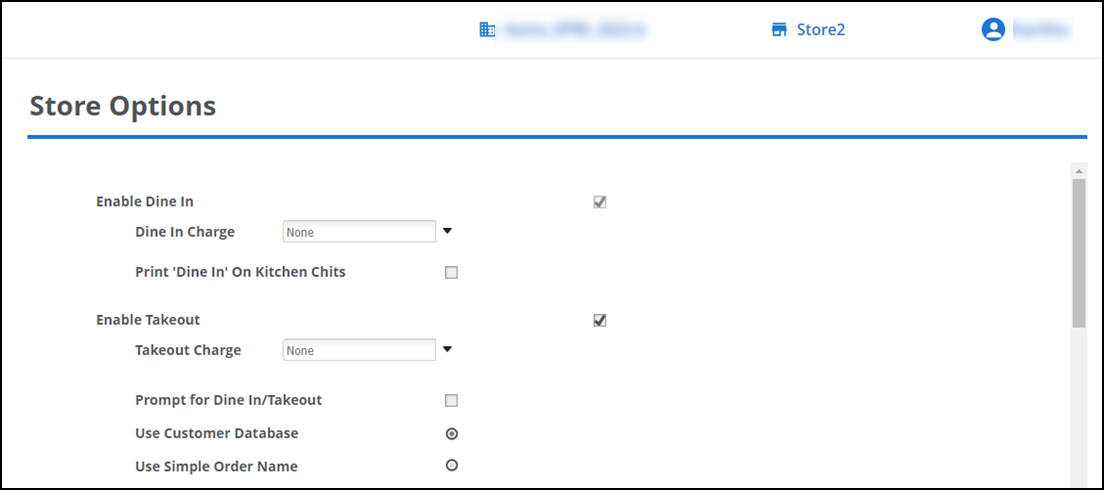
Select Settings & Privacy > Store > Store Options from the left menu.
-
Under 'Order Mode Preferences' group bar, select Enable Dine In to enable dine in orders.
-
(Optional) Select a Dine in Charge to add an additional charge to dine in orders, for example a license tax.
-
(Optional) Select Default to send all items to the kitchen display system (KDS) when the order is finalized or select One-Behind to send each item when you enter the next item in the order.
Note: If a cook time is configured for an item and you select the One-Behind option, the 'Cook Times ignored with One Behind' pop-up appears.
-
Click Confirm to save the changes.
-
Toggle on the Enable Takeout to enable takeout orders.
-
(Optional) Select a Takeout Charge from the drop-down list (if applicable).
-
Select either Use Customer Database or Use Simple Order Name to choose the method for adding a name to a takeout order.
-
(Optional) Select either Default or One-Behind kitchen routing method from the drop-down. Selecting 'One-Behind' allows you to send the previously entered item to the Kitchen Display System (KDS) each time a new item is added in the POS.
-
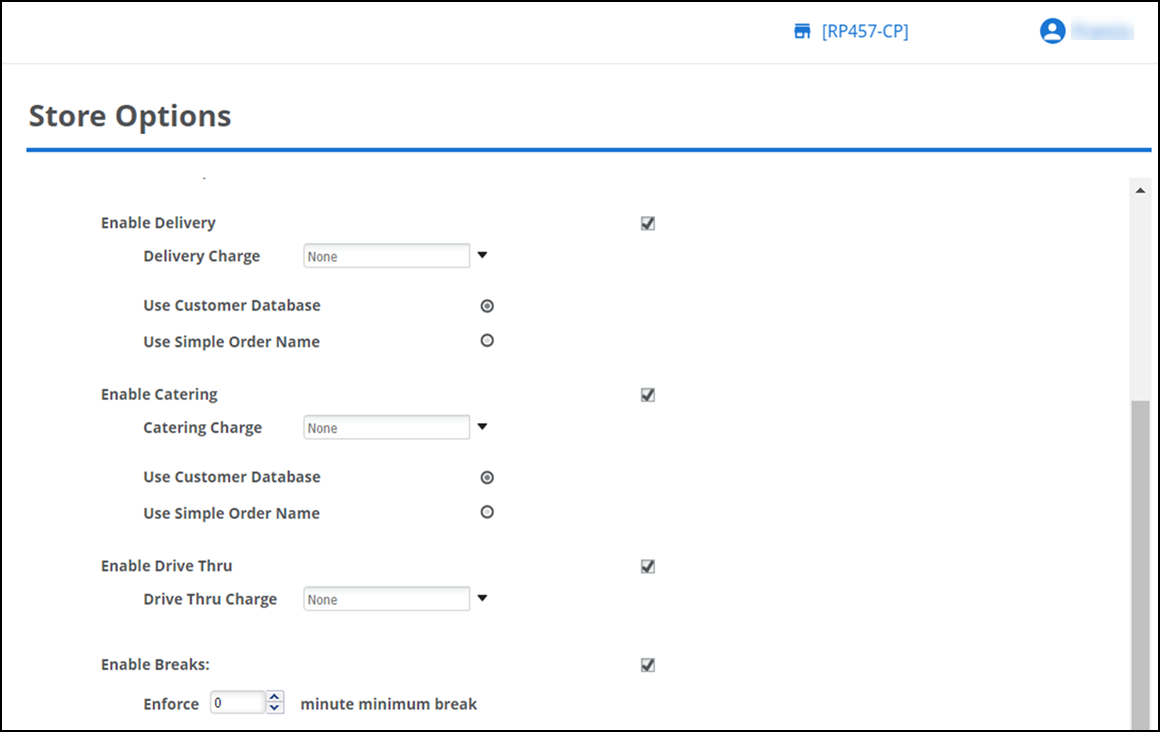
Toggle on the Enable Delivery to enable delivery orders.
-
(Optional) Select a Takeout Charge from the drop-down list (if applicable).
-
Select either Use Customer Database or Use Simple Order Name to choose the method to add a name to a delivery order.
-
(Optional) Select either Default or One-Behind kitchen routing method from the drop-down. Selecting 'One-Behind' allows you to send the previously entered item to the Kitchen Display System (KDS) each time a new item is added in the POS.
-
Toggle on the Enable Catering to enable catering orders.
-
(Optional) Select a Takeout Charge from the drop-down list (if applicable).
-
Select either Use Customer Database or Use Simple Order Name to choose the method for adding a name to a delivery order.
-
(Optional) Select either Default or One-Behind kitchen routing method from the drop-down. Selecting 'One-Behind' allows you to send the previously entered item to the Kitchen Display System (KDS) each time a new item is added in the POS.
-
Toggle on the Enable Drive Thru to enable drive thru orders. When you select this feature, Back Office adds the Phone/Drive Thru icon to the POS home screen.
-
(Optional) Select a Drive Thru Charge to add charges to drive thru orders, if applicable.
-
(Optional) Select either Default or One-Behind kitchen routing method from the drop-down. Selecting 'One-Behind' allows you to send the previously entered item to the Kitchen Display System (KDS) each time a new item is added in the POS.
-
Under 'Additional Options' group bar, toggle on the 'Enable PUC' to establish integration between Point of Sale system and the Kitchen Display Screen with PUC Food Lockers.
-
Enter the PUC Store ID and PUC OrgID.
-
Select Enable Breaks to add the option for employees to take non-paid breaks during their shift. When an employee logs in to the POS and clocks in, a Start Break icon is added to the POS home screen.
-
Type the minimum amount of minutes to enforce for breaks, which is the required amount of time an employee must remain on break. If an employee wishes to return to break early, a supervisor's approval is required.
-
(Optional) Under the 'Guest Count Method' group bar, select the options that best reflect your preferred method of guest counting. Guest count is also used in applying the auto-gratuity to a guest ticket. For more information, refer to "Working with gratuities."
-
Quick Service Methods: One per transaction (default), by item or by POS prompt.
-
Table Service Methods: By occupied seat (default), by item or by POS prompt.
Note: If you choose By Item option, you can assign the count value in the item details of your menu.
-
-
Under Online Ordering group bar, if applicable.
-
(Optional) Toggle on the Automatically close pre-paid orders? for online orders. When you select this feature, fully paid online orders will not appear in the Takeout/Delivery queue and will not require you to close the order. Rather, as soon as the POS receives the order, a customer receipt prints and the order is closed. Note: This feature does not appear until you receive at least one online order.
-
(Optional) Toggle on the Print Customer Receipts for Online Orders to print customer receipts for online orders.
-
(Optional) Select Immediately print all orders? Selecting this option removes the takeout and delivery thresholds and immediately prints a kitchen chit to the defined kitchen printers.
-
(Optional) Enter the number of minutes prior to the order target time to print a kitchen chit for online orders designated as takeout in 'Takeout Download Threshold (in minutes).' By default, the POS prints a kitchen chit to the defined kitchen printers 30 minutes prior to the order target time.
-
(Optional) Enter the number of minutes prior to the order target time to print a kitchen chit for online orders designated as delivery orders in 'Delivery Download Threshold (in minutes).' By default, the POS prints a kitchen chit to the defined kitchen printers 60 minutes prior to the order target time.
-
Click Save.
-
Continue to the next procedure.
View video
Please allow time for the "Setting Gratuities and Breaks in Aloha Cloud" video to load.
Configuring gratuity
Use Settings & Privacy > Store > Gratuity to allow customers to provide non-cash tips. You must log in to a specific site to access this function.
- Select Settings & Privacy > Store > Gratuity from the left menu.
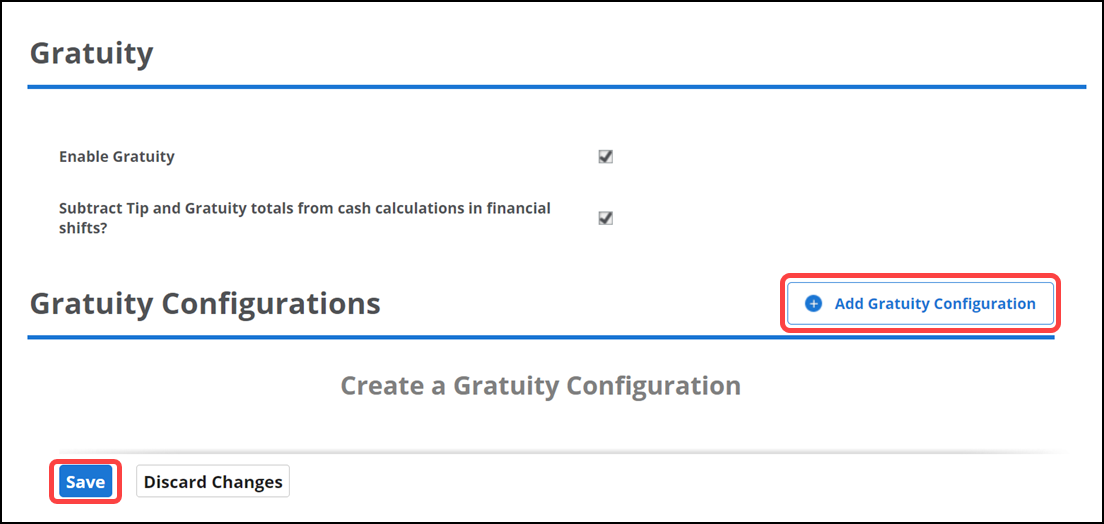
- Select Enable Gratuity to populate/enable the gratuity configuration. Related Requirements: It is necessary to define a gratuity tax under Settings > Taxes, if you are subject to gratuity tax.
- Select Subtract Tip and Gratuity totals from cash calculations in financial shifts to have the system remove employee tips and gratuities earned from the total cash owed amount at the end of a shift. By default, the system enables this feature.
- Click Save.
- Continue to the next procedure.
Adding gratuity configuration
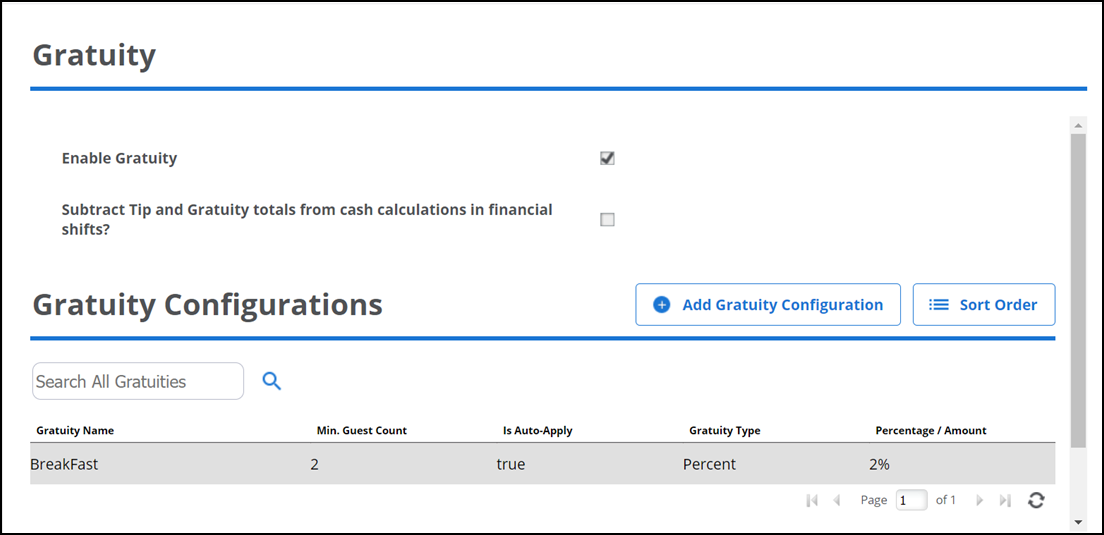
A gratuity is an additional charge to the customer usually added for a large party. Use Settings & Privacy > Store > Gratuity > Add Gratuity Configuration to add gratuity configuration. This can be configured either in percentage or in amount. The application of auto or manual gratuity force the guest to provide the tip for their tickets.
To add gratuity configuration:
-
Select Settings & Privacy > Store > Gratuity from the left menu.

-
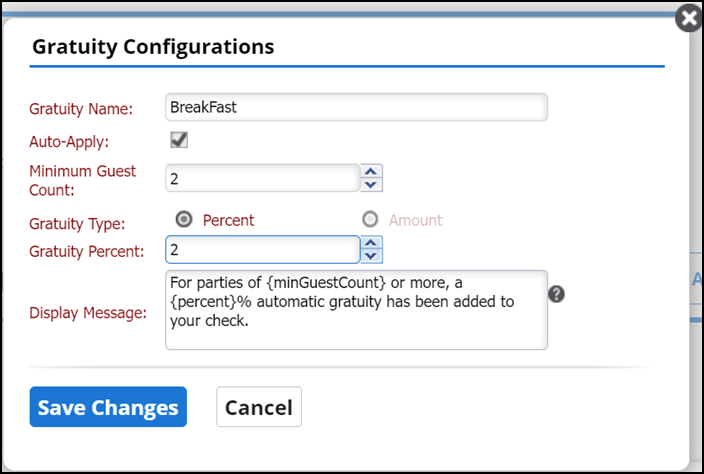
Click Add Gratuity Configuration. The Gratuity Configurations screen appears.
-
Enter a name for the gratuity.
-
Select Auto-Apply check box to apply gratuity automatically to the guest check. When enabled, it automatically adds a set tip percentage based on the number of guests per order. This is helpful in scenarios:
- When a table wants separate checks for each person
- When you seat a large party (typically six to eight or more).
For more information, refer to "Working with gratuities."
-
Enter minimum guest count to apply the gratuity.
-
Select gratuity type as:
-
Percent: Enter gratuity in percentage.
-
Amount: Enter gratuity in amount.
Note: Tax is not applicable to gratuity amount or percentage.
-
-
Based on gratuity type selection, enter gratuity amount or percentage.
-
Edit display message, if required. This message is pre-populated, when gratuity is automatically applied.
Note: Do not alter or remove words in braces if you wish for those values to be automatically updated with current values when saving.
-
Click Save Changes. to save the gratuity configuration.
Sorting gratuity
After you create gratuities you can sort the order in which the POS attempts to apply them. If multiple gratuities are configured for the same guest count, then sort order is used as a criteria to apply the gratuity. The POS stops searching for gratuities once it finds the first gratuity that applies to the guest check.
- Select Settings & Privacy > Store > Gratuity from the left menu.
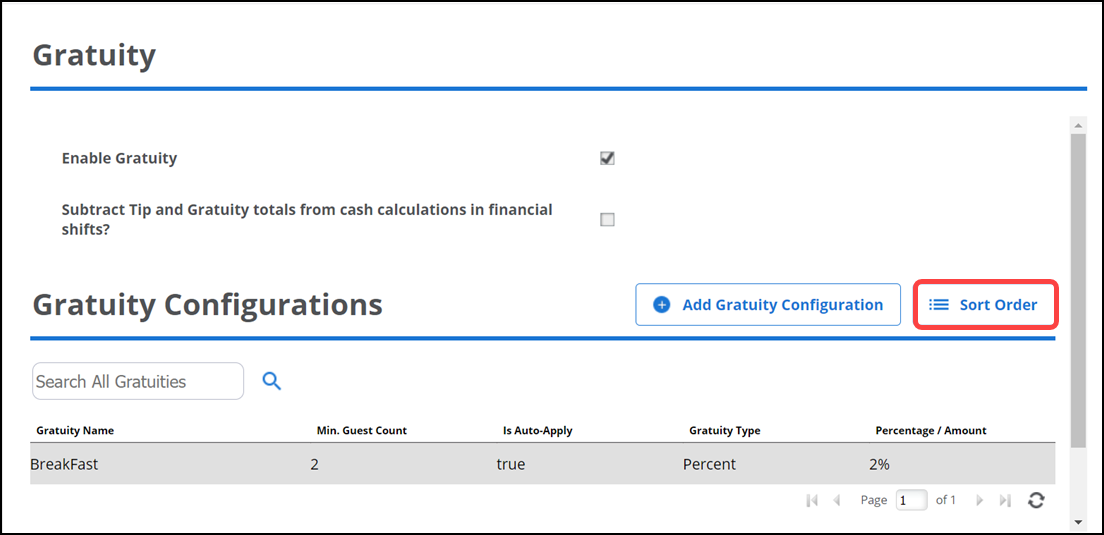
- Click Sort Order.
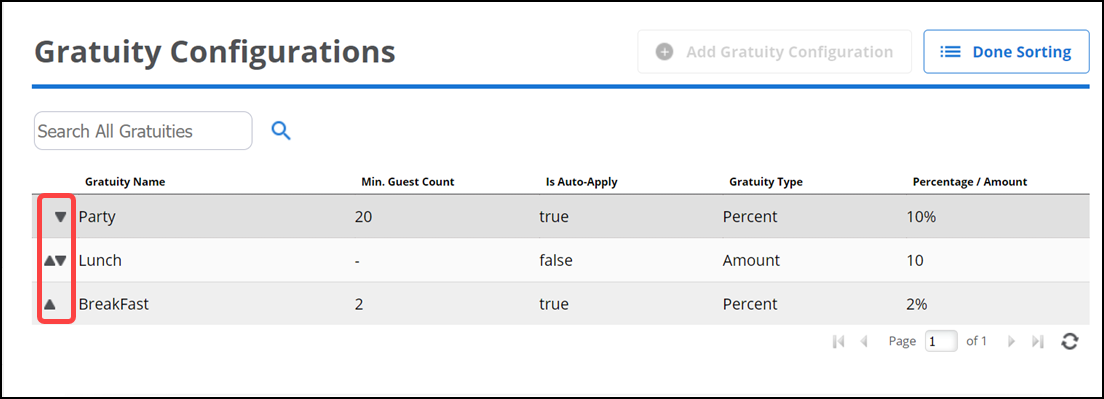
- Click the sort order up and down icons to dynamically change the gratuity order in which they appear on the screen.
- When you have everything sorted to your liking, click Done Sorting to exit sort order mode. Your Back Office changes are pushed to the POS device(s).
Editing gratuity configuration
-
Select Settings & Privacy > Store > Gratuity from the left menu.

-
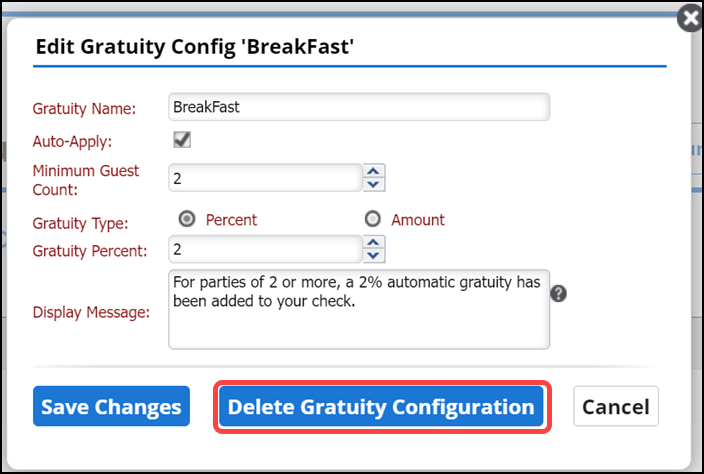
Select gratuity. The Edit Gratuity screen appears.
-
Do one of the following:
- To remove the gratuity, select Delete Gratuity Configuration and confirm the removal
-OR-
- Edit the details for the gratuity and click Save Changes.
Using alert management
The system sends alerts to your Activity Dashboard when unusual sales activity or other important information needs to be brought to your attention. Use the Alert Management menu option to configure the criteria for what is considered unusual.
- Select Alert Management from the left menu.
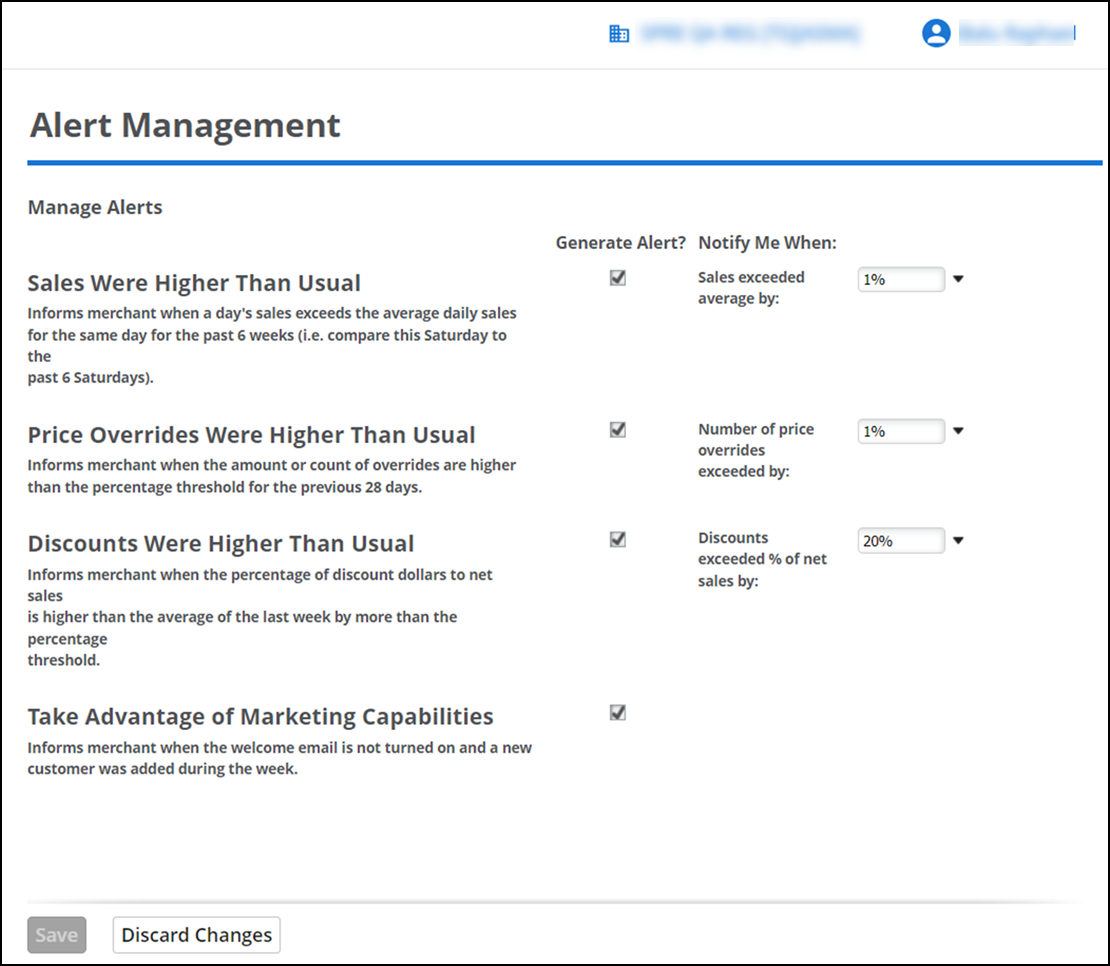
- Configure the following alerts:
- A Sales Were Higher Than Usual alert is generated if the net sales for the day being closed are higher than the average "same day" net sales for the previous 6 weeks by more than the percentage threshold. This alert compares a day's business against the same day of the week in previous weeks, such as Monday to Monday, Tuesday to Tuesday, etc.
- A Price Overrides Were Higher Than Usual alert is generated if the amount or count of overrides is higher than the percentage threshold for the previous 28 days. This alert also contains a link to the Price Overrides Report in the Back Office.
- A Discounts Were Higher Than Usual alert is generated if the percentage of discount dollars to net sales is higher than the average of the last week by more than the percentage threshold. This alert also contains a link to the Discounts Report in the Back Office.
- A Take Advantage of Marketing Capabilities alert is generated if the welcome email is not turned on and a new customer was added during the week.
- A Time to Order More Inventory alert is generated if Quantity on Hand falls below the Re-order Point set in Count Entry.
- To make an alert active, select the Generate Alert? check box to the right of the alert.
- Determine the percentage threshold at which to generate an alert from the 'Notify Me When' drop-down list for each alert.
- Click Save.
- Continue to the next procedure.
Viewing alerts
Alerts appear on your My Store > Activity Summary page in the upper-right corner. You can view alerts for the previous seven days.
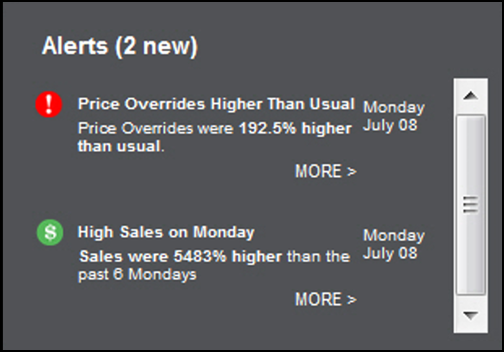
Click More > underneath any alert to view the details that caused the alert to generate.
- The graphs on the right compare the alert trigger data to the data from the previous week to explain why the alert activated.
- Below the graphs, the top five transactions that triggered the alert appear.
Click Hide to exit the alert.
View video
Please allow time for the "Creating and Managing Dashboard Alerts" video to load.
Using menu QR code
Use the Menu QR Code option to upload the QR code of the menu.
To upload a menu QR code:
- Log in to Back Office using Company View (All Stores), or select a specific store.
- Select Settings & Privacy > Store. The Store Configuration menu option appears by default.
- Select Menu QR Code from the left menu.

- Click Upload Menu. The Upload Menu screen appears.
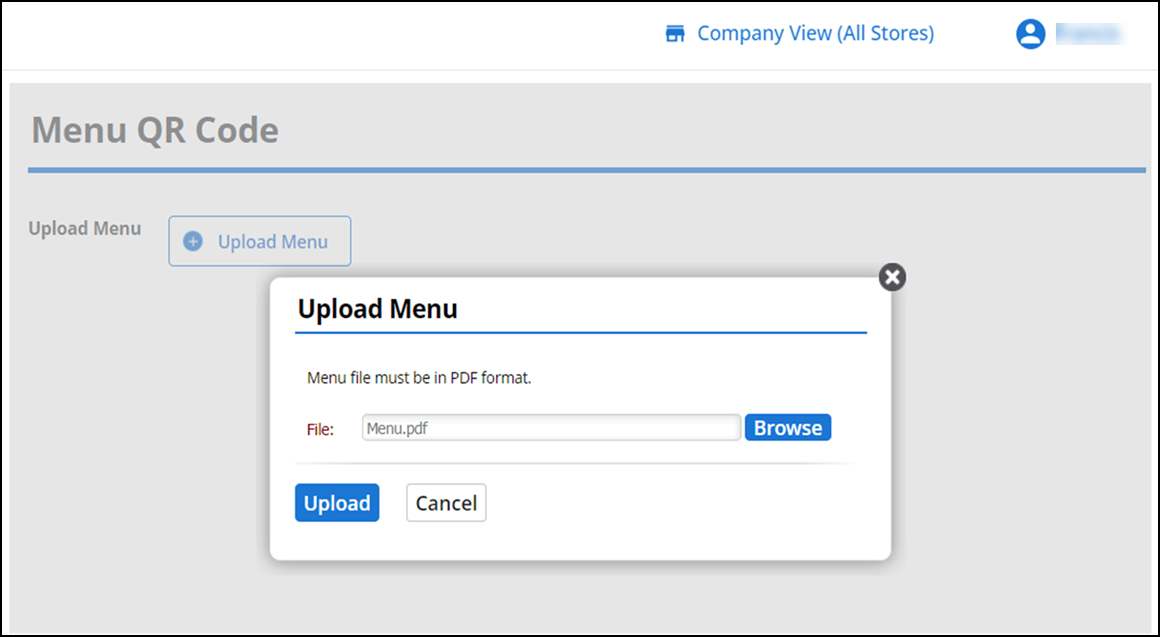
- Click Browse to select the file and click Open.
- Click Upload.
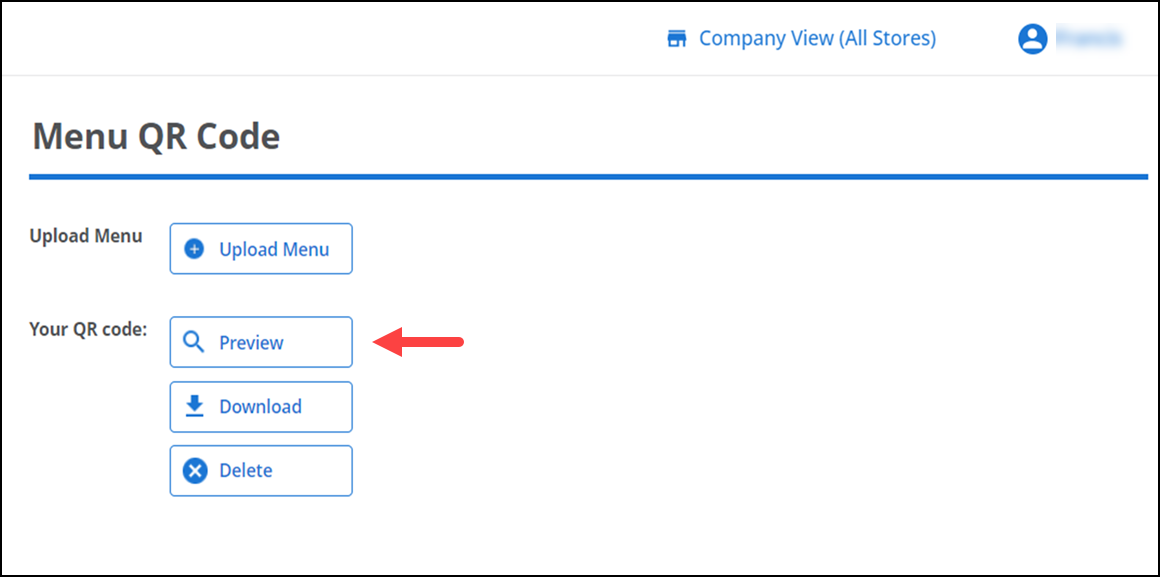
- Click Preview to preview the menu QR code.
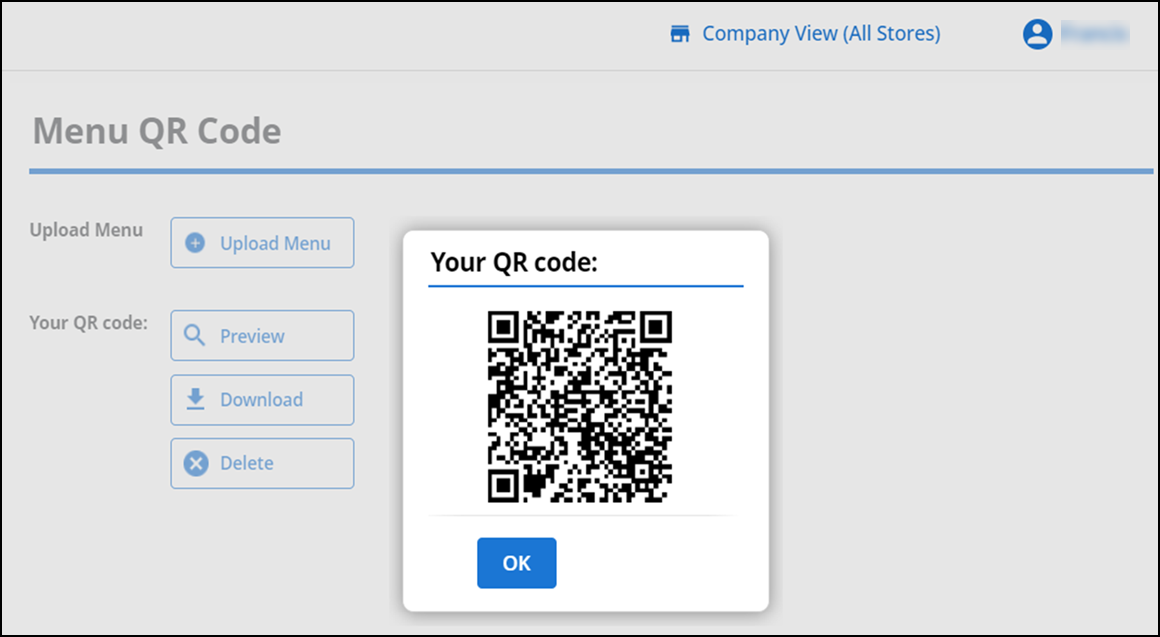
- Click OK.
- Click Download to download your menu QR code.
- Click Delete to delete the menu QR code.
Adding void reason codes
Use the Void Reason Codes menu option to add reason code(s) to use when voiding an item or a ticket. Once you proceed with a void item/ticket, the configured reason codes appear on the POS ticket entry screen. For more information on using void reason codes, refer to Voiding an item and Voiding a guest check.
To add void reason codes:
- Log in to Back Office using Company View (All Stores).
- Select Settings & Privacy > Store. The Store Configuration menu option appears by default.
- Select Void Reason Codes from the left menu.

- Click Add a void Reason Code. The Void Reason Code screen appears.
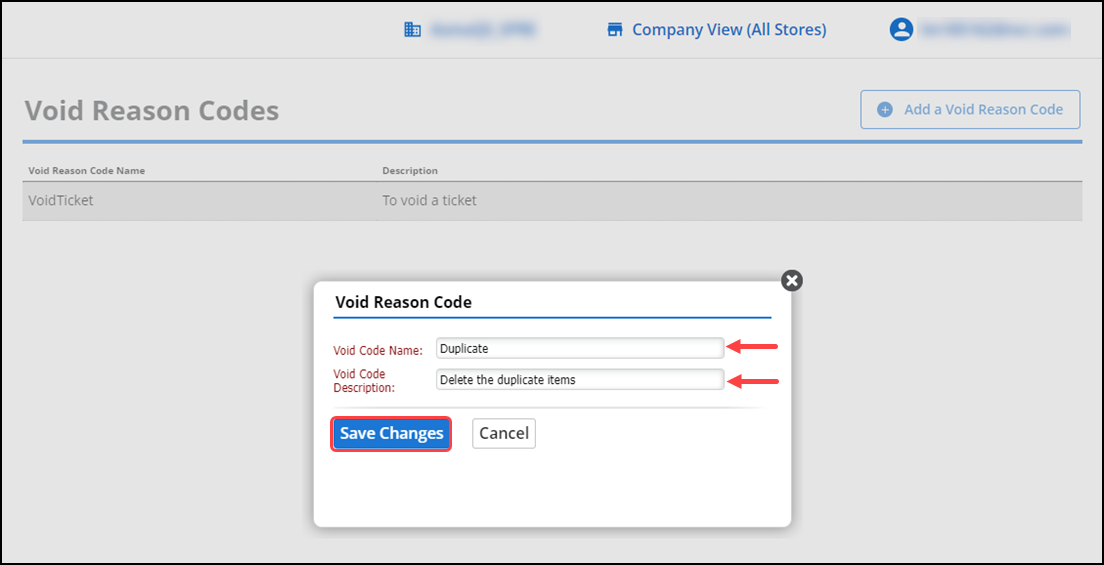
- Enter a unique name or code in Void Code Name. The maximum number of characters allowed is 20.
- Enter a unique description in Void Code Description.
- Click Save Changes to add a void reason code.
Defining business dates
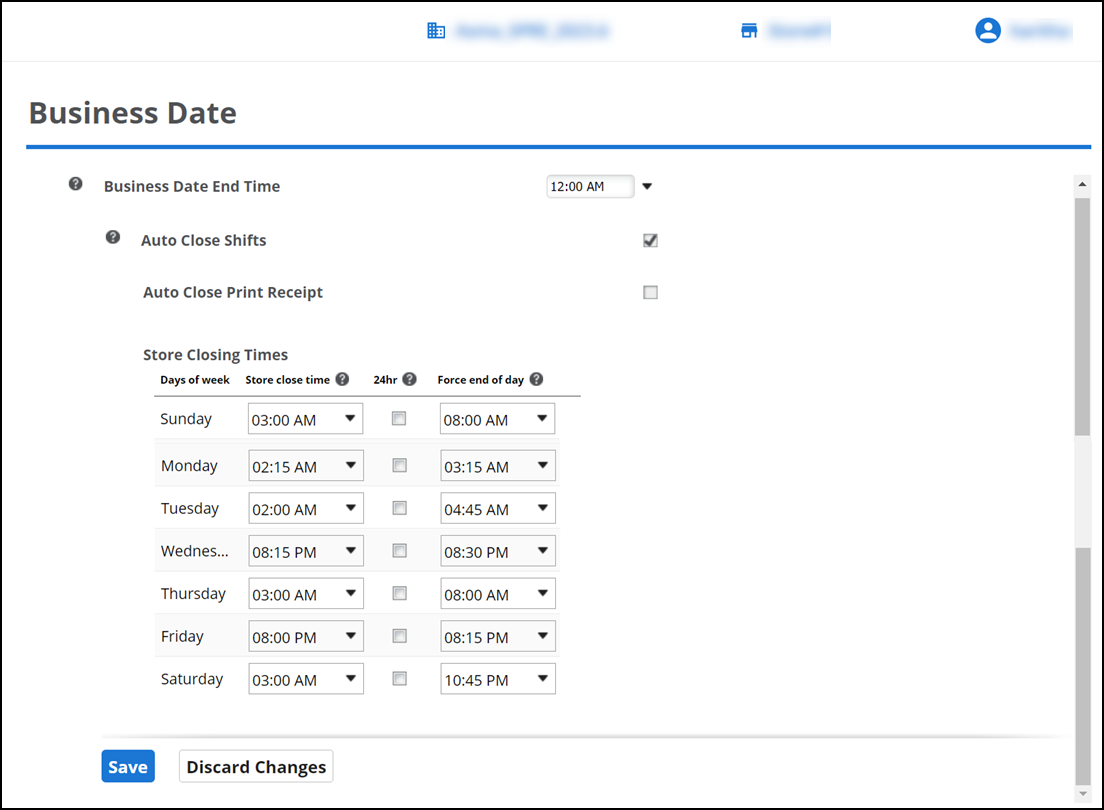
The Business Date feature provides a way for you to enable 'Auto Close' in Back Office, with date and time preferences. When enabled, the store automatically forces end-of-day on the preferred date and time. Additionally, you can choose to print the Shift End Report automatically. You can also establish your store closing time for each day. You can track the details of the auto closed shifts along with manually closed shifts in the Financial Shifts report. To learn more about Auto Close Shift, refer to Using auto close shifts.
To define business dates:
-
Log in to Back Office using a specific store.
-
Select Settings & Privacy > Store. The Store Configuration menu option appears by default.
-
Select Business Date from the left menu.
-
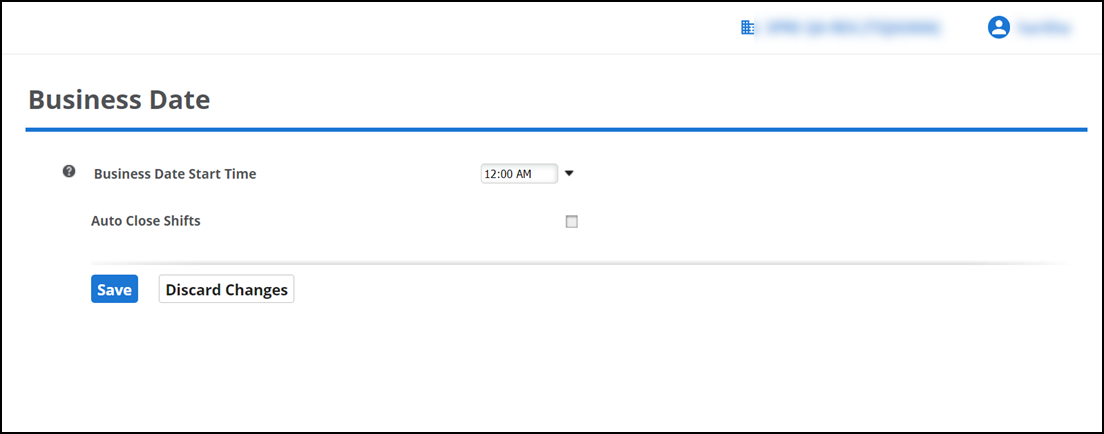
Select the store start time from the Business Date Start Time drop-down list.
-
Select Auto Close Shifts to configure the store closing time and the time to force end-of-day. The Store Closing Times group bar appears.
-
Select Auto Close Print Receipt to print the auto close shift details on the receipt.
-
Under the 'Store Closing Times' group bar, make selections for each day of the week:
-
Store close time: Establishes the time the store closes.
Note: Once the store close time is reached for a given day, you are unable to create new orders and shifts; however, existing orders and shifts can still be updated, paid, and closed. This is to ensure that all transactions are complete and accounted for by the end-of-the day.
-
24hr: Stipulates the store stays open for 24hrs. If enabled, the business date spans at least 24 hours. This means the store close time may be pushed to the next day, depending on your configuration.
Note: This can impact scheduling and reporting, as shifts and orders may span multiple days.
-
Force end of day: Establishes the time to force the store to close. Once the force end-of-day time is reached, any open orders and shifts for the given day are closed automatically. This is to ensure that all transactions are complete and accounted for by the end-of-the day. Ensure that all orders and shifts are closed before the force end-of-day time, if not they are closed automatically.
-
-
Click Save to save your changes.