Setting up payments
Use Settings & Privacy > Payments to define the different payment methods. You must log in to a specific site to access this function. Back Office supports the following payment methods:
Integrated Credit & Non-Integrated — Integrated credit allows you to use a system-approved credit processor to process your customer's credit cards or gift cards through your POS system. The non-integrated credit option allows you to simply use our system to ring in transactions (for reporting etc.) and process credit payment on a stand alone terminal.
Setting Up Integrated Gift Cards — If you are currently signed up with a merchant services provider supported by our system, we will work with you and also with your provider to complete your credit setup. Please contact Customer Care at 1-877-270-3475 to determine the information is needed to set up integrated credit and gift card processing. Once the integrated setup is complete, we will send you an email about the status of integrated credit availability. You will also see a Status of Active on the Payment Methods screen.
Generic Gift Card API — Generic gift card API supports (integrates with Paytronix service URL) swiping Paytronix gift cards on the mag card reader attached to the POS terminal rather than on the payment terminal.
To set up your accepted payment methods:
-
Log in to Back Office using a specific store.
-
Select Settings & Privacy > Payments.
-
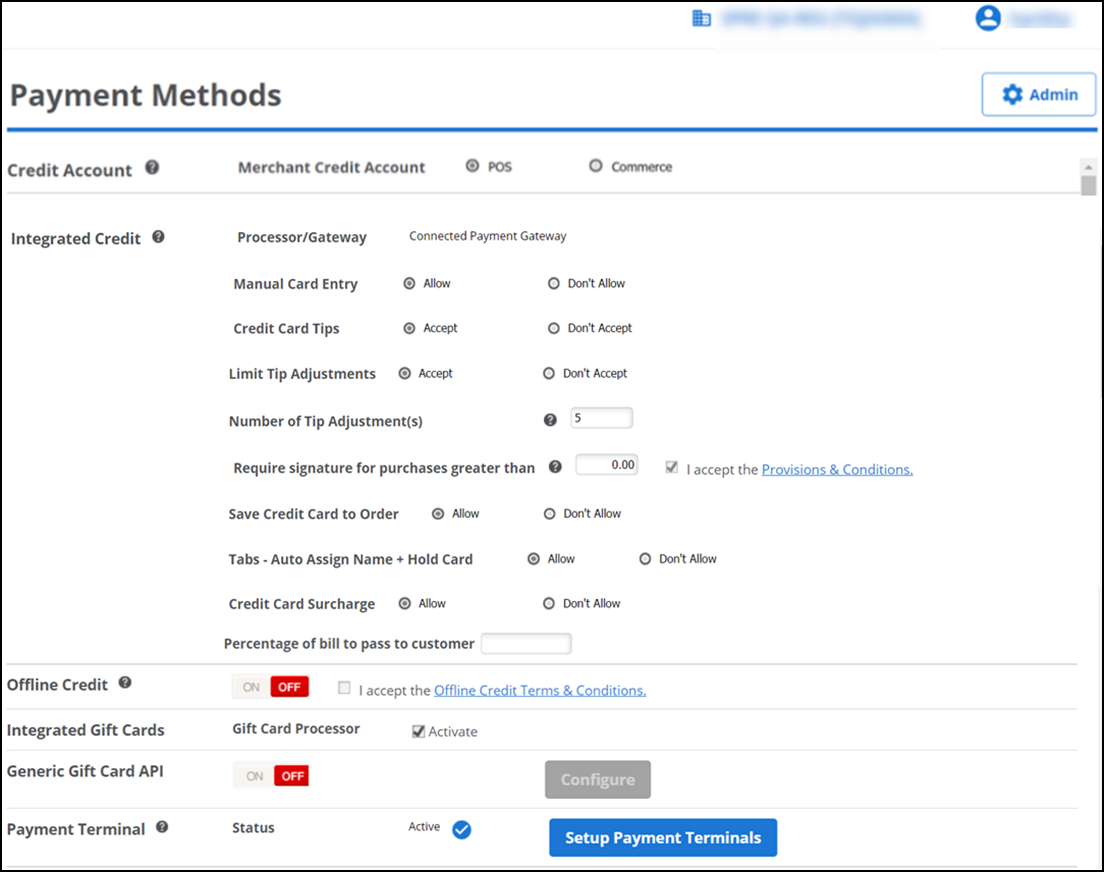
Under the 'Credit Account' group bar, select POS for 'Merchant Credit Account' to process transactions through the POS; select Commerce to process transactions not associated with the POS.
-
Under the 'Integrated Credit' group bar:
-
Select Allow for 'Manual Card Entry,' if you allow manual entry of the customer's credit card details; otherwise, select Don't Allow. This is subject to the Payment Card Industry (PCI) compliance requirements. PCI compliance is mandated by credit card companies to ensure the security of all credit card transactions and cardholder personal data.
Note: If you use the Connected Payments Gateway to process payments, select Allow for 'Save Credit Card to Order,' to save the credit card information for orders. This gateway also supports applying surcharges for the purpose of offsetting the cost of credit card processing fees. To implement this feature, select Allow for 'Credit Card Surcharge' and then specify the percentage, up to 4% maximum, to apply in 'Percentage of bill to pass the customer.' When a customer chooses to pay using a credit card tender type, a percentage of the total check is calculated and added to the total ticket sale. The surcharge prints on the receipt as a separate line item along with a disclaimer at the bottom of the check.
For more information regarding legal requirements around surcharges and answers to frequently asked questions, refer to "Merchant Surcharging and Considerations" and "Surcharging Credit Cards–Q&A for Merchants."
- Select Accept for 'Credit Card Tips,' if you allow POS users and/or your customers to enter a tip amount on the POS device when paying with a credit card. This exposes the setting, limit tip adjustments. Otherwise, select Don't Accept.
- Select Accept for 'Limit Tip Adjustments,' to limit the number of tip adjustments for the POS users. This exposes the setting, number of tip adjustment(s). Otherwise, select Don't Accept.
- Enter a value in 'Number of Tip Adjustment(s).' For example, if you enter 10 for the maximum number of tip adjustments, when an employee attempts to enter adjustment number 11, an error message appears on the POS preventing the employee from performing the tip adjustment.
- Enter the minimum amount at which to require a customer's signature in 'Require signature for purchases greater than.' To enable faster checkouts, you can enter a minimum dollar amount of $99,999.99 at which to require a customer's signature.
- Select Allow for 'Save Credit Card to Order' to save the credit card payment on the ticket, otherwise, select Don't Allow, which prevents users from saving the credit information on the ticket. If you select Allow, a new option Tabs - Auto Assign Name + Hold Card appears. Select Allow to auto assign tab with customer details. Otherwise, select Don't Allow.
- Select Allow to apply a surcharge for credit card usage. Otherwise, select Don't Allow.
- Enter the bill amount percentage you wish to transfer to the customer.
-
-
Under the 'Offline Credit' group bar:
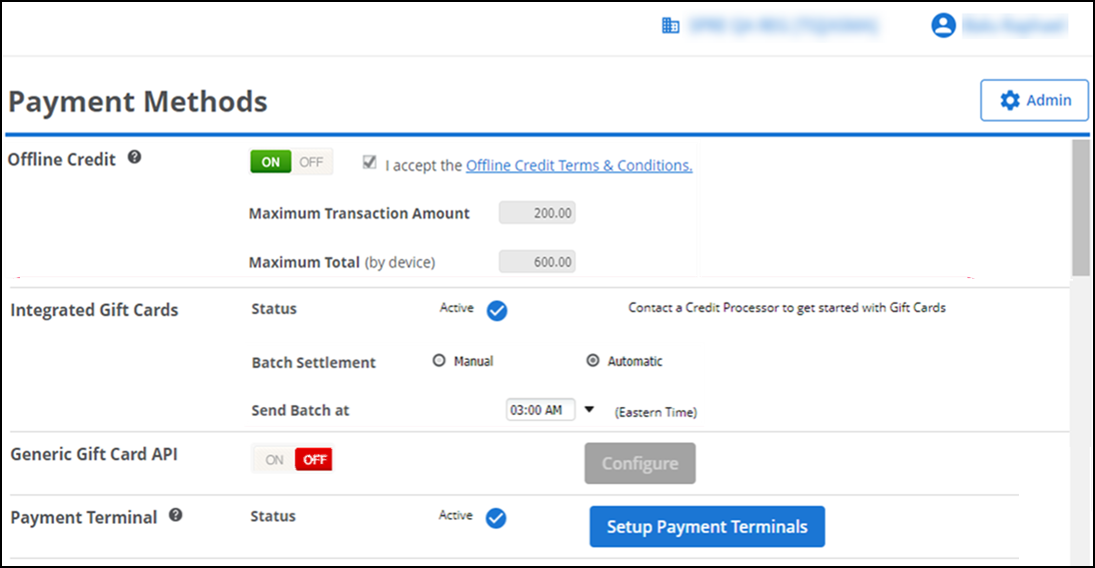
- Select ON to process a limited number of credit card transactions, when the connection is not available between your POS device and the credit card processor.
- Accept the Offline Credit Terms and Conditions.For more information on Offline Credit, refer to Enabling offline credit mode.
-
Under the 'Integrated Gift Card' group bar:
-
Select Automatic radio button from 'Batch Settlement'.
-
Select a time for the batch to be sent using the 'Send Batch' at drop-down list. The time zone setting for batch submission is Eastern.
For more information on Offline Credit, refer to Settling a batch of card purchases.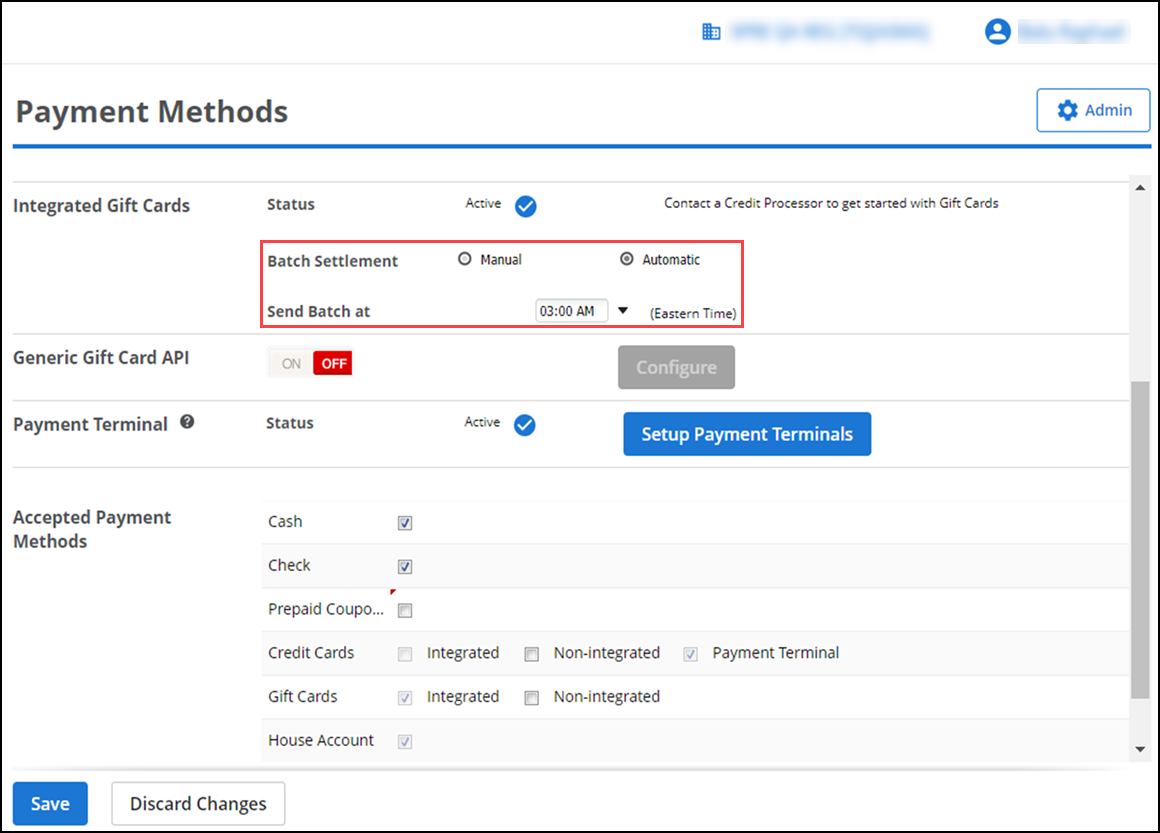
Note: If you select Automatic as your settlement type, you can still submit batches manually.
Tip: If you adjust tips at the end of your business day, select a settlement time that provides adequate time to adjust tips before automatic settlement occurs. Once settlement completes, you cannot make changes to a transaction.
-
-
Verify whether your gift card processing is active or not using Integrated Gift Cards.
-
Select ON for 'Generic Gift Card API', if you use gift card for payment.
-
Click Configure to configure gift card API. The Generic Gift Card API Configuration screen appears.
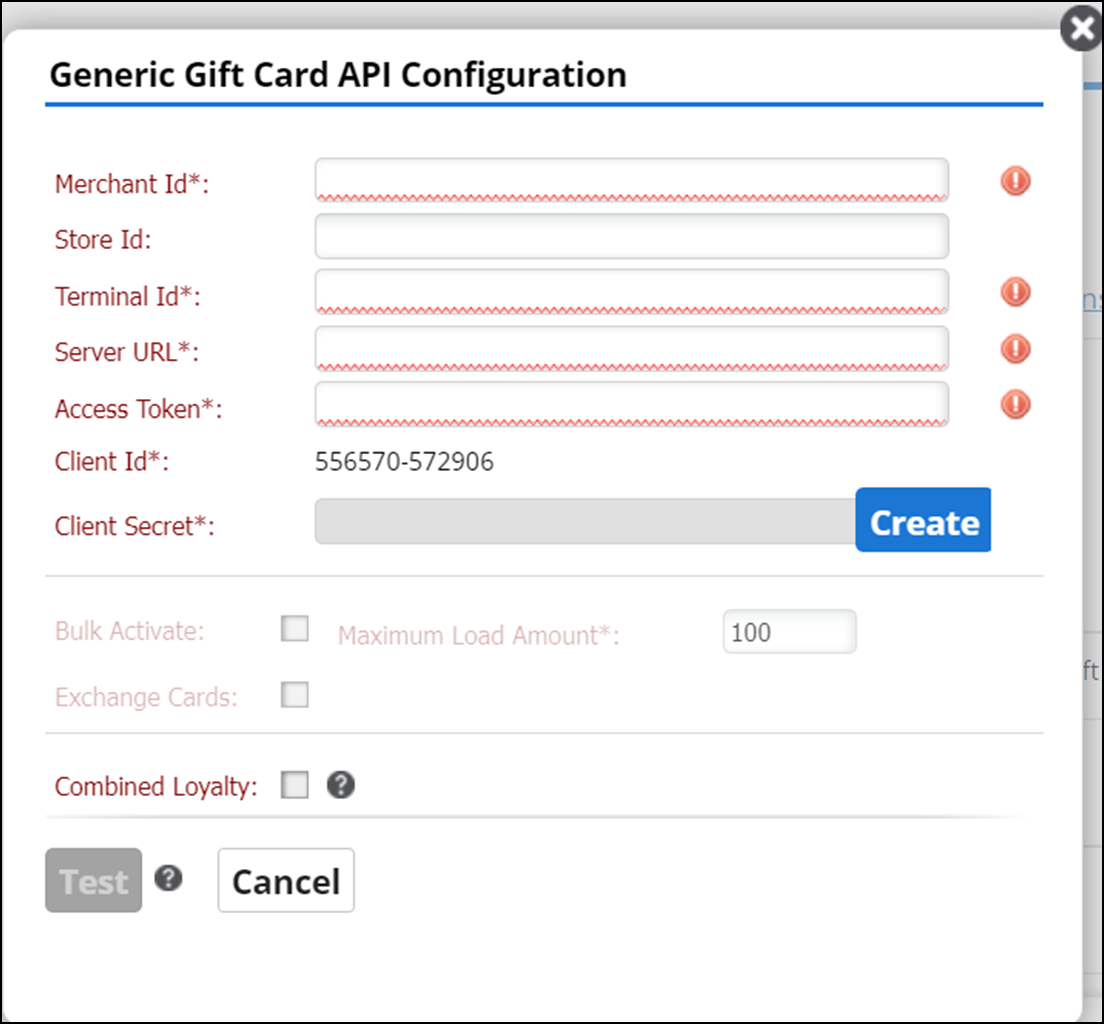
Note: This invokes the required APIs to get the merchant and other details.
-
Select Combined Loyalty to use the gift card for lookup the customer's loyalty reward information.
-
Click Test to check, if the client supports bulk activation and exchange card balance for the gift cards. Based on the client requirements, you can enable for bulk activation and exchange card balance.
Note: If you enable Bulk Activate check box, then you are required to provide maximum load amount for activating the gift cards.
-
-
Under the 'Payment Terminal' group bar, click Setup Payment Terminals if you use an EMV device. Customer care will assist in setting this up.
Note: We offer integration with LevelUp, which requires an account with the third-party partner. You can link your account here in the Back Office.
-
Under the 'Accepted Payment Methods' group bar, select the accepted payment methods for your store.
. The POS provides options based on your selections.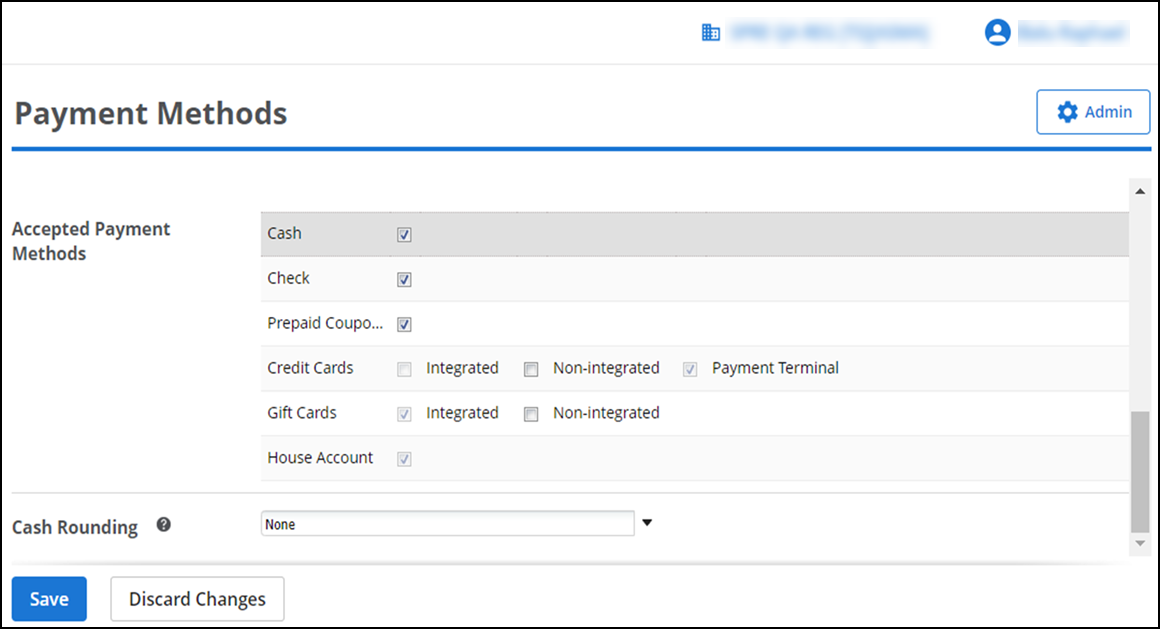
-
Cash (Clear this option to operate in a cashless environment). When cleared, the cash payment option no longer appears as a payment option for all POS devices.
Note: The Cashless environment is only available for Monetra, Ingenico and Connected Payments Gateway.
-
Check
-
Prepaid Coupons (Select Prepaid Coupons to accept daily deals (e.g. Groupon or LivingSocial) or similar prepaid coupons.)
-
Credit Cards (Integrated, Non-integrated, Payment Terminal)
-
Gift Cards (Integrated, Non-integrated)
-
House Account
-
-
Under the 'Cash Rounding' group bar, if your country does not support penny currency, select the desired denomination from the cash rounding drop-down list.
-
Click Save to complete your changes.
Enabling offline credit mode
Warning: Only an Account Manager can enable Offline Credit mode, due to the increased liability and risk exposure.
Warning: Do NOT delete the POS app when you are in Offline Credit mode. If you do this, you will lose all offline credit transactions and they cannot be recovered.
Enabling Offline Credit mode allows you to process a limited number of credit card transactions, when the connection is not available between your POS device and the credit card processor. Once connection is reestablished, all transactions are sent to the processor automatically.
Features not supported in offline mode include:
-
Payment by gift card and checking gift card balances
-
Manual card entry
-
Returns to original credit card
Note: Before processing an offline credit transaction at the POS, ensure at least one online credit card transaction is processed, to verify the credit set up was successfully completed.
To enable Offline Credit mode:
-
Log in to Back Office using a specific store.
-
Select Settings & Privacy > Payments.
-
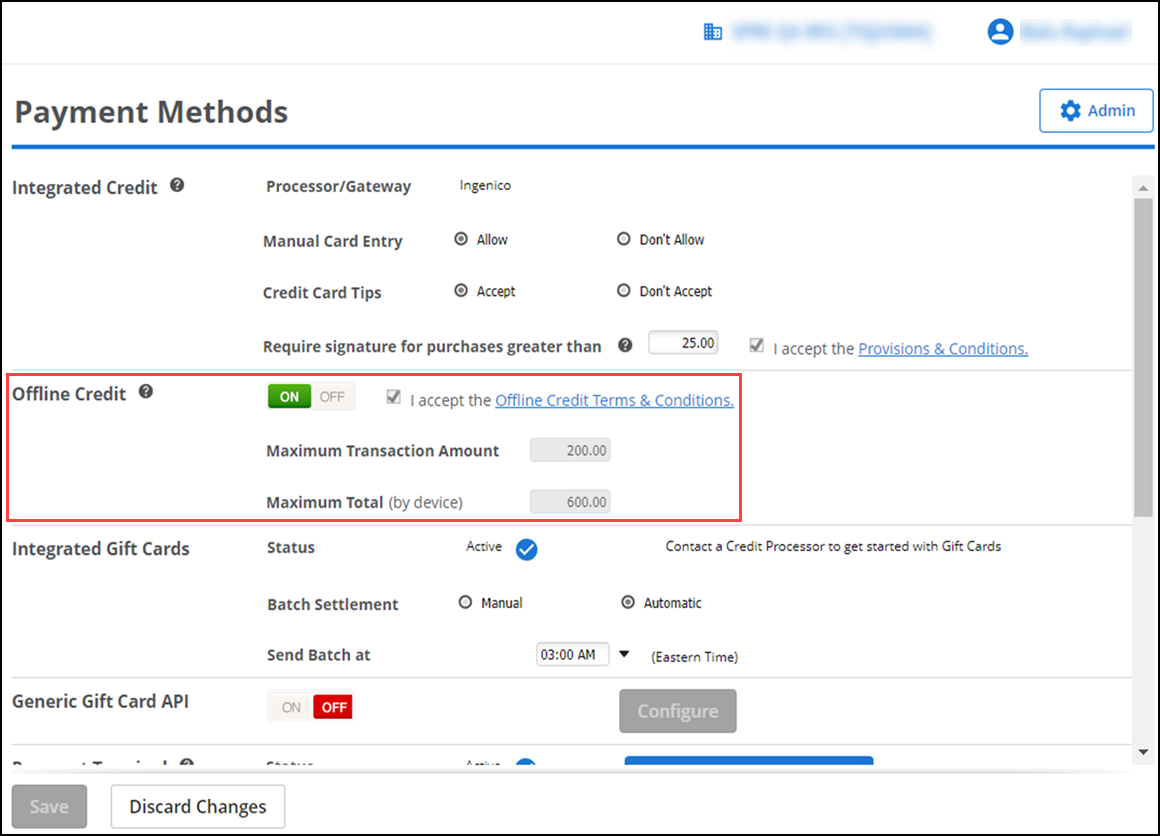
In the Offline Credit section, click ON.
-
Review and accept the Offline Credit Terms & Conditions. Risks associated with Offline Credit mode include:
- Cards may be declined once back online.
- Prepaid credit cards (i.e., Visa gift cards) are accepted without the balance being verified.
- If the POS app is deleted from the device before offline credit transactions are sent to the processor, the transactions and any associated payments will be lost.
-
Set the Maximum Transaction Amount (total amount allowed for a single transaction while in Offline Credit mode) and the Maximum Total by Device (total amount for all transactions completed while in Offline Credit mode) allowed for Offline Credit Mode. The maximum amount you can set is $5,000.
-
Click Save.
-
Exit the Payments function.
Note: If you are a multi-store customer, repeat steps 2 through 6 for each store.
Viewing offline credit reports
There are reports in Back Office and on the POS that show information regarding transactions processed in Offline Mode. Users with appropriate access to Reports can view an Offline Credit Report that shows any pending card transactions not yet sent to the credit processor.
Settling a batch of card purchases
You can process a batch (group) settlement of card purchases at one time and in a manner you deem convenient. A batch is a collection of card transactions you must settle with the card processor. You can establish a time to automatically submit your batch for processing, or you can manually submit it at one time.
-
Select Manual for 'Batch Settlement' to manually send your batch settlement to your payment processor. To settle a batch manually go on the Results > Credit Settlement screen each time you are ready to settle a batch -OR- Select Automatic (default), for the system to pre-populate 'Send Batch at' with the optimal time (in EST) to automatically send your batch settlement to your payment processor. This ensures the quickest deposit of funds. You can change this time, if you prefer to send it at a different time. Please note that if you accept tips, be sure to review your settlement time to ensure it allows you adequate time to enter tips before settlement occurs. Once settlement is complete, no changes can be made to a transaction.
-
Designate the time at which to settle credit card batches in 'Send Batch at.' Required Options: This option appears once you select the Batch Settlement as Automatic) Be sure to set your batch settlement time to occur after your normal business hours.
Note: The batch settlement is not available for all credit gateways. You can only adjust tips for closed transactions that belong to a batch that has not been settled yet. If you adjust tips at the end of your business day, you want to be sure to set your batch settlement time to occur after your normal business hours.
As soon as the batch settlement completes, you receive an email message with the results. The subject line contains the heading, SUCCESS or FAIL. If the batch settlement fails, contact the your customer care team for assistance at
1-877-270-3475.