Creating extended items
Use Extended Item Setup, after you enter general information using Basic Item Setup, to enter detailed information about complex items. We will use the example of creating a sweater with variations of size, color, and type with a modifier for a monogram. We will let the system automatically generate all the possible combinations for us, and we will use a unique bar code for each combination.
To create extended item:
-
Log in to Back Office using Company View (All Stores).
-
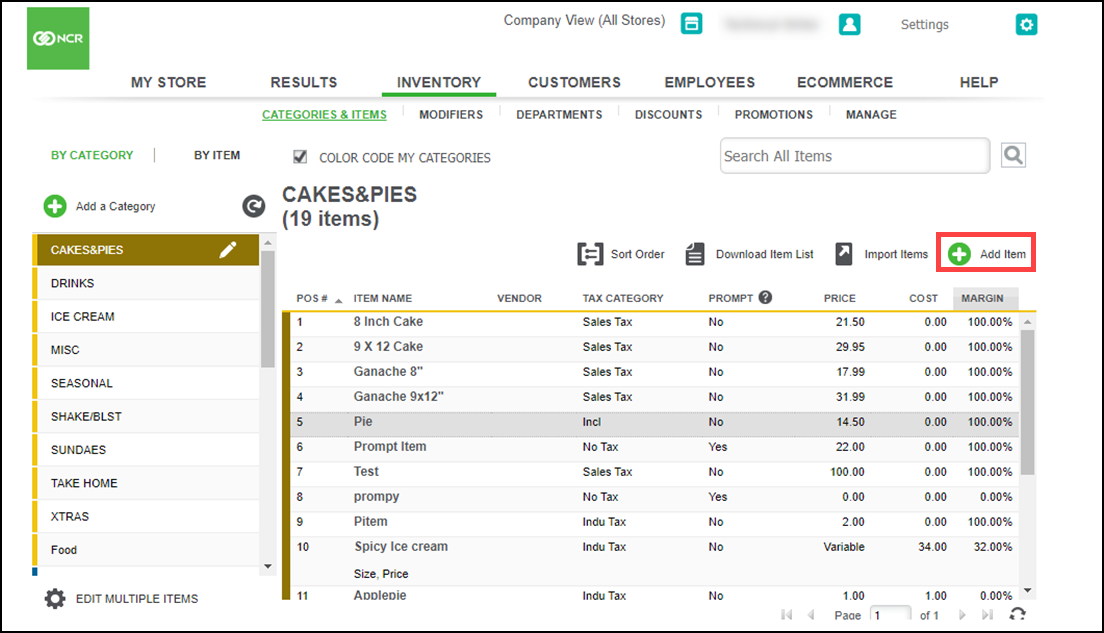
Select INVENTORY > CATEGORIES & ITEMS.
-
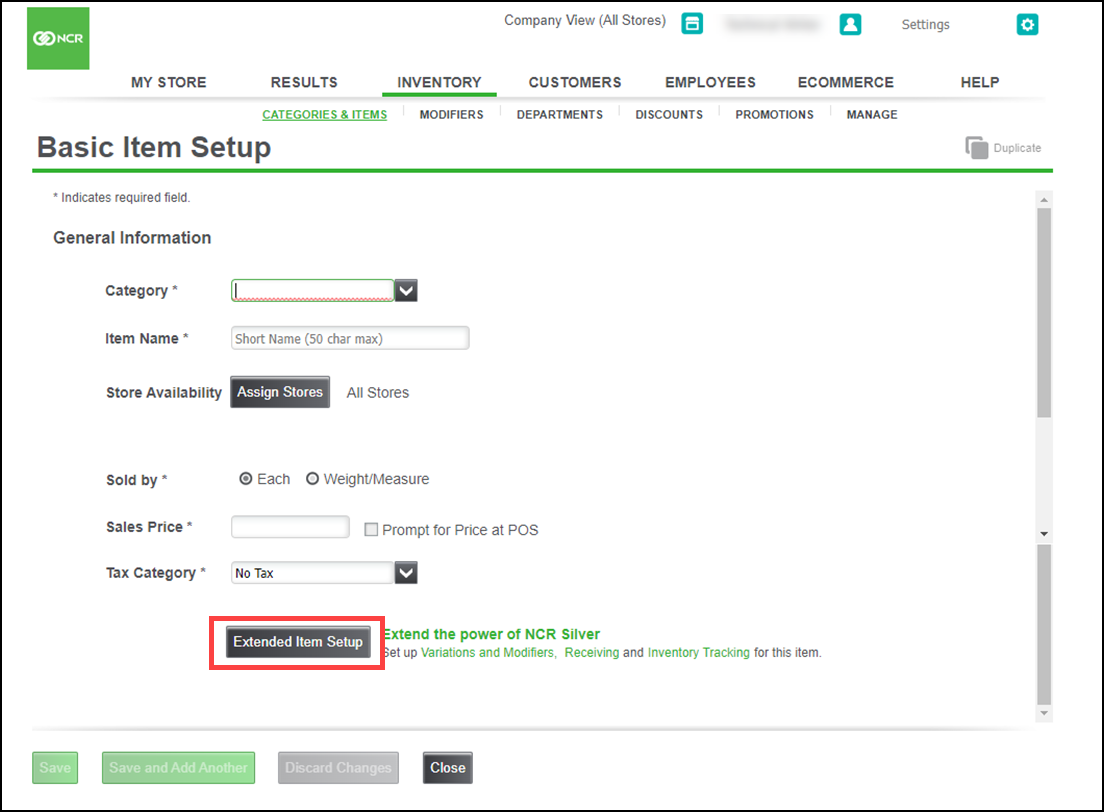
Click Add Item. The Basic Item Setup screen appears.
-
Click Extended Item Setup. When the screen refreshes, you will see that information you entered on the Basic Item Setup screen is populated on the Extended Item Setup screen, and you will see additional fields and selections, including:
- Variations
- Item Modifiers
- Printer Groups
- Bar Codes
- External IDs
- Buying & Selling
- Inventory Tracking
-
Select a Category from the drop-down list.
-
Type a name for the item. The maximum number of characters is fifty. The item name is what you see on the POS app on the order entry screen.
-
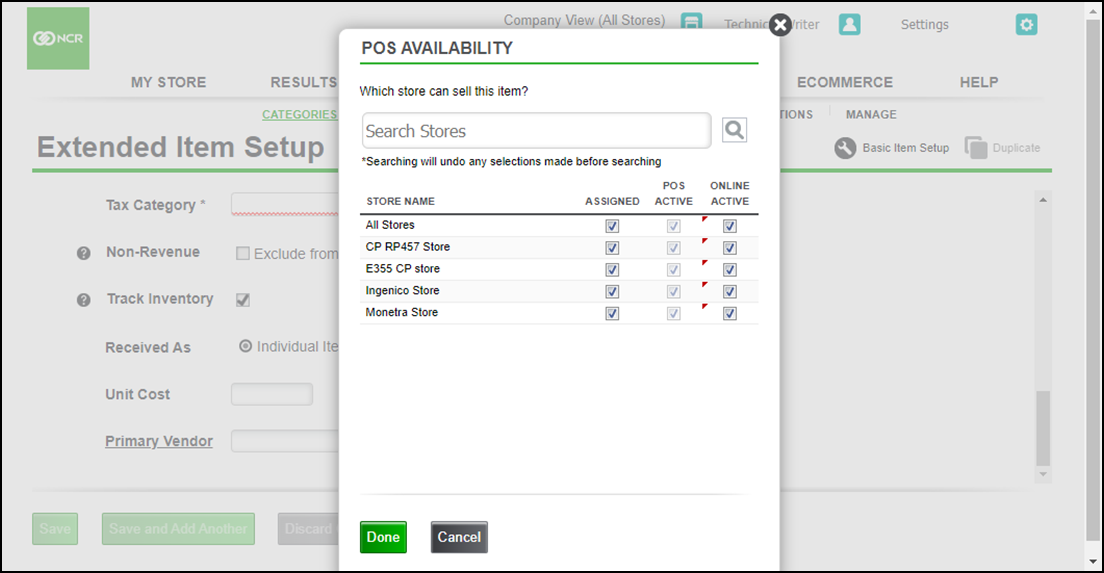
(Optional) Click the Assign Stores for which you want to make the item available on POS and click Done. On the item screen, the system identifies the stores to which you assigned the item. If the item is available to all stores, All Stores appears next to Assign Stores.
-
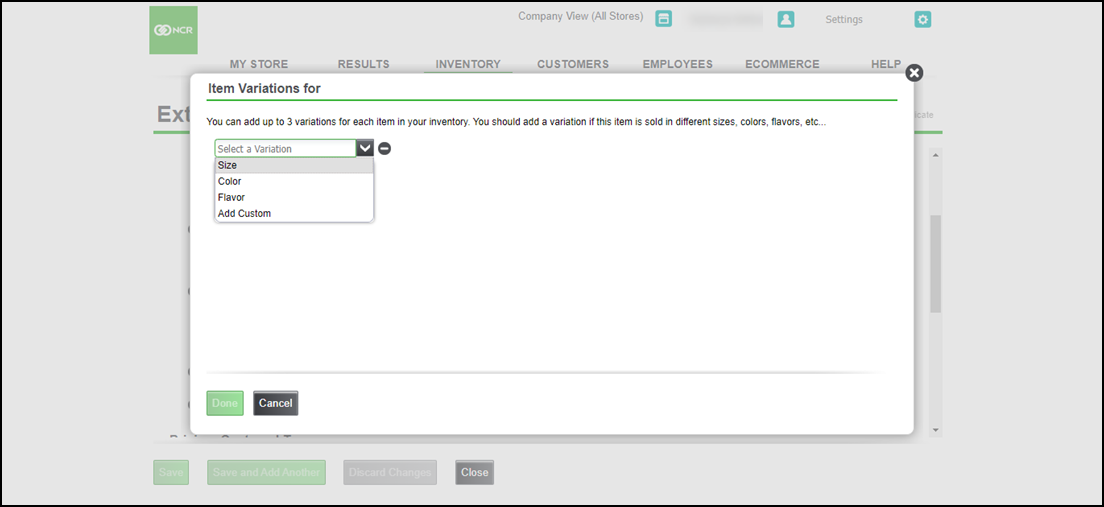
(Optional) Add a Variation: Each item can have up to three variations, such as size, color, or flavor. Click Add a Variation to enter your own variation. Select a variation from the list or enter, when the screen refreshes, you will see a new button to click to enter the values for your first variation.
Use 'Size' as the first variation, click the Add a Size button to enter your required sizes. Example: Small, Medium and Large.
-
Repeat the above step until you have entered all the values for the first variation.
-
Use the up-arrow icon and down-arrow icon to re-arrange the order of your list of values and use the minus symbol to delete a value.
-
Click Done. Once you have saved the variations for an item, the Add a Variation button changes to Edit Variations so you can make any necessary changes and/or additions.
-
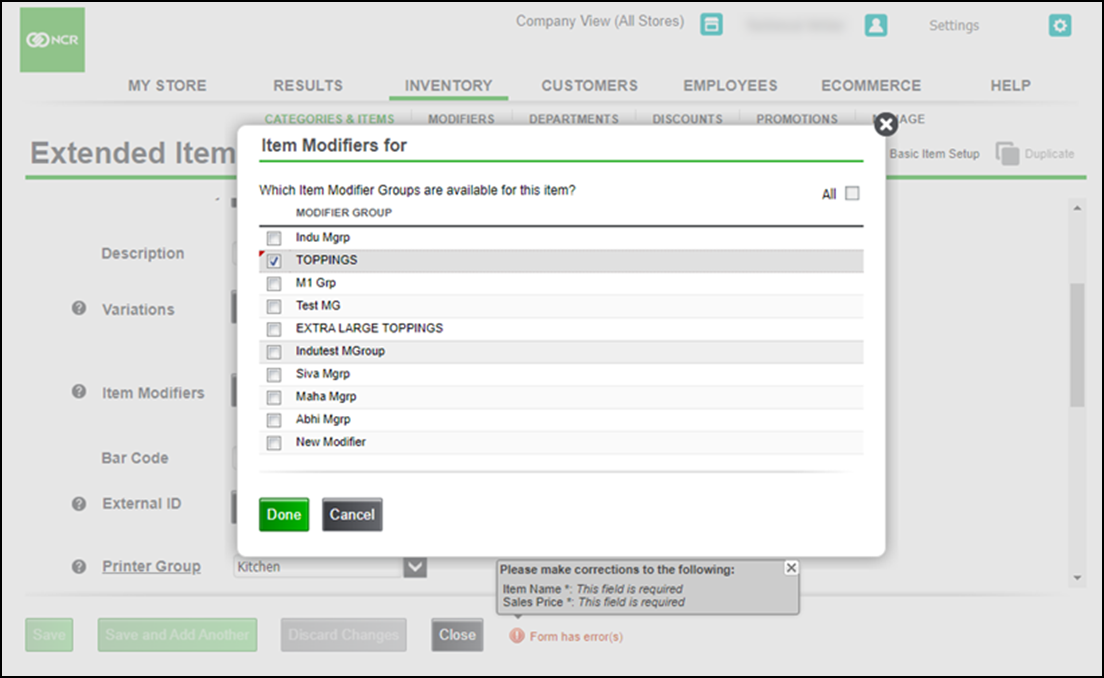
(Optional) Assign Item Modifiers: Item Modifiers are additional selections (options) the POS user can make to add the item to a ticket. Click Assign Item Modifiers. The system will display the Item Modifiers screen. If you haven't set up your modifier groups yet, refer to Creating a Modifier Group.
-
To remove any modifier group that should not be associated with the item, click the Done button. Any time this item is selected at the POS, the selected modifier will not be available to the POS user.
-
(Optional) Bar Codes: Used to create a single bar code for all the combinations of your item variation. However, you can also assign a unique bar code to each possible combination.
- Click Assign Bar Codes. The system will automatically create the list of all of the possibilities using the variations you entered. All you need to do is assign a bar code to each variation.
- Click Enter a Bar Code and enter or scan the bar code for each variation of the item.
- Click the Done.
-
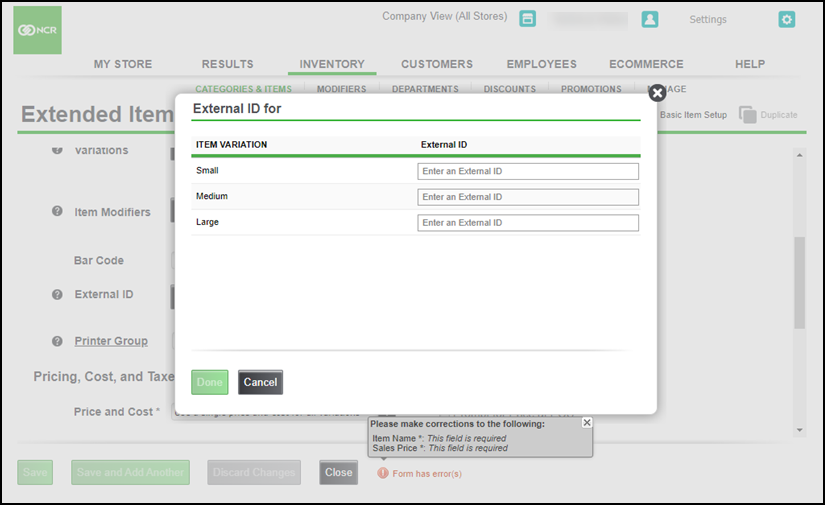
(Optional) External ID: Allow you to enter and search for items by External ID. If the item does not have any variations, a single field is displayed. You can enter the External ID for the item in the field. If the item has variations, a Assign External ID button is displayed instead of a field. Click the button, it will open a modal that allows you to enter an External ID for each variation combination.
-
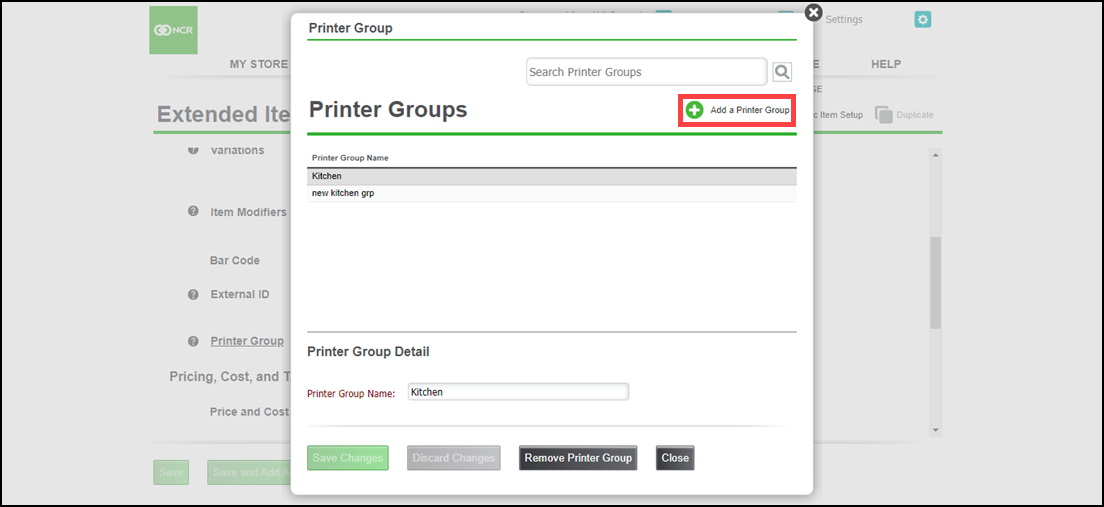
(Optional) Printer Group: Printer Groups are used to determine where, in addition to the receipt printer, an item will print. They are most often used by businesses that prepare food and send orders to the kitchen. Examples of common printer groups includes Kitchen, Bar, and Grill. Using this field, you can select which printer you want each of your items to print to. You can use the default groups or create your own custom groups. You can also choose to leave the field blank if there are items you do not want to be sent to a printer.
-
All new items are defaulted to the Kitchen printer group.
-OR-
Click the Printer Group field and select a different printer group from the list.
-OR-
Click Add a New Printer Group and enter a new printer group. (If your business does not use printer groups, you can simply ignore this field. It is not necessary to change the printer group from the default value to blank.)
Note: For your printer routing to work correctly, you must configure each printer group on each POS device.
-
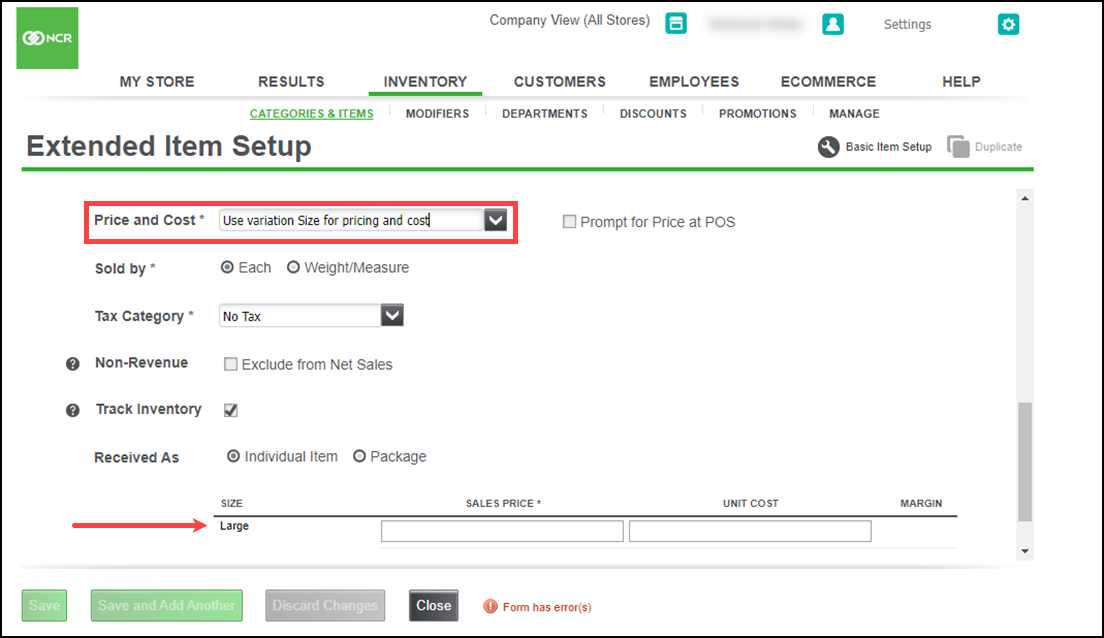
Pricing, Cost, and Taxes: Buying & Selling allows you to pick one variation that will control the price of the item. Choose the Price and Cost option form the drop-down list, which is relevant to the variation selected. For more information refer to Configuring items for use with a scale
-
Select a Sold by (method) option to sell the item, either by Each or by Weight.
-
Select a Tax Category from the drop-down list.
-
(Optional) Non-Revenue: Check the box to exclude the item from Net Sales.
-
(Optional) Check the Track Inventory to track the inventory.
-
Choose the item received as option as an Individual item or Package. If you select Pakage, then enter the untis in package field.
-
When the screen refreshes, you will see a new grid for the variation chosen.
- Click in the SALES PRICE box for the first row and enter the price for that variation.
- Click in the UNIT COST area for the first row and enter the cost for that variation. The system will auto-calculate the MARGIN for you.
-
Repeat above step for each variation (row).
-
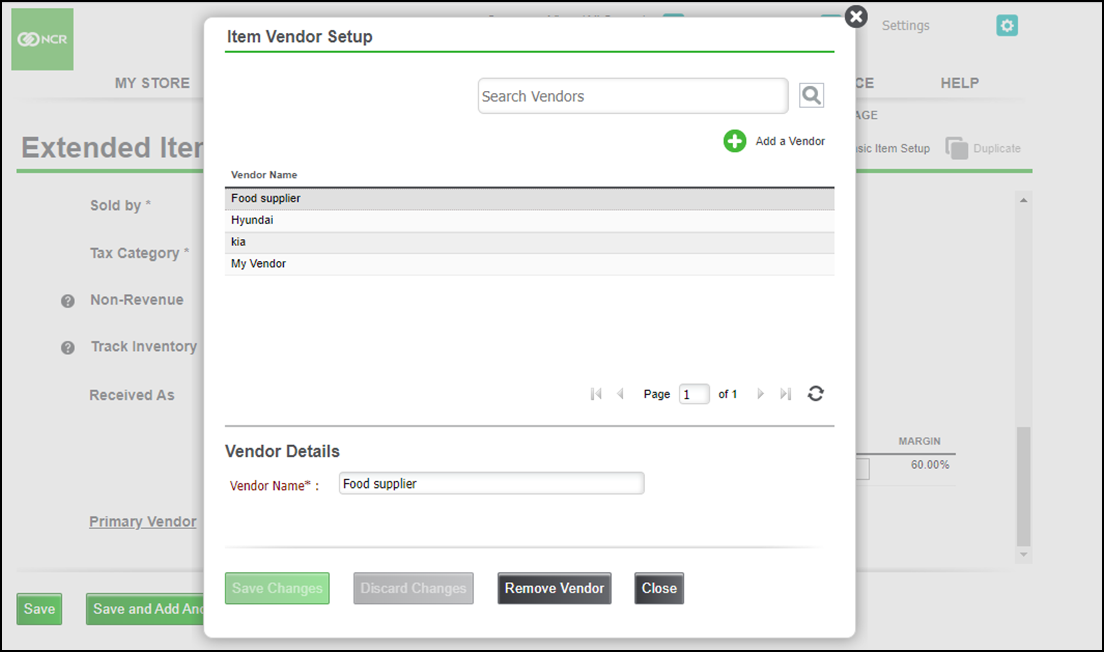
(Optional) Primary Vendor: Click the Primary Vendor field and select a different vendor from the list.
-OR-
Click Add New and enter a new vendor name.
Configuring items for use with a scale
Prior to configuring a scale for use with the POS system, you must configure at least one item to be priced by weight in your Back Office. If you do not configure an item to be priced by weight, you will not see the configure scales setting on the POS.
When creating items priced by weight, you can also define a tare. Tare refers to the weight deducted from the gross item weight to allow for the weight of the container. When you establish tares, the total price of the product is calculated based on the net weight (gross weight minus tare weight) times the unit price.
To configure an item without variations for use with a scale:
- Log in to Back Office using Company View (All Stores).
- Select INVENTORY > CATEGORIES & ITEMS. The ITEMS list appears.
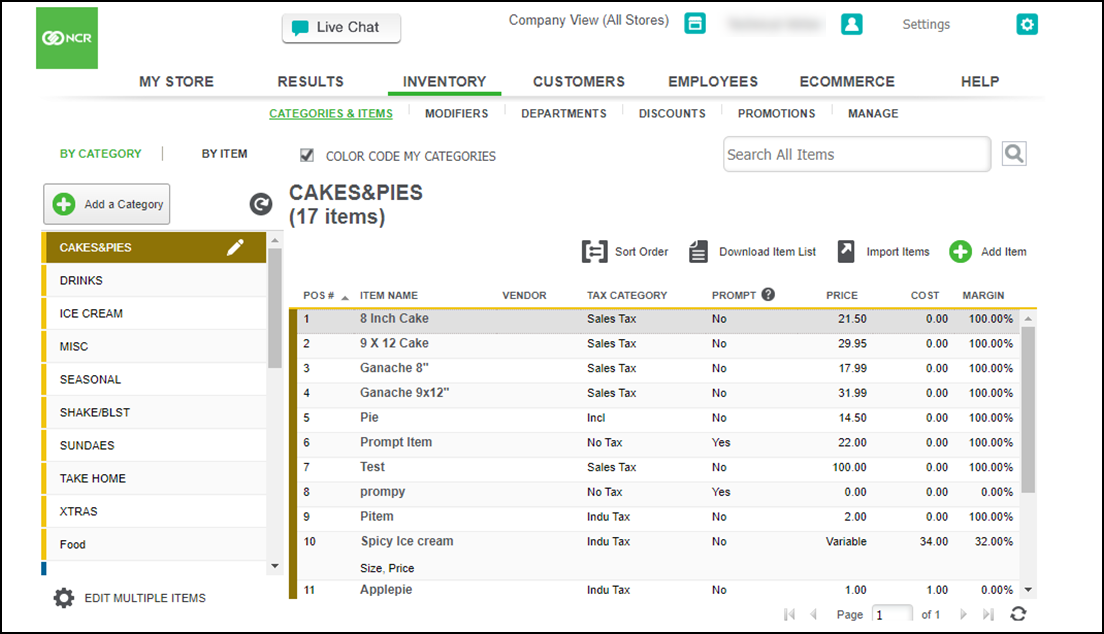
- Select a category containing the item.
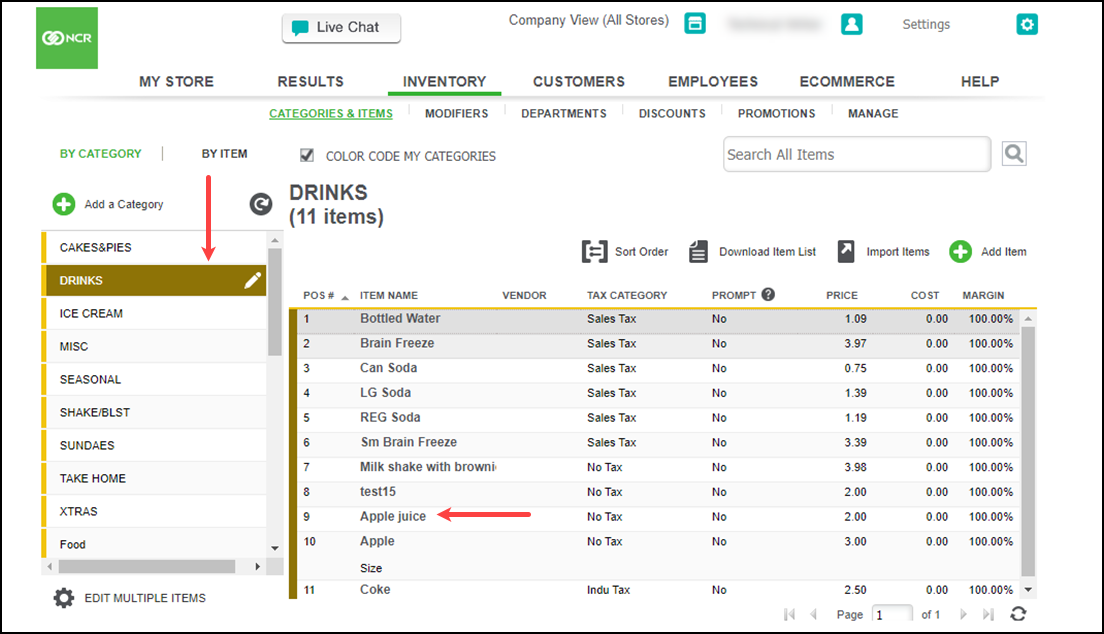
- Select the item.
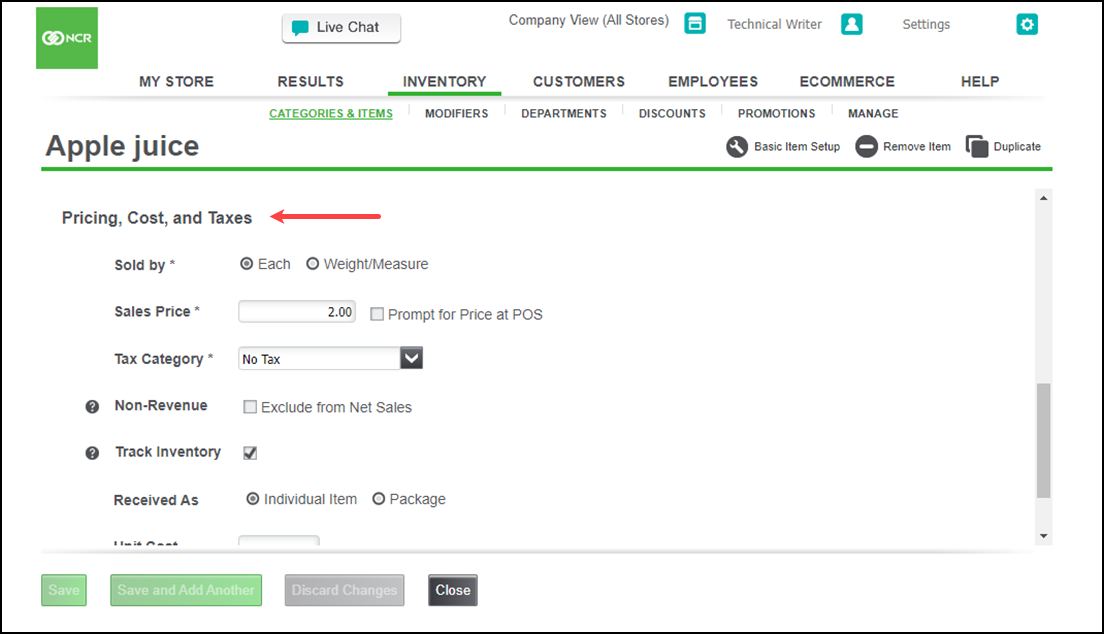
- Under the Pricing, Cost, and Taxes group bar, select Weight/Measure.
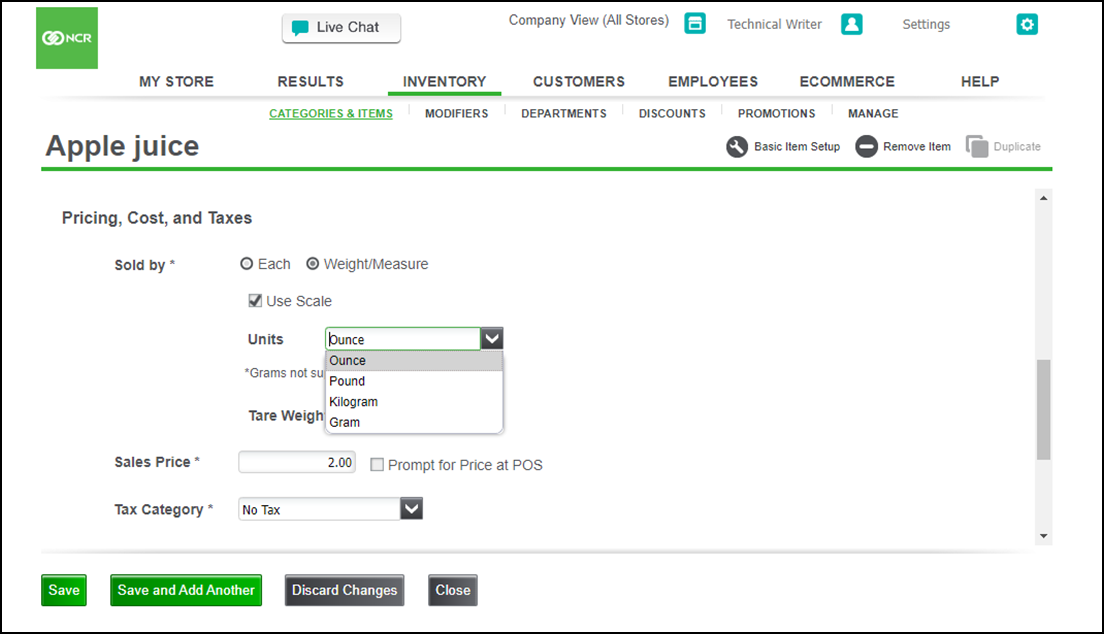
- Select Use Scale.
- Select the unit measurement from the drop-down list.
- Type the tare weight.
- Type the sales price for the item.
- Click Save.
To configure an item with variations for use with a scale:
-
Log in to Back Office using Company View (All Stores).
-
Select INVENTORY > CATEGORIES & ITEMS. The ITEMS list appears.

-
Select a category containing the item.

-
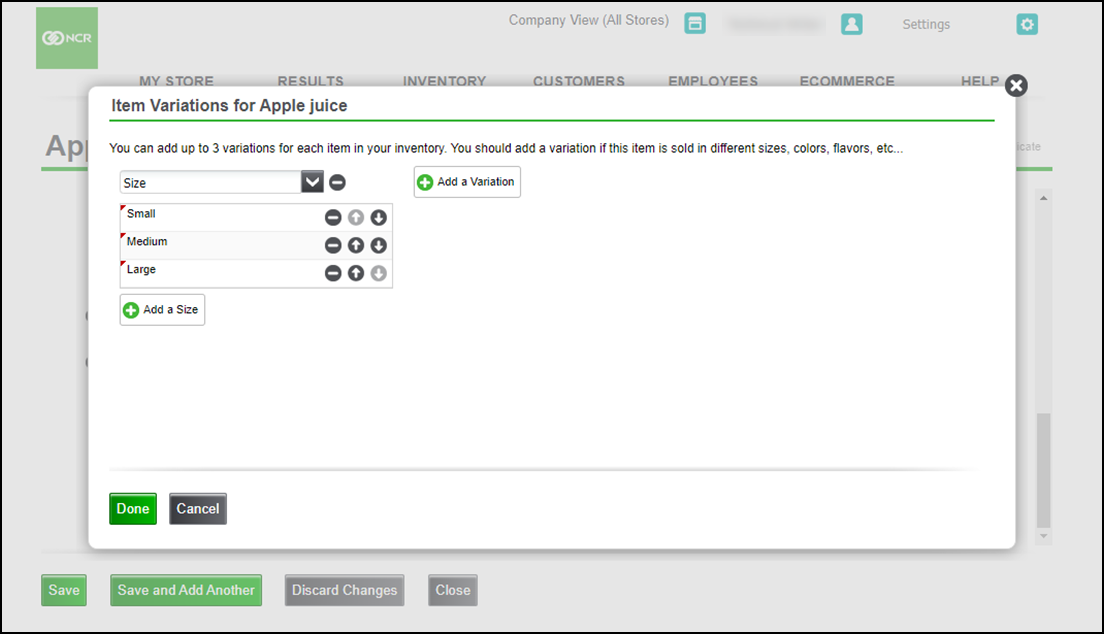
Click Add a Variation. The Item Variations screen appears.
-
Select a variation type, such as size, and add the item variations, such as Small, Medium, and Large from the drop-down list.
Note: You can add up to three variations for each item in your inventory. You should add a variation if this item is sold in different sizes, colors, flavors, etc.
-
Click Done. The system returns to the Item Detail screen.
-
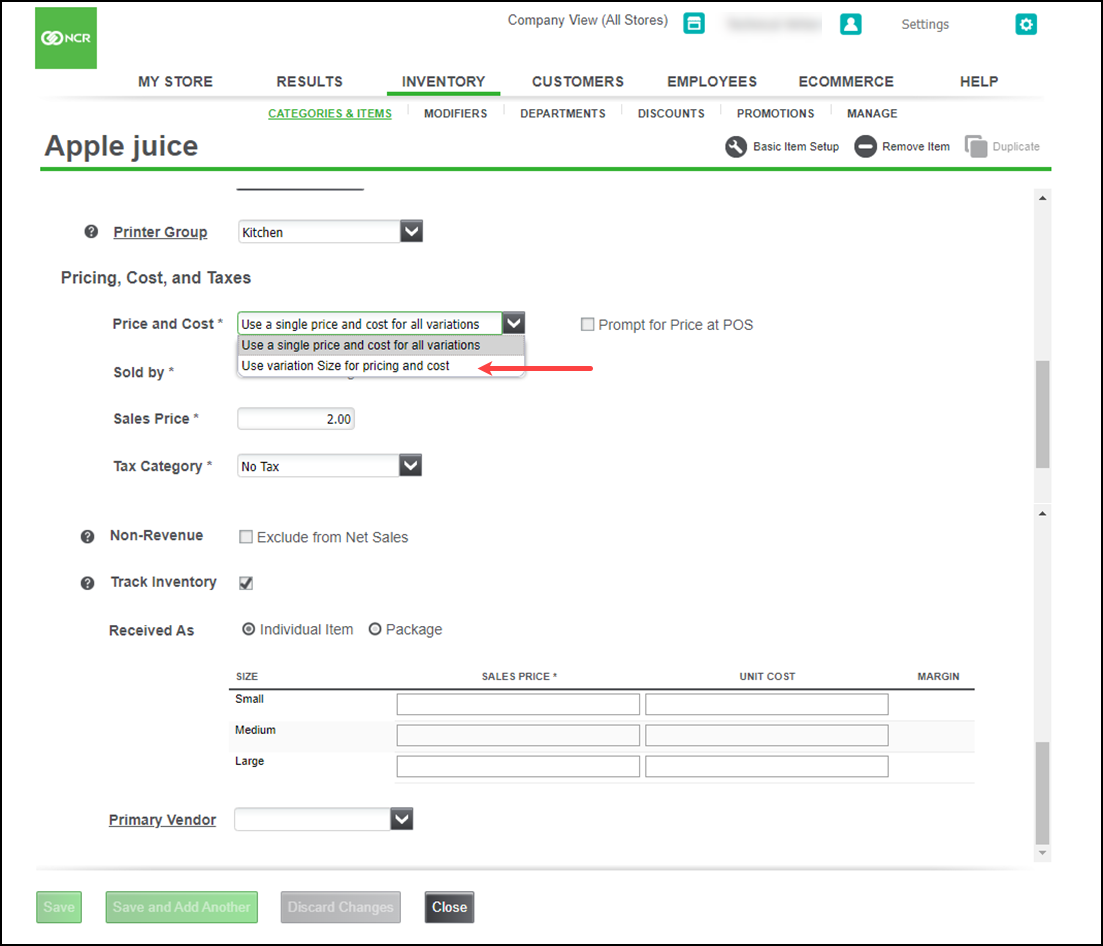
Under the Pricing, Cost, and Taxes group bar, select Use variation Size for pricing from the Price drop-down list.
-
Select Weight/Measure.
-
Select Use Scale.
-
Select the unit of measurement from the drop-down list.
-
Type the tare weight and the sales price and the for each item variation.
-
Click Save.
Reference documentation
Refer to the below related documents for additional information.
Looking for resources or help with Silver? Click here.