Managing your inventory
The key to any successful business is accurate insight to crucial data. Knowing what you are selling, when you are selling it, and how much you are selling removes the element of surprise, leading to smarter decisions, more accurate inventory, and happier customers. Before you can manage your inventory, you will need to either perform an item count or an item receiving. You get to decide which items you want to track in your inventory.
This document discusses the following:
Working with snapshot
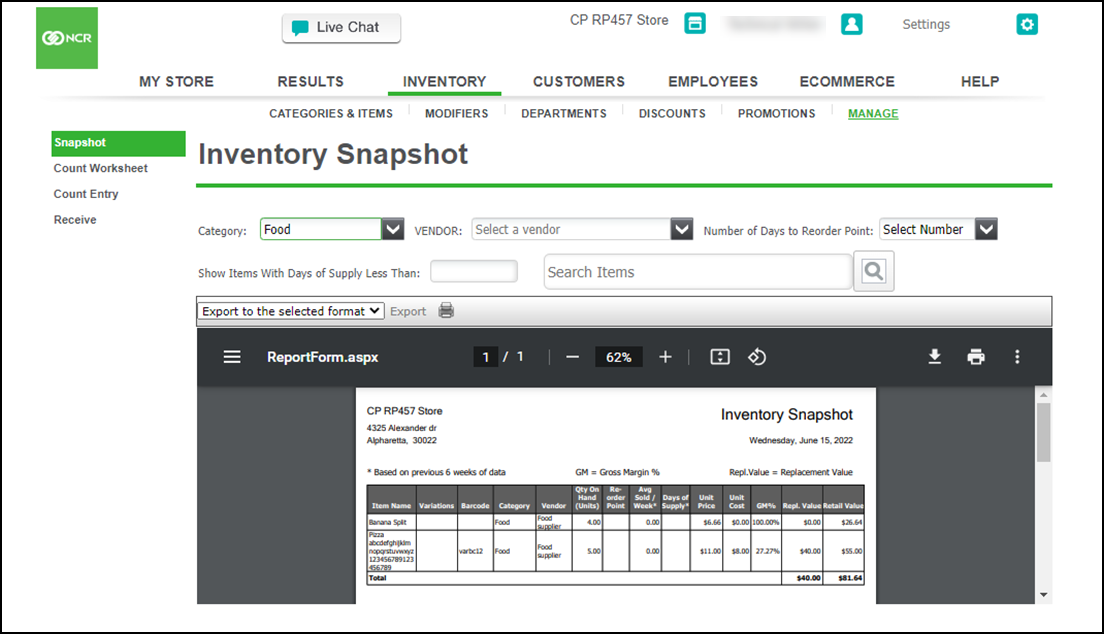
The Inventory Snapshot allows you to view your tracked inventory at a glance. From the Snapshot screen, you can view what you have, what you need more of and how much it will cost to replenish your inventory all in one place. You can search the tracked items by item name or by bar code. You can also print this screen or export it to another format.
Note: Items do not appear in inventory snapshot until you have either entered a count for the item or you receive the item.
To view the inventory snapshot:
- Select INVENTORY > MANAGE > Snapshot. The Inventory Snapshot screen appears. There are three options for filtering the information on this screen.

- After choosing a filter, click the mignifier icon.
- The Number of Days to Reorder Point filter shows those items projected to require reordering in “x” days (or less). This number is calculated based on the average sales activity for those items over the past six weeks and the item’s reorder point. The reorder point is a value you chose and entered when adding or editing an item to your inventory list. It represents the number of units on hand that will trigger the system to tell you it’s time to place an order for more of this item.
- The Show Items With Days of Supply Less Than filter shows those items projected to be out of stock in “x” days (or less). This number is calculated based on the average sales activity for those items over the past six weeks and the item’s current on-hand quantity.
- The Search box filters the list of items based on what you enter here.
Screen contents
- The first four columns show the item name, any item variations, the bar code you may have entered, the item’s category, and the vendor who sells you the item.
- Qty On Hand (Units) displays the number of units of the item you should currently have on hand based on your initial item count plus any items received and less any items sold.
- Reorder Point displays the value entered when you added inventory to let you know when it is time to place a new order. It is used as a safeguard to ensure that you always have the necessary quantity on hand to meet sales demands.
- Avg. Sold Per Week is calculated based on your total sales over the past six weeks.
- Days of Supply uses your average sales activity from the past six weeks to calculate the estimated number of days until that item is out of stock.
- The next three columns show the unit price, unit cost, and the GM%. These figures are calculated for individual units even if the item is set up to be received by the package.
- The item replacement value, if assigned.
- Retail Value is calculated by multiplying your Qty On Hand (Units) by the Unit Cost. This is a valuation of inventory that might be used for accounting or insurance purposes.
Printing an item count worksheet
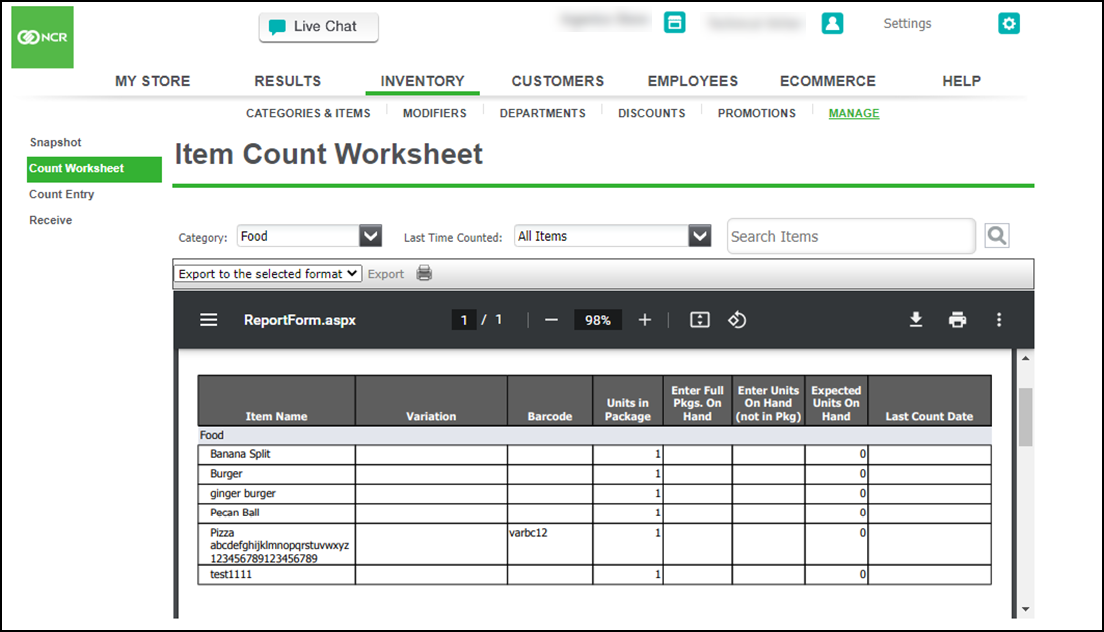
Use the 'Item Count Worksheet,' to perform an inventory count on a large number of items. This also allows you to create a useful template to print and use when manually (i.e. pen and paper) performing your actual count.
- Log in to Back Office using a specific store.
- Select INVENTORY > MANAGE > Count Worksheet.
- Filter the items that appear by Category and Last Time Counted or by entering an item name or bar code in the Search box and clicking the magnifier icon to add the items you want to count on the Item Count Worksheet.

- Print the page so you can have it with you as you count and record the quantity of items on the sales floor and in the stock room.
- Start by counting the packages on hand and then count any individual units. If an item is only available in individual units, do not write down a quantity in Enter Full Pkgs. On Hand, but instead capture it in Enter Units On Hand. For the most accurate results, remember to count all inventory, including unopened and partial packages.
- Write the counts on the Item Count Worksheet and continue with Entering Inventory Counts.
Entering inventory counts
The first step to managing your inventory is to know how much you have. To do this, you need to perform an initial count of each item you wish to track. This number serves as the starting point for tracking the quantity on hand for that item during the entire period that item remains in your inventory. To help you accomplish this task, you can use the Item Count Worksheet to create a listing of all items you intend to count. Once you finish counting, print the worksheet and take it with you as you count the items in your store. Write the counts in the appropriate boxes. When you have completed your count, use the Count Entry screen to enter the count for the items.
Note: During the creation of the Extended Item Setup menu, if 'Track Inventory' is not selected, the item does not appear on 'Manage Inventory' pages. By default, 'Track Inventory' is selected.
To enter inventory counts:
-
Log in to Back Office using a specific store.
-
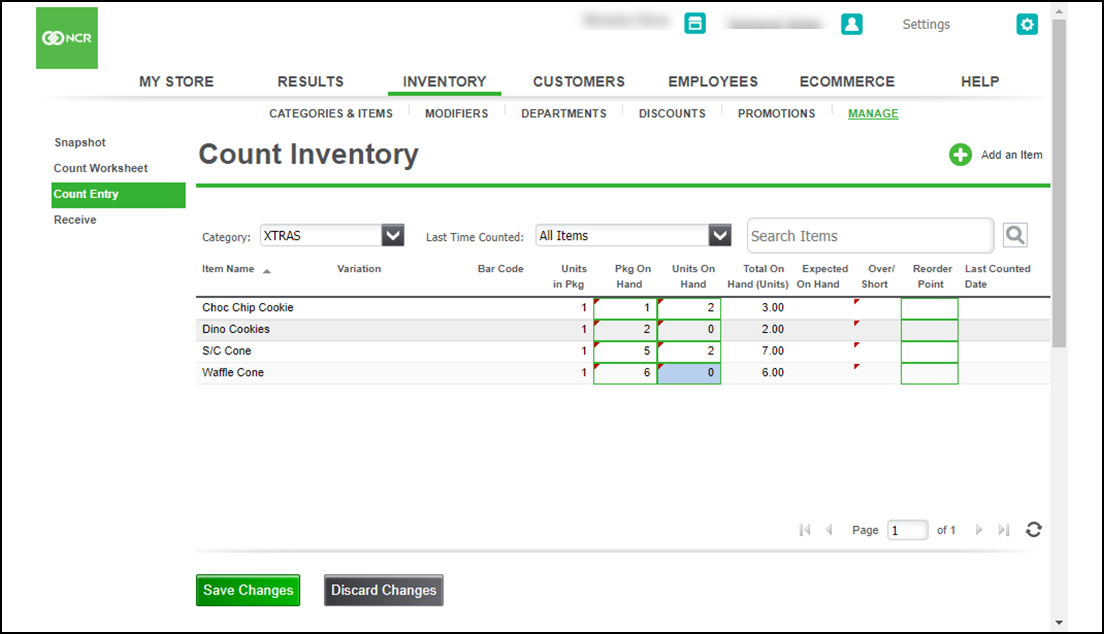
After completing your count, select INVENTORY > MANAGE > Count Entry to open the Count Inventory screen.

-
Enter the count of the items you just counted. You can filter the items that display by Category and Last Time Counted or by entering an item name or bar code in the Search box and clicking the magnifier icon.
-
The Expected On Hand quantity is calculated using your last count of an item minus any sales of that item plus any returns of that item since your last count.
-
The system calculates and displays the Total On Hand (Units).
-
Click Save Changes when you are done.
Tip: If you see any small red triangles, the information on the screen has changed since the last save.
Receiving inventory
Inventory is always changing, whether you are selling items or receiving new items. Keeping track of those fluctuations is important to ensuring profitability. The 'Receive Inventory' screen enables you to know the quantity of items being added to your inventory, as well as know the quantity of items you are selling. Use the 'Receive Inventory' screen to easily track the quantity of items being added to your inventory, as well as to update the vendor, cost, and retail price for those items.
Note: If 'Track Inventory' is not selected in the Extended Item Setup menu creation, the item does not appear on 'Manage Inventory' pages. By default, 'Track Inventory' is selected.
To receive inventory:
-
Log in to Back Office using a specific site.
-
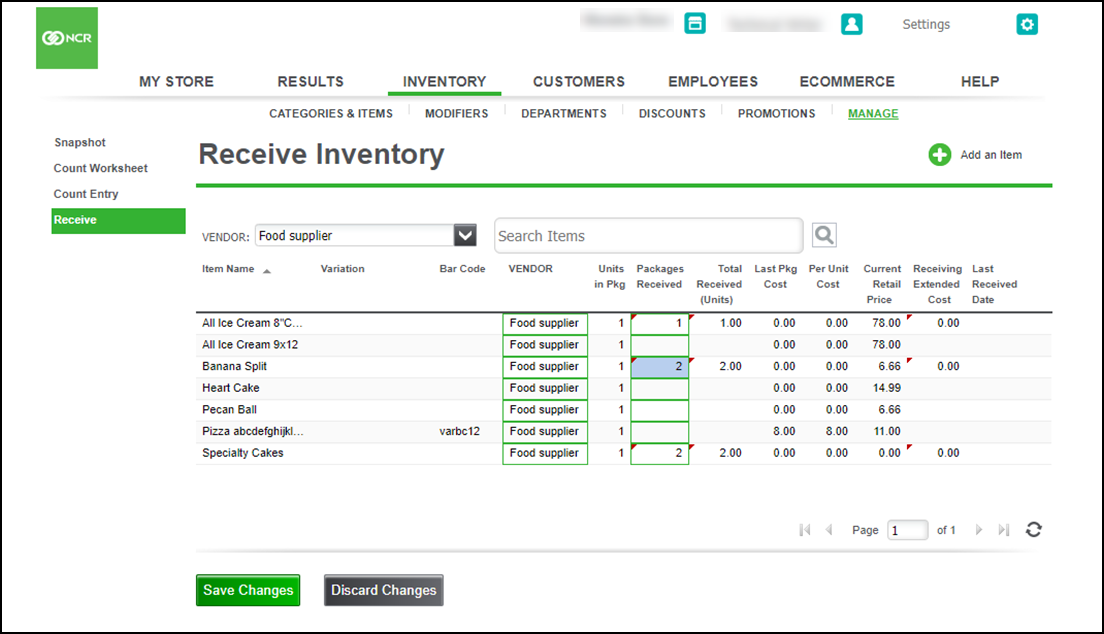
Select INVENTORY > MANAGE > Receive. The Receive Inventory screen appears.

-
For efficiency, we suggest you filter the items that appear by vendor; however, you could enter the item name or bar code in the Search box and click the magnifier icon.
-
For each item, enter the quantity received in the green box under the Packages Received column.
If the Units in Pkg. is equal to 1, the package quantity is the same as the unit quantity, meaning you do not receive this item in packages.
If the Units in Pkg. is greater than 1, there are multiple units in one package, and the item should be received as a package. For example, if you receive a 3-pack of socks by the package with 12 packages in a box, you would track that item as received by package with 12 units in the package. If you receive a sweatshirt one at a time (not in a package), you would track that item as received by unit with 1 unit in the package.
-
The system automatically calculates the correct number of Total Received (Units) based on the information in Units in Pkg. A small red triangle appears in the upper-left corner or edited/updated cells.
-
To change vendors for a particular item, choose the new vendor from a drop-down list of vendors already in your system or you can add a new vendor.
-
If the cost for an item has changed, enter that in New Cost.
-
The Receiving Extended Cost is calculated by taking the quantity of packages received multiplied by the package cost. A comparison of your shipping invoice with this number ensures you are being billed accurately.
-
Click Save Changes when you are done.
-
Click Add an Item, if you can also add an item from this screen.
Tip: Small, red triangles indicate where information on the screen has changed since the last save.
Looking for resources or help with Silver? Click here.