Working with items
After creating categories, create an item record for each item you sell. For each item you enter, you must specify a category, item name, price, and tax category (the system selects your default tax category, but you can change to another tax category, as needed). You also need to indicate how you sell the item by unit or weight/measure. In addition, you can add the vendor who supplies the specific item and your cost for the item. This feature makes reordering simpler and provides visibility into profitability when items are sold.
In addition, you can set up item modifiers to make it easy for employees to select options and extras when selling an item at the POS app. You will group modifiers into modifier groups.
The POS app makes it very intuitive for you to track your inventory. By allowing you to define up to three variations for any item, you can track all of the possible combinations of these characteristics under a single item. Variations are usually grouped together into variation groups.
This document discusses the following:
- Creating basic items
- Editing and removing items
- Editing multiple Items/batch update
- Importing items
- Using price embedded bar codes
- Scanning price embedded bar codes at the POS
Creating basic items
You can create an item for the selected category.
To create basic items:
-
Log in to Back Office using Company View (All Stores).
-
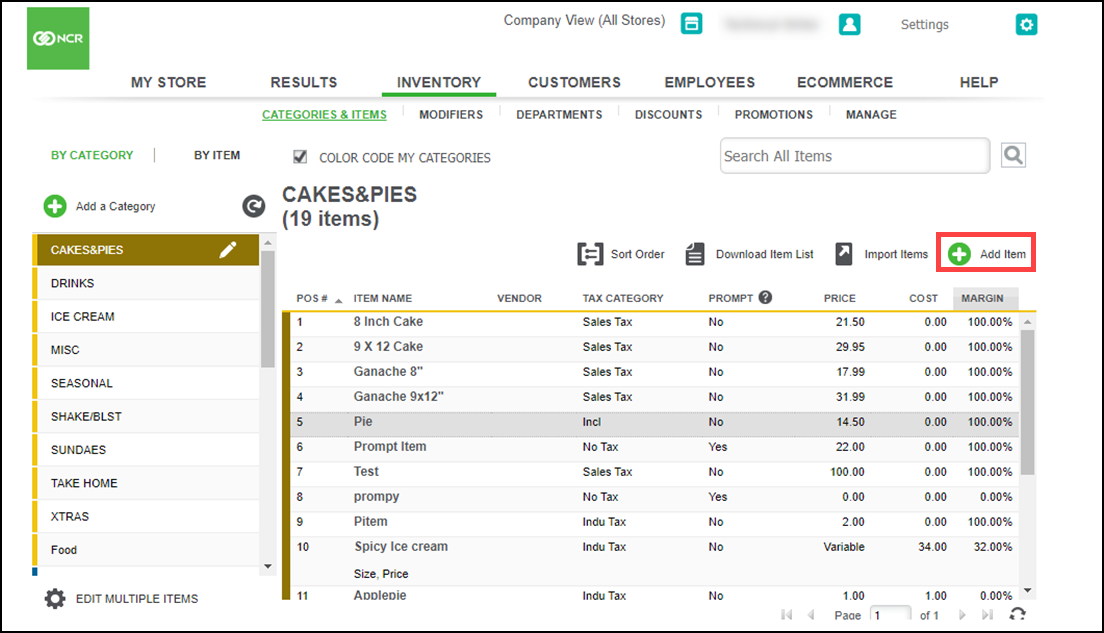
Select INVENTORY > CATEGORIES & ITEMS.
-
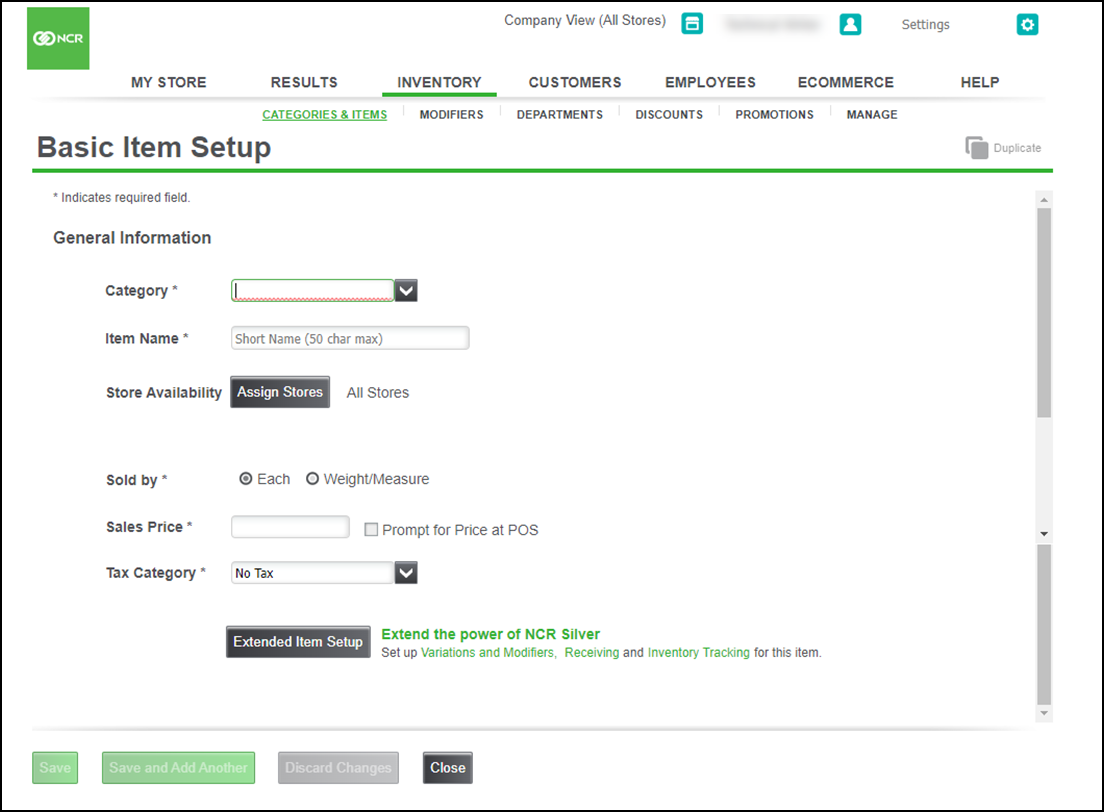
Click Add Item. The Basic Item Setup screen appears.
-
Select a category from the drop-down list.
-
Type a name for the item. The maximum number of characters is 50. The item name is what appears on the POS app on the order entry screen.
-
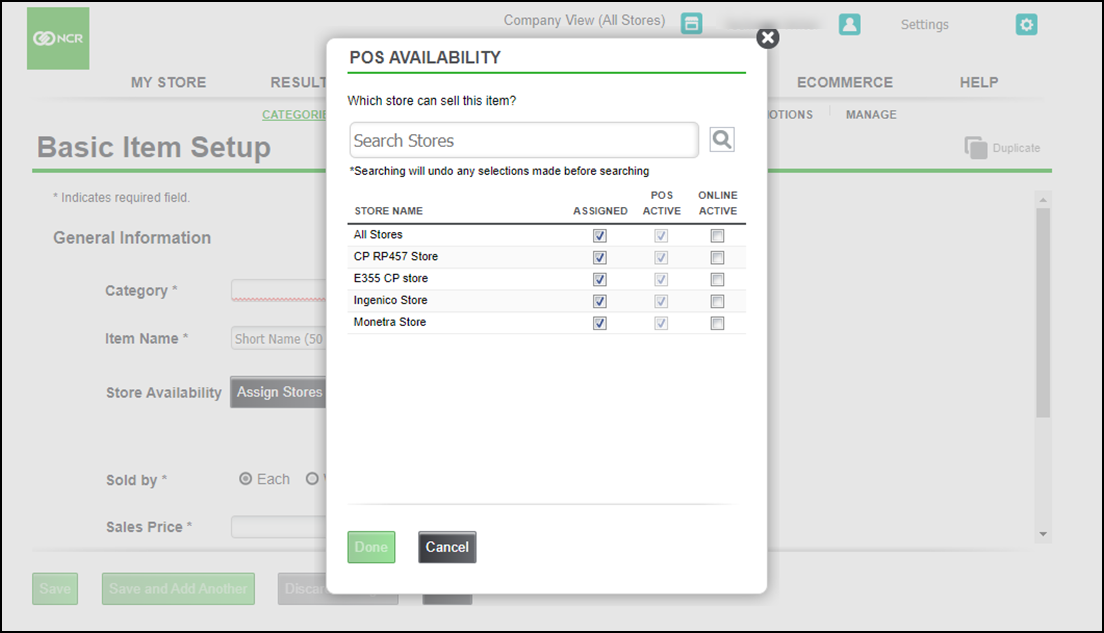
Click the Assign Stores for which you want to make the item available on POS and click Done. On the item screen, the system identifies the stores to which you assigned the item. If the item is available to all stores, All Stores appears next to Assign Stores.
-
Select a Sold by (method) option to sell the item, either by Each or by Weight.
-
Enter a sales price for the item. Select the check-box Prompt for Price at POS to prompt for the item price item in the POS.
-
Select a tax category from the drop-down list.
-
Do one of the following:
-
Click Extended Item Setup if you need to enter more information about this item, such as variations, bar codes, inventory tracking information, etc.
-
Click Save to save your changes. The system will return you to the CATEGORIES & ITEMS main screen.
-
Click Save and Add Another to save this item and start adding another new item. The system will return you to the Basic Item Setup screen.
-
Click Discard Changes to not save any of the information you entered. The system will prompt you to confirm that you want to discard your changes.
-
Click Close to close the screen. If you have made changes that you haven't saved, the system will prompt you to confirm that you want to discard your changes.
Note: If you have more complex items, use the creating extended item.
-
Editing and removing items
To edit or remove an item:
- Log in to Back Office using Company View (All Stores).
- Select INVENTORY > CATEGORIES & ITEMS.
- Scroll through the list of your categories and items, or search for the item by name or bar code, and then click the row of the desired item. From here, you can, edit information about the item, or can create a duplicate of the item.
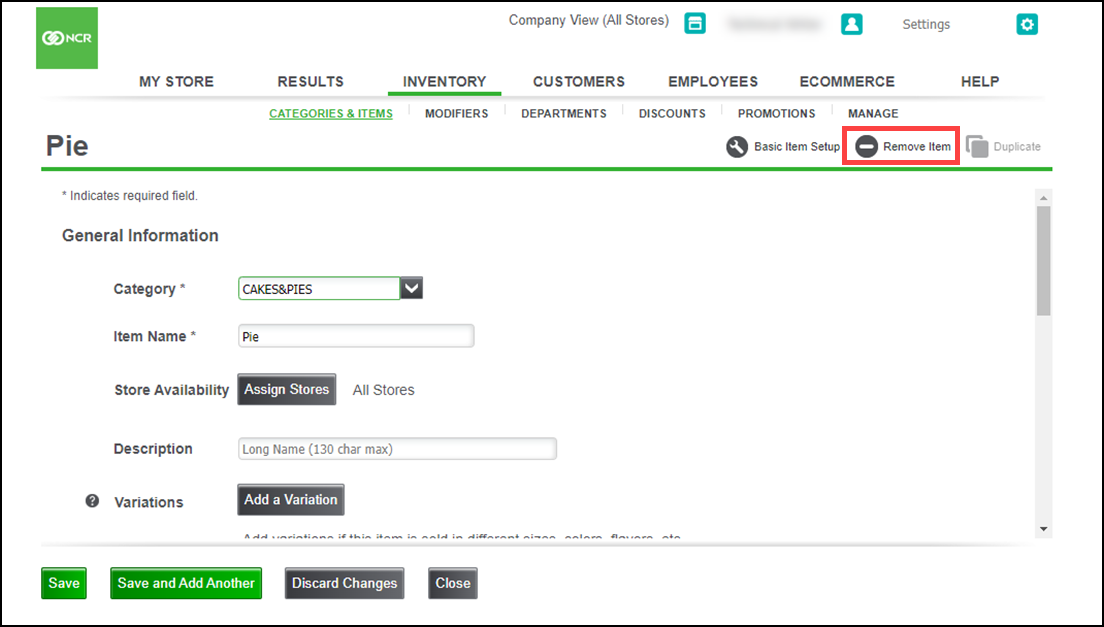
- Remove the item by clicking Remove Item. An alert appears to let you confirm the removal of the item.
- Click Yes to remove the item. If the selected item has any sales activity, the system lets you know so you can determine if you still want to remove the item.
- Remove individual variations, variation groups, modifier items, and modifier groups. If you remove the last variation in a variation group, the system lets you know it will also delete the variation group. If you remove the last variation group, the item is no longer be considered an item with variations.
Note: Removing an item is a "soft delete". This means that although the item is removed from your view, all data and activity associated with that item is still shown in reports, transactions, etc.
Removing vendor
You can remove a vendor if they are no longer in use, and also the vendor is still listed.
To remove a vendor:
- Log in to Back Office using Company View (All Stores).
- Select INVENTORY > CATEGORIES & ITEMS.
- Scroll through the list of your categories and items, or search for the item by name or bar code, and then click the row of the desired item. From here, you can, edit information about the item, or can create a duplicate of the item.
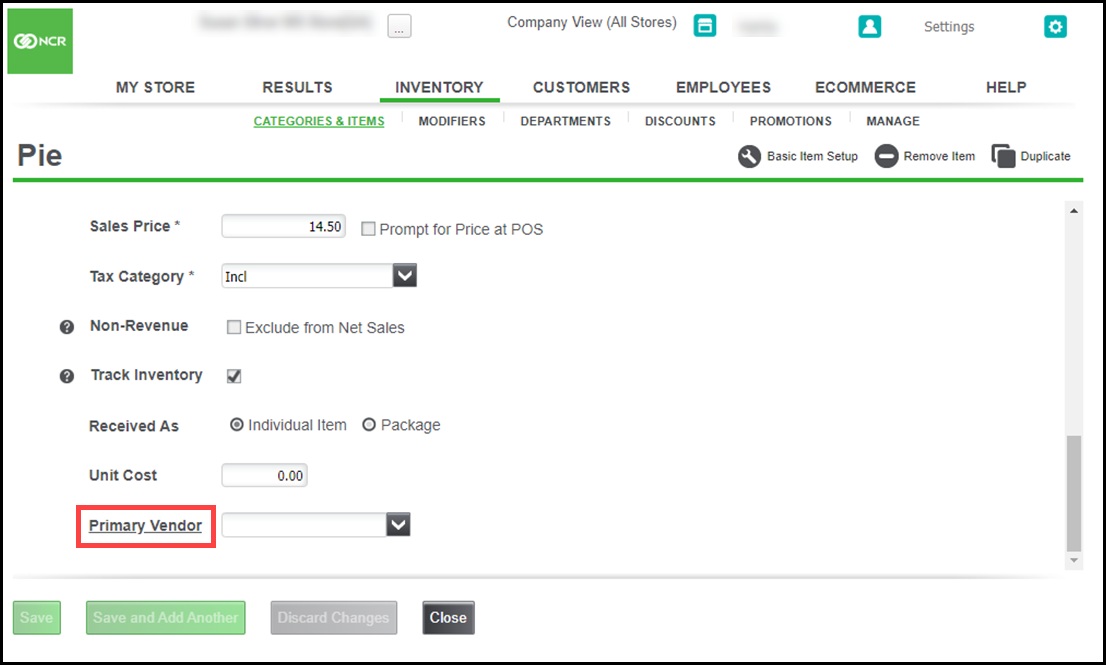
- scroll to the bottom of the page and click the Primary Vendor link. The Item Vendor Setup dialog box appears.
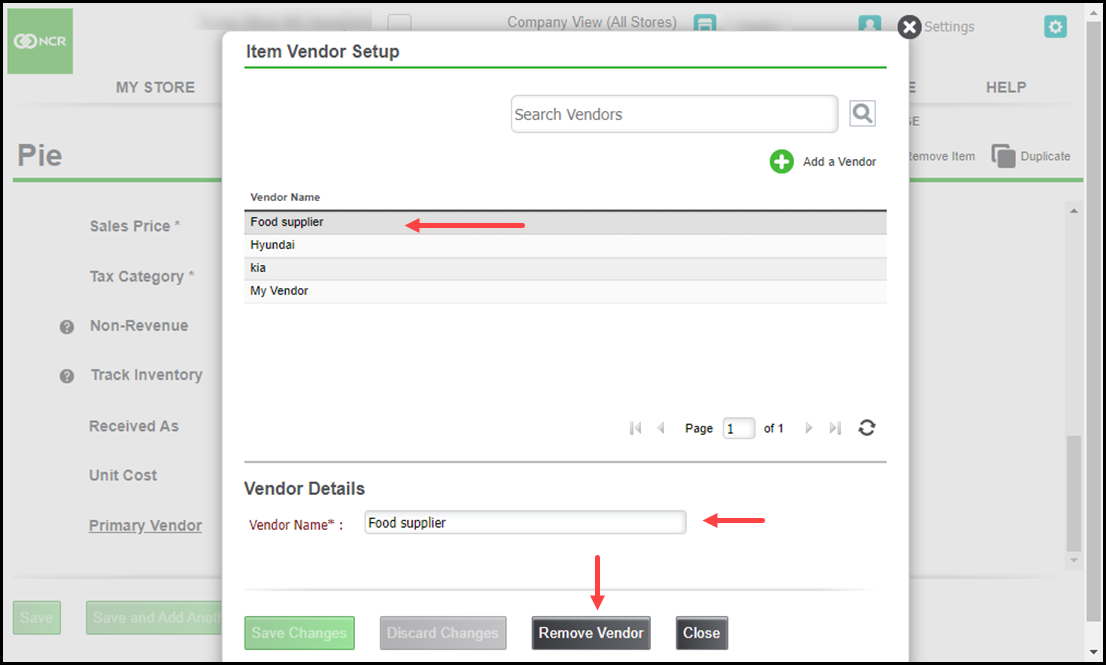
- There should be a list of all vendors. Make sure no current items are attached to that vendor.
- Once verified, select a vendor and then click Remove Vendor.
- Click OK to confirm the deletion.
Editing multiple items/batch update
This feature allows you to select a group of items and do the updates to them at once without opening each individual item record. Item attributes you can change using this feature are price, category, tax category, printer group, vendor, and availability at POS. You can also use this feature to delete multiple items at one time.
To use this feature:
- Log in to Back Office using Company View (All Stores).
- Select INVENTORY > CATEGORIES & ITEMS.
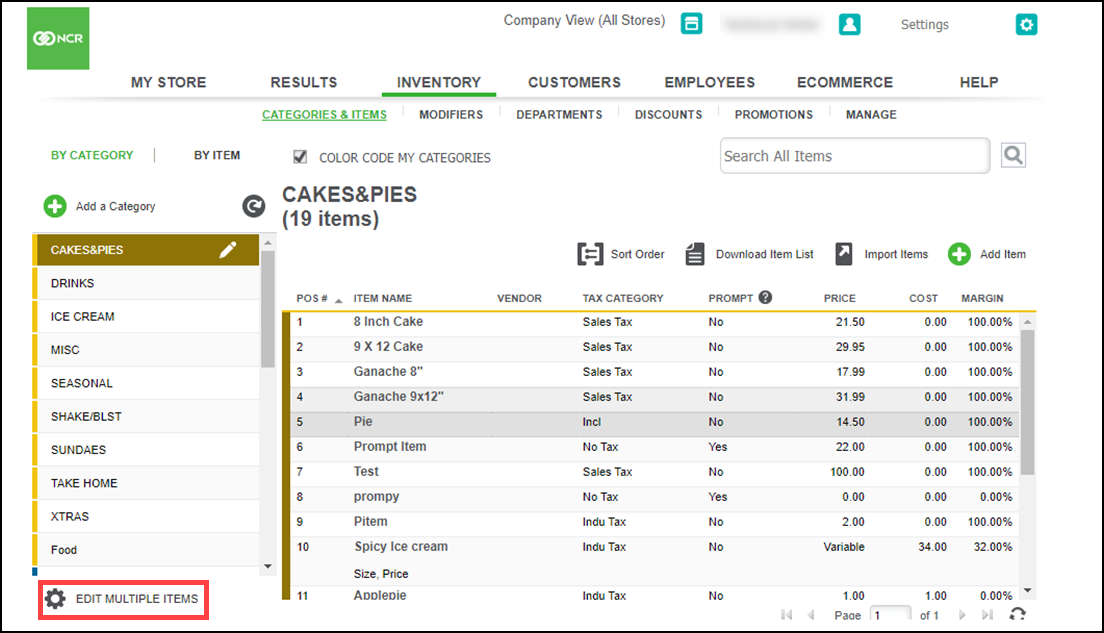
- Under your category list, click EDIT MULTIPLE ITEMS. The Edit Multiple Items screen appears.
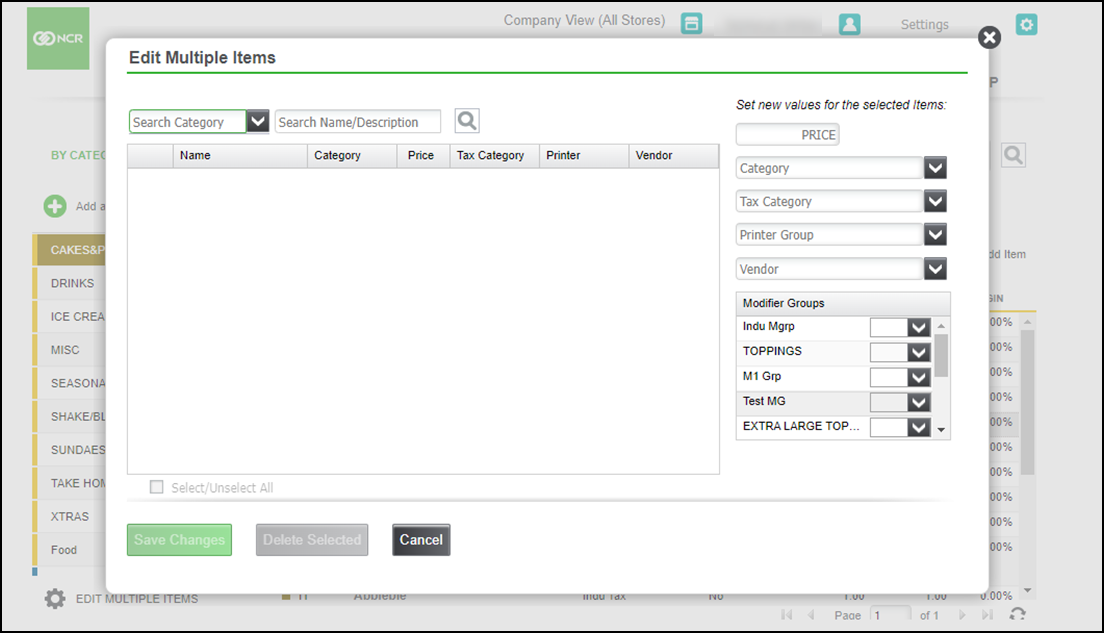
- Search by category or by item Name/Description for the items you want to update.
- Select the checkbox next to any items you want to change.
- Select the new values you want to update to the items, by selecting a Category/Tax Category/Routing Group/Print Priority from the drop-down list.
- Click Save Changes.
- On the confirmation message, click OK to save or Cancel to go back and make additional changes.
Note: Using this feature to update the prices for items priced by variation will result in all variation prices being updated to the price entered.
Importing items
Using Back Office you can create categories, items, and modifiers manually, however, you can import your menu from a .csv file. Prior to importing a file, it is necessary to create tax categories and select one as your default. You cannot add tax.
Refer to the following before importing items:
- Please make sure your import file has 999 items or less in it. If you have more than 999 items, you will need to separate your master file into smaller files and then import them one file at a time.
- You have entered values for all of the required fields (Category, Item Name, Price).
- When you begin your import, we will check your import file to ensure that there are no more than 999 items in your file and that all of the required fields have a value in them. If either of these "pre-tests" fail, the system will alert you.
- As of NCR Silver Essentials version 4.5, you can now identify what modifier group the item is modified by. You can Assign up to 5 modifier groups to an item when using the Silver back office item import template.
- The item import tool will edit any information for existing items, so every time you do an import you need to make sure that all of the information for existing items is correct. This means you can edit information using the import tool, but if you miss a box on the import of an existing item, that field or flag will be empty once imported. A best practice is to complete an item list export before importing so that you start with the most current information.
Tip: If you sell items that have different tax categories, such as food, alcohol, general merchandise, etc., go ahead and create those tax categories first. Then, ensure you have the same exact name for the tax categories in your import file, and the system will assign all your items to your selected tax categories during the import process.
To import the items:
-
Log in to Back Office using Company View (All Stores).
-
Select INVENTORY > CATEGORIES & ITEMS.
-
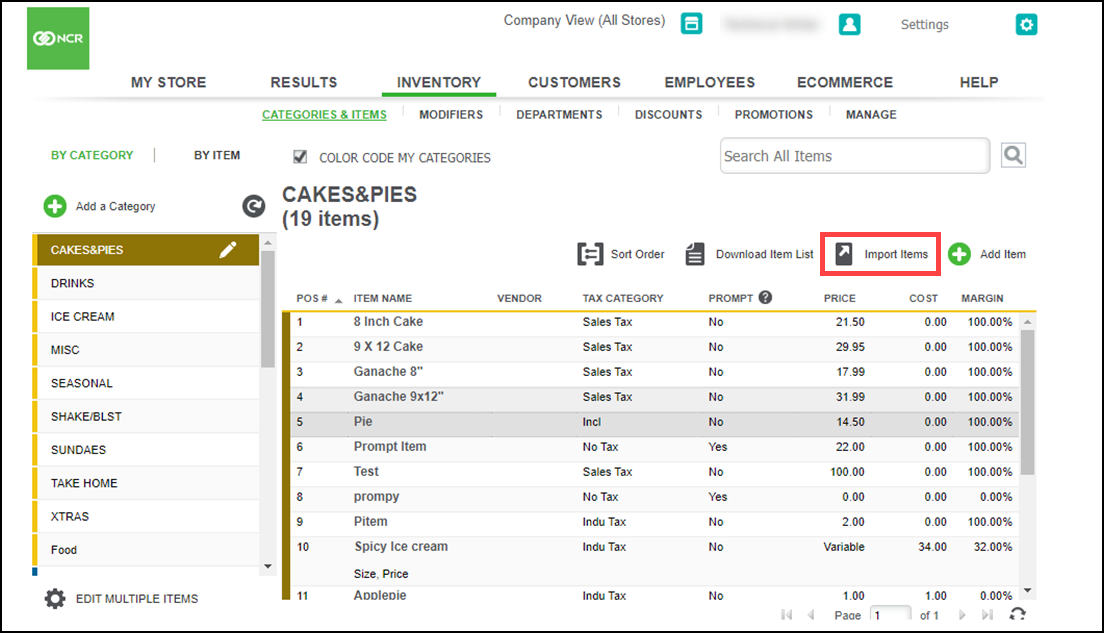
Click Import Items. The Import Items screen appears.
-
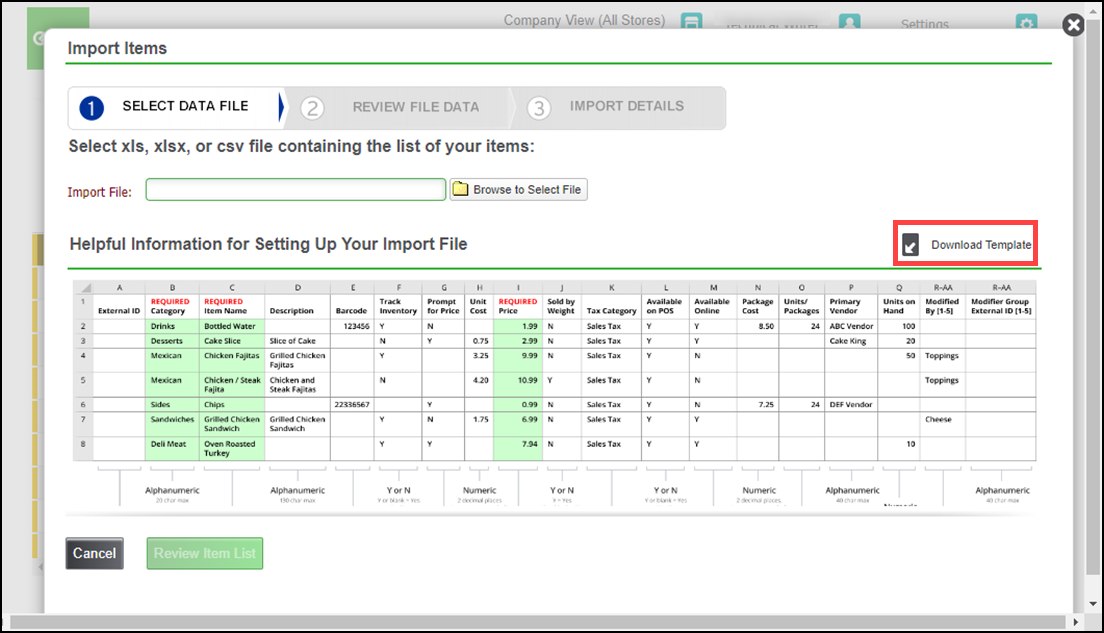
Click Download Template, and save the file as a .csv file.
-
Copy your inventory data into the sample file or modify an existing item list to match the format of the sample file. Save this file to your local computer with a name you will recognize. Ensure your data matches up with the appropriate column headers. Also, make note of the required fields and save the file as a .csv file.
-
At the Import Items screen, click Browse to Select File, navigate to the .csv file, and click Open.
Note: The system will do 2 pre-tests on your import file. The first will be to count the number of items in your file. Make sure you have no more than 999 items in your import file. If you have more than 999 items, the system will alert you to separate your list into multiple files. The second test will be to make sure that all of the required fields have a value in them. If a required field is blank, the system will alert you to fix this in your import file and try again.
-
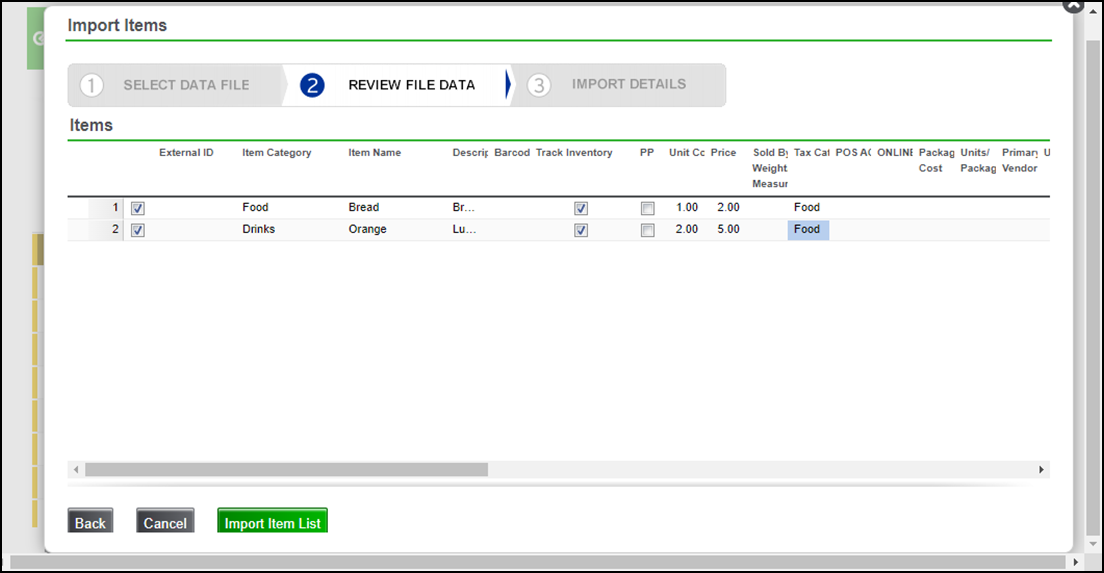
Click Review Item List. at the bottom of the screen and review the data in your inventory file when it displays on the screen. When the screen refreshes, you may see rows of your data displayed with red exclamation points at the beginning of the row. This means that there was an error in that row that the system could not resolve. Click on the red exclamation point for each row to see the error(s) on that row. You can edit the information on the screen, or if you have multiple errors, you may choose to cancel your current import, go back to fix the errors in your source file, and begin the import process again with your updated file.
-
Make any edits to the data on the screen, and when you are satisfied with the data, make sure the check box is selected for each item you want to import. REMEMBER THAT AN ITEM IMPORT WILL UPDATE ANY INFORMATION THAT HAS CHANGED FOR EXISTING ITEMS.
-
Click Import Item List. A message appears, indicating the number of items you are about to import. Click Yes to start the import.
-
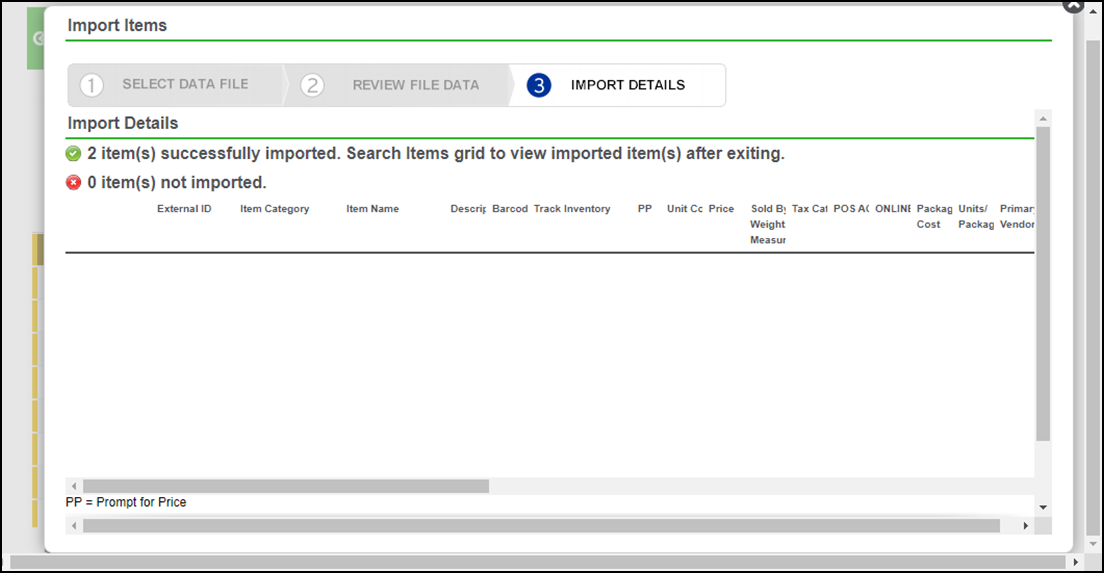
When the import is finished, the Import Details screen displays the results of the import, including the number of items that were successfully imported and the number of items that could not be imported (these are usually duplicates).
-
Review the inventory records that were not imported, so you can make the necessary corrections to your file and import them again.
-
Click Exit at the bottom of the screen to close the Import Items screen.
-
Click refresh icon to display the newly-imported items.
Using price embedded bar codes
Price embedded bar codes are bar codes that have a price built into them. They are commonly used in markets and specialty stores for items purchased by weight, such as meats or cheeses, or for items received in bulk and repackaged for sale.
Price embedded bar codes can be created by weighing items on a label printing scale. This article describes steps on how to enable scanning of such barcodes on the POS.
To configure items with price embedded bar codes:
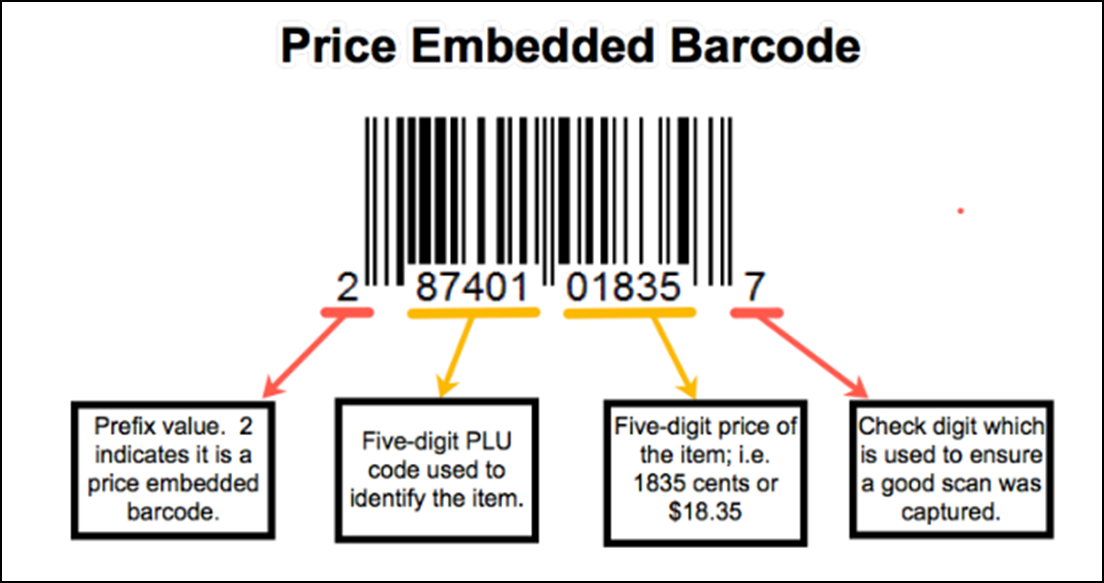
When a bar code is created using a label printing scale, it follows the standard format as shown in the above image.
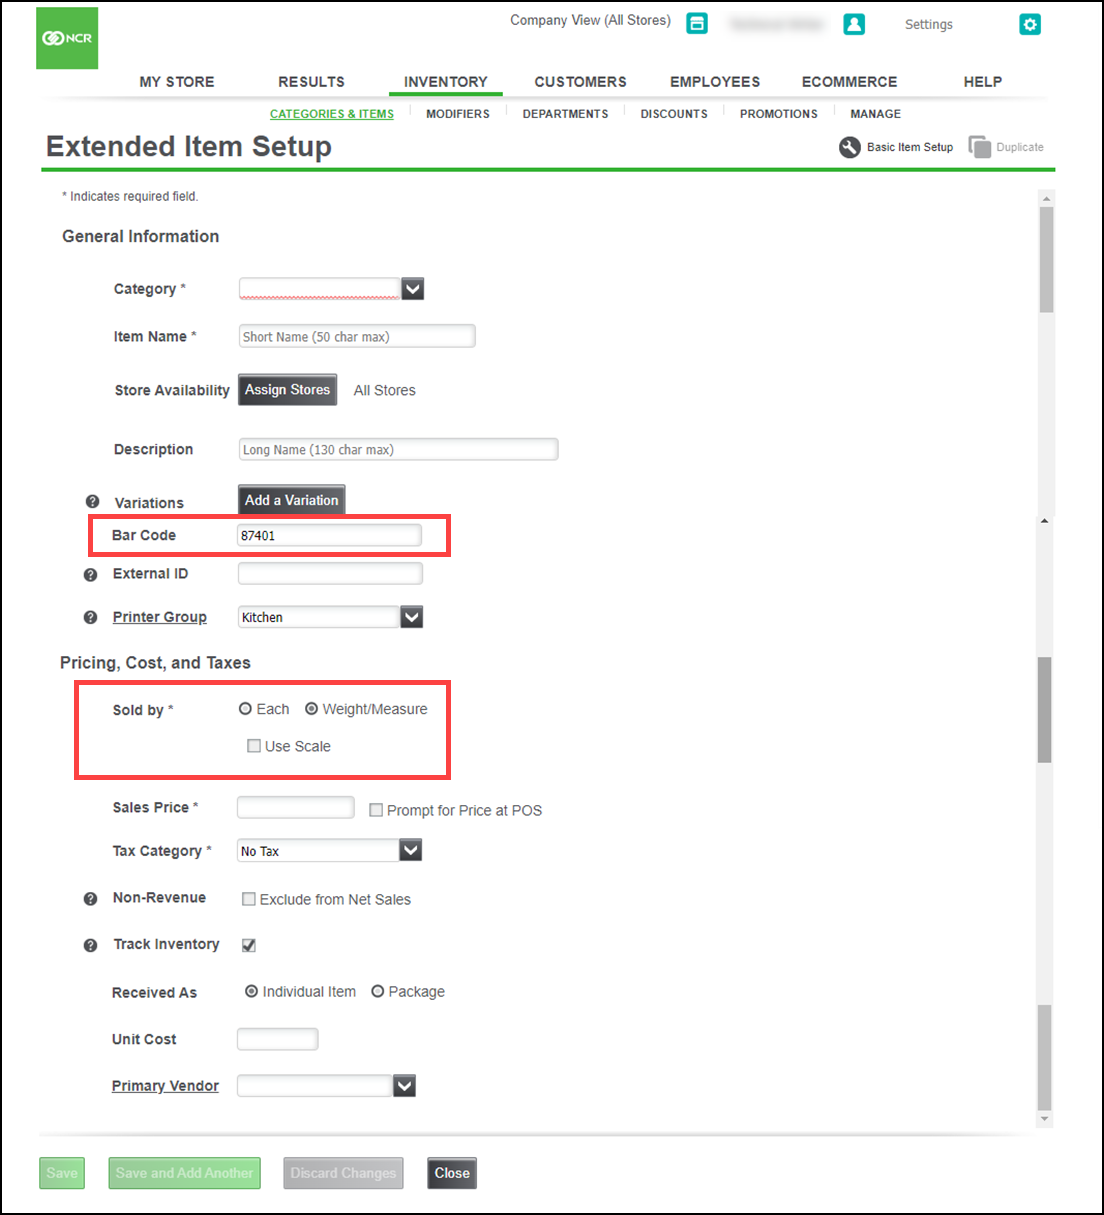
- In Extended Item Setup, enter the five-digit PLU code for the item in Bar Code.
- For Sold by, select Weight/Measure.
Scanning price embedded bar codes at the POS
If the scanned bar code starts with 2, the POS identifies it as a price embedded bar code. It will use the PLU code to identify the item and the item is added to the ticket using the encoded price. The weight of the item is determined by dividing the price embedded in the bar code by the item price configured in the Back Office.
Note: If the bar code does not start with a 2, if an item match cannot be found using the PLU, or if the item is not configured as a weighted item, the POS assumes the bar code is a regular bar code (not price embedded) and tries to find an item configured with the full bar code. If an item is not found, a prompt appears to add a new item or link the bar code to an existing item, as normal.
Reference documentation:
Refer to the following related documents for additional information.
Looking for resources or help with Silver? Click here.