Working with schedules
Use Schedule to create schedules for employees to work for the current and future weeks, depending on business requirements. You can create, edit, and delete employee schedules to ensure the optimal utilization of resources and gain maximum productivity with ease.
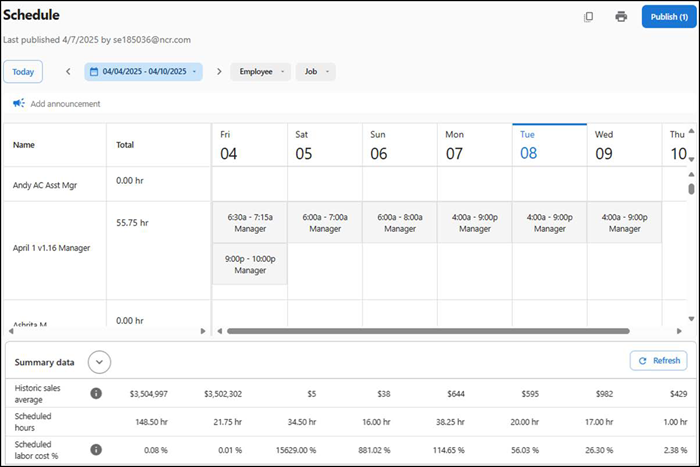
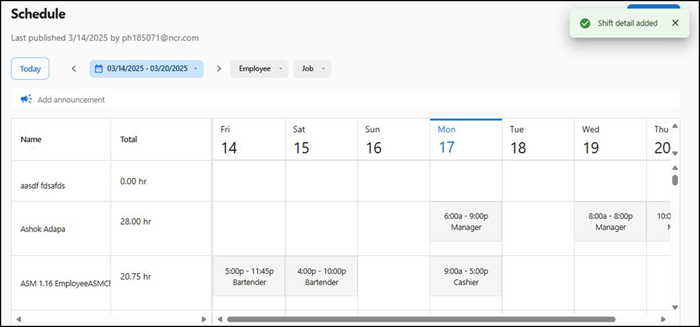
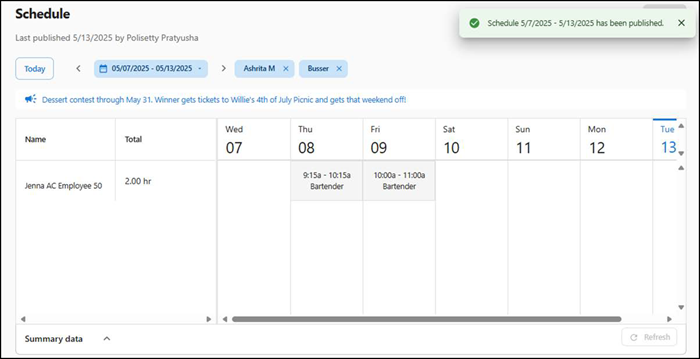
The schedule is a calendar-based user interface that helps you view schedules of all employees within a single screen and allows you to schedule and view shifts for a specific day or multiple days of a week. The list of active employees appears under the ‘Name’ column and the total number of hours worked for the current week for that employee appears under the 'Total' column. For example, in certain jurisdictions, the organization must schedule shifts up to 14 days in advance. This helps you know which employees are assigned to a shift and their working hours.
Understanding the Schedule screen
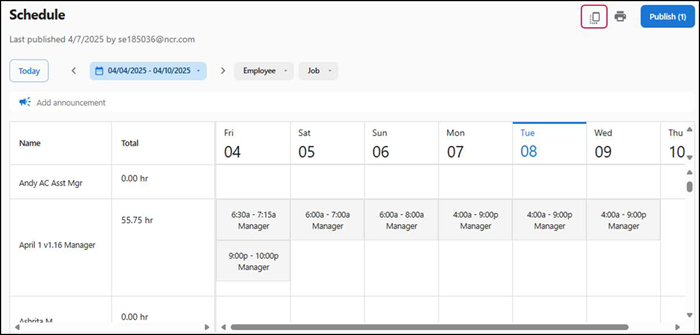
The following image and table describe the 'Schedule' screen:

| Column | Description |
|---|---|
| Today | View the schedule for the current day (today). |
| Date picker | Navigate between weeks. |
| Calendar | Open the calendar control to select a week. |
| Employee | Select a specific employee to plan a schedule. You can scroll through the list of available employees who are assigned to the selected job or you type a specific employee name. Related Information: Ensure the manager has approved the employee record. |
| Job | Select a job. Upon selection, the employees assigned to the corresponding job appear in the schedule viewer. Related Information: Ensure the jobs are already defined in the 'jobs configuration' screen. |
| Add announcement | Add an announcement to a schedule.Example 'Desert contest this week.' |
| Schedule viewer | Schedule viewer (calendar view of a specific week). The calendar view lists the following details: .
|
| Adding a shift | Hover over the calendar to view the Add Shift option. Use this option to create new shifts. Related Information: To understand how to create shifts, see "Adding a shift." |
| Cell in Schedule table | Indicates the shift and job currently assigned to the employee. |
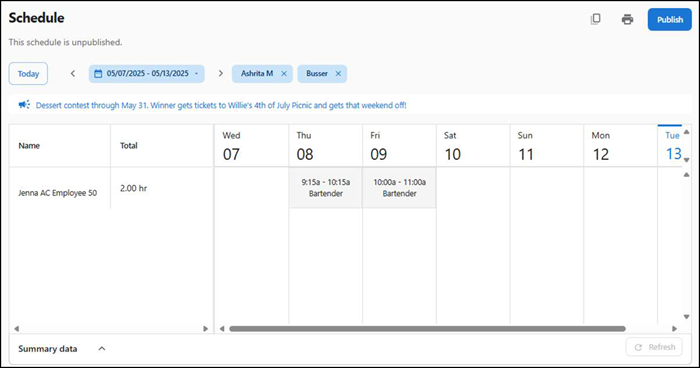
| Summary data | View the summary information for the past six weeks under Historic sales average, Scheduled hours, and Scheduled labor cost %. |
| Publish | Publish the shift calendar to employees. |
Selecting a schedule week
The schedule includes the employee schedule data, so the manager knows who is working on each shift, what time they enter and leave and where in the restaurant they will be working.
A manager creates, views, publishes, and prints the weekly schedule based on the date selection. Also, ASM provides you with the weekly employee schedule which helps in calculating and displaying the daily/weekly hours by employee. This helps you to understand if you are properly distributing the hours to your employees and to meet staffing needs for the restaurant while adding employee weekly schedule shifts.
Also, you can view:
- The historical net sales average in the associated day-of-week (column) this helps as a reference while scheduling.
- A weekly total of historical net sales, this helps in understanding your average total sales and the labor percentage, and you can decide if your scheduling meets your budget constraints.
-
Select Labor > Schedule. The 'schedule' screen appears.
-
Perform any of the following to navigate to the schedule week:
- Select Today to display the schedule for the current week with the current day selected. For example: If today is 'Wednesday,' the date range appears for the current week with Wednesday selected.
- Select < and > to move one schedule week at a time, forward or backward.
- Select the range from the calendar picker.
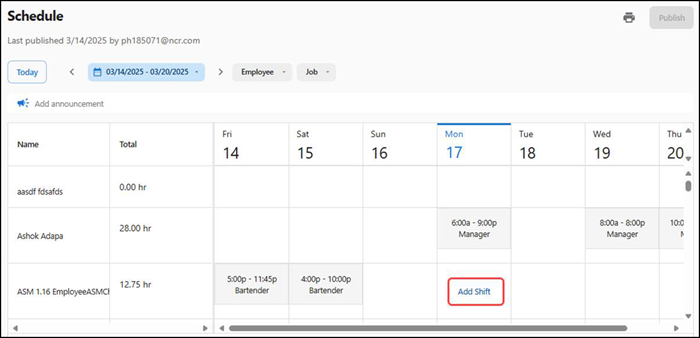
Adding a shift
A manager creates shifts and specifies the employees to work for the shift. When you create a shift, you select the job, define the shift timing, define the break timing, and add any additional information to communicate to the employee.
To add a shift:
-
Select Labor > Schedule. The 'Schedule' screen appears.
-
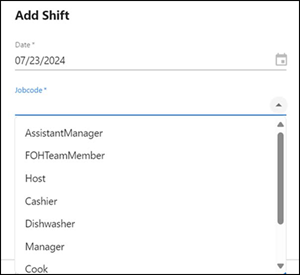
Locate the employee in the list, hover over the date to the right, and click Add Shift. The 'Add Shift' screen appears as a pop-out with the selected date.
-
Select a job from the 'Job' drop-down list.
-
Select the start time and end time for the shift using 15 minutes intervals (00, 15, 30, 45).
-
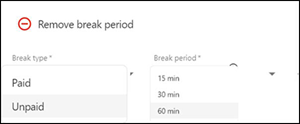
Click Add break period. This is necessary for regions that require employees to take breaks.
-
Select one of the following break types:
Paid — Employee is paid if the break is taken. It is sometimes referred to as a 'rest break.'
Unpaid — Employee is not paid if the break is taken. It is sometimes referred to as a 'meal break.'
-
Select the duration of minutes for which the employee is allowed to take a break. The predefined break periods are 15, 30, and 60 (in minutes).
-
Enter the start time and end time for the break using 15-minute intervals (00,15, 30, 45).
-
To add additional breaks, repeat steps 5 through 8.
Note: Click Remove break period to remove any breaks you added.
-
Click More options to enter any notes to communicate to the employee, such as 'You're working the VIP room for this shift so look sharp.'
-
Click Save. The shift is added to the schedule week.
Filtering shifts by job or employee
You may want to view the shifts assigned to a specific employee to determine if the employee is approaching overtime for the week. You can also view the shift assigned with a specific job code to ensure that you have each area of the restaurant covered.
- Select Labor > Schedule. The 'Schedule' screen appears.

- To display all shifts assigned to a job, select the job from the 'Job' drop-down list.
- To display all shifts assigned to an employee, select the employee from the 'Employee' drop-down list.
Publishing a schedule
When you are finished with a schedule, click Publish in the top right corner to publish and finalize the schedule. Publish exposes the shift to the employees for the first time. Until then the schedule is in a 'draft' state and managers can make all the edits they need. You can return to the schedule, make changes, and republish, as needed.
To publish a schedule:
- Select Labor > Schedule. The 'Schedule' screen appears.
- Click Publish at right top corner of schedule screen.
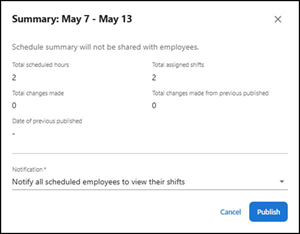
- Click Publish. A confirmation detail appears on the page publishing the schedule.
Copying a schedule
The 'copy schedule' feature for a manager is efficient, saving time by duplicating existing schedules. It is convenient, simplifying the process of creating new schedules with ease. Additionally, it ensures consistency across different shifts, making it user-friendly and flexible for quick adjustments and modifications.
To copy a schedule:
- Select Labor > Schedule. The 'Schedule' screen appears.
- Click the copy icon at the top corner of the screen. A confirmation screen appears as a pop-out with the selected date.

- Click Apply. The system copies the schedule for the current-selected week and also all future schedule weeks as required.
Adding an announcement to a schedule
An announcement is a generic message a manager wants to communicate to all employees during a shift. For example, you can broadcast an announcement to all employees working a shift that a VIP customer is visiting the restaurant.
To add an announcement to a schedule:
- Select Labor > Schedule. The 'Schedule' screen appears.
- Click Add announcement. The 'Announcement' screen appears.
- Type the message, up to 150 characters in length.
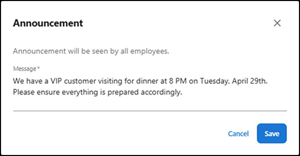
- Click Save to send the announcement.
Return to "About labor management," or continue to "Viewing employees on a shift."