Working with promotions
Promotions are an advanced form of discounts you configure in Back Office to promote specific products and drive sales in your restaurant. Examples of promotions are:
- Buy one, get one free
- Buy three for the price of two
- Buy 10 items and get each at $1 off
Promotions and discounts: What's the difference?
A promotion automatically applies to an item as you add the item to a ticket based on the rules and promotion rankings you define in Back Office; you have to manually apply a discount to an item or ticket.
You cannot apply both a promotion and a discount to an item at the same time. Promotions are item level discounts (not ticket level). If you attempt to manually apply a discount to an item to which a promotion has already been applied, you will receive a message indicating the promotion has already been applied. If you continue and apply the discount to the item, the promotion is removed and the ticket is recalculated for promotions, excluding that item.
How are promotions applied?
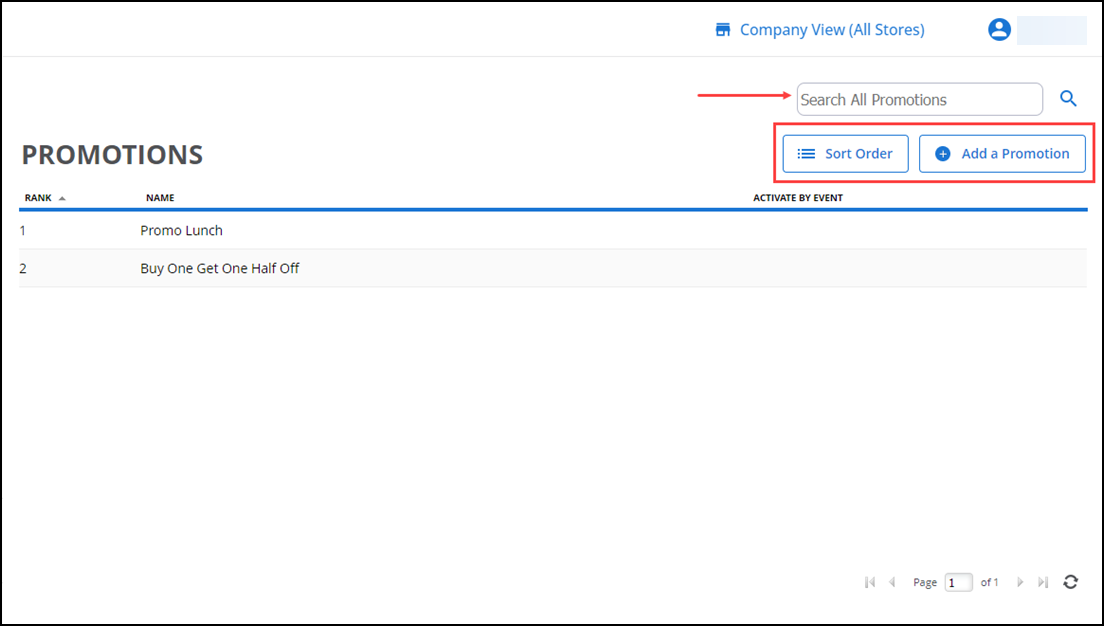
The system applies promotions to the ticket in the order you rank them in Back Office. The highest ranked promotion is applied first, then the next highest ranked promotion for which the remaining items on the ticket qualify is applied, and so on. You can change the rank of a promotion by clicking 'Sort Order' and assigning a number to each active promotion (1 being the top ranked).
- Items included in multiple promotions — An item can only be used in one promotion at a time. If an item qualifies for more than one promotion, the promotion ranking determines which promotion to apply to the item.
- Different-priced items — If items included in a promotion are different prices, the promotion discount is always applied to the lowest-priced item.
- Grouping items — First, items that qualify for the highest ranked promotion are grouped together. Then this group of items is sorted by price from highest to lowest. The promotion discount is then applied to the correct item. The process is repeated for all remaining items on the ticket that did not qualify for the first promotion using the next highest ranked promotion. Example: Buy any three items for the price of two.
Adding a promotion
-
Log in to Back Office using Company View (All Stores) or select a specific store.
-
Select Menu > Promotions.
-
Click Add a Promotion.
-
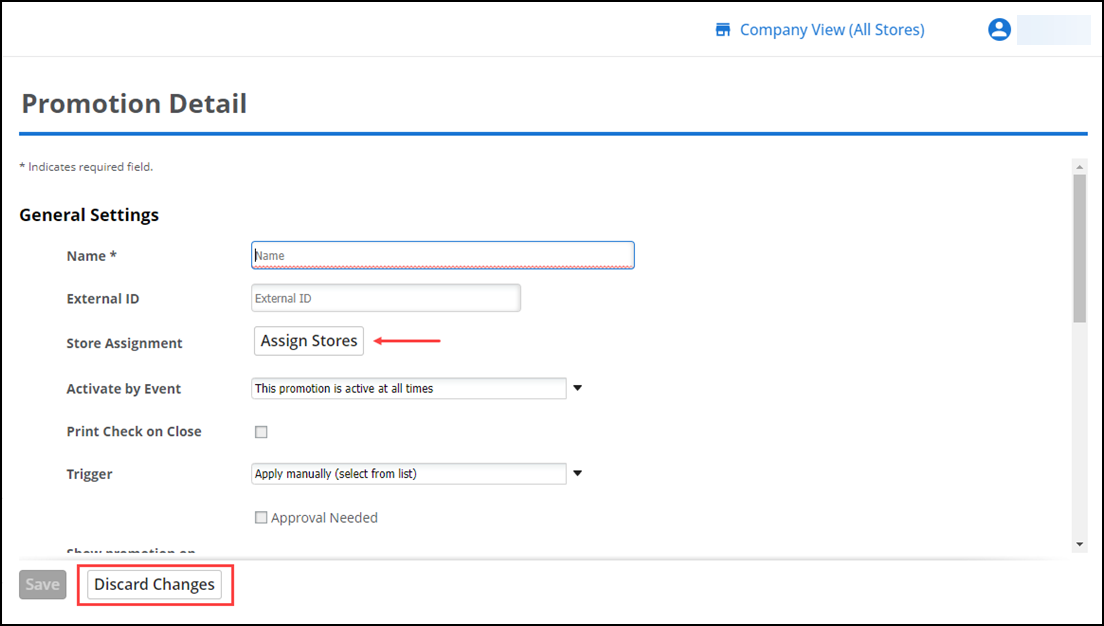
Under the 'General Settings' group bar, type a descriptive name for the promotion. The name appears on the guest check screen after applying the promotion.
-
Type an external ID (Optional) or leave this blank to have the system automatically assign an external ID.
-
If using Company View (All Stores), click Assign Stores (Optional) to choose the stores for the promotion.
-
Select the event that activates the promotion from the Activate by Event drop-down list. You create the events that appear in the list using Menu > Events.
-
Select Print Check on Close (Optional) to print a duplicate receipt when you close the check.
-
Select the method to use for applying the promotion from the 'Trigger' drop-down list. Your choices are:
Apply manually — Requires you to select the promotion from a list on the POS. Only the promotions that qualify appear for an employee to select.
Detect automatically — Designates the POS system automatically applies the promotion when the guest check meets the requirements of the promotion.
Scan barcode — Requires you to scan a barcode to apply the promotion. Selecting this option exposes additional options and requires the configuration of a barcode range. The following rules apply:
- The barcode range must have from 1 to 20 alphanumeric characters.
- The length of the start and end of the barcode strings must be the same.
- The barcode end range must be the same or greater than the barcode start range.
- The barcode ranges do not need to be unique across promotions.
-
Select Approval Needed (Optional) to require a manager to authorize the promotion on the POS. This option is only available when you select 'Apply manually' or 'Scan barcode' as the promotion trigger.
-
Select Show promotion on Activity Summary charts (Optional) to include the discount in the totals on the Activity Summary page. Clear this option to not have the discount calculated as part of the totals. For example, clear this option if you do not want employee discounts to appear as part of the Discounts and Promotions calculation on the Activity Summary page, to give you a more accurate reflection of the effectiveness of your discounts and promotions.
-
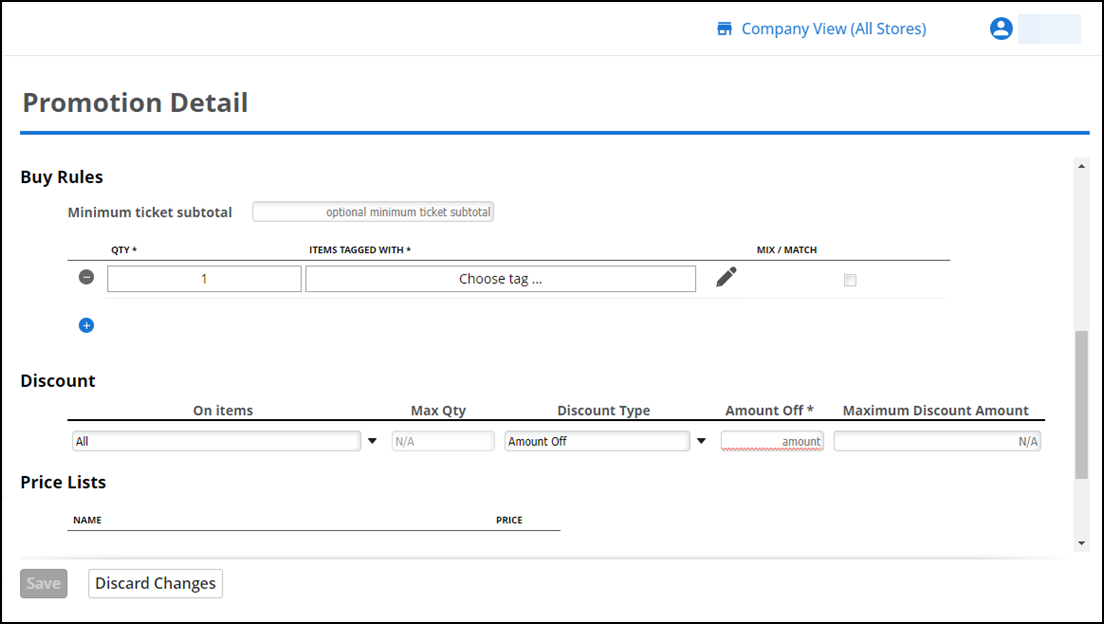
Under the 'Buy Rules' group bar, enter the minimum ticket subtotal required to qualify for the promotion. Leave this blank, if you do not require a minimum purchase subtotal.
-
Define the first rule for the promotion:
- Update the quantity, if greater than 1.
- Select the tag containing the items for the promotion. You define the tags that appear in this drop-down list using Menu > Tags.
- Select Mix / Match (Optional) to allow items meeting the conditions of the rule to be different. For example, in a sandwich promotion, if Mix / Match is cleared, both sandwiches must be the same. Mix / Match is selected by default. If the rule quantity is '1,' then Mix / Match is not an available option.
- Click the plus symbol (+) to add additional rules for the promotion. For some promotions, you may have multiple rules, particularly if you are creating a promotion with items from different tags.
-
Under the 'Discount' group bar, select the rule for which the discount applies from the On Items drop-down list. The system defaults to All.
When you select a specific rule for the discount, it only applies to that rule. For example, you have a BOGO promotion of buy one sandwich get one drink free. You would apply the discount to the rule containing the drink tag.
-
Select the quantity for which the discount applies from Max Qty. For example, if you are providing a BOGO coupon, the discount applies to one item. If you are providing a 'Buy four shots, get two at half off,' the discount applies to '2' items.
-
Select the discount type from the drop-down list. Your choices are:
Percent Off — To provide a discount in the form of a percentage, such as 50% off.
Amount Off — To provide a discount in the form of a dollar amount, such as $2.00 off.
Set Unit Price — To provide a discount as a set sales amount, such as $7.50 to cause the system to charge a set amount for the items.
-
Type the discount amount in 'Amount Off.'
-
Type the maximum discount amount for the item. This is only required when using 'Percent Off.' A maximum discount amount provides the limit you are willing to discount. For example, you create a promotion for 50% off and you add a maximum discount amount of $10. If the promotion items total $15, the discount is $7.50. If the promotion items total $30, the discount is $10 rather than $15, since $10 is the maximum dollar amount to discount.
-
Click Save.
Configuring a Buy One Get One (BOGO) promotion
When configuring a Buy One Get One (BOGO) promotion, it is common practice to apply the discount to the lowest priced item that qualifies for the promotion. The following procedure discusses how to configure the BOGO for this scenario.
-
Refer to steps 1 through 11 detailed in the section Adding a promotion.
-
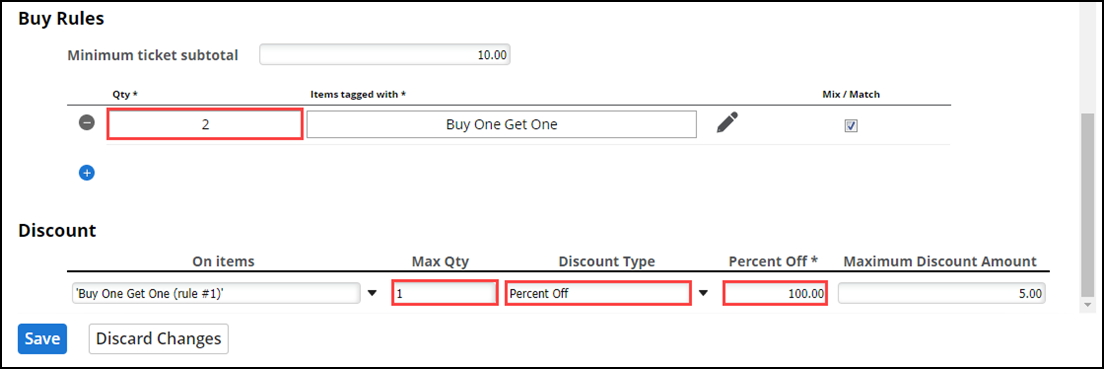
Under the Buy Rules group bar:
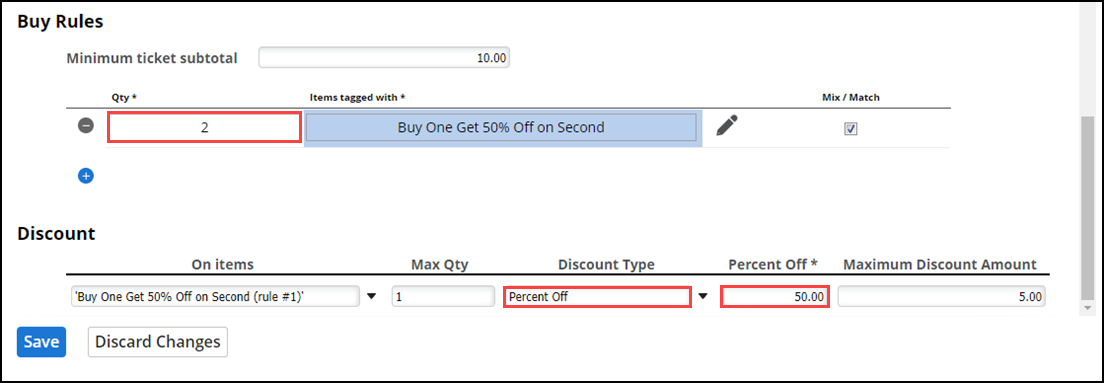
- Qty: Specify the number of items you must add to the ticket to meet the requirements of the BOGO. For example, to apply the Buy One Get One promotion, type 2 in Qty (i.e. the buy items quantity + the free items quantity). Similarly, to apply a Buy Two Get Two promotion, you must type a 4 in Qty.
- Items tagged with: Select or create a tag from the drop-down list.
- (Optional) Mix / Match: Select to allow items meeting the conditions of the rule to be different. For example, in a sandwich promotion, if Mix / Match is not selected, both sandwiches must be the same. This is selected by default. If the rule quantity is '1,' then the Mix / Match option is not available.
-
Under the Discount group bar:
-
On Items: Select the rule for which the discount applies from the drop-down list. The system defaults to All.
-
Max Qty: Enter the quantity of items for which the discount applies. For example, the discount applies to '1' item for a BOGO coupon. Similarly, if you are providing a 'Buy four shots, get two at half off,' the discount applies to '2' items.
-
Discount Type: Select the discount type from the drop-down list. Your choices are:
Percent Off — To provide a discount in the form of a percentage, such as 50% off.
Amount Off — To provide a discount in the form of a dollar amount, such as $2.00 off.
Set Unit Price — To provide a discount as a set sales amount, such as $7.50 to cause the system to charge a set amount for the items.
-
Percent Off: Enter the discount percentage as 100. In this scenario, when you add two items to the ticket, the price of the second item is discounted 100 percent. To apply the promotion for buy one get 50% off for the second item, enter the discount percentage as 50.
-
Maximum Discount Amount: Enter the maximum discount amount for the item. This is only required when using 'Percent Off.' A maximum discount amount provides the limit you are willing to discount.
-
-
Click Save to save the promotion details.
Editing a promotion
- Log in to Back Office using Company View (All Stores) or select a specific store.
- Select Menu > Promotions. The PROMOTIONS screen appears.
- Select the promotion to view the Promotion Detail screen.
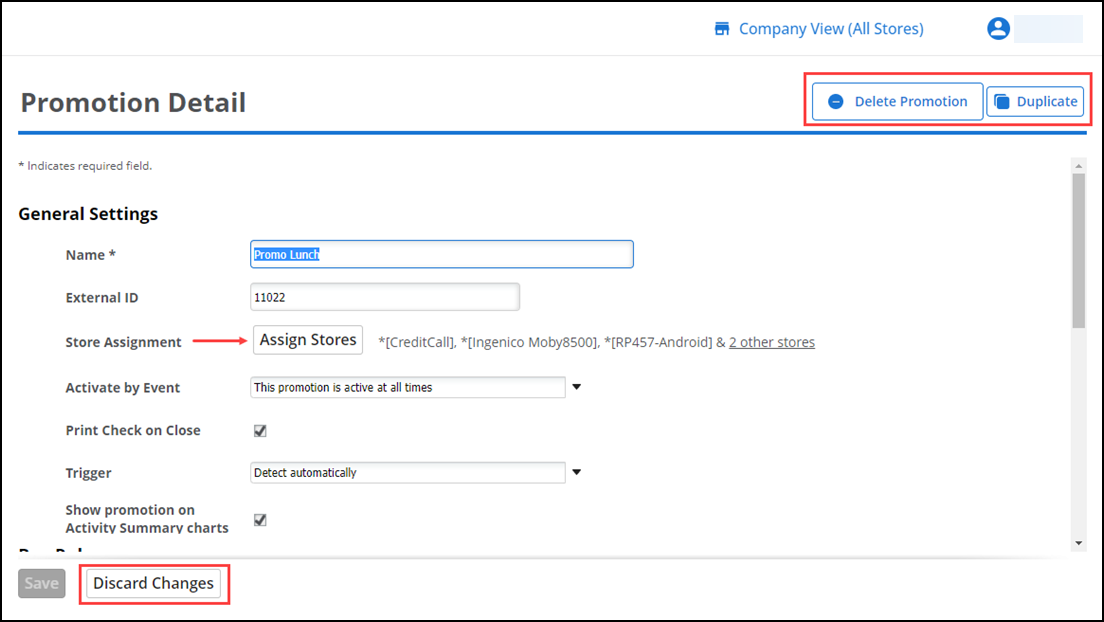
- Make the necessary changes to the promotion.
- Click Save.
Deleting a promotion
- Log in to Back Office using Company View (All Stores).
- Select Menu > Promotions. The PROMOTIONS screen appears.
- Select the promotion to delete.
- Click Delete Promotion. A confirmation to remove the promotion appears.
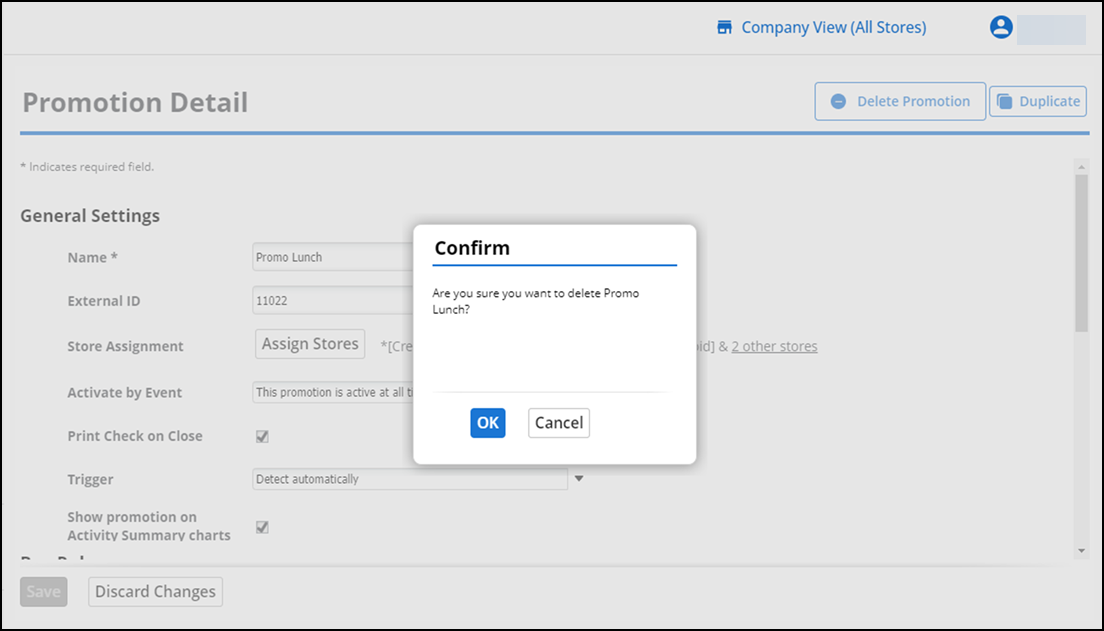
- Click OK to delete the promotion.
Duplicating a promotion
- Log in to Back Office using Company View (All Stores) or select a specific store.
- Select Menu > Promotions. The PROMOTIONS screen appears.
- Select the promotion to duplicate.
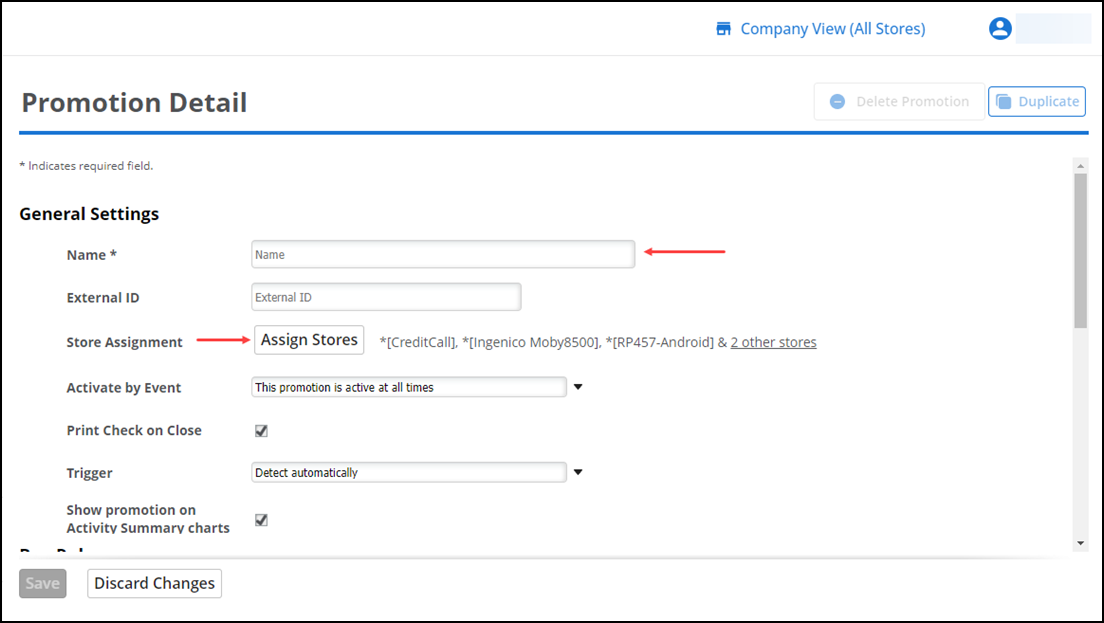
- Click Duplicate in the upper right corner. The newly created promotion has all fields pre-populated except for Name and External ID.

- Edit the details for the discount and click Save.
Sorting promotions
After you create promotions, sort the order in which the POS attempts to apply them. The POS stops searching for promotions once it finds the first promotion that applies to the guest check.
When using Company View (All Stores), additional rules apply when sorting promotions. At the company level, you can sort all promotions. At the store level, you can only sort promotions created at the store level.
- Log in to Back Office using Company View (All Stores) or select a specific store.
- Select Menu > Promotions. The PROMOTIONS screen appears.
- Click Sort Order.
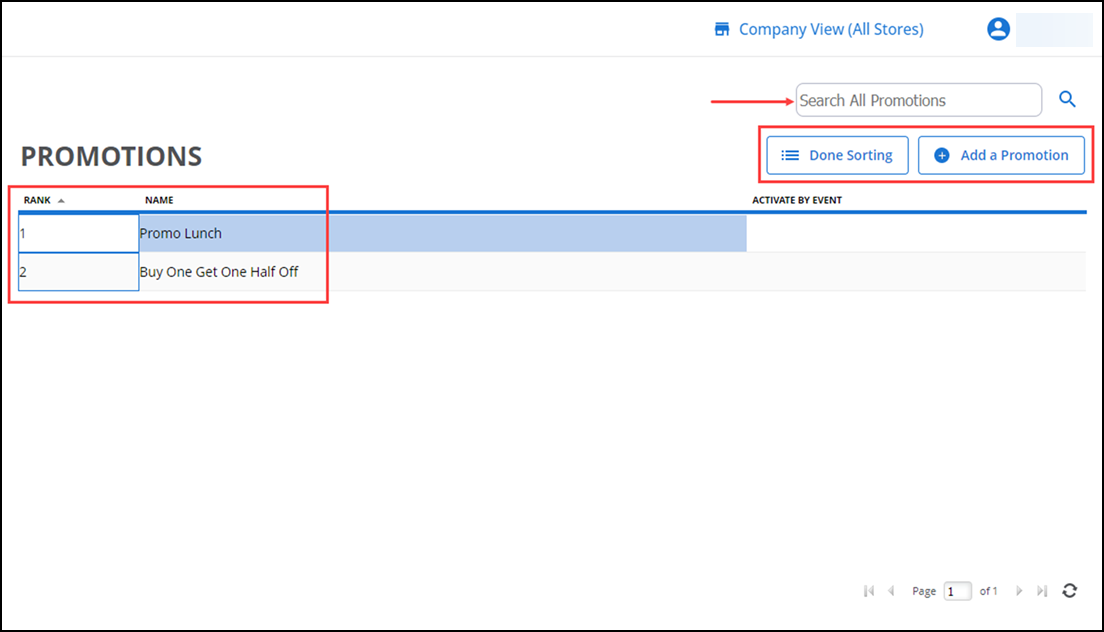
- Enter the rank in which to apply the promotion to the order, with a rank of "1" being first in line.
- Click Done Sorting.
View video
Please allow time for the "Creating Promotions in Aloha Cloud" video to load.