Configuring POS device settings
The POS application contains configuration settings specific to each device. Here you can connfigure the POS device for different hardware devices like printers, cash drawers, scales etc; If you have more than one device, it may be necessary to configure some of these settings on each device.
This document discusses the following:
- Accessing device settings.
- Configuring printers.
- Performing a data sync.
- Defining check close options.
- Configuring customer prompt.
- Configuring auto gratuity.
- Controlling which devices receive online orders.
- Arranging point of sale buttons.
- Installing payment gateway.
Accessing device settings
The POS settings screen can be accessed as follows.
To access device settings:
-
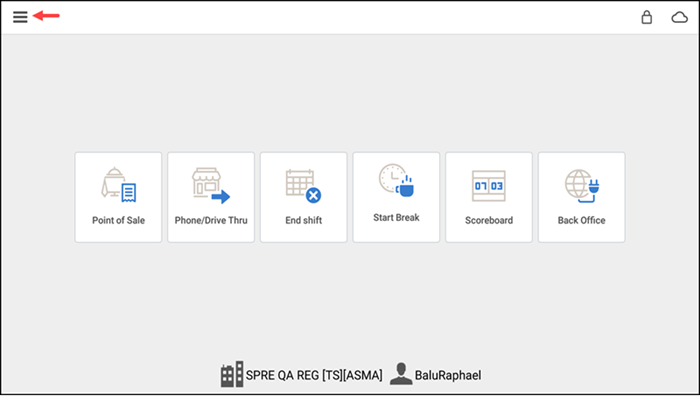
Log in to the POS.
-
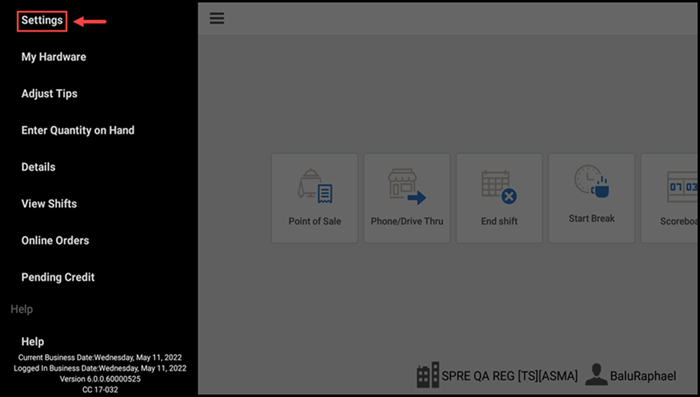
Tap the menu icon on the top left to display the slide out menu.
-
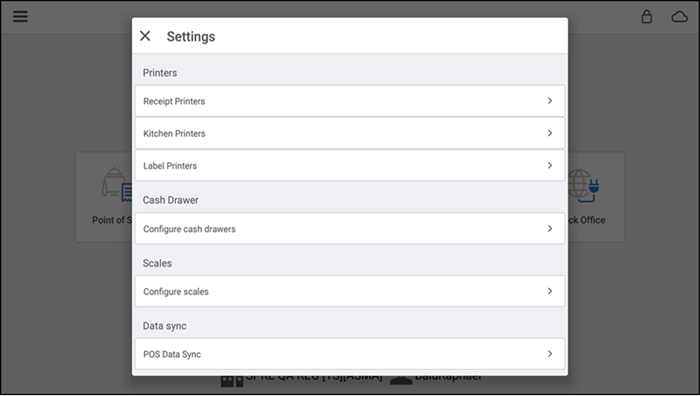
Tap Settings. If your user role allows you to access the Settings screen, the Settings screen appears and you can view and edit settings for the device.
-OR-
If your user role does not permit you to access the Settings screen, the Manager Approval Needed Screen appears.
-
An employee with sufficient permissions must enter their four-digit PIN and tap Override to continue.
Configuring printers
Use the Printers option on the Settings menu to define the receipt, kitchen, and label printers to use with the device. Prior to setting up kitchen printers, you must configure Kitchen Routing in the Back Office. See Setting up Kitchen Routing.
In some cases, for the network to recognize the printer, you must open port 9100.
To configure a device for receipt printing:
- Log in to the POS.

- Tap the menu icon on the top left to display the slide out menu.
- Tap Settings.
- Tap Receipt printers.
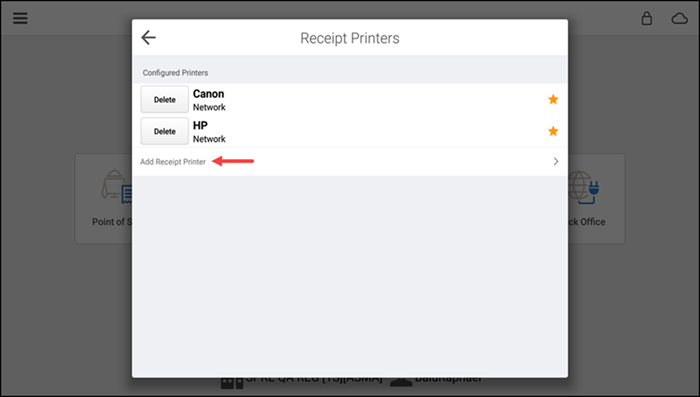
- Tap Add Receipt Printer. The Add Printer screen appears.
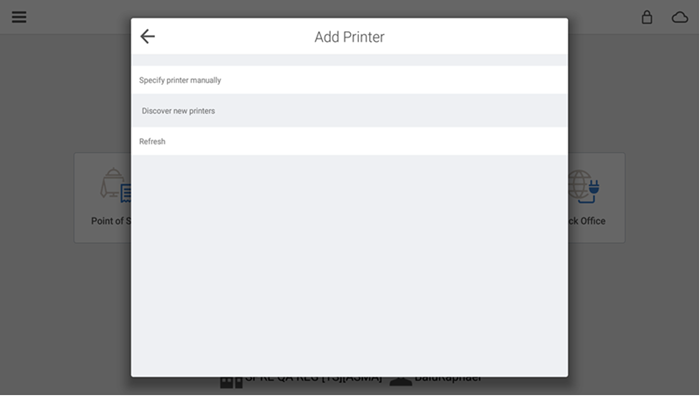
- Tap a listed printer or Refresh, and then tap the desired printer. If your printer does not appear, you may need to specify the printer manually. See the section Specifying a printer manually.
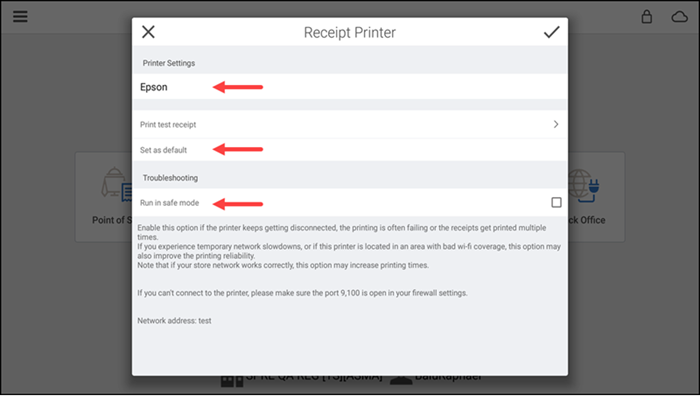
- Tap the printer to use as a receipt printer to display the 'Receipt Printer' screen.
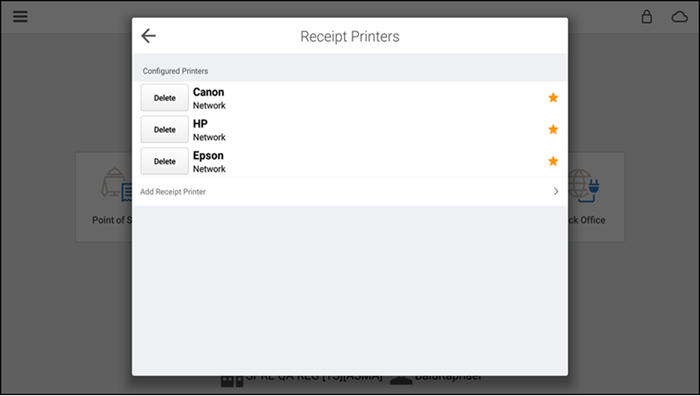
- Type a name for the printer and the newly added printer appears in the Receipt Printers list.
- Select Set as default to identify the receipt printer as the default printer.
- (Optional) Under 'Troubleshooting,' select the Run in Safe Mode to improve printing stability. Only enable this feature if you experience temporary network slowdowns, the printer often fails, or receipts get printed multiple times. If your store network works correctly, this option may increase printing times.
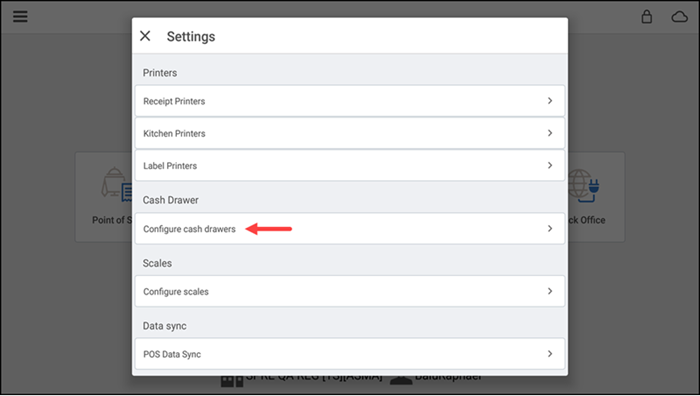
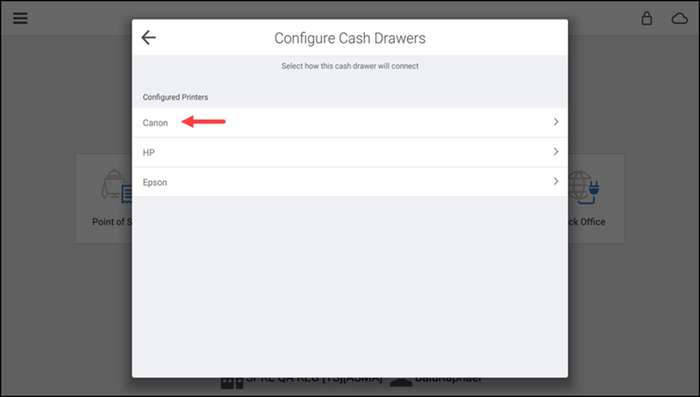
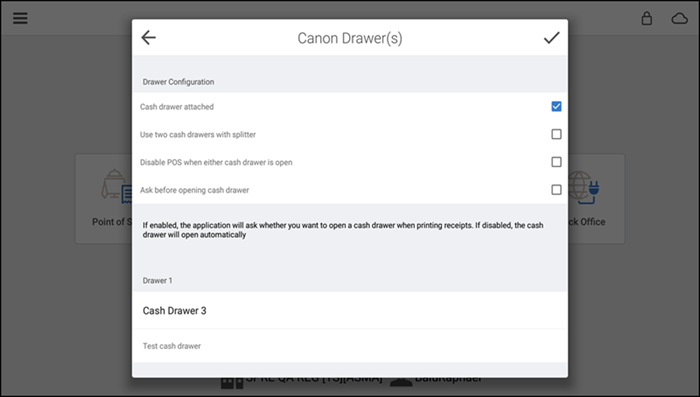
- Under 'Cash Drawer,' select the Cash drawer attached to identify the selected receipt printer as connected to the cash drawer, if necessary. When you activate the attached cash drawer, the system opens the cash drawer and a menu prompt appears to confirm the successful opening of the cash drawer. It is not necessary to have a cash drawer attached to a receipt printer; however, you will need to manually open a cash drawer.
When you associate a cash drawer to a receipt printer, the cash drawer, unless otherwise configured, automatically opens when you close a cash transaction.
- Type a unique name for the cash drawer.
- Tap check mark to exit the 'Configure Cash Drawers' screen.
- Tap back arrow to return to the Settings screen.
To configure a device for kitchen printing and label printing:
-
Log in to the POS.

-
Tap the menu icon on the top left to display the slide out menu and tap Settings.
-
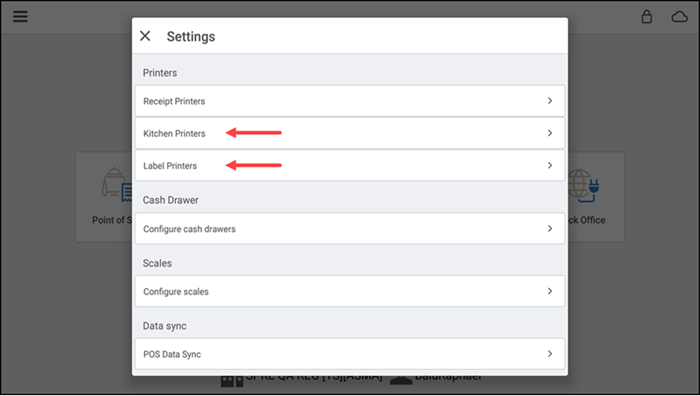
Tap Kitchen Printers or Label Printers.

-
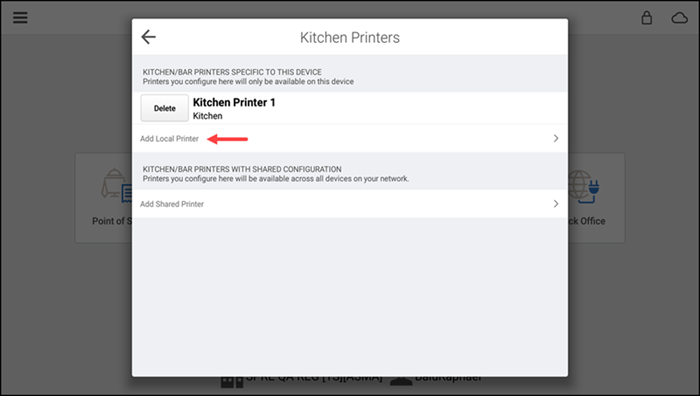
Tap Add Local Printer to configure the kitchen printer ONLY for the device on which you are working, or tap Add Shared Printer to configure the kitchen printer as available for all devices on your network.
-
Tap a listed printer or Tap Refresh, and then tap the desired printer.
-
If your printer does not appear, you may need to specify the printer manually. See the section Specifying a printer manually.
-
Tap the printer you want to use as a kitchen printer.
-
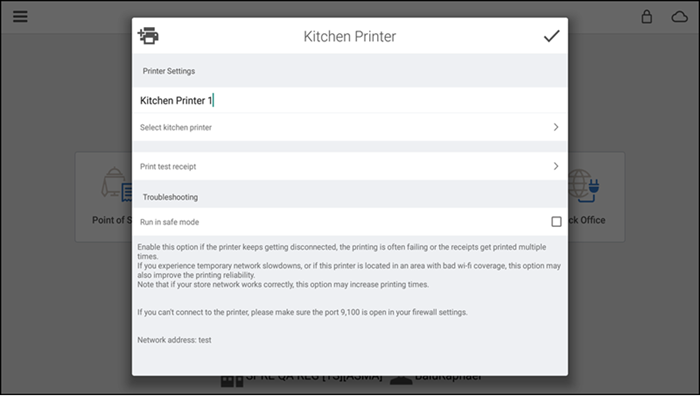
Tap Select kitchen printer.
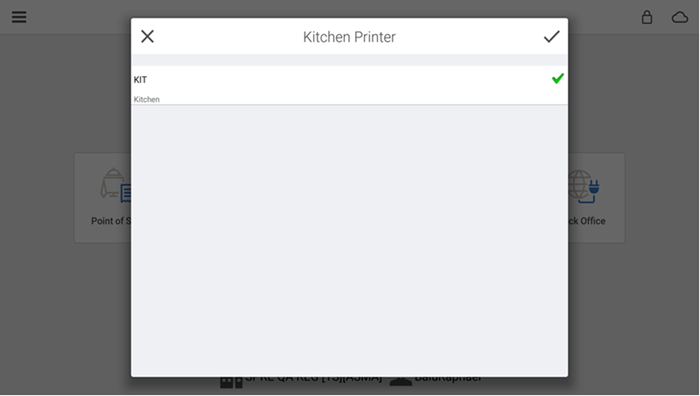
-
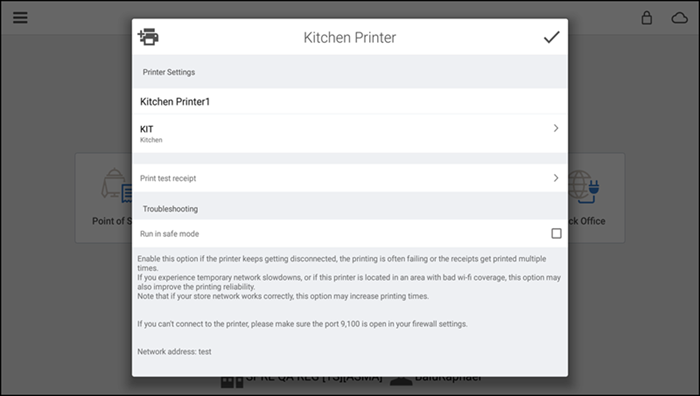
Tap the kitchen printer device to use for the printer, and then tap check mark. The system auto-fills the name of the printer with the kitchen device you selected.
Note: If you chose 'Local Printer', you have the option to enter a unique name for the kitchen printer.
-
Under 'Troubleshooting,' select Run in Safe Mode to improve printing stability. Only enable this feature if you experience temporary network slowdowns, the printer often fails, or receipts get printed multiple times. If your store network works correctly, this option may increase printing times.
-
Tap check mark to exit.
-
Tap back arrow to return to the Settings screen.
Specifying a printer manually
In some instances, even though you connect a printer directly to the router, your device may not automatically discover the printer. You can connect the printer to the device by manually specifying the printer IP address.
To manually specify a printer:
-
Tap the desired receipt, kitchen, or label printer.
-
Under ' Add Printer,' tap Specify printer manually.
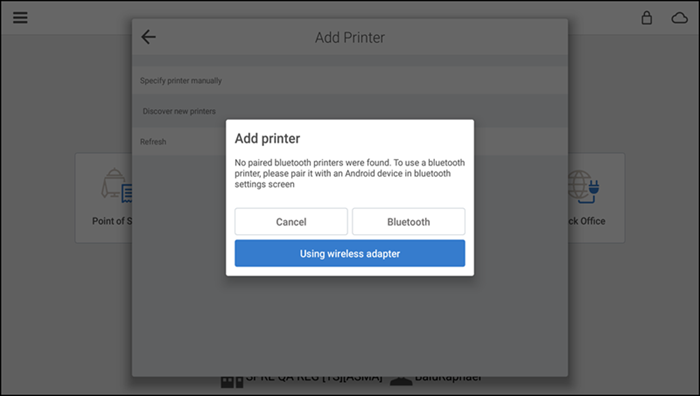
-
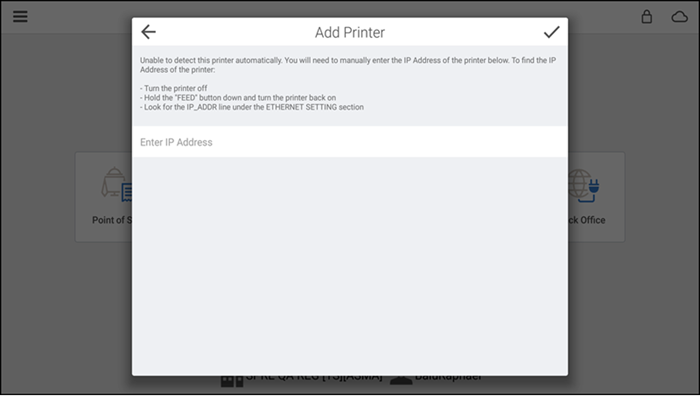
Tap Using wireless adapter. The Add Printer screen appears.
-
Locate the printer IP address.
Note: Initiate a self-test to discover the printer IP address. Turn off the printer, press and hold the FEED button on the front of the printer, turn on the printer, and release the FEED button. The printer beeps and prints a chit. Under Wi-Fi Settings, locate IPADDR to find the printer IP address -OR- in some instances, the Bixolon SRP-275ii and SRP-350 printers do not provide an IP address when initiating a self-test. To locate the printer IP address, press the Function button located in the pinhole on the back of the printer. The printer prints a chit with the IP address.
-
Enter the printer IP address.
-
Tap check mark to exit.
Performing a data sync
The system syncs data between the device and the Back Office at least every three minutes, and each time an employee logs in to application You can view the time of the last sync, the time of the next scheduled sync, and even initiate a sync between the device and the Back Office.
- Log in to the POS.

- Tap the menu icon on the top left to display the slide out menu and tap Settings.
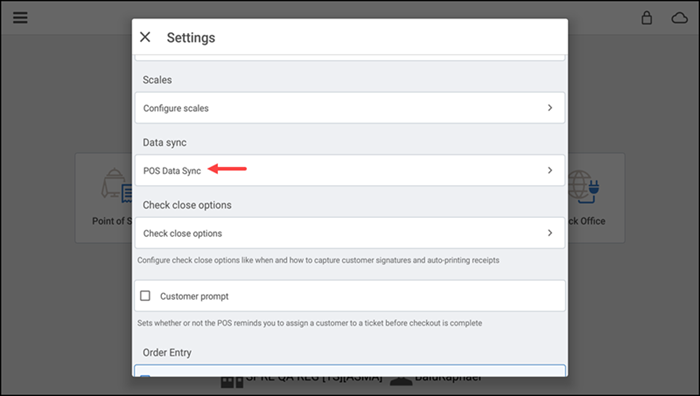
- From the Settings screen, under 'Data sync,' tap POS Data Sync. The Data Sync screen appears.
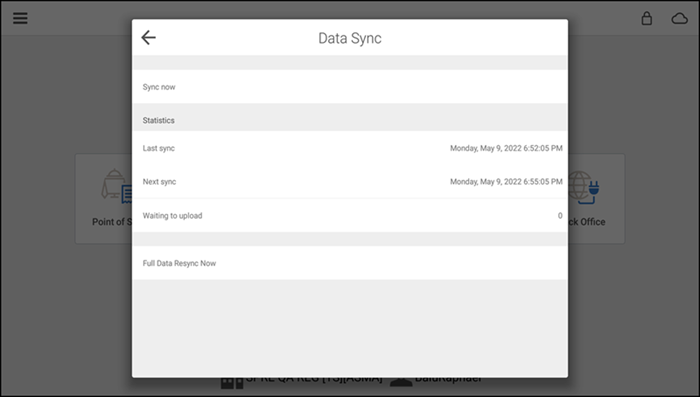
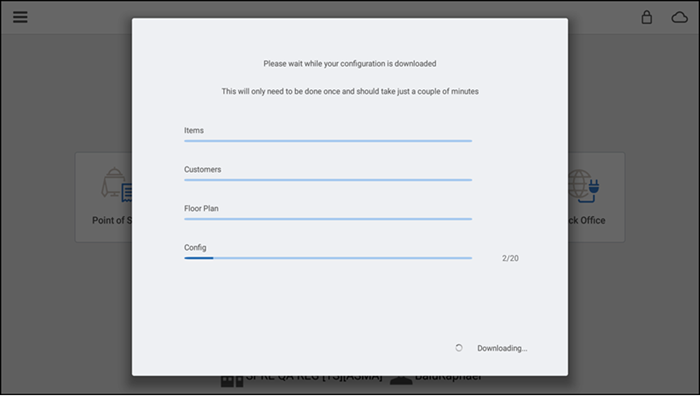
- View the data sync details, or tap Sync now to force a data sync.
- Tap back arrow to return to the Settings screen.
Defining check close options
Use check close options to define how you capture customer signatures, on printed paper or electronically on the device screen, and how you provide receipts to customers. You can set receipts to auto-print, or to provide your customers with the option of receiving their receipts in an email message, which can be a great way to capture customer information and build your mailing list.
Capturing customer signatures on printed receipts
You can configure POS application to always print a receipt for customers to sign when using a credit card to pay for their order.
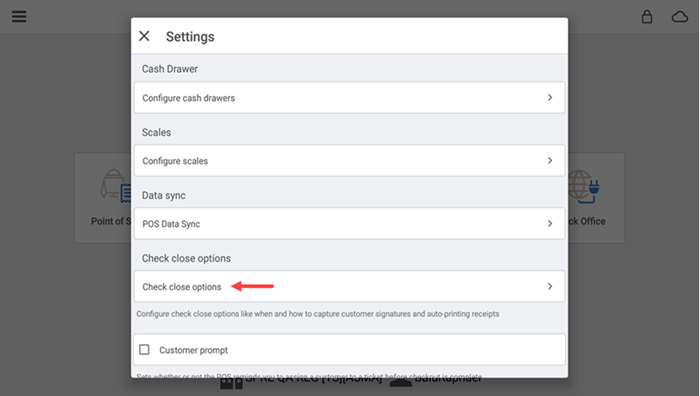
- From the Settings screen, under 'Check close options', tap Check close options.The Close Check screen appears.
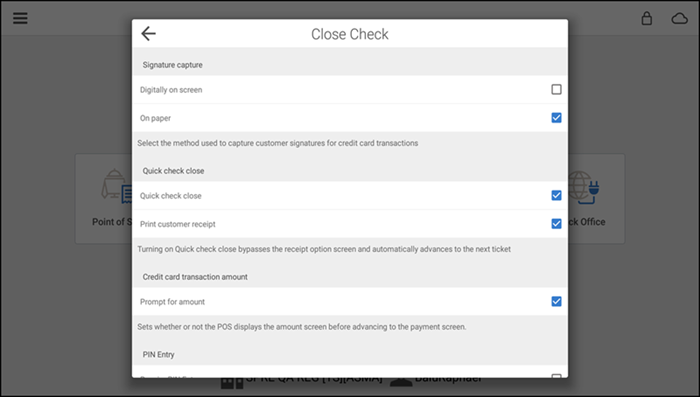
- Under 'Signature capture' select On paper check-box.
- Tap back arrow to return to the Settings screen.
Capturing customer signatures electronically
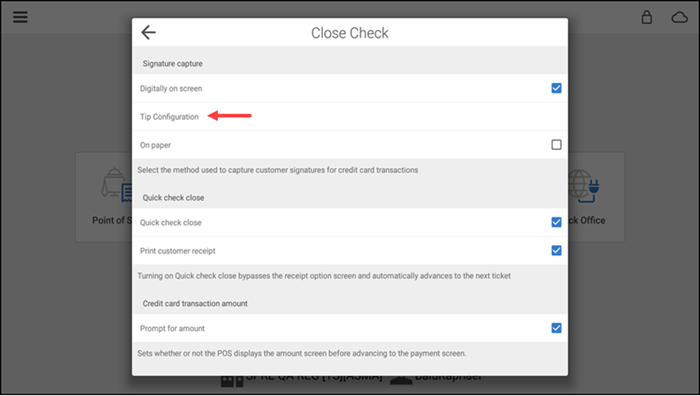
You can configure POS application to capture customer signatures electronically on the device screen when using a credit card to pay for their order.
-
From the Settings screen, under 'Check close options', tap Check close options.
The Close Check screen appears.
-
Under 'Signature capture' select Digitally on screen check-box.
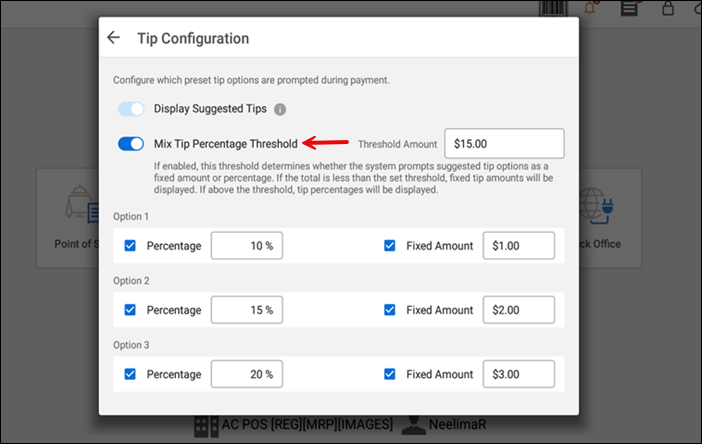
The Tip Configuration screen appears, enabling you to define up to three tip percentages or dollar amounts. You can choose between fixed dollar amount or percentage-based tips.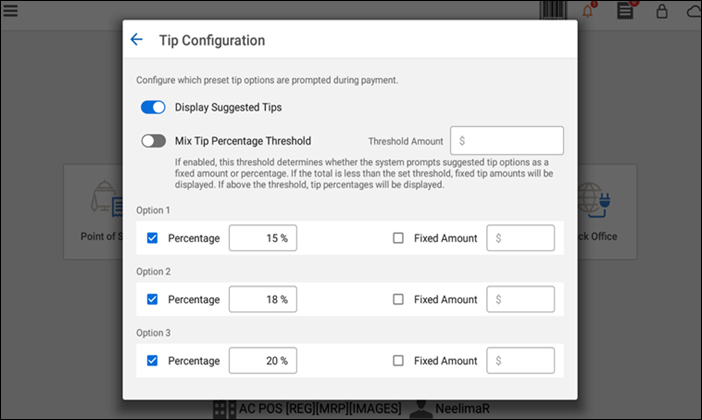
-
Toggle on the Display Suggested Tips to display both percentage and fixed amount tips.The customer can elect to provide a different tip percentage or dollar amount on the screen.
-
Select the percentage check box to change the default tip percentage amount. POS application defaults to the following percentage amounts:15%, 18%, and 20%. To turn off a percentage option, unselect the percentage check box.
To change the percentage, select the percentage check box, type a new percentage.
To use a dollar amount instead of a percentage, select Fixed Amount to the right. The system turns off the corresponding percentage button and enter a dollar amount.
-
Toggle on the Mix Tip Percentage Threshold to define a threshold. Enter the threshold amount that determines whether the system shows fixed, or percentage tips based on the guest check total. If the amount is below the threshold, the fixed tip options are displayed on the checkout screen; if it's above, percentage-based tips are shown.
-
Deselect both options to display only 'No tip' and 'Specify an amount'.
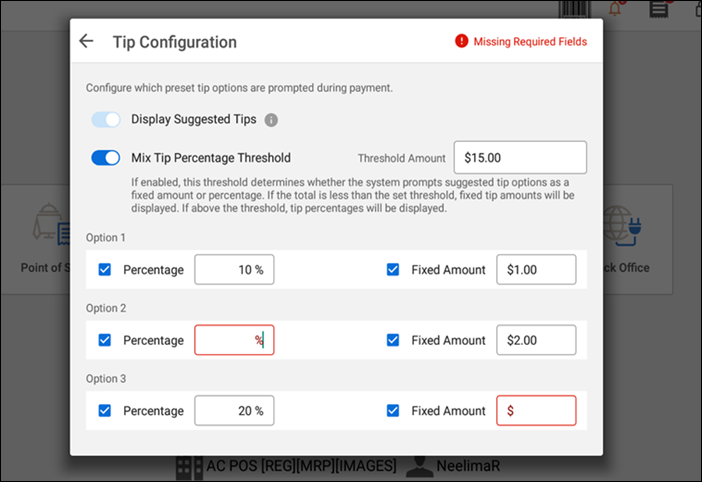
Note: If you attempt to return to the settings page without completing all required fields, a red warning message appears at the top.
Configuring the receipt option screen
POS applicatiion enables you to provide your customers options for receiving their receipts. By disabling 'Quick check close,' the Receipt screen appears when you close a guest check and provides you with the option to email, print, reprint, or not provide a customer with a receipt. When you select 'Quick check close,' the Receipt screen does not appear, and customer receipts print to the local printer when you close a guest check.
When you disable 'Quick check close,' the Receipt screen appears after you close each check.
- From the Settings screen, under 'Check close options,' tap Check close options.The Close Check screen appears.
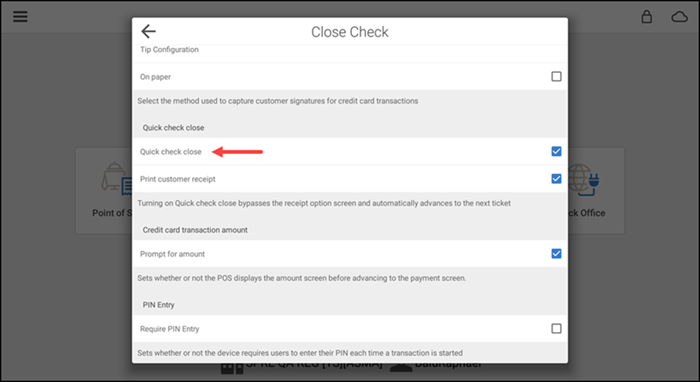
- Select the Quick check close to prevent the 'Receipt' screen from appearing and to have the system automatically advance to the next ticket. When you select 'Quick check close,' 'Print customer receipt' appears, and by default, the system enables the option -OR- Unselect the Quick check close to have the 'Receipt' screen appear when you close each guest check.
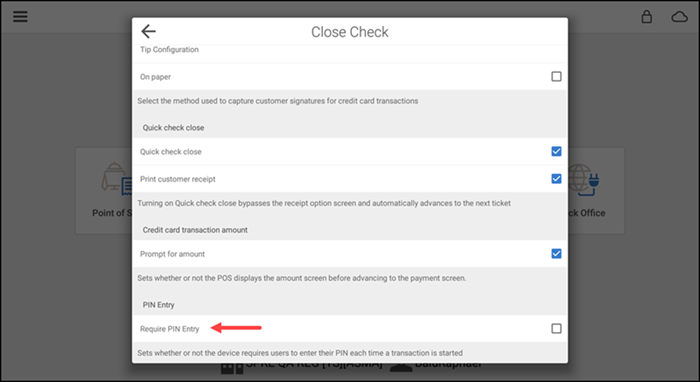
- Select the Require PIN Entry, if you'd like the POS to automatically close completed checks and require a cashier to input their POS PIN in order to access the POS.
Configuring customer prompt
Use 'Customer prompt' to remind you to assign a customer to a guest check when closing a guest check, which can be a great way to collect customer information and build your marketing list.
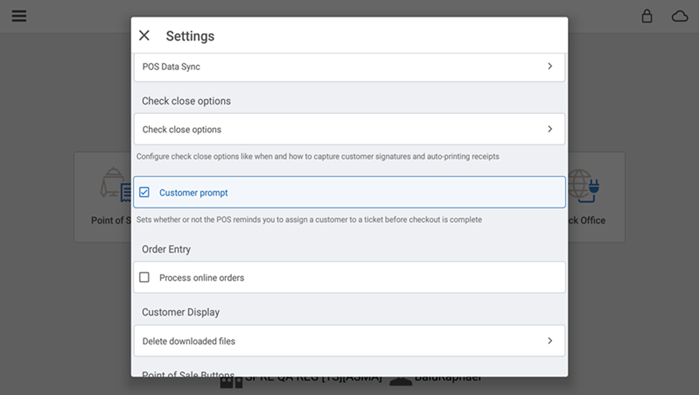
From the Settings screen in the POS app, under 'Check close options,' select Customer prompt to activate the prompt for a customer. By default, POS application disables the option.
Configuring auto gratuity
Use 'Auto-Gratuity' to apply gratuity automatically on this device.
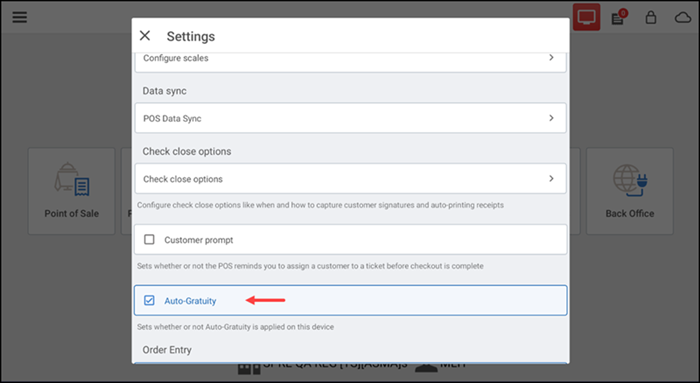
From the Settings screen in the POS app, under 'Check close options,' clear Auto-Gratuity check box to de-activate the gratuity. By default, POS application enables the option.
Controlling which devices receive online orders
You can control the devices allowed to process online orders, which can prevent multiple devices from downloading the same orders for preparation. By default, the system activates the feature for all devices. If you want to restrict the devices processing online orders, you must turn off the feature on those devices.
Note: On the device you set to process online orders, set the Auto-Lock feature to 'Never' to ensure the device remains awake and receives incoming online orders.
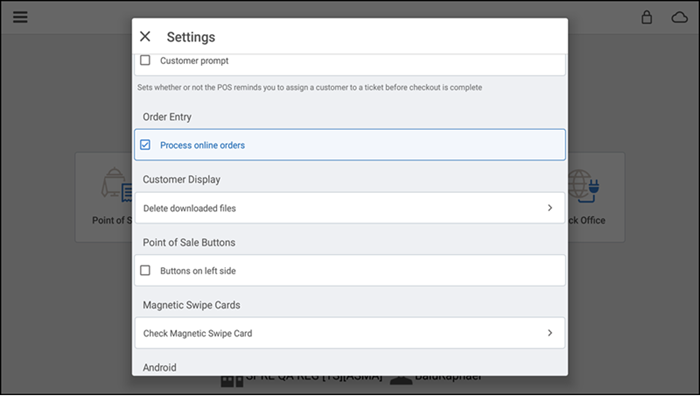
- From the Settings screen, under 'Order Entry,' select Process online orders, to allow the device to download online orders for processing.
- Unselect the Process online orders to prevent the device from downloading online orders for processing.
Arranging point of sale buttons
You can customize the look of your order entry screen on a device to have the point of sale buttons appear on the left side of the screen.
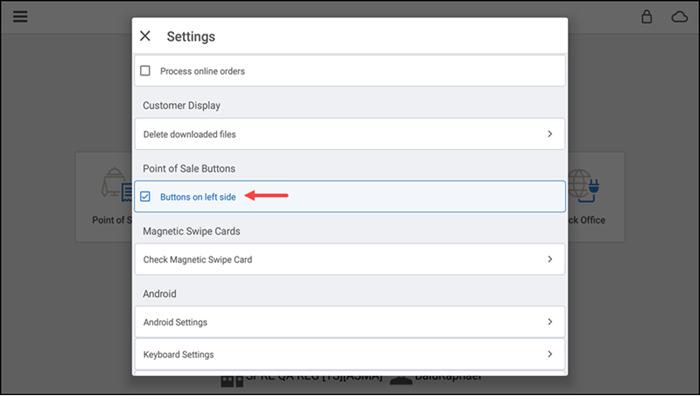
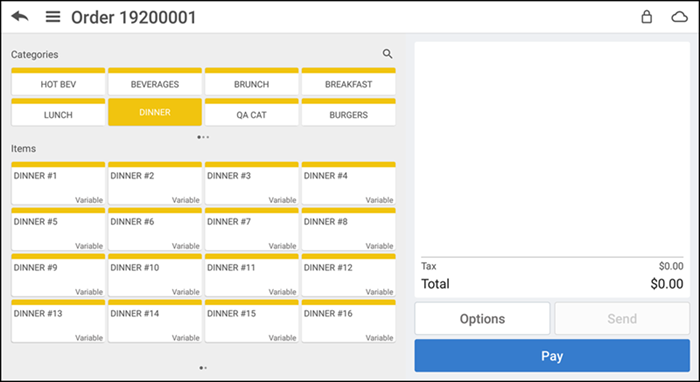
From the Settings screen on the device, under 'Point of Sale Buttons,' select Buttons on left side to move the point of sale buttons to the left side of the order entry screen on a device.
Installing payment gateway
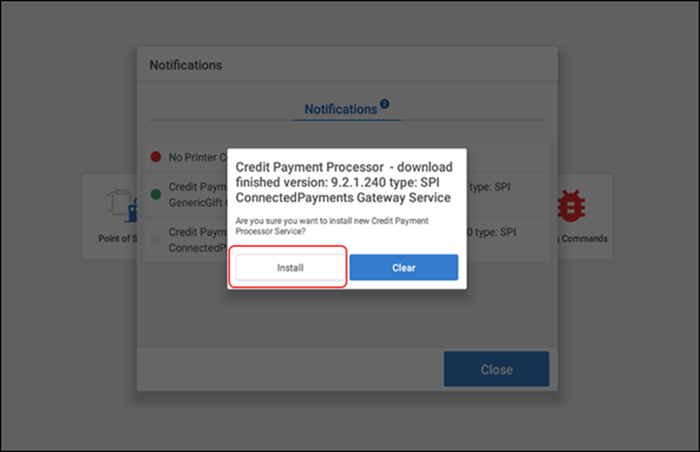
When a payment gateway upgrade is available, the POS automatically detects the configured payment gateway version and downloads the required files to complete the payment processing update. You receive a notification to install the update on the POS system once the download successfully completes. After a successful download, the system prompts for permission to allow the installation. Click OK to proceed.
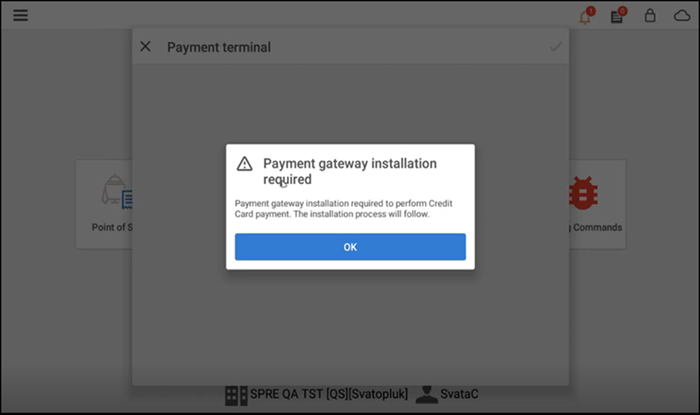
Note: You cannot process credit card transactions during the installation process.
You have three options for installing the update:
Option 1: Use the Install button to initiate the installation process.
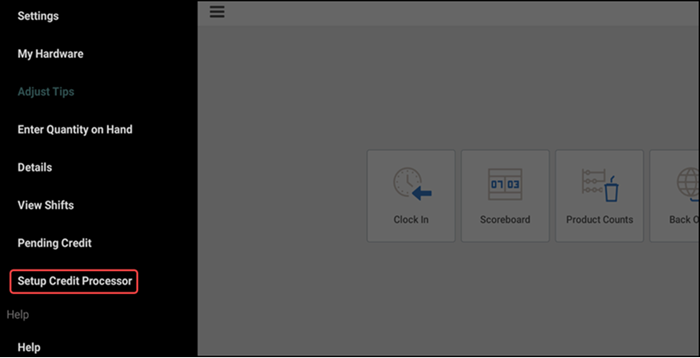
Option 2: Tap the menu icon to open the slide out menu and click Setup Credit Processor to initiate the installation process.
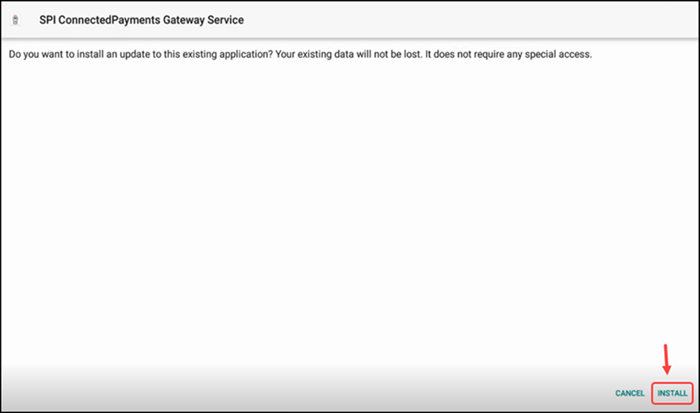
Option 3: Choose to install it when processing a credit card transaction in online mode.
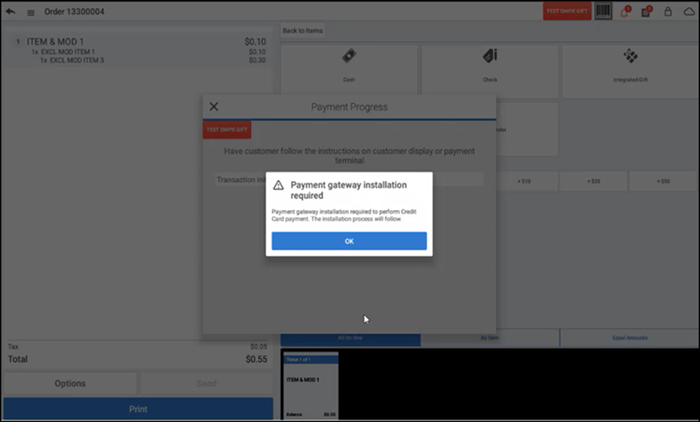
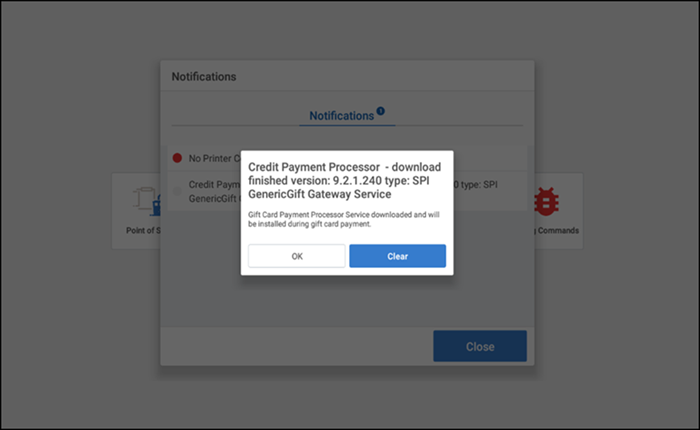
Note: The SPI Generic Gift Gateway service can be downloaded and installed automatically during gift card payment processing.
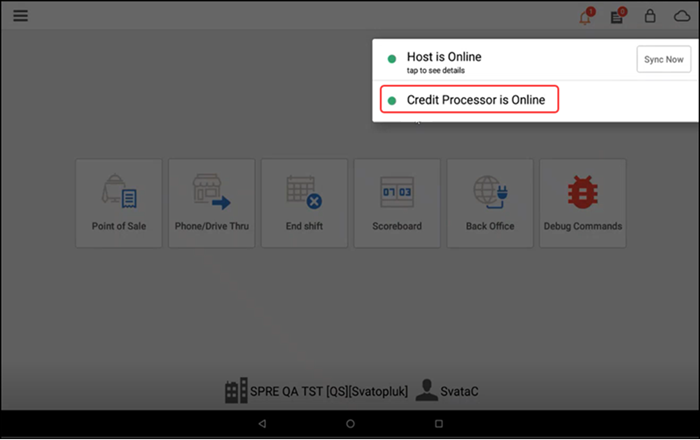
After successful installation, the notification disappears, and your payment gateway is updated allowing you to process credit card transactions.