NCR Voyix Logo

Docs

Aloha Cloud

About Aloha Cloud

Customer training videos

Implementing

Integrating

Reporting (Results)

Using the POS

Configuring POS device settings

Viewing POS device details

Creating a floor plan

Connections

Shifts and management

Orders and checks

Introducing Table Service

Introducing the order entry screen

Understanding the online order flow

Starting a guest check

Understanding check sequence numbers

Using get check

Working with items

Using the device camera to add items

Splitting a guest check

Working with phone and drive-thru orders

Sending order ready SMS

Working with online orders

Assigning a customer to an order

Editing a customer profile

Entering Training Mode

Applying loyalty rewards

Working with gift cards

Searching for open customer order

Applying charges to guest check

Changing the order mode

Applying a discount to a guest check

Deleting an order ticket

Voiding a guest check

Transferring tabs, tables, and guest checks

Working with gratuities

Adding donations

Closing a guest check

Adjusting tips

Receiving house account payment at the POS

Refiring an item

Printing a guest check

Removing payment methods

Rushing an order

Performing a refund

Adding items to a closed check

Using item availability

Offline Credit Transactions

Hardware

Kitchen Display System (KDS)

Aloha Cloud

Introducing Table Service

After you log in to the POS and tap Point of Sale, the TABS screen appears by default. (Table Service mode only).

Add tab screen

Navigating the TABS screen

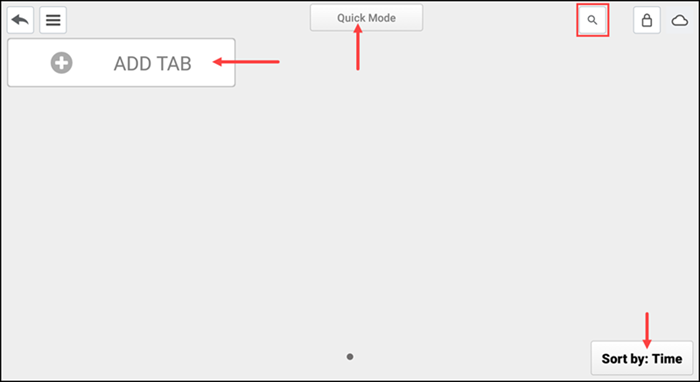
Use ADD TAB to start a tab for a customer, such as in a bar environment, without seating a customer at a table.

Use Sort by on the TABS screen to sort tabs by name or time. Name sorts orders A-Z according to first name, and Time sorts orders from oldest to newest.

Use Quick Mode to quickly enter customer orders and take payment from the customer.

Tap the magnifying icon to search for a specific tab.

Navigating tables and tabs

To start a table, you need to tap the menu icon and select Tables from the flyout menu that appears. Use the floor plan to seat customers at a table and enter orders. You can also move customers from one table to another, from a table to a tab, and from a tab to a table. Refer to the following to learn how to navigate tables and tabs on your floor plan:

Floor plan screen

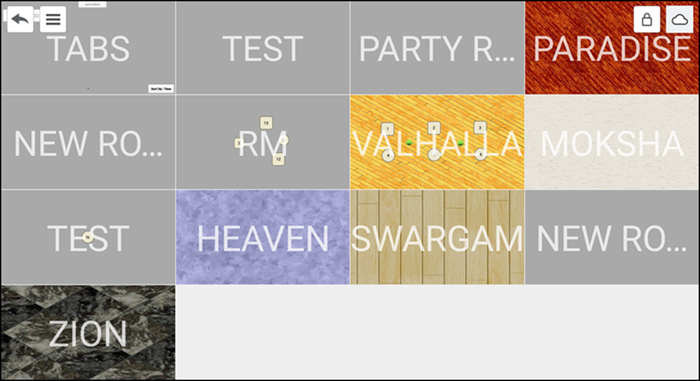
Pinch two fingers together on the device screen to see all rooms within the floor plan.

Tap a room on the floor plan to select a room.

Swipe right to left or left to right to move from one room to another on the device.

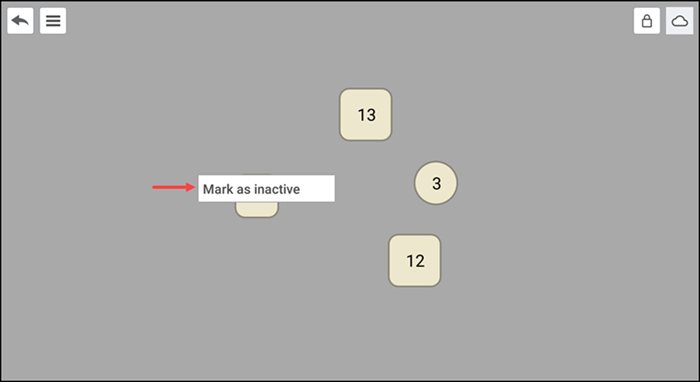
Press and hold a selected table, and then select Mark as inactive from the menu that appears, to mark a table as inactive. Inactive tables appear in dark gray.

View all rooms within the floor plan

Looking for resources or help with Silver? Click here.

  • In this Article

  • Navigating the TABS screen

  • Navigating tables and tabs

NCR Voyix Logo

© 2025 NCR Voyix Corporation

Contact Us
Voyix Privacy Policy
Do Not Sell My Information
Legal Notice

NCR Payment Solutions, LLC is a registered ISO/MSP of Citizens Bank, N.A., Providence, RI.