Configuring POS device settings
The POS application contains configuration settings specific to each device. Use configuration settings to set up the POS device for different hardware devices (printers, cash drawers, or scales). If you have more than one device, you can configure settings on each device.
This article discusses the following:
- Accessing device settings
- Enabling checkout options
- Printing gift receipts
- Sending orders manually to kitchen printer
- Viewing and printing online orders
- Enabling customer prompt
- Assigining tables and tags
- Enabling PIN entry
- Enabling time clock
- Declaring cash tip at clock out
- Counting cash at back office
- Enabling multiple cash drawers
- Hiding empty categories
- Performing a data sync
- Changing position of point of sale buttons
- Configuring printers and cash drawers
- Logging out automatically
- Enabling dynamic delivery
- Testing network strength
- Uploading screenshots
- Running diagnostics
- Configuring Android settings
- Viewing Android downloads
Accessing device settings
The settings for NCR Silver running on the Android operating system are managed on the Settings page. To access this screen, tap the hamburger menu icon near the top-left corner of the screen and then tap Settings at the bottom.
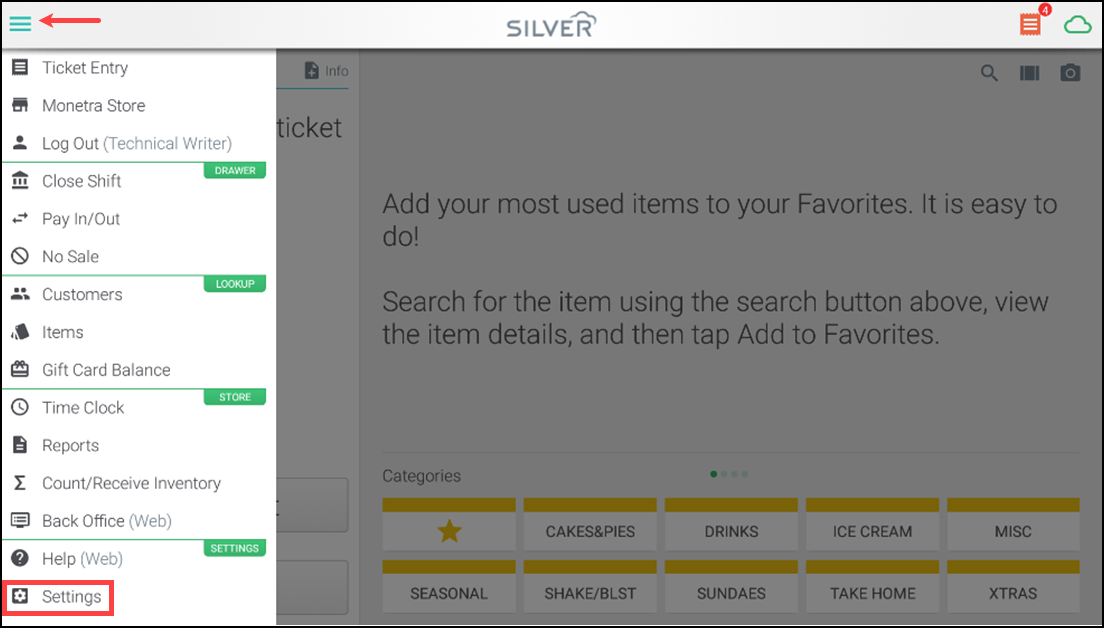
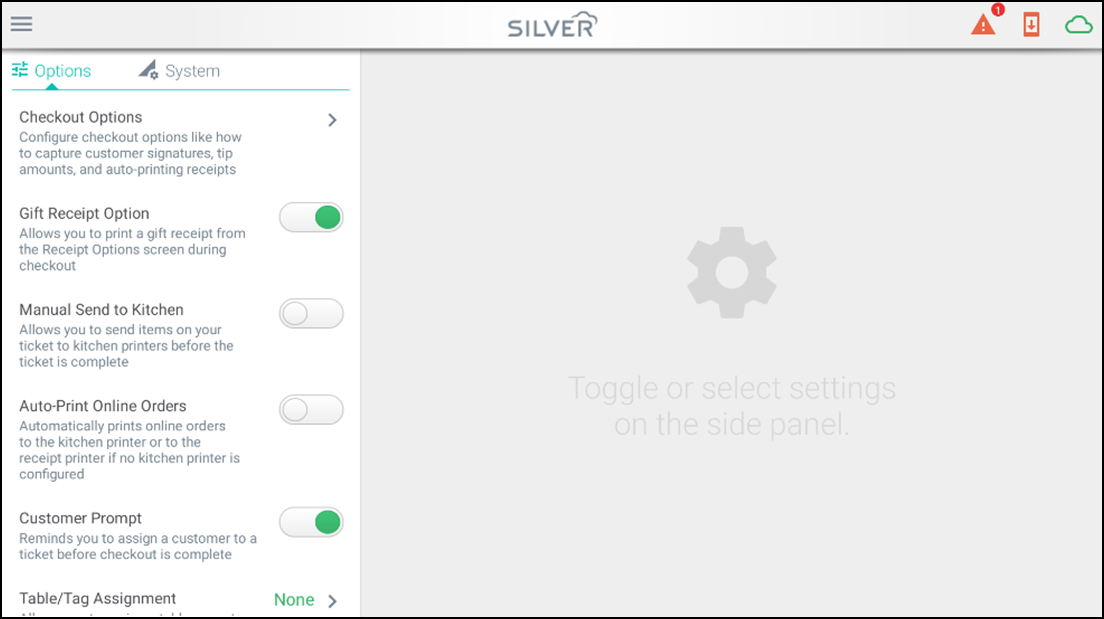
Please note the hardware-related settings for NCR Silver running on the Android Operating System are managed on the Hardware page.
Viewing hardware settings
The hardware-related settings for NCR Silver running on the Android Operating System are managed on the My Hardware page (instead of on the Settings screen). To access this screen, tap the hamburger menu icon near the top-left corner of the screen and then tap My Hardware at the bottom.
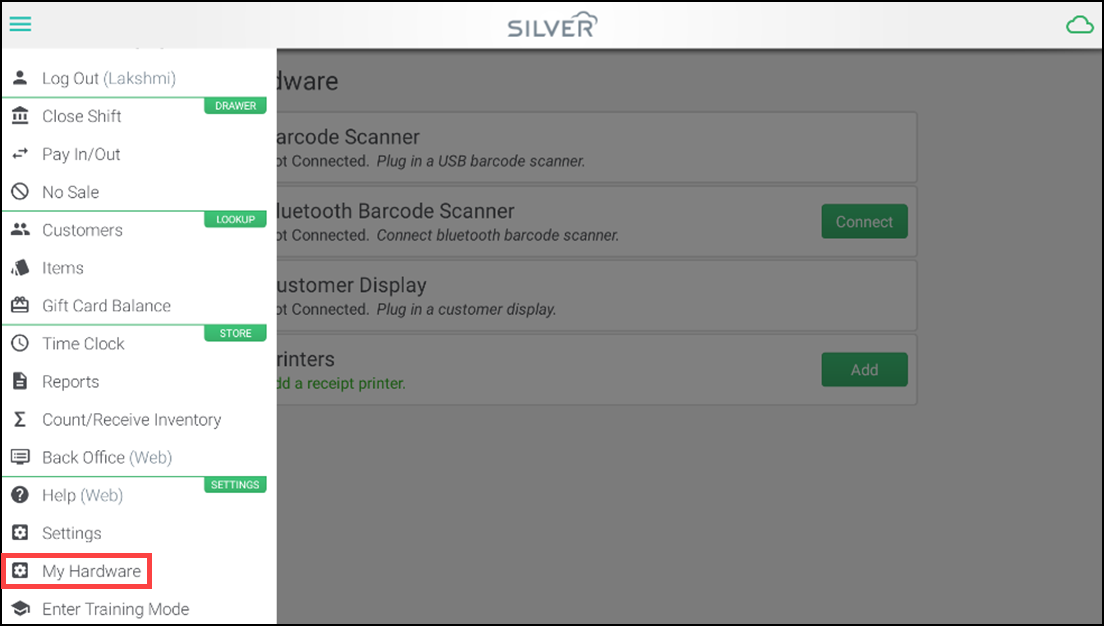
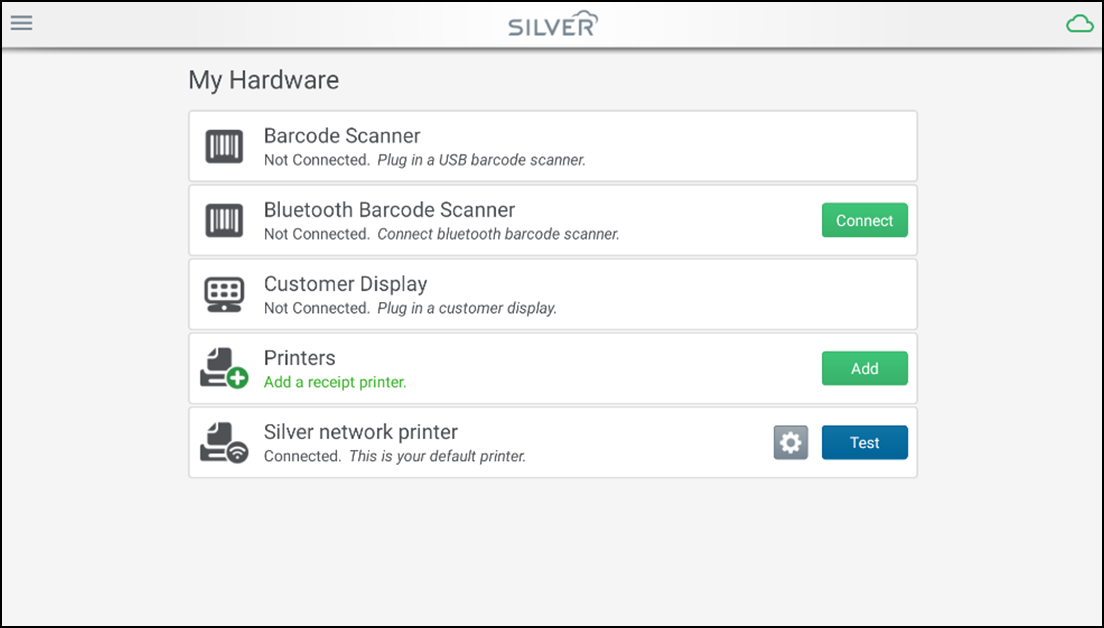
Please note the other settings for NCR Silver Essentials running on the Android Operating System are managed on the Settings page.
Enabling checkout options
Use checkout options to define how you capture customer signatures, on printed paper or electronically on the device screen, and how you provide receipts to customers. You can set receipts to auto-print, or to provide your customers with the option of receiving their receipts in an email message, which can be a great way to capture customer information and build your mailing list. Checkout options can be set and changed by using POS Settings. These options help you to determine what steps are automated or prompted during the checkout process.
To configure your checkout options, do the following:
- Log in to the POS.

- Tap the hamburger menu icon to open the slide out menu and tap Settings.
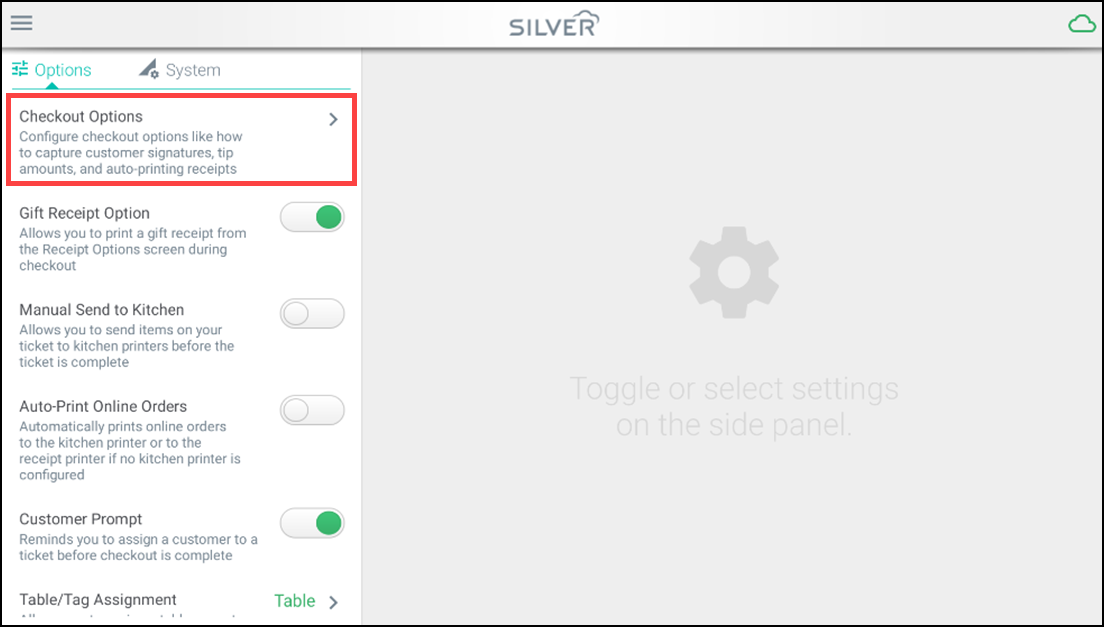
- Tap Checkout Options to configure the following settings:
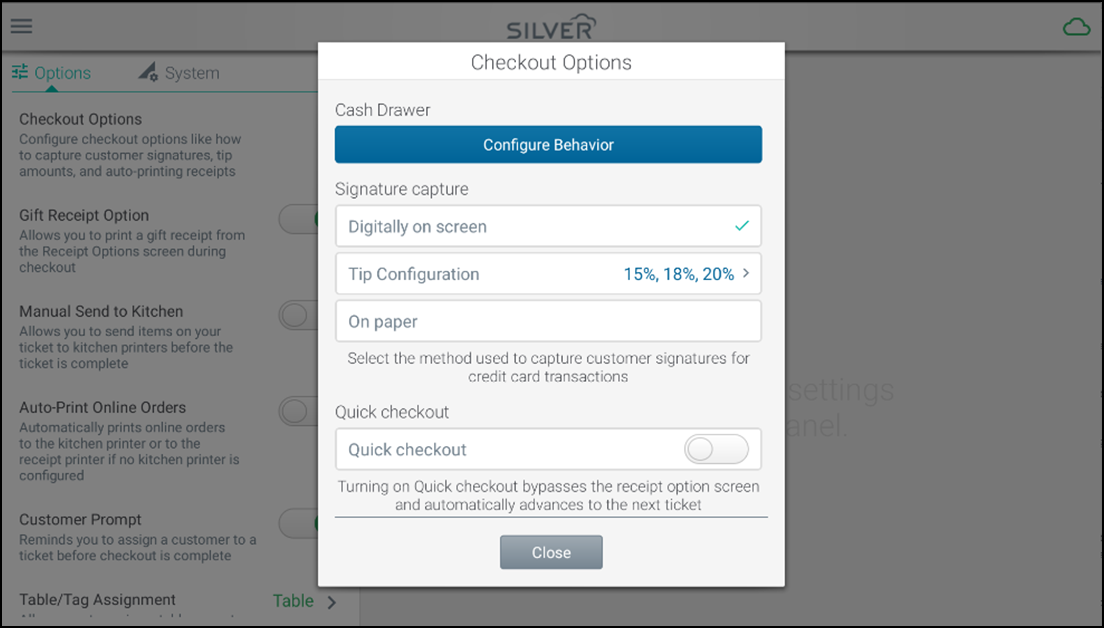
-
Cash Drawer — To configure the cash drawer behavior to open at all times, or only for certain actions.
-
Signature Capture — Decide whether you want to capture customer signatures digitally on your POS device/customer-facing display or on paper when you take a credit card payment.
- If Digitally on screen, the customer can use their finger or a stylus to sign the POS or customer-facing display device directly. The captured signature prints on the receipt.
- If On paper, a signature capture receipt prints for the customer to sign. If tips are enabled, the tip can be written on the receipt and added to the ticket at a later time.
-
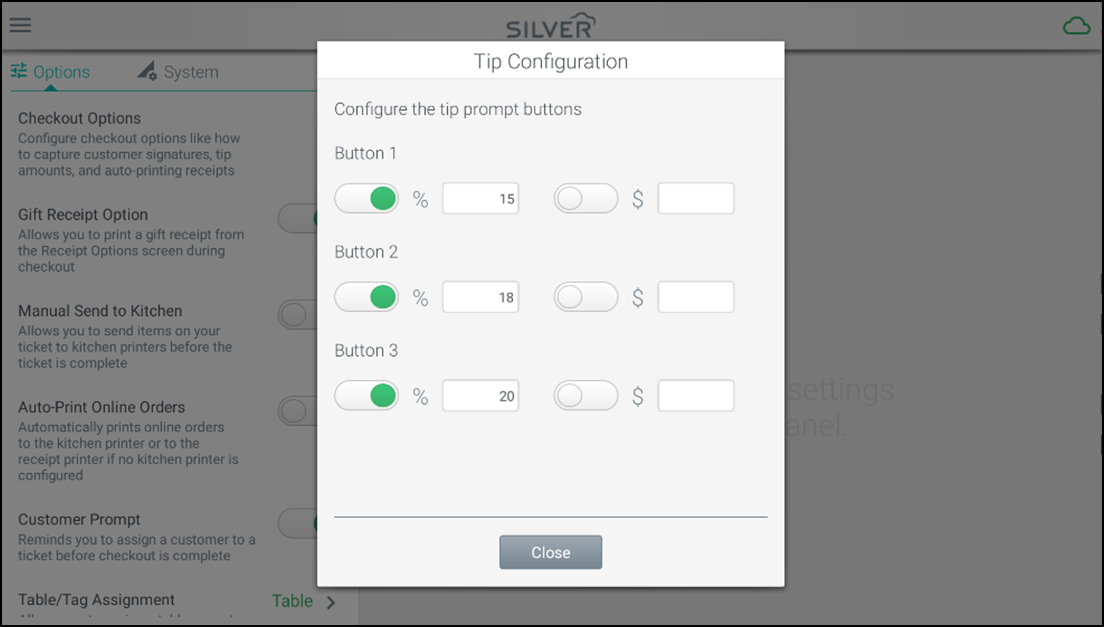
Tip Configuration — If signature capture is set to Digitally on screen and tips are enabled in the Back Office, you can configure suggested tip amounts to be displayed during the checkout process. You can configure up to three buttons that can be percentages or dollar amounts.
Note: Customers can always have the option to enter a custom tip amount instead of using one of the configured suggestions.
-
Quick Checkout — When turned on, it bypass the print receipt option screen and automatically advance the user to the next ticket. You can also set the option for whether or not you want to auto-print the customer receipt.
-
Email Marketing — When enabled, customers are asked if they want to opt in to email marketing communications by entering their email address.
Note: You must set signature capture to "Digitally on screen" and disable Quick Checkout to see this option.
-
Customer Rating (Android Only) — When enabled, customers are asked to rate their experience (from one to five stars) in your store as part of the checkout process.
Note: You must set signature capture to "Digitally on screen" and disable Quick Checkout to see this option.
-
Printing gift receipts
You can print a gift receipt when closing the tickets and select what items will appear on the gift receipt. A gift receipt will exclude item pricing, item total, and payment information.
To enable the gift receipt printing:
- Log in to the POS.

- Tap hamburger menu icon to open the slide out menu and tap Settings.
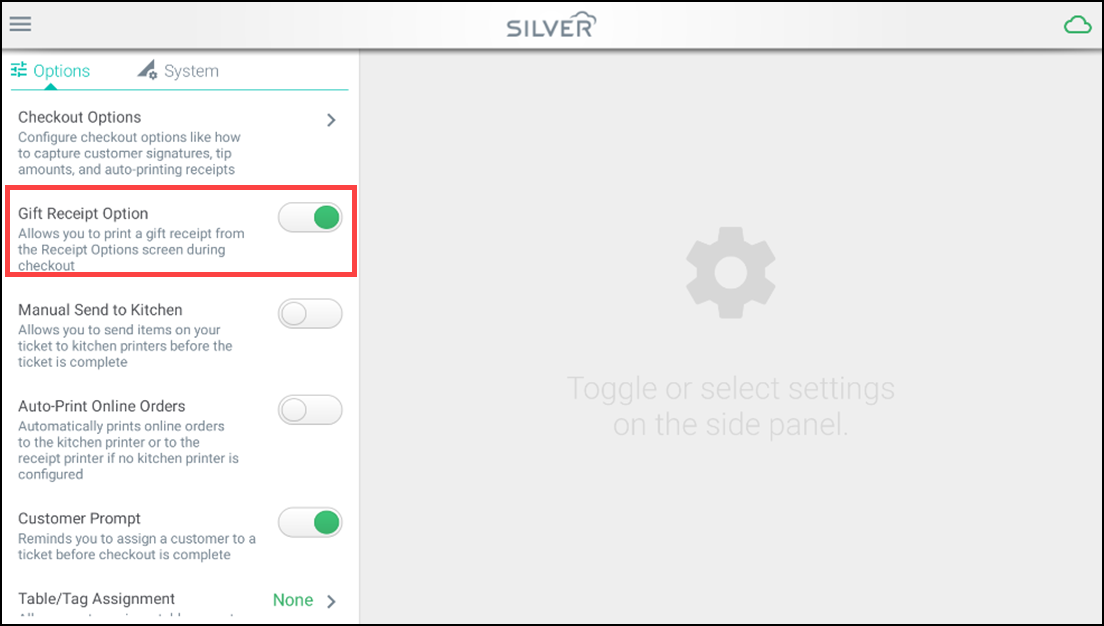
- To enable gift receipts, toggle the Gift Receipt Option to ON.
To print a gift receipt:
-
After closing the ticket, tap the Gift Receipt button in the receipt options menu.
You can also print gift receipts when recalling a held/completed ticket.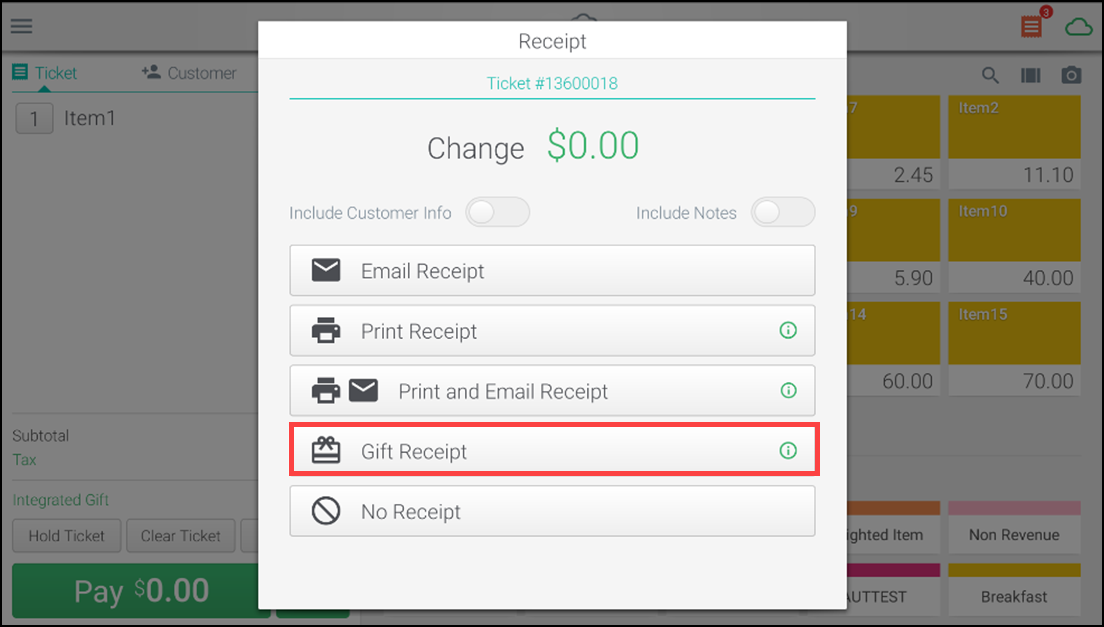
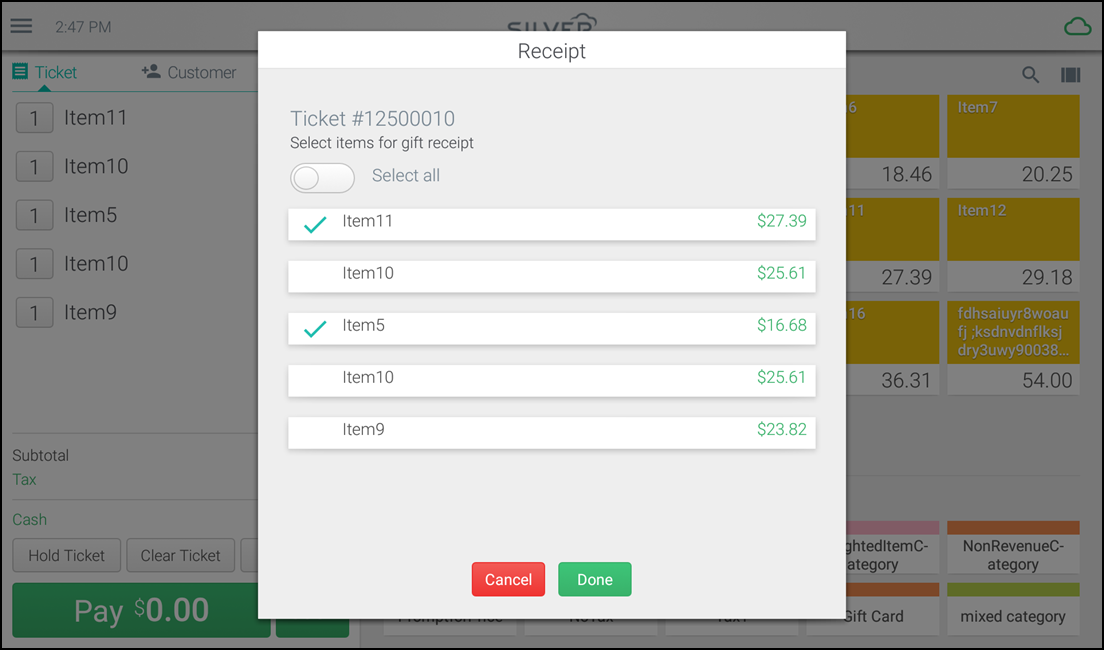
-
Select items that you would like to add to the gift receipt.
Note: This feature is to only filter the items to be included when printing the gift receipt. Once printed, application does not remember what items were selected.
-
If a customer makes a return using the gift receipt, application will recall the original ticket with all the items it had and use it to do the return.
Sending orders manually to kitchen printer
Once you have set up a kitchen printer, you can see a new setting on the POS Settings screen labeled Manual Send to Kitchen. During high volume times, you may want to be able to start making orders as soon as possible, especially when there are multiple orders on a single transaction. This feature provides you the option to send items to the kitchen printer on demand, not just at the end of a transaction or when the transaction is placed on hold.
This setting is off by default, but if you want to use this feature:
- Log in to the POS.

- Tap hamburger menu icon to open the slide out menu and tap Settings.
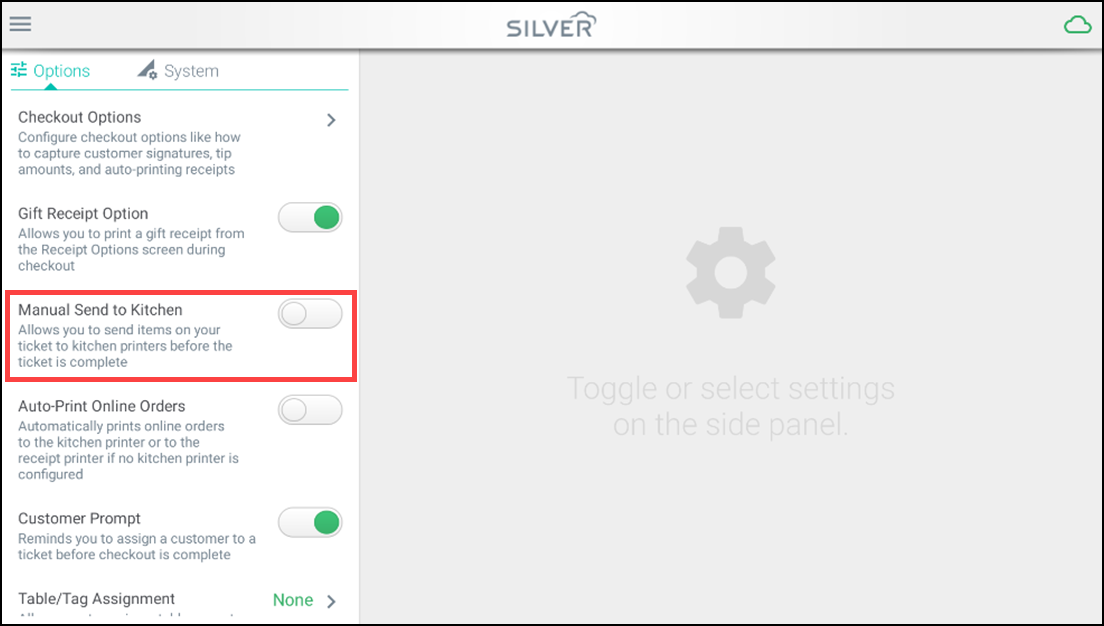
- Toggle for Manual Send to Kitchen to ON.
Note: This setting is not visible unless you have at least one printer configured as a kitchen printer.
Additional Information:
- When this feature is on, a Send to Kitchen button will display at the bottom of the POS screen when you have an open ticket.
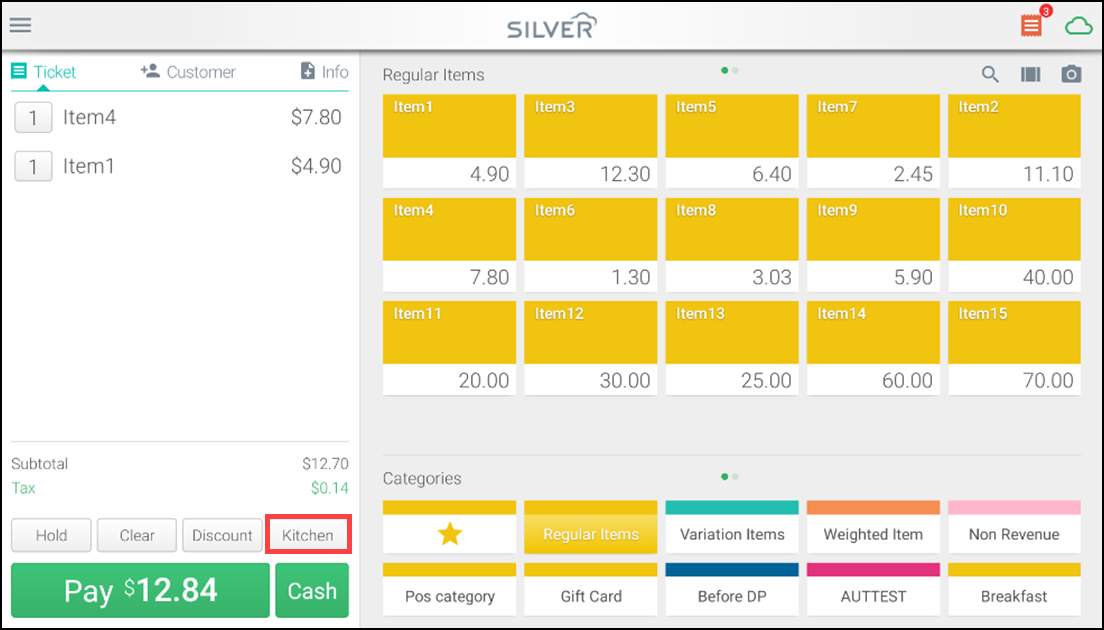
- You can press this button at any time while you are ringing up a ticket and anything on the ticket at that time (that has not been sent to the printer) will be sent to the kitchen printer.
- Once you have sent an item to the printer, any variations, modifiers or notes associated with the item cannot be changed.
- When you place the ticket on hold or complete checkout, any items not already sent to the printer will be sent to the printer automatically. Any items already sent to the printer will not be sent again.
Viewing and printing online orders
This section details about how to view the received orders and to print the online orders.
Receiving online orders
When a customer places an online order, the order is sent to the Back Office (BO). Each POS device checks the BO periodically to see if any new orders have been received. When a new online order is found, a new online order alert will appear at the top-right corner of the screen. The number on the new online order icon identifies how many new online orders have been received.
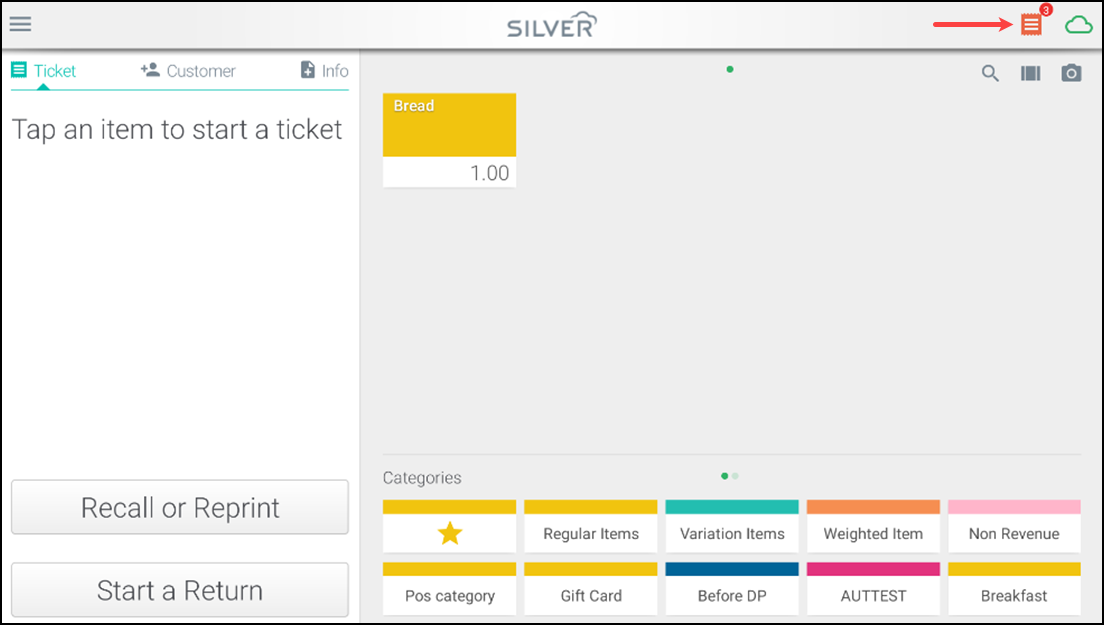
Viewing new online orders
To vew the online orders:
- Tap the New Order Alert Box in the top-right corner of the screen. The Orders screen appears.A red dot next to the order indicates that the order has not yet been viewed.
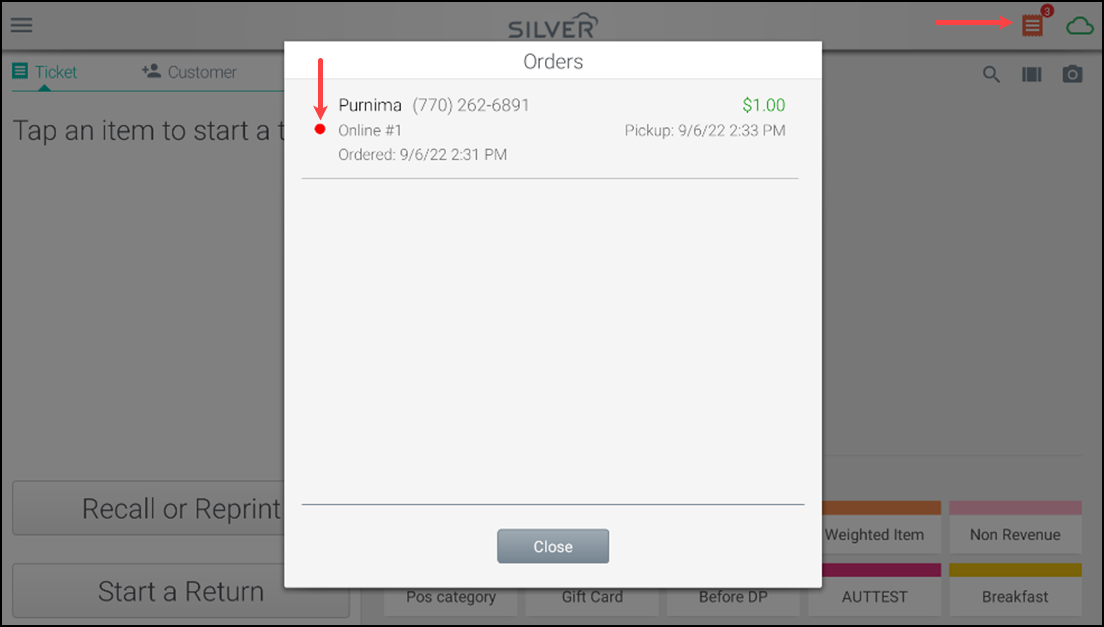
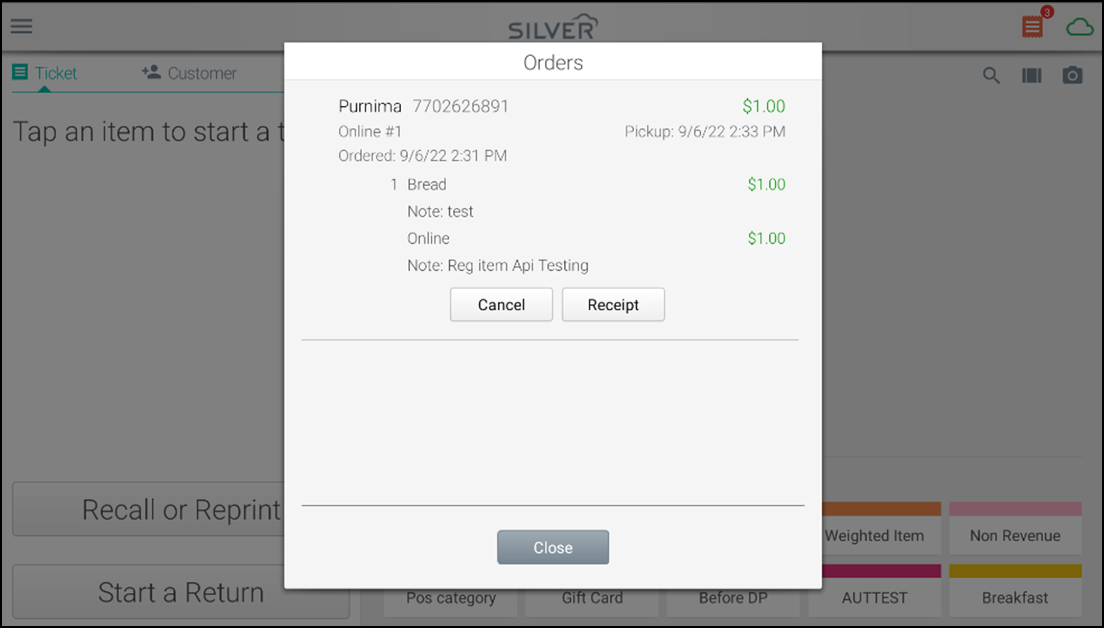
- Tap Online Order to view the order details.
- After viewing the order, you have following options:
-
Tap Receipt to print the online order to your receipt printer.
-
Tap To Kitchen to print the online order to your the kitchen printer.
Note: This option is displayed only if you have a kitchen printer configured.
-
Tap Cancel to cancel the order.
Note: This option cancels the sale but does not refund the customer. You can contact your third party order provider to request a refund for the cancelled order.
-
Tap Close if you do not wish to take any action on the order.
After viewing the order, it is marked as processed and no longer appears in the new order alert box.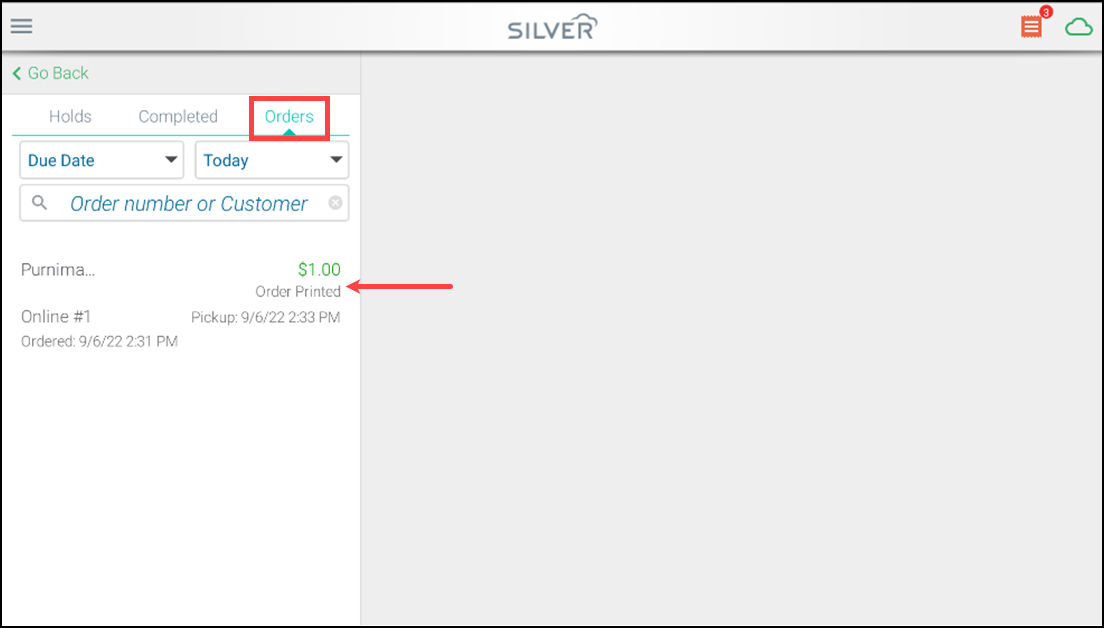
-
- To view processed orders, tap Recall or Reprint from the ticket entry screen and select the Orders tab.
Note: If you have multiple POS devices, once you process an online order on one device, it is marked as processed on the other POS devices so that it does not get processed twice.
Printing online orders automatically
If you do not wish to process orders manually, you can enable auto-printing of online orders. This option automatically prints the online orders to your kitchen printer. If you do not configure a kitchen printer, the order prints on your default receipt printer. When the order is printed, it is automatically marked as processed.
To print online orders automatically:
- Log in to the POS.

- Tap hamburger menu icon to open the slide out menu and tap Settings.
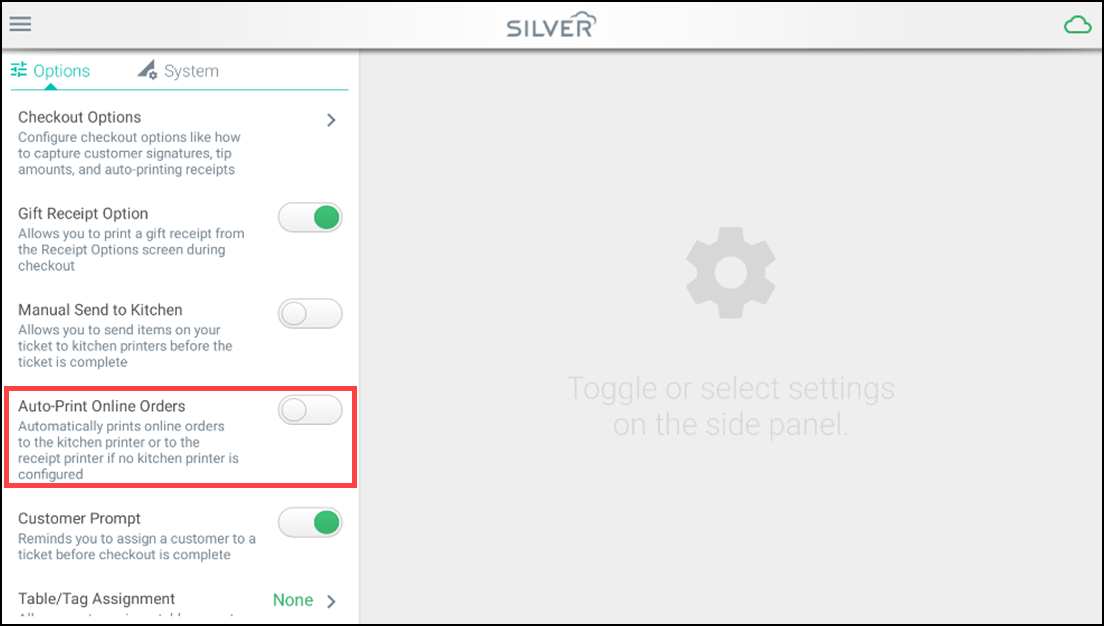
- Scroll down to Auto-Print Online Orders.
- To enable the device to automatically print online orders, toggle the Auto-Print Online Orders option to ON.
Note: To review the online orders in Back Office, refer to POS transaction report.
Enabling customer prompt
Assigning customer to sales allows you to track your customers purchase history and preferences. It also enhances your ability to market to customers using the integrated e-mail marketing features in the Back Office. You can configure the POS app to remind you to assign a customer to each sale.
- Log in to the POS.
- Tap hamburger menu icon to open the slide out menu.

- Tap Settings.
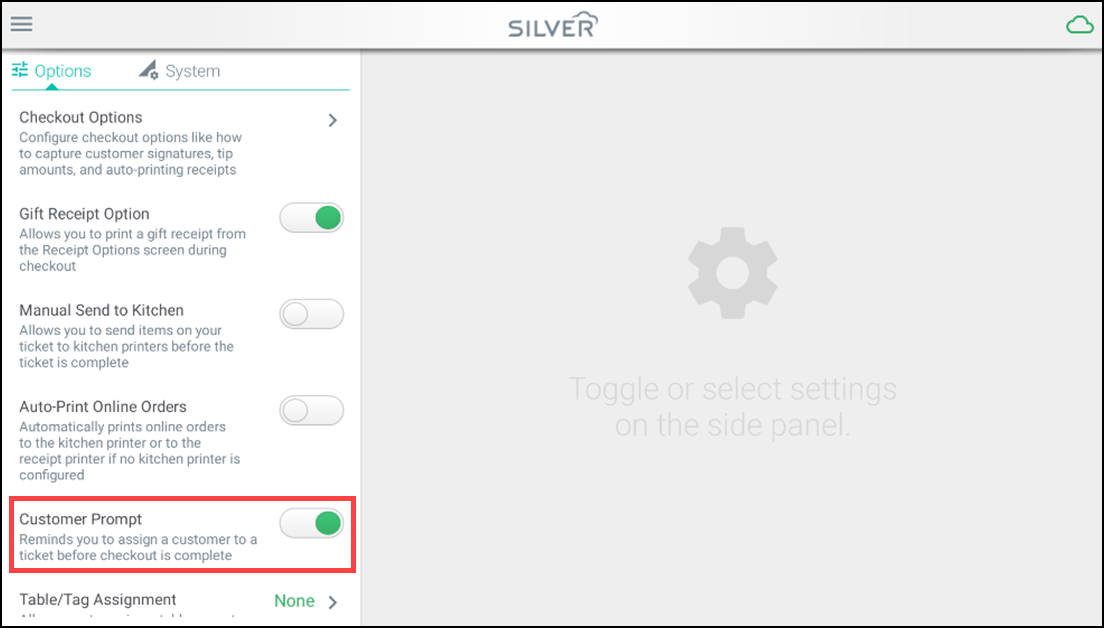
- Scroll down to and tap Customer Prompt and set the ON/OFF toggle to:
- ON — To ensure the POS app always prompts the POS user to capture the customer for a sale.
- OFF — To ensure the POS app does not prompt the POS user to capture the customer for a sale.
Note: When the customer prompt setting is ON, you receives a reminder to assign a customer at check out if one is not already assigned.
Assigining tables and tags
This feature allows you to assign a table or custom tag to each ticket. If you choose to use the tag option, you can create your own custom label that fits your business needs. For example, you can use Invoice #, Claim #, or Work Order. With either option, you also have the ability to pre-configure values that you use often, as well as to create temporary values for each ticket.
This setting is off by default, but if you want to use or enable this feature:
- Log in to the POS.

- Tap hamburger menu icon to open the slide out menu and tap Settings.
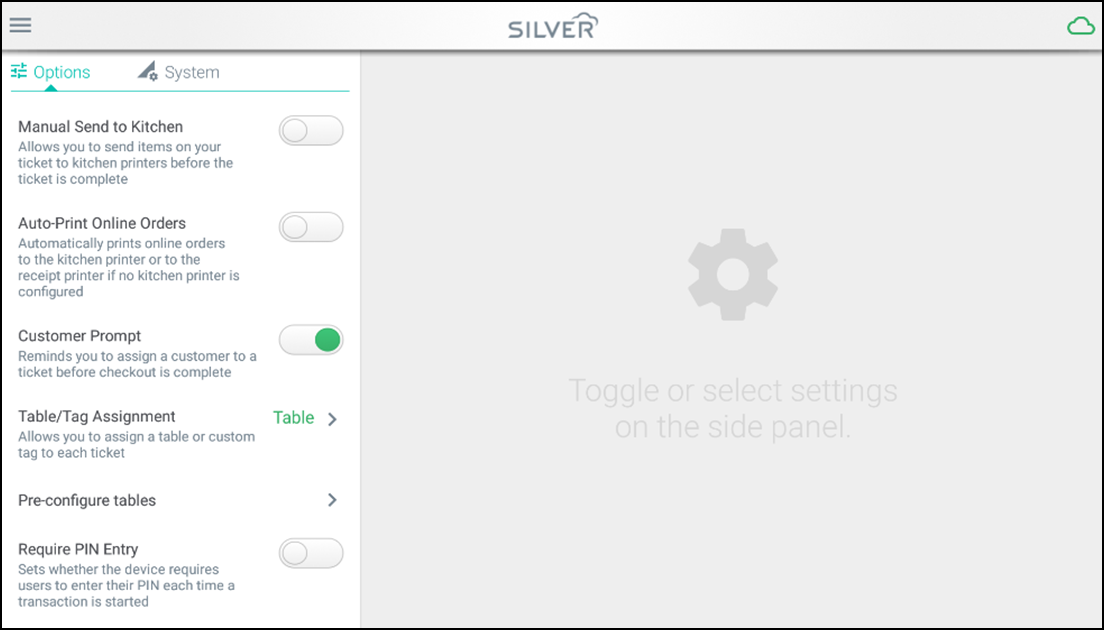
- Scroll down and tap the Table/Tag Assignment section.
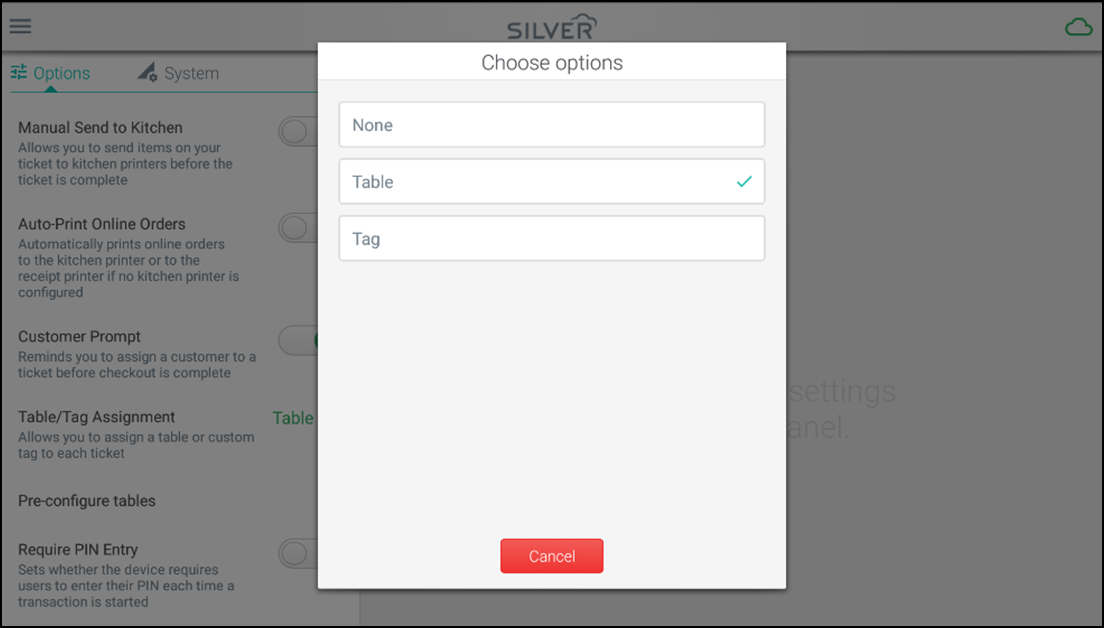
- Do one of the following:
- Tap None to not use this feature.
- Tap Table to set up tables.
- Tap Tag to create your own tag/label.
- Tap Cancel to return to the ticket entry screen.
Enabling PIN entry
Require PIN Entry is another optional feature for our customers who want to ensure that all POS activity is tracked by distinct user. When this feature is enabled, each time the system displays the ticket entry screen, the POS user is required to enter their four-digit PIN to start a new ticket or to access any of the functions at the bottom of the screen. A prompt to enter their PIN appears each time the user returns to a new ticket screen. This setting is off by default.
To enable this, do the following:
- Log in to the POS.

- Tap the hamburger menu icon to open the slide out menu and tap Settings.
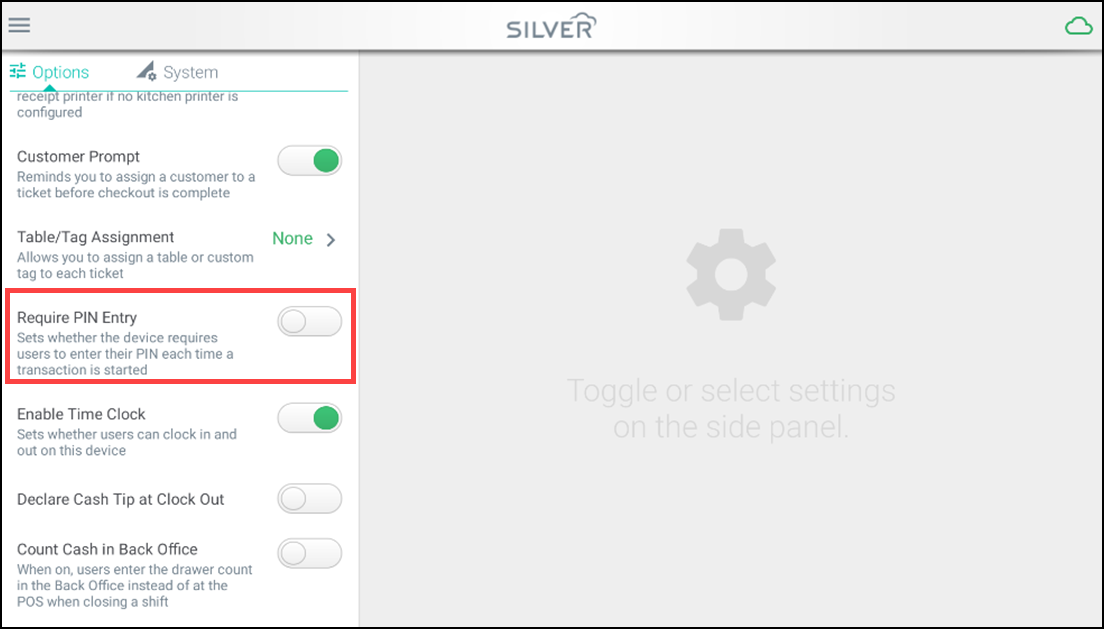
- Scroll to the Require PIN entry section and set the ON/OFF toggle to ON. When this feature is on, the POS user is required to enter their PIN for every transaction.
Enabling time clock
By default, the time clock functions on the POS are enabled, but if required, you can disable the option. Enabling time clock on your devices helps to reduce duplicate time punches. This also ensures that employees are warned of any duplicate and unpaired punches on the device even if the POS is offline.
When you disable the time clock functions, the Clock-In and Clock-Out buttons do not appear on the POS.
To enable the time clock on a device:
- Log in to the POS.
- Tap the hamburger menu icon to open the slide out menu.

- Tap Settings.
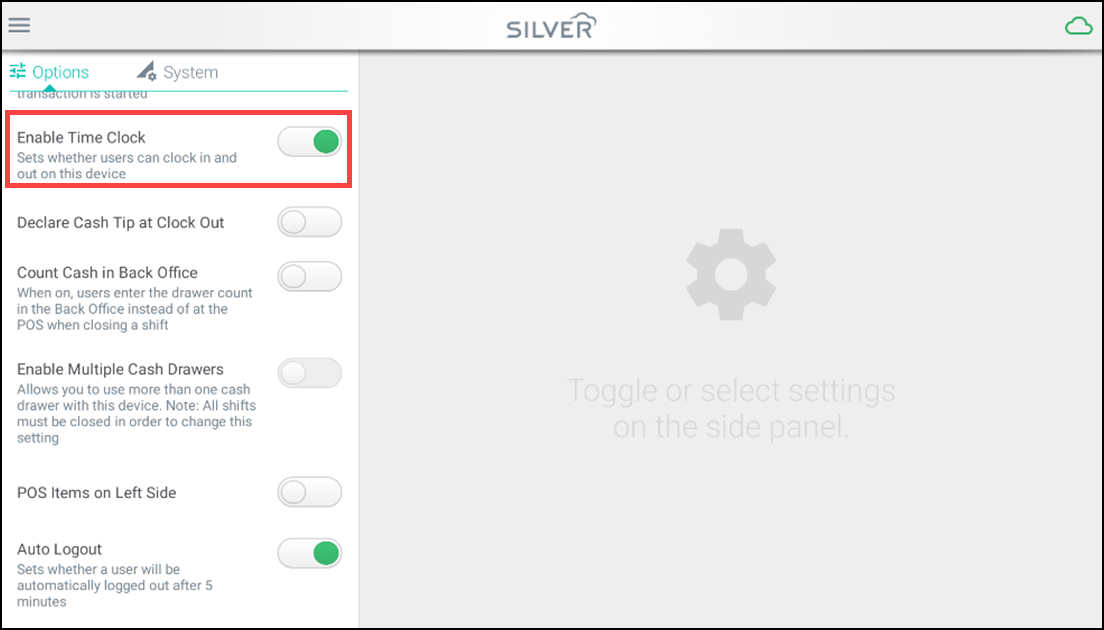
- Scroll down to the Time Clock section.
- Slide the ON/OFF slider:
- ON (Green) — To enable time clock and display the Clock-In and Clock-Out buttons on the login screen (default).
- OFF (Gray) — To disable time clock and not show the Clock-In and Clock-Out buttons on the login screen.
- Close the slide out menu.
Declaring cash tip at clock out
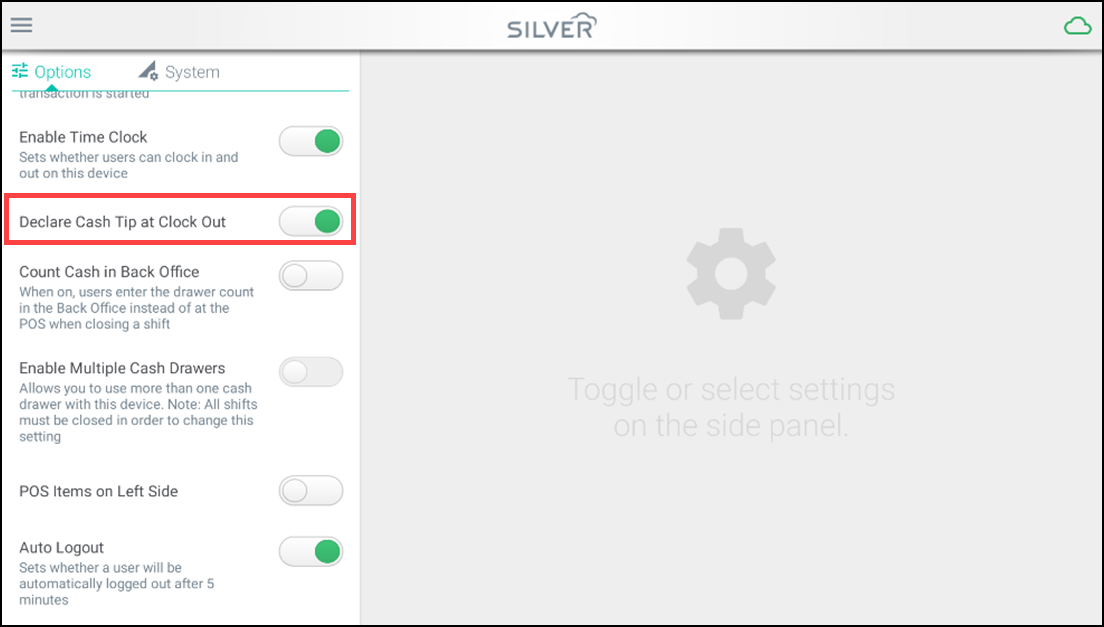
Employees can enter cash tips at the end of their shift. This setting is OFF by default.
To enable this, do the following:
-
Log in to the POS.
-
Tap the hamburger menu icon to open the slide out menu.

-
Tap Settings.
-
Toggle switch Declare cash tips at checkout to ON.
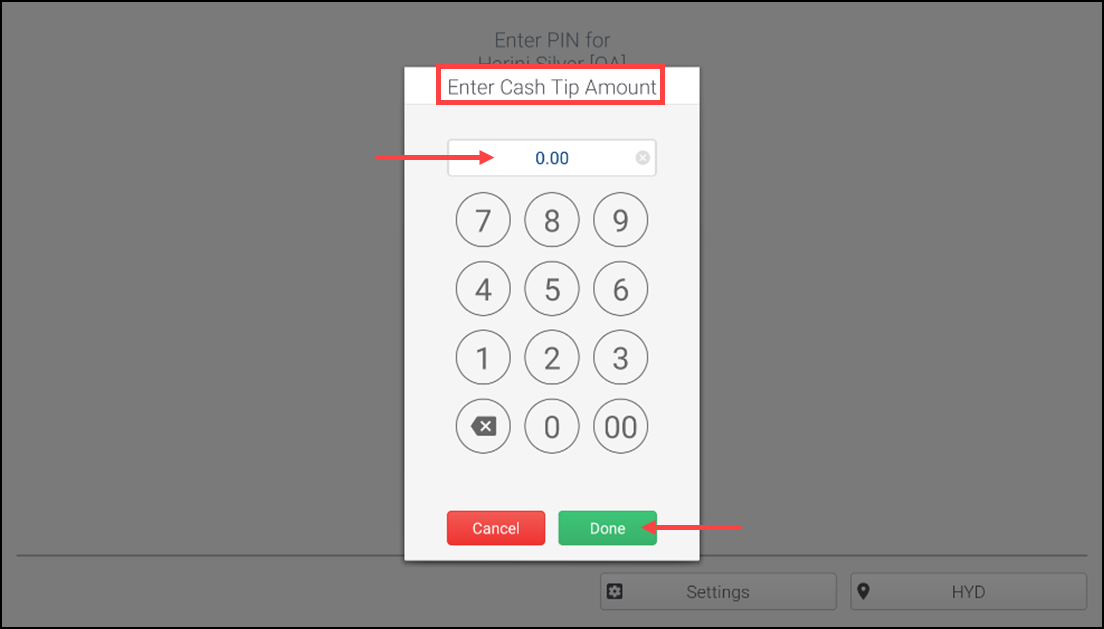
Note: This setting is only available if Enable Time Clock is turned ON. Once you enable this setting, a prompt to enter cash tips appears when you clock out.
Note: If you have no tips to declare, you can leave the amount as $0.00.
-
Enter the desired amount and tap Done.
Reference: For more information, refer to Tip summary report.
Counting cash at back office
Using this feature you can enter the drawer count/amount in the Back Office instead of entering the amount at the POS when closing the shift.
To enable this feature, do the following:
- Log in to the POS.
- Tap the hamburger menu icon to open the slide out menu.

- Tap Settings.
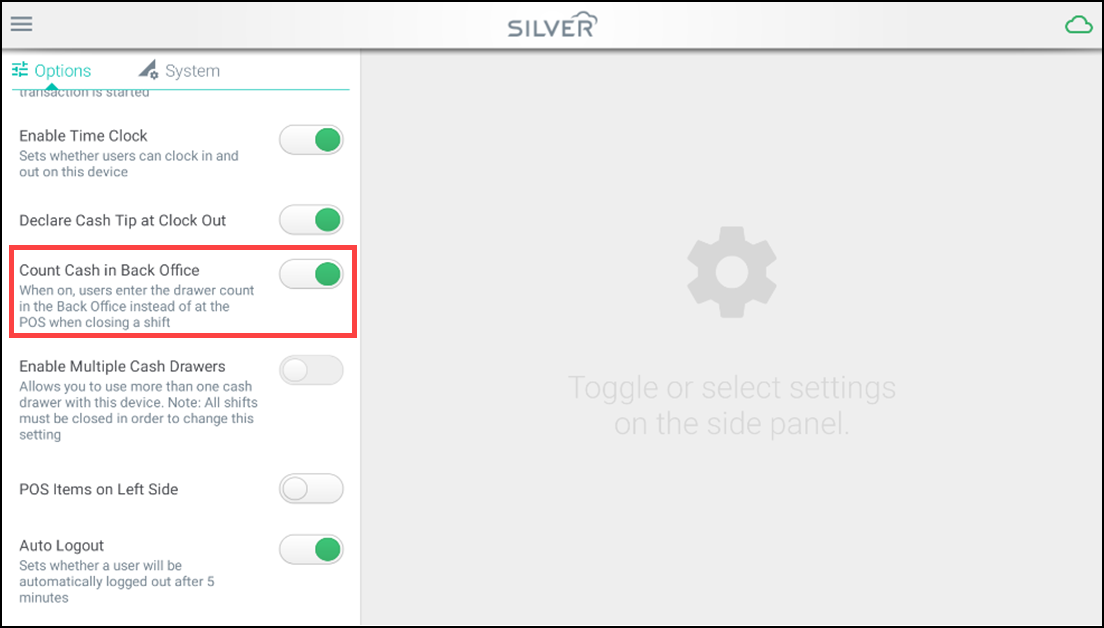
- Toggle Count Cash in Back Office to ON.
Enabling multiple cash drawers
Silver Essentials registered users can now attach more than one cash drawer to the one POS system. This allows each employee to have their own drawer and be responsible for their cash reconciliations. A user who has a user role permission for access all drawers, can choose any drawer for their use, regardless of whether or not there is already an employee assigned to it. For more information, refer to Defining user roles.
Note: All shifts must be closed in order to change this setting.
To enable multiple cash drawers:
- Log in to the POS.

- Tap hamburger menu icon to open the slide out menu and tap Settings.
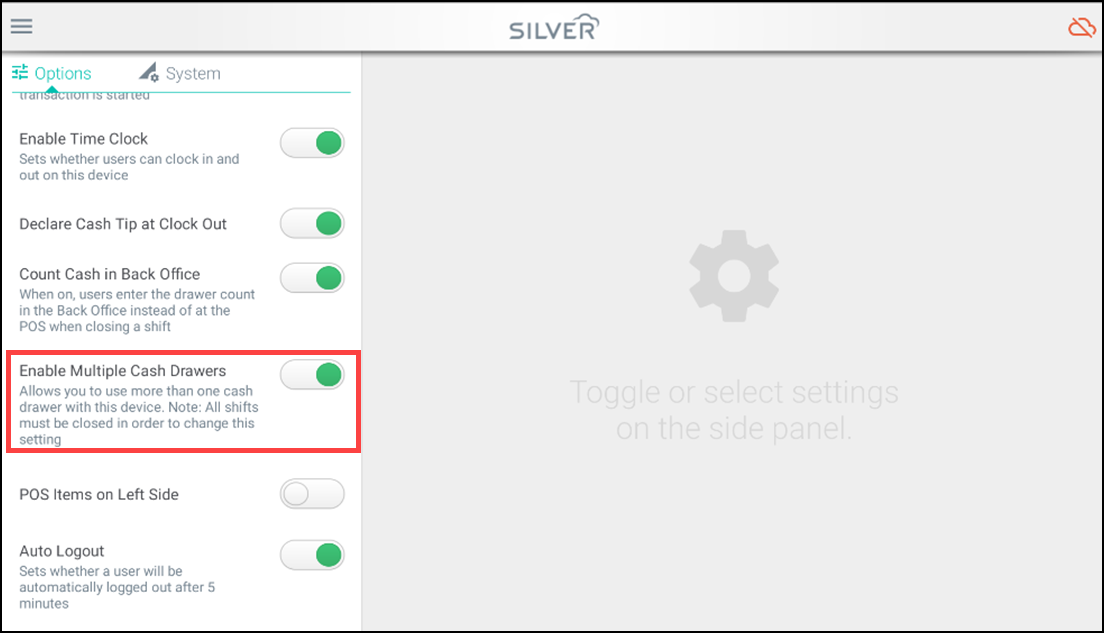
- Scroll down and tap Enable Multiple Cash Drawers so that the button turns green (on).
Hiding empty categories
A store can only hide categories that have no assigned items. You can adjust item assignment in Back Office using company view or the individual store view. If you are in a multi-store that sells different items in different locations, you can unassign any items from the POS and hide the empty category buttons. For more information, refer to Working with items.
Note: You must be a multi-store user to hide empty categories. The option is device specific and must be enabled for each device.
To hide the empty categories at POS:
- Log in to the POS.

- Tap hamburger menu icon to open the slide out menu and tap Settings.
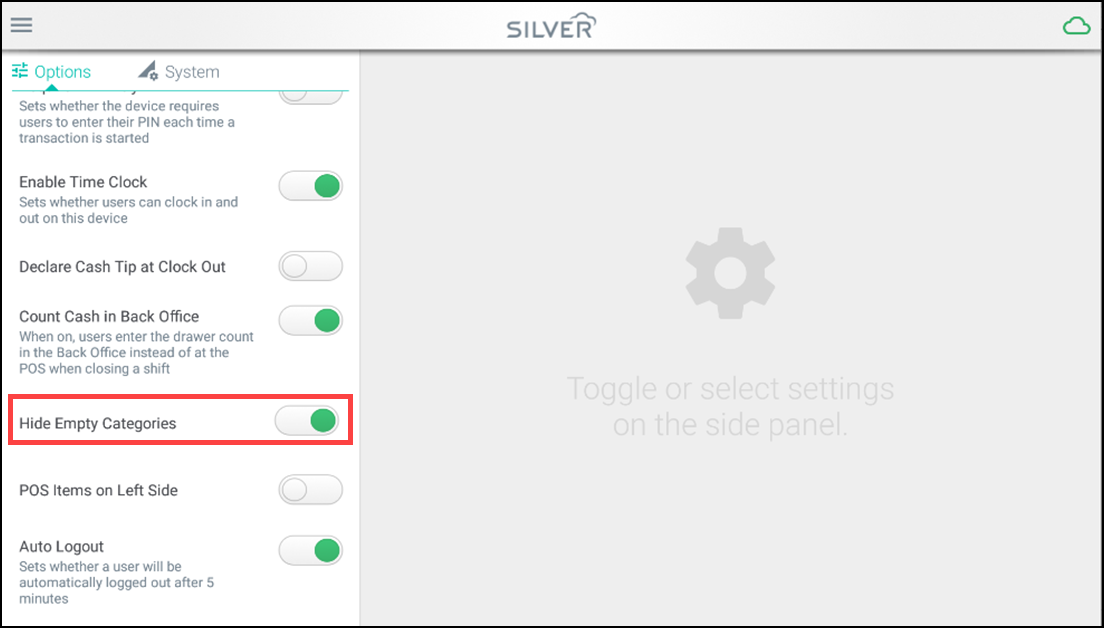
- Scroll down and tap Hide empty categories so that the button turns green (on). Your empty categories no longer appear.
Changing position of point of sale buttons
You can change the position of Categories and Items buttons on the screen. This feature is commonly called Left Hand Mode, because it places the item and category buttons on the left side of the POS.
To changes the button positions:
- Log in to the POS.
- Tap the hamburger menu icon to open the slide out menu.

- Tap Settings.
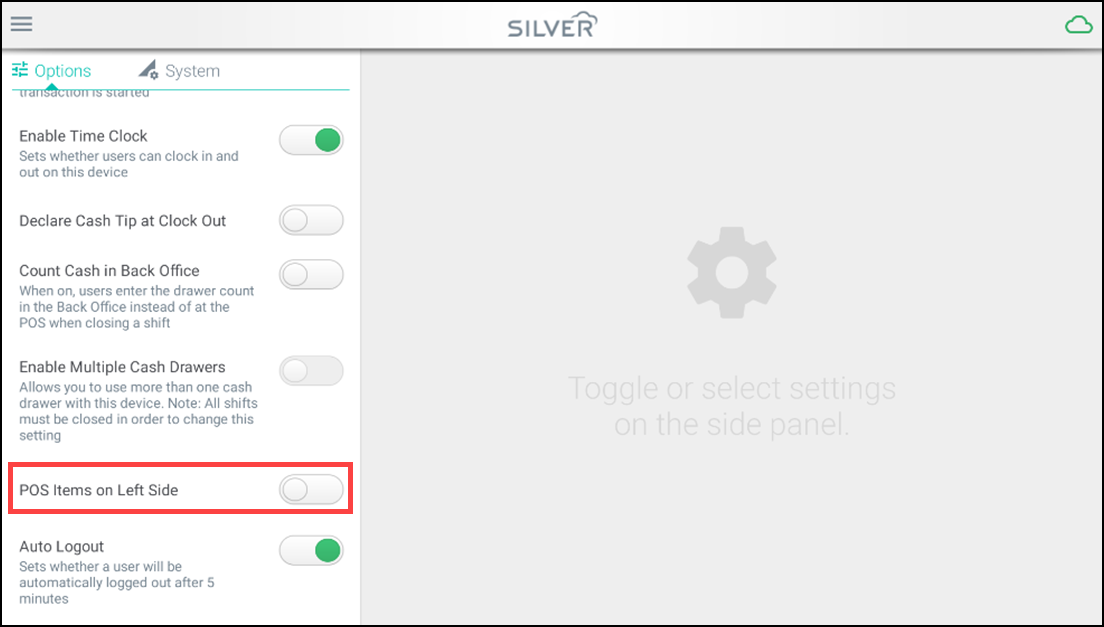
- Scroll down to POS Items on Left Side.
- Slide the ON/OFF slider to:
- OFF — To show the POS buttons on the right side of the screen (default).
- ON — To show the POS buttons on the left side of the screen.
- Tap Close.
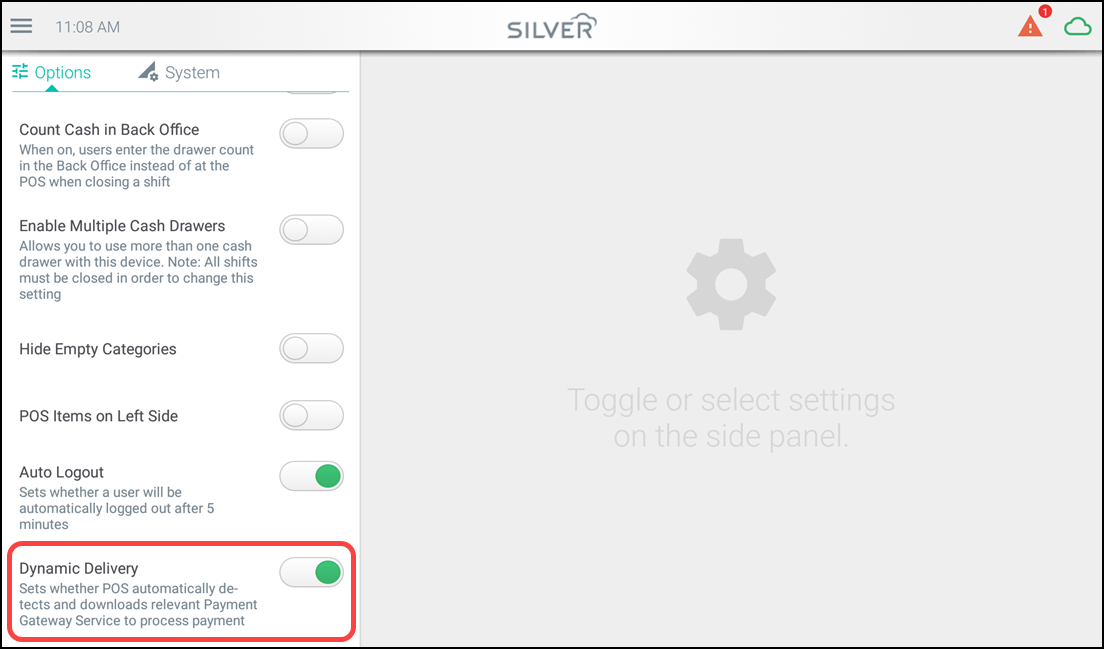
Enabling dynamic delivery
With this option, you can allow POS to detect and download the relevant payment gateway services automatically and proceed with the payment. By default, this setting is enbaled in your application.
To enable this feature, do the following:
-
Log in to the POS.
-
Tap the hamburger menu icon to open the slide out menu.

-
Tap Settings.
-
Toggle Dynamic Delivery to ON (by default).
-OR-
Toggle Dynamic Delivery to OFF to perfom the transaction in static/standard mode.
Performing a data sync
Your POS device automatically downloads updated items, customers, and other important data from the Back Office every few minutes. However, occasionally, you may need to manually synchronize a POS device to ensure that updated data is available immediately.
Your POS device must be connected to the Internet to synchronize with the Back Office. If you are unable to connect to the Internet for any reason, you cannot process credit card transactions on your POS device, and you can not receive updated item and customer records from the Back Office.
To quickly synchronize your POS device with the Back Office:
- Log in to the POS.
- Tap the hamburger menu icon to open the slide out menu.

- Tap the System tab.
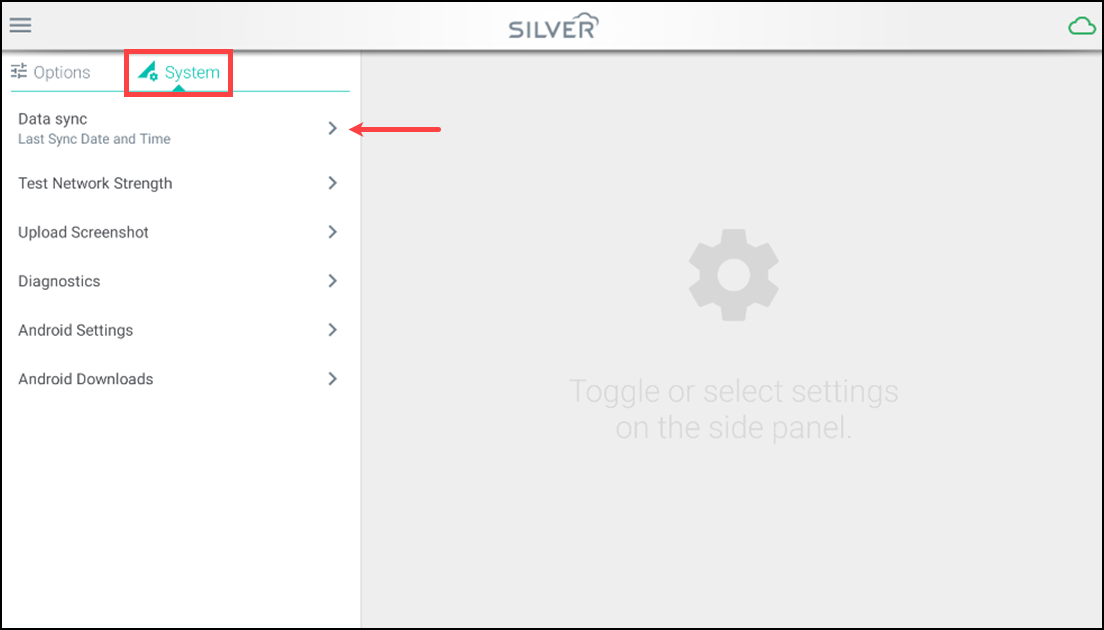
- Tap Data Sync.
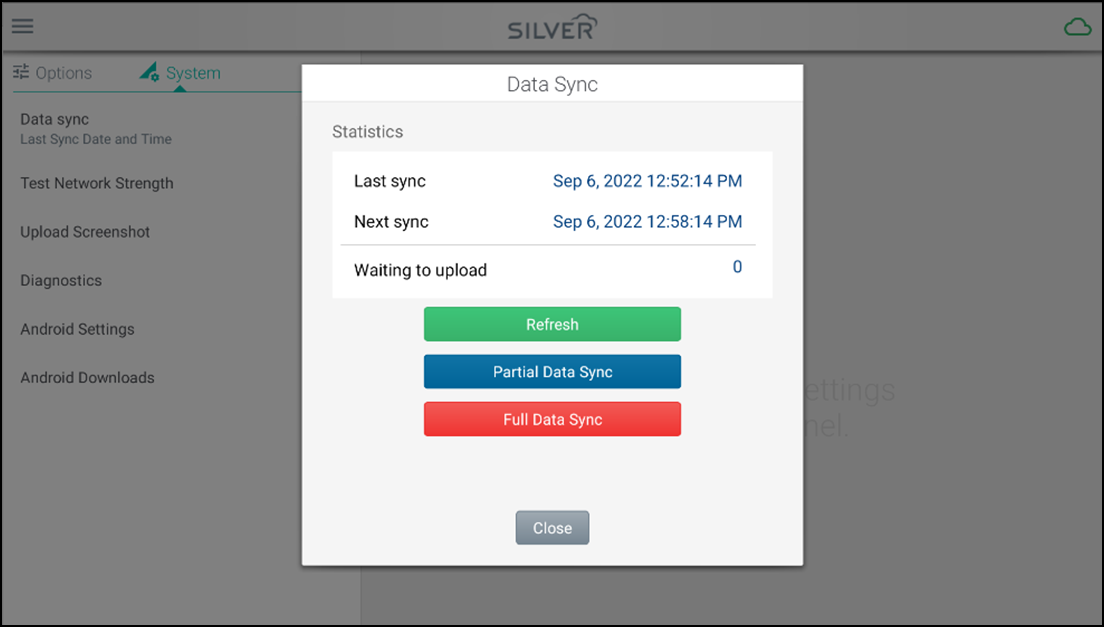
- Select one of the following Data Sync options:
- Refresh — Only syncs changes that have been done in the past 6 minutes.
- Partial Data Sync — Only syncs items, customers, or configurations that have been changed in the past three days.
- Full Data Sync — Deletes local copies and re-downloads all data.
- If you selected Partial Data Sync option, tap Yes in the confirmation message.
- If you selected Full Data Sync option, tap Yes.
- Wait for the sync process to complete and tap Close. Depending on the option you select, the process can take from a few seconds to 30 minutes.
Configuring printers and cash drawers
After setting up your hardware physically, you need to configure your printers in the POS app.
We support two categories of printers:
-
Receipt Printer — Used for customer receipts and to provide a means for signature capture for credit card transactions.
-
Kitchen Printer — Used to print a kitchen chit. A chit contains instructions to the kitchen on how to prepare an item. Kitchen chits do not look just like regular receipts, they display the item name and note details (such as modifiers details) but it does not include any price information.
Note: If you only have one printer, it can be used as both a receipt printer and a kitchen printer.
-
Cash drawer — Used if you want to connect the cash drawer to the POS terminal through printer. When a user enters their PIN and opens a shift, they will be prompted to enter a starting cash amount.
Once you have set up your printer with your other hardware and have configured your network:
To configure printers:
-
Log in to the POS.

-
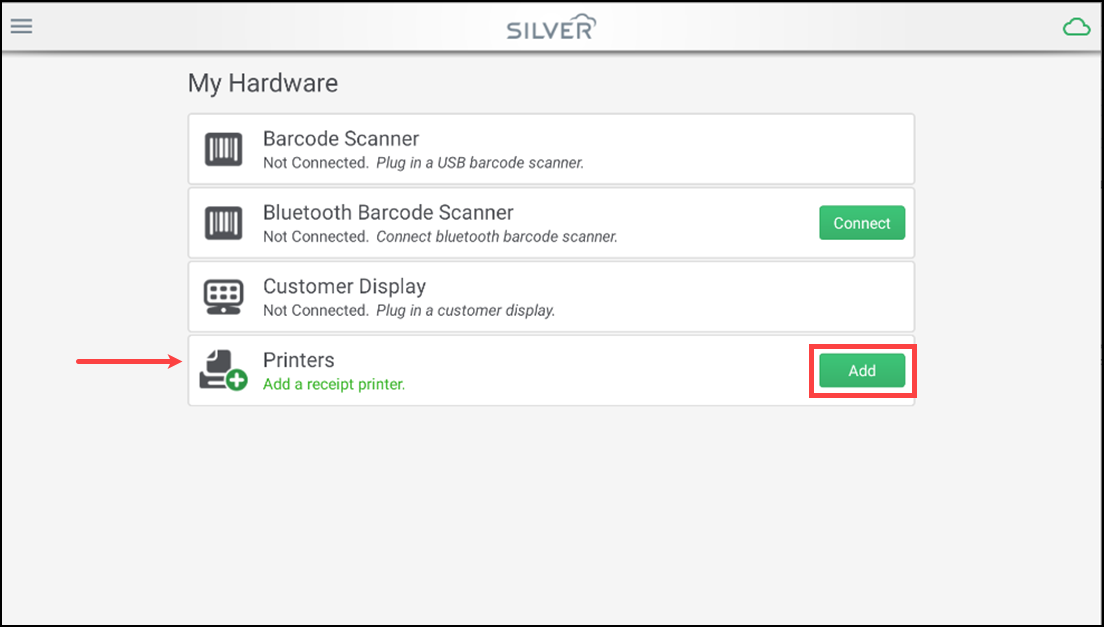
Tap hamburger menu icon to open the slide out menu and tap My Hardware.
-
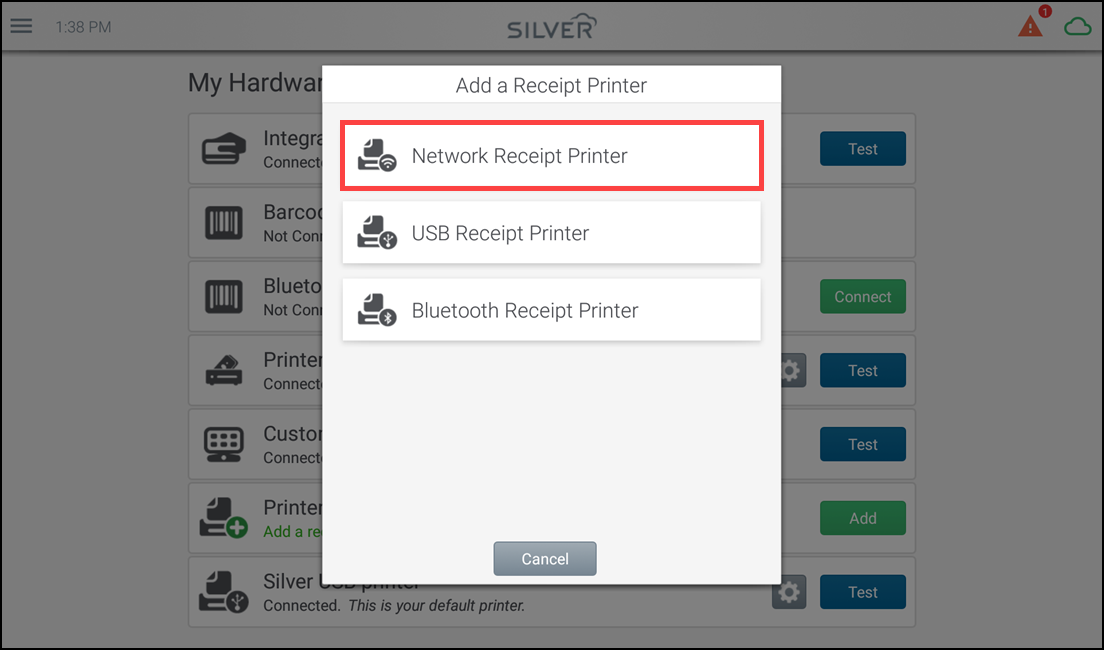
Tap Add at in the Printers group bar. The Add a Receipt Printer screen appears.
-
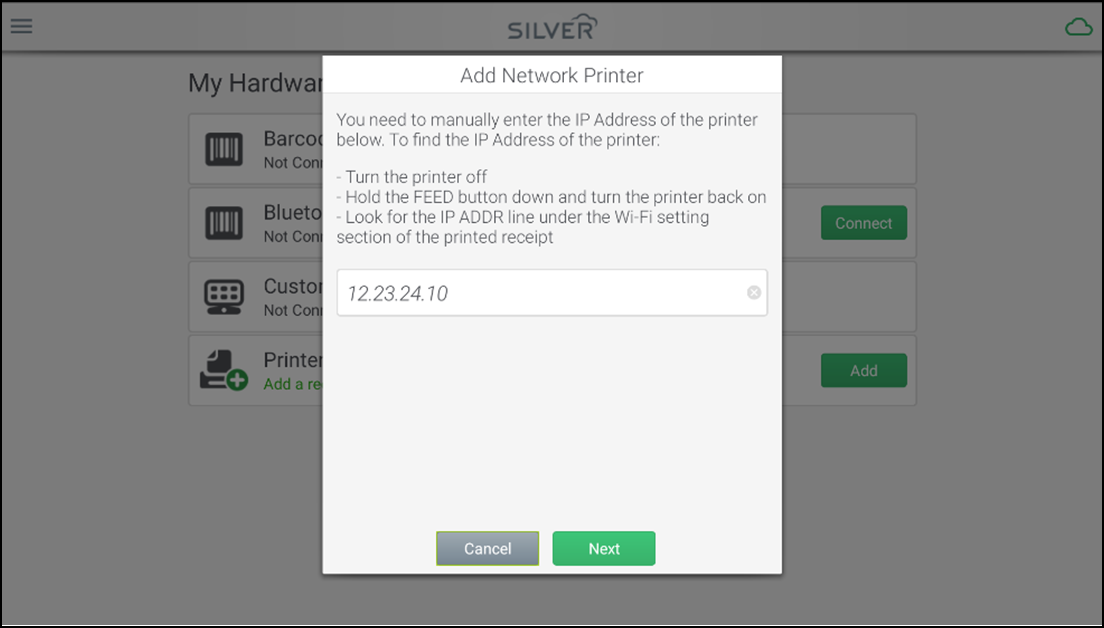
Choose the printer type to configure. For example, tap Network Receipt Printer. The Add Network Printer screen appears.
-
Enter the IP Address and tap Next.
-
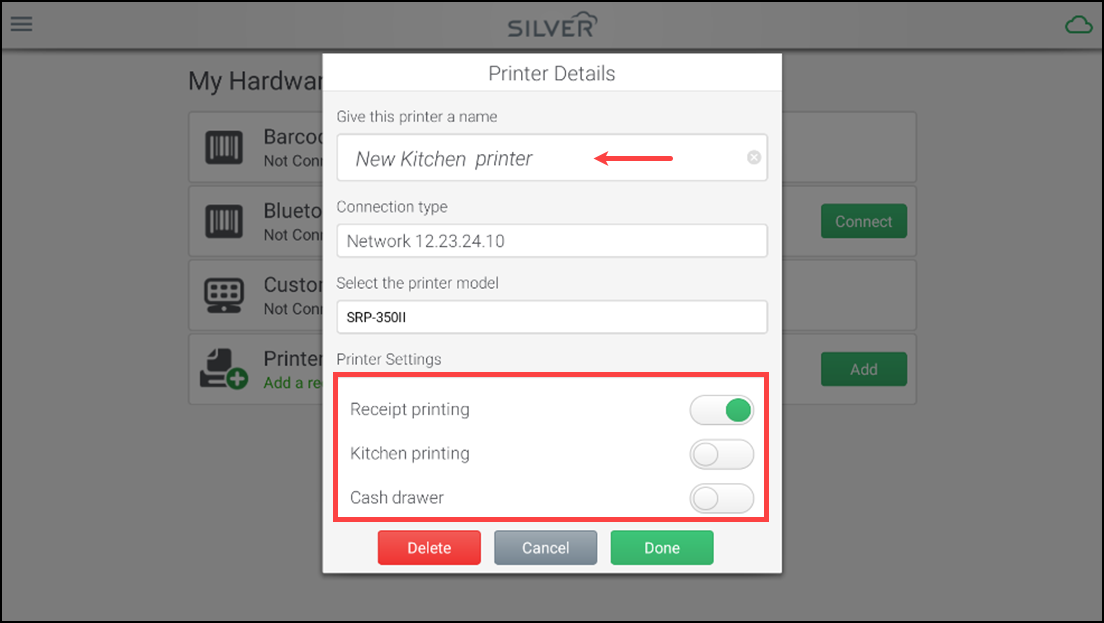
Give your printer a name that designates its purpose and/or location, such as Kitchen Printer or Front Counter Printer.
-
Define printer settings (role):
- Receipt printing: Turn Receipt printing ON if you want the printer to be able to print a receipt at the end of a transaction or during a hold/recall.
- Kitchen printing: Turn Kitchen printing ON if you want the printer to be able to print a kitchen chit automatically after completing a transaction or holding a ticket.
- Cash drawer: Turn Cash drawer ON if you want to connect the cash drawer to the POS terminal through printer. When a user enters their PIN and opens a shift, they will be prompted to enter a starting cash amount.
-
If you are only using your printer for receipt printing, skip to step 11. If you are configuring a kitchen printer, continue with step 8.
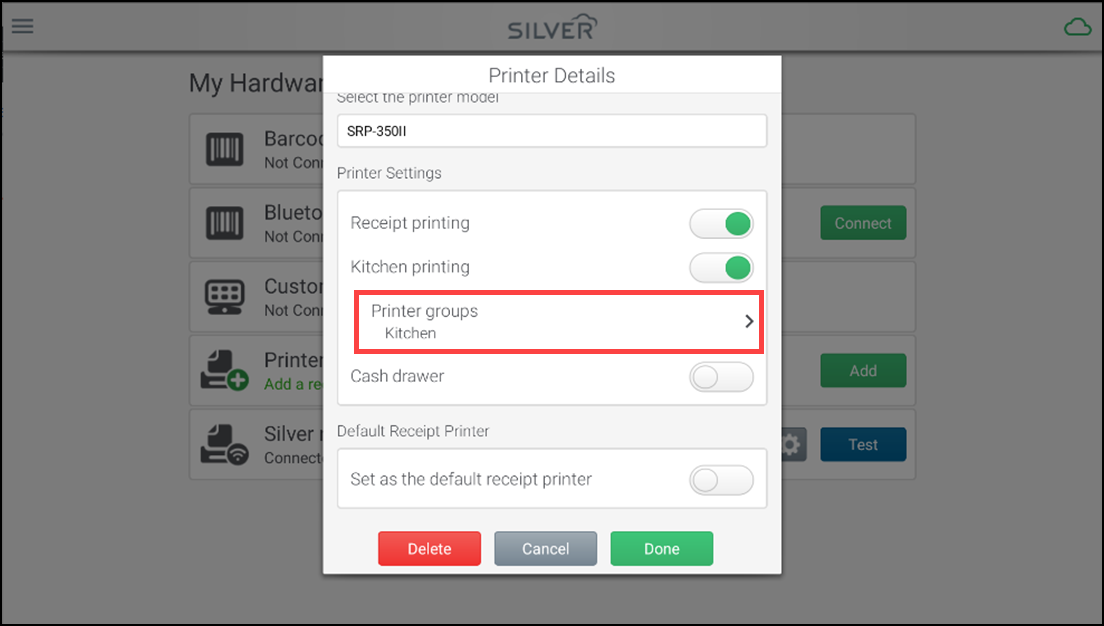
Once you have turned on kitchen printer, you can see an additional option called Printer groups. The Printer Groups screen appears.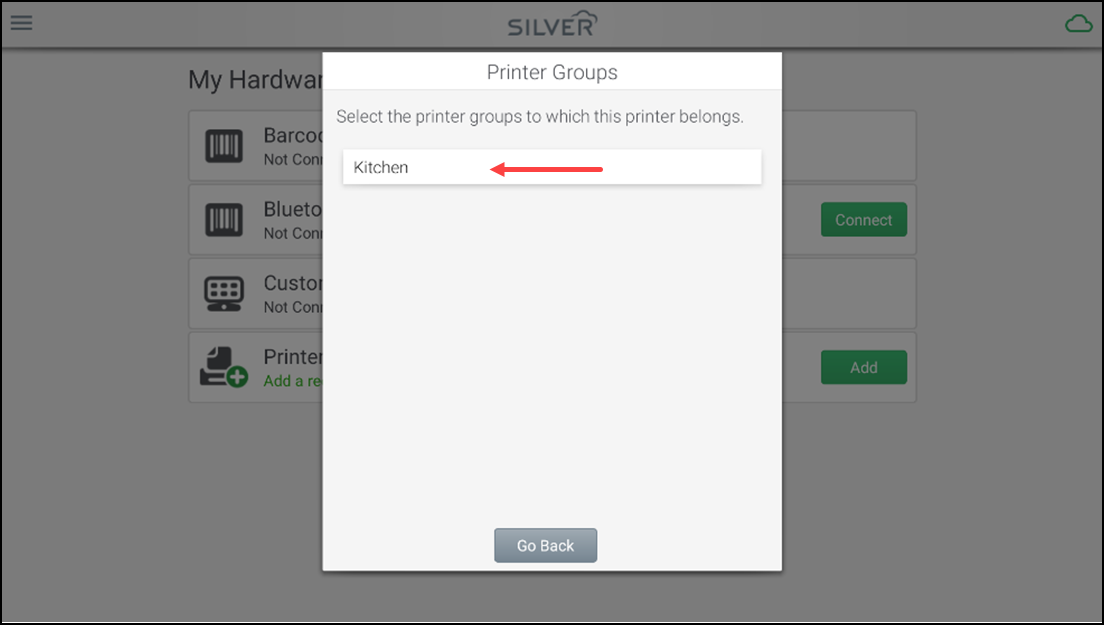
-
Tap the printer group to associate with this printer.
Note: You must assign at least one printer to each printer group, or the items assigned to that printer group are not sent to any kitchen printer.
-
Tap Done to return to the main page.
-
Set Cash drawer setting to ON if there is a cash drawer connected to the printer.
-
Tap Print test receipt to test your printer setup and printer settings.
Note: If you have multiple POS devices, you must configure each printer on each POS device for receipt printing and kitchen printing for printer routing to work properly.
Connecting the printers to the cash drawer
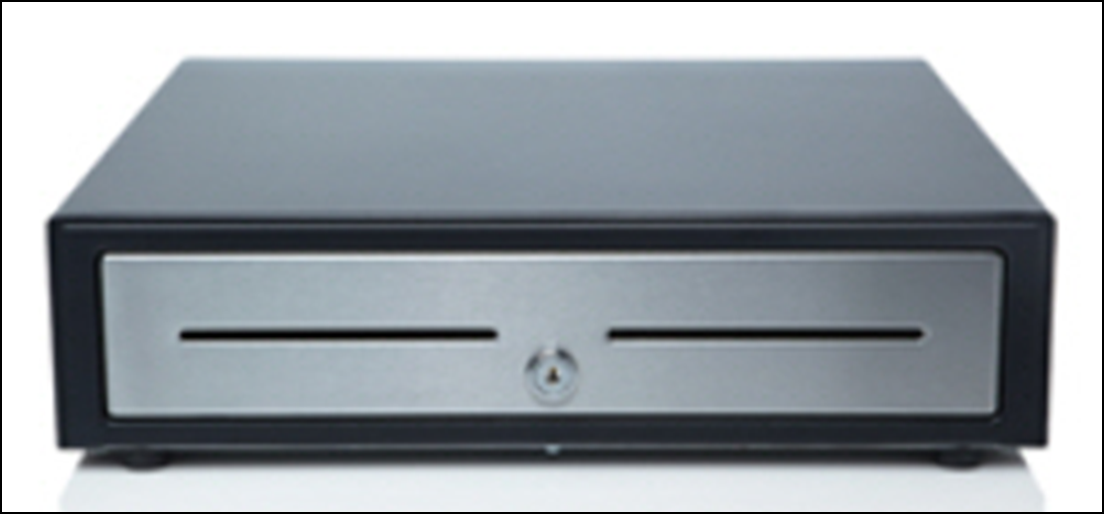
Note: When using the cash drawer without a receipt printer, you can use the provided key to manually open and close the cash drawer.
To connect printers to the cash drawer:
-
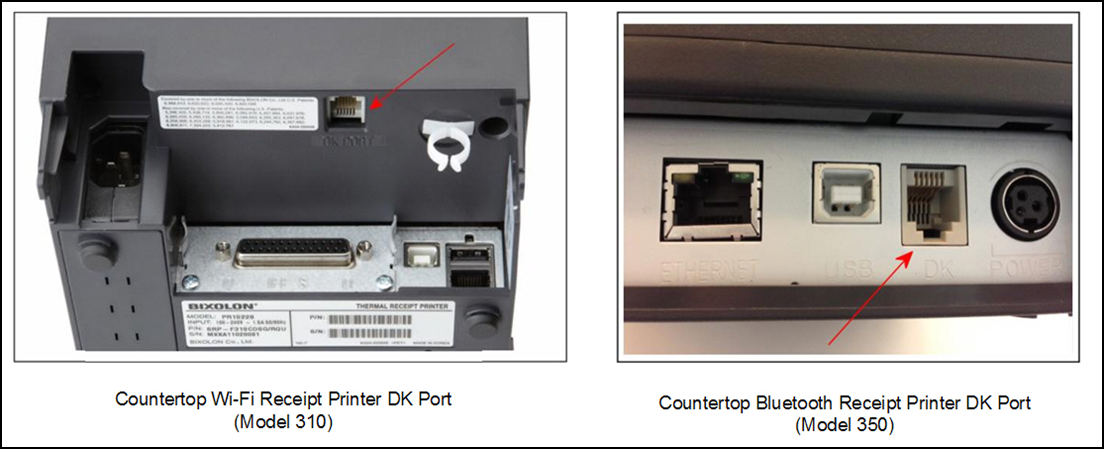
Locate the cable included with the cash drawer and connect the end of the cable labeled To Printer to the port labeled DK Port on the printer.
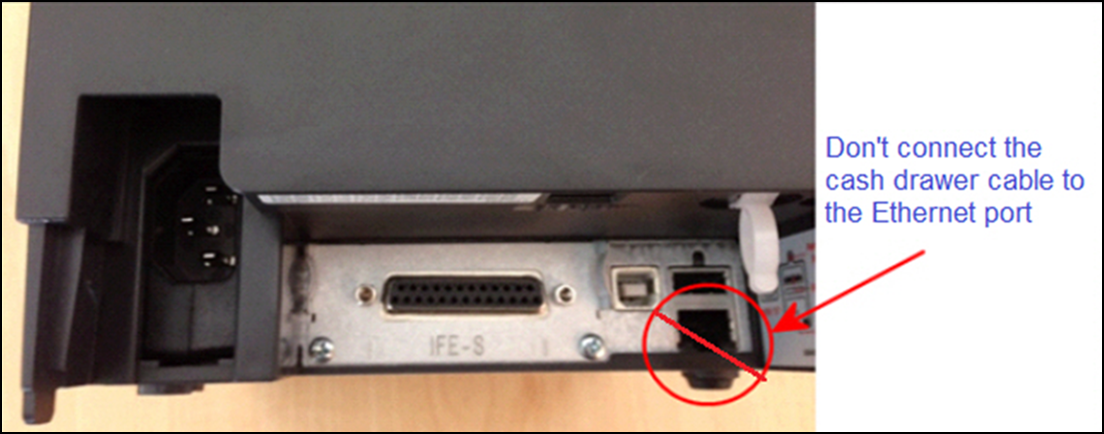
Caution: Do NOT connect the cash drawer cable to the Ethernet port on the printer!
-
Connect the other end of the cable labeled To Drawer to the port on the bottom of the cash drawer.
-
Insert the cash drawer key in the vertical position to ensure it is unlocked.
-
Verify the cash drawer option is turned on in the POS app in the My Hardware screen.
Enabling time clock
The time clock functions on the POS are enabled by default, but you have the option to disable it. By enabling time clock on just one of your devices, you can reduce duplicate time punches. This also ensures that employees will be warned of any duplicate and unpaired punches on the device even if the POS is offline.
When you disable the time clock functions, the Clock In and Clock Out buttons will not appear in the POS.
To select whether Time Clock is enabled on a device:
- Log in to the POS.
- Tap the hamburger menu icon to slide out menu and tap Settings.
- Scroll down to the Enable Time Clock section.
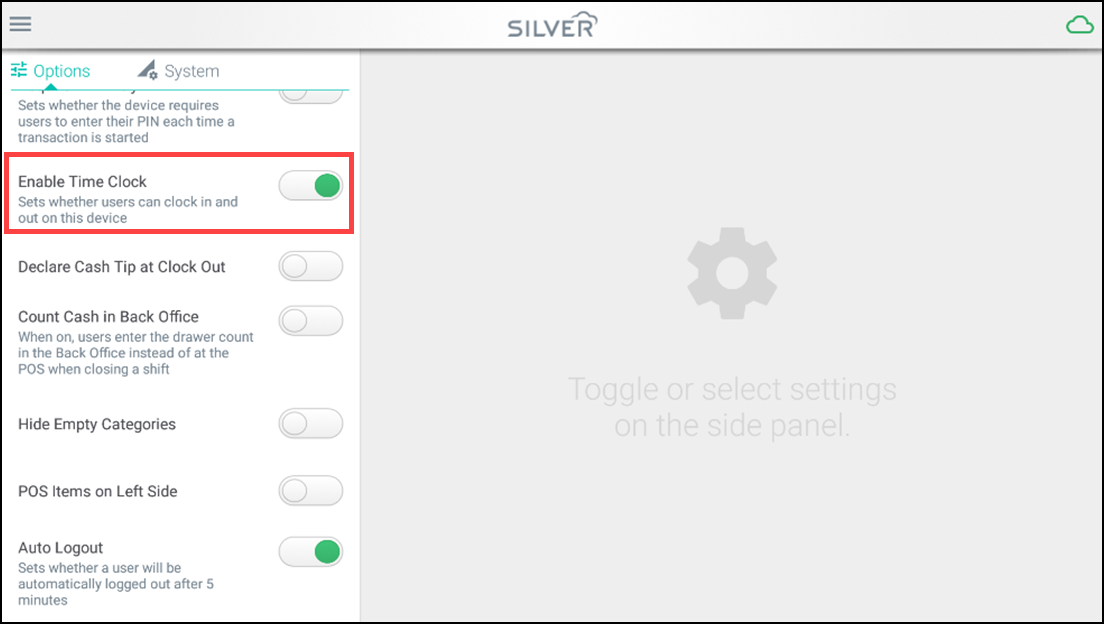
- Slide the ON/OFF slider to:
- ON (Green) — to enable time clock and display the Clock In and Clock Out buttons on the login screen (default).
- OFF (Gray) — to disable time clock and not show the Clock In and Clock Out buttons on the login screen.
- Close the slide out menu.
Logging out automatically
After you log in, the machine automatically logs you out, if you do not use the application within a given time, i.e. five minutes.
To configure the POS to log out automatically:
- Log in to the POS.
- Tap the hamburger menu icon to open the slide out menu.

- Tap Settings.
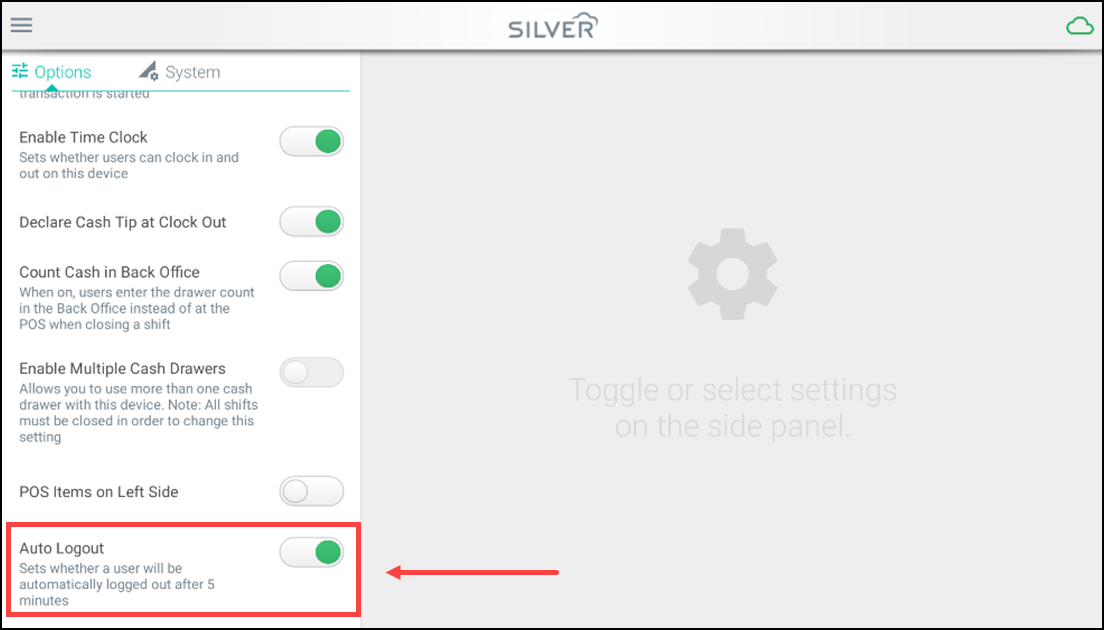
- Toogle Auto Logout to ON.
Testing network strength
It is basically a measure of the power received by your application. The greater the signal strength, the more reliable and faster your Wifi will be.
To test the network strength:
- Log in to the POS.
- Tap the hamburger menu icon to open the slide out menu.

- Tap Settings > System.
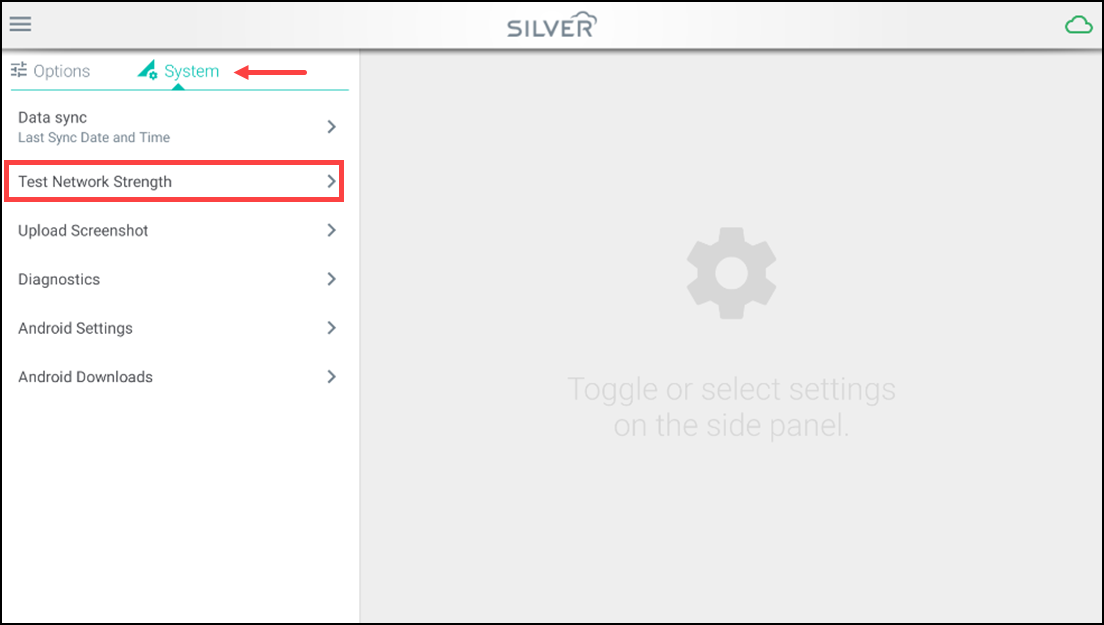
- Tap Test Network Strength. The Network Test window appears.
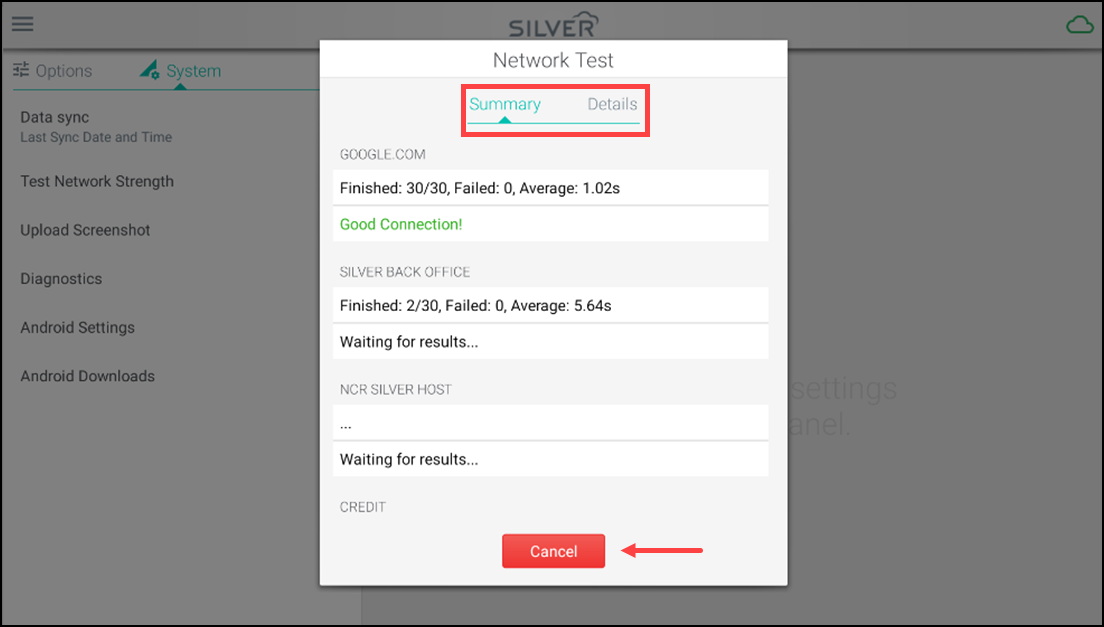
- Tap Cancel after viewing the details.
Uploading screenshots
Using this feature so you can upload the screenshots from the POS application. The uploaded screens can be downloaded in Back Office.
To upload the screenshots, do the following:
- Log in to the POS.
- Tap the hamburger menu icon to open the slide out menu.

- Tap Settings > System.
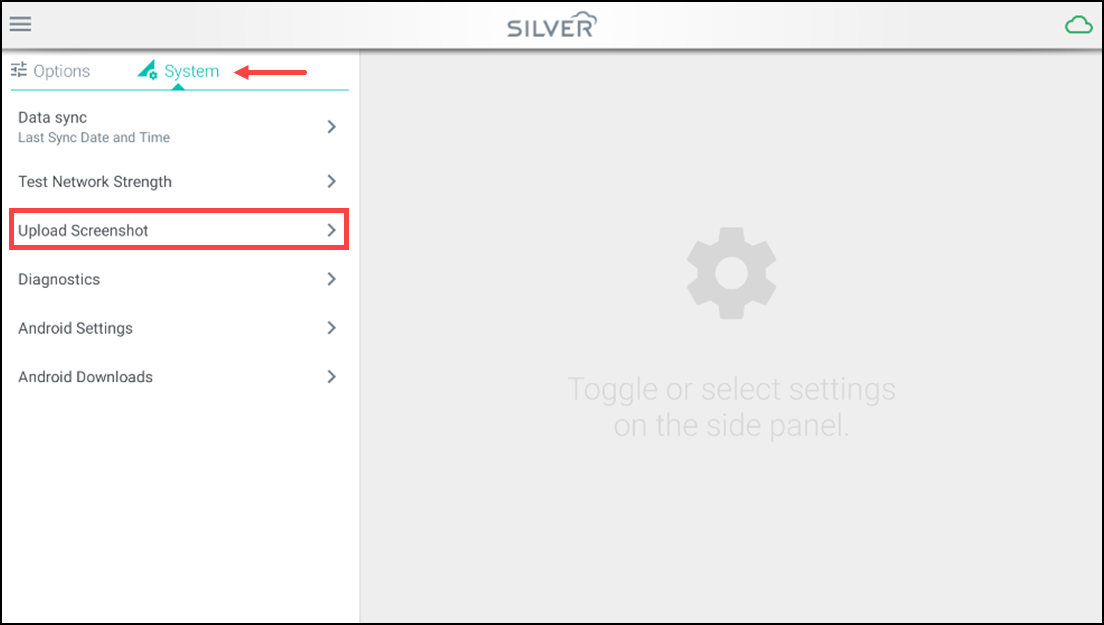
- Tap Upload Screenshot. The Screen Capture Upload screen appears.
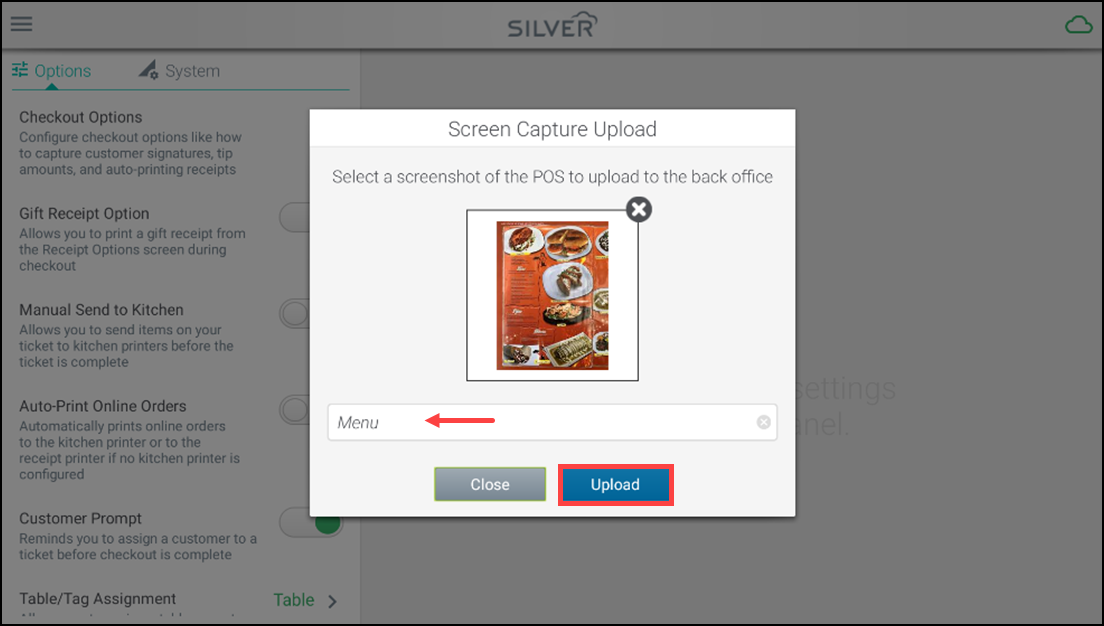
- Tap camera to upload the screenshots.
- (Optional) Enter the description to the screenshot.
- Tap Upload.
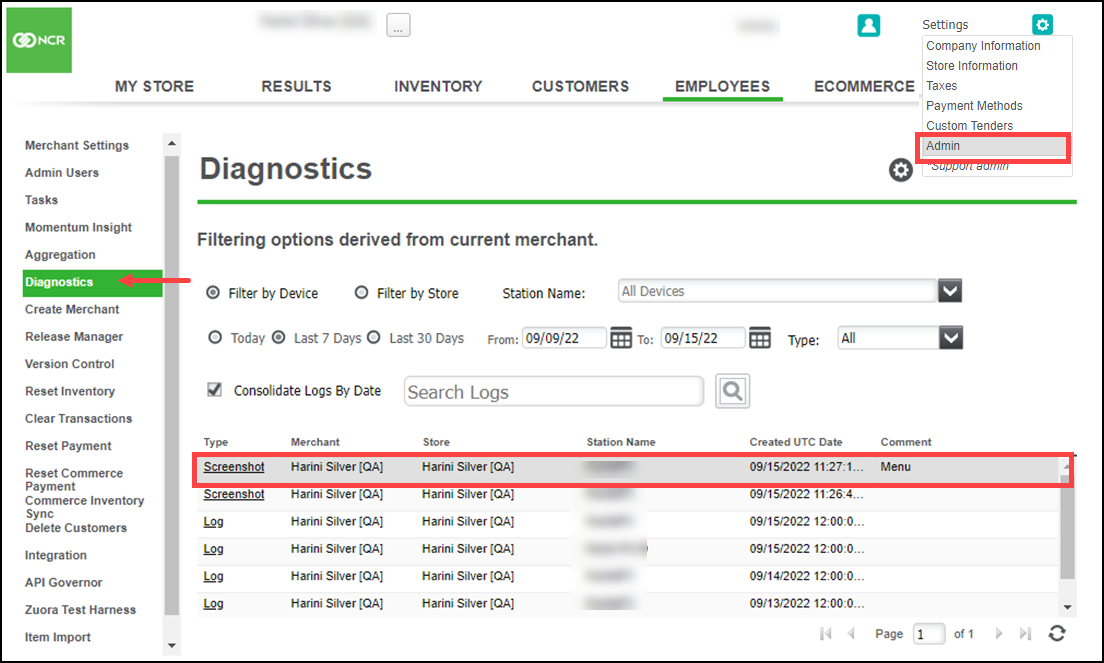
Note: An admin user, can download the uploaded screenshots from the Back Office. To download the screenshots, go to Settings > Admin > Diagnostics.
Running diagnostics
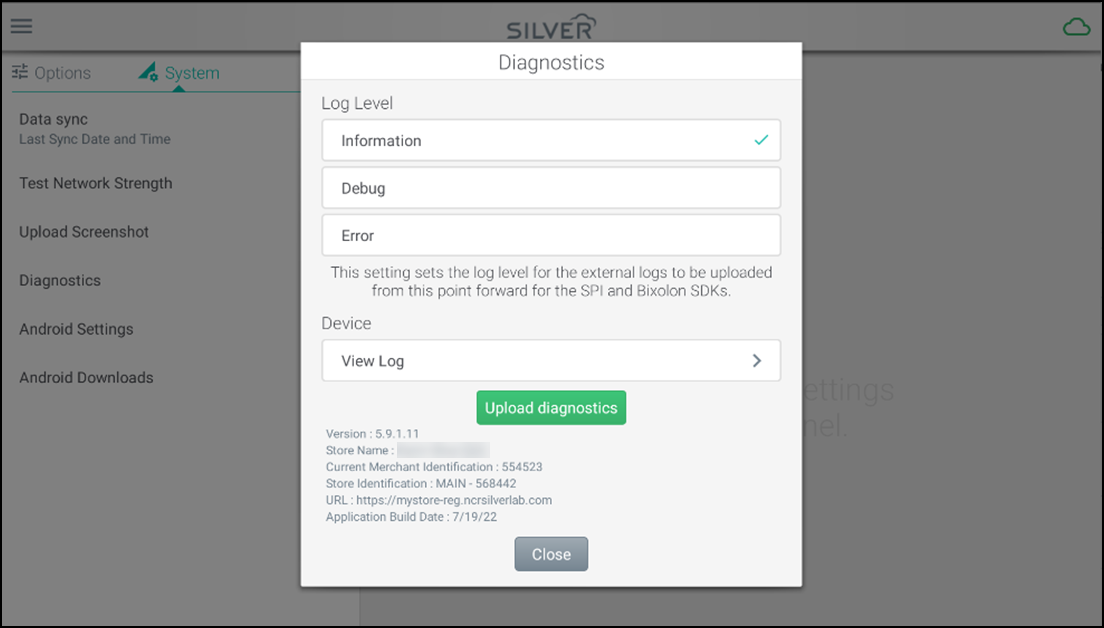
If you are having a problem with your application, you can run the diagnostic tests to debug and possibly solve the problem. And you can upload the logs to Back Office and if required you can view the logs by downloading them.
To run the diagnostics:
- Log in to the POS.
- Tap the hamburger menu icon to open the slide out menu.

- Tap Settings > System.
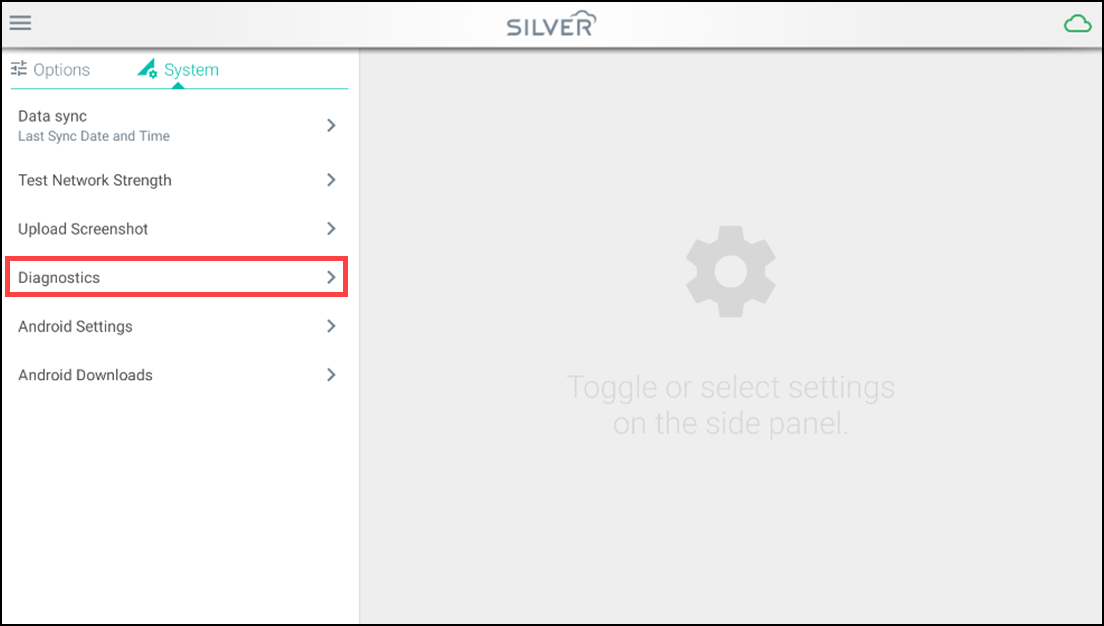
- Tap Diagnostics. The Diagnostics screen appears.
Configuring Android settings
Use this feature to set or configure the settings for your Android device.
To configure Andriod settings:
- Log in to the POS.
- Tap the hamburger menu icon to open the slide out menu.

- Tap Settings > System.
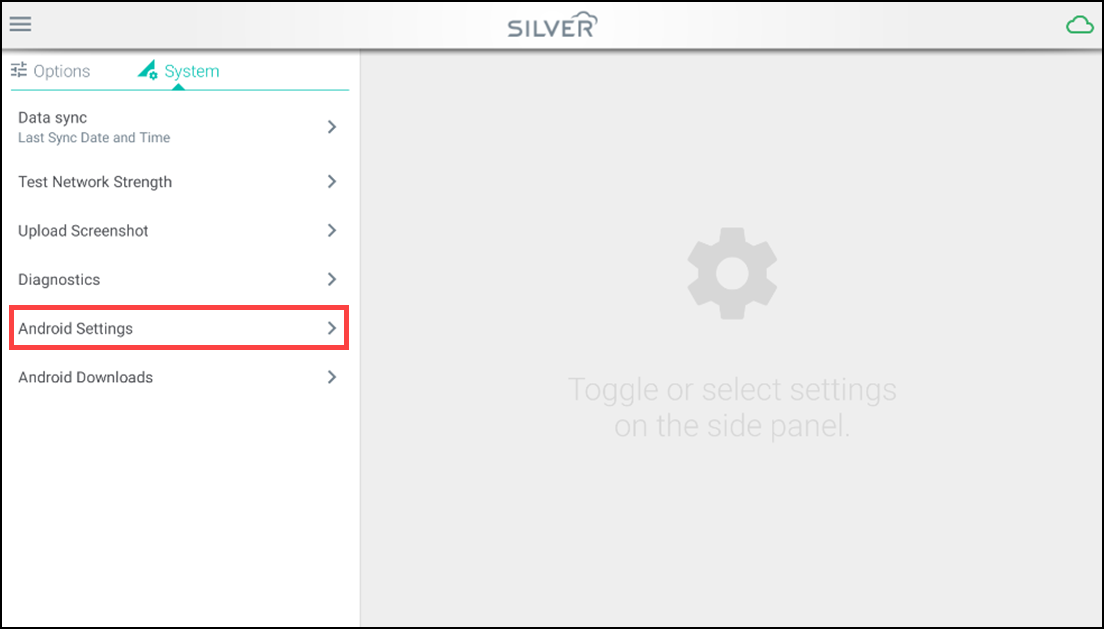
- Tap Android Settings. The device setting screen appears.
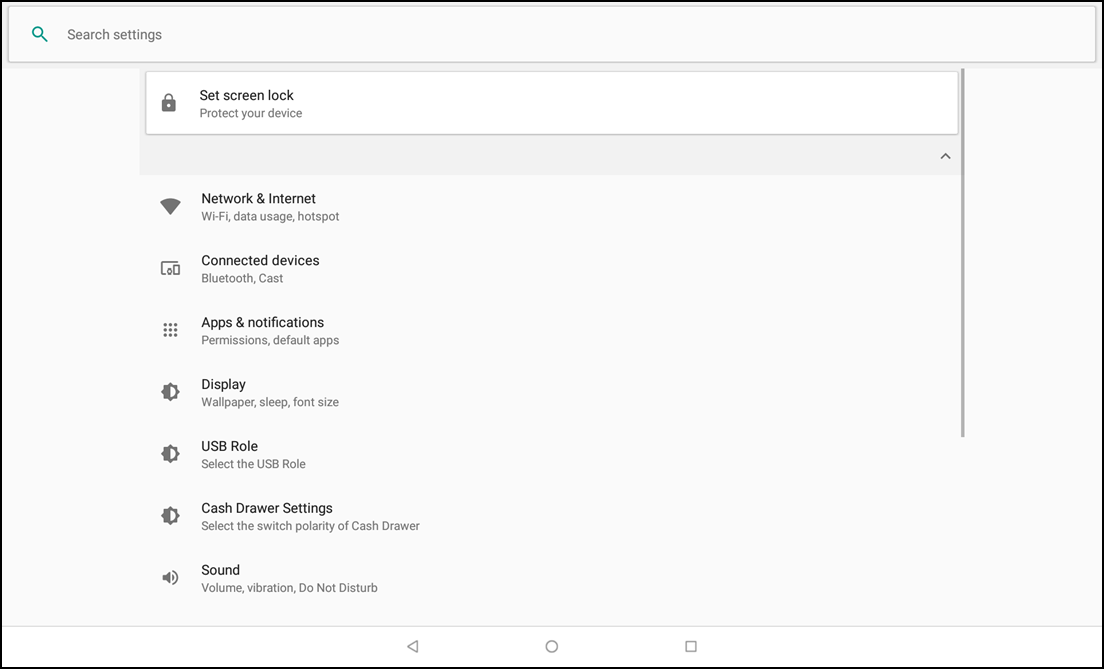
- Do the required changes to the device settings.
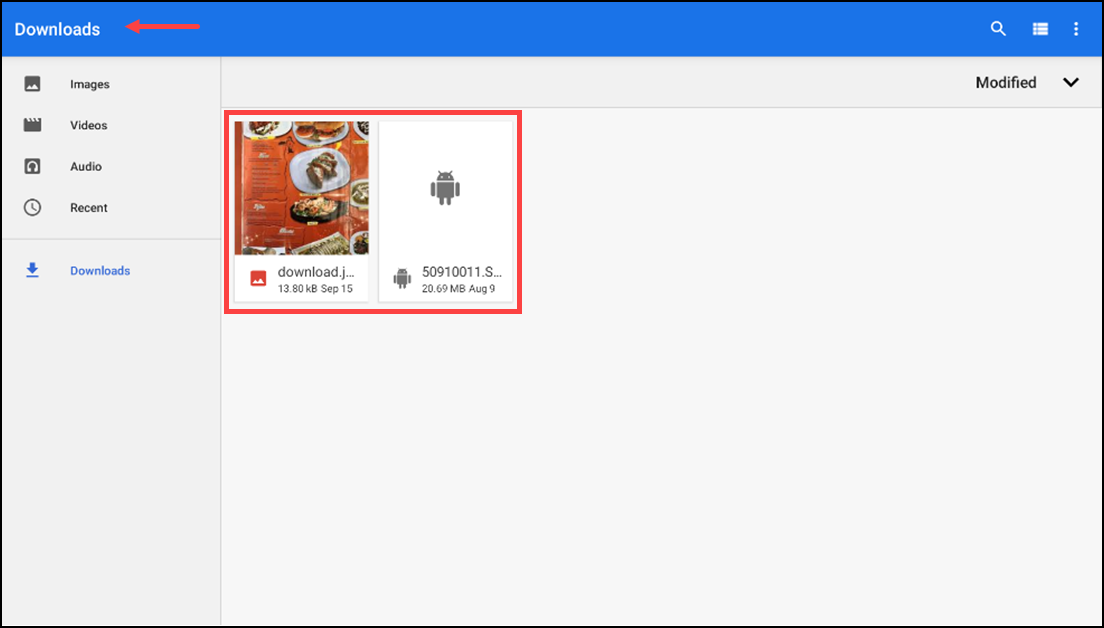
Viewing Android downloads
Use this feature to view the downloaded files in your Android device.
To view the downloaded files in your device:
- Log in to the POS.
- Tap the hamburger menu icon to open the slide out menu.

- Tap Settings > System.
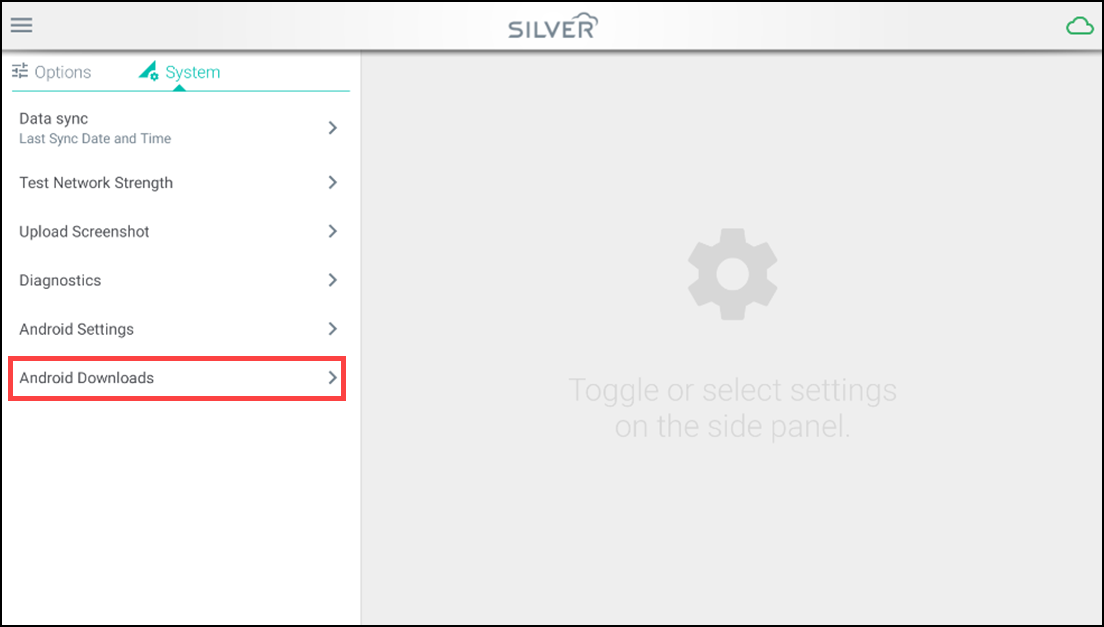
- Tap Android Settings. The device setting screen appears.
Looking for resources or help with Silver? Click here.