Working with guest tickets
This document discusses the following:
- Adding an item to a sale
- Applying a ticket-level discount
- Grouping and ungrouping like items on a ticket
- Putting a sale on hold
- Deleting an item from a sale
- Changing guest ticket tax amount
Adding an item to a sale
Selling items from the POS is quick and easy. From the ticket entry screen:
-
Log in to the POS. The ticket entry screen appears with your favorites available by default.
Note: With certain loyalty integrations, a prompt to start a ticket appears.
-
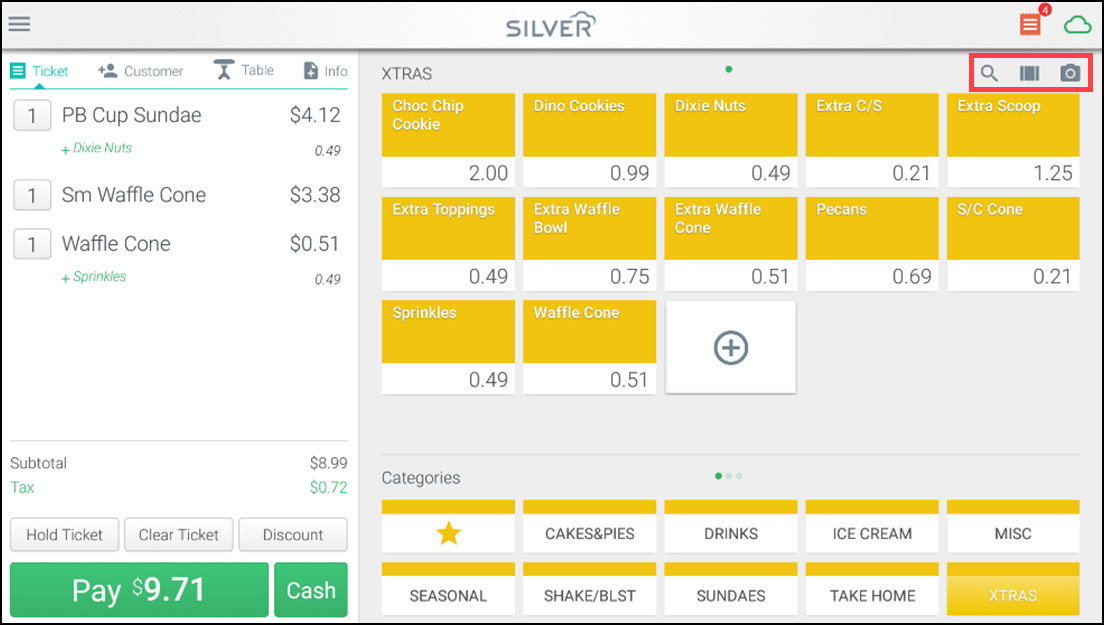
Tap the category to which the item is assigned and then tap the item to add. The item appears on the left panel in the ticket section.
-OR-
Tap the bar code icon on the ticket screen to manually enter a bar code and add an item to the ticket.
-
If you are unable to locate the item in your categories, search for and add items using one of the following methods:
- Tap the search magnifying glass icon located on the top right corner of your menu and search for the item.
- If using a bar code scanner, scan the bar code of the item.
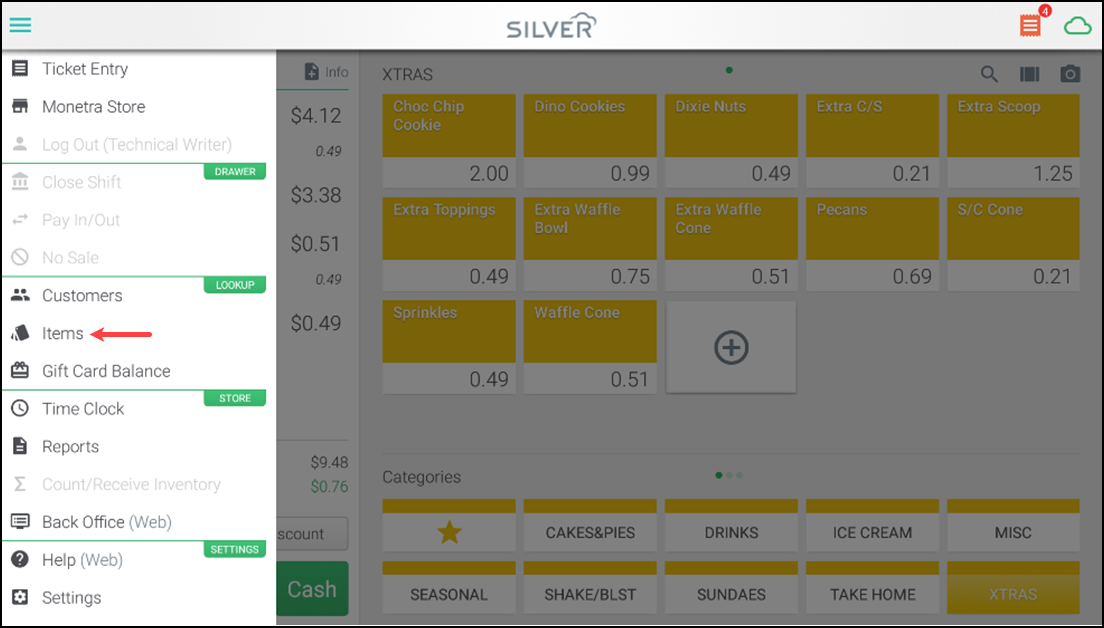
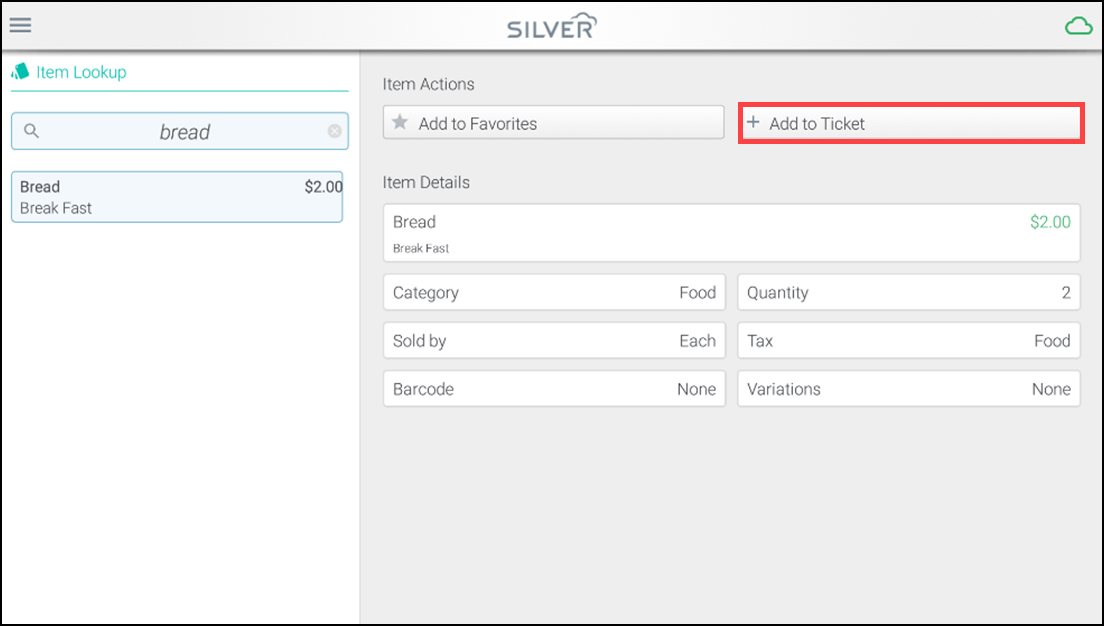
- Open the hamburger menu icon and tap Items under the Lookup heading. Search for and tap the item to open additional actions.
-
Tap Add to Ticket.
-
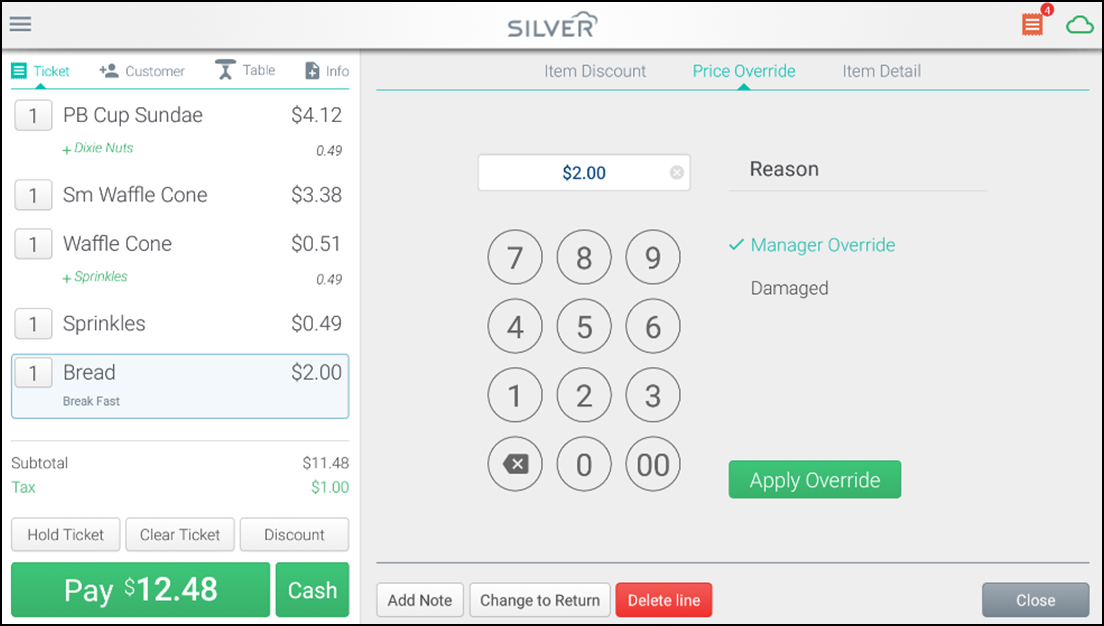
Once you add an item to a ticket, you can change the item quantity, override the item price, apply a line-item discount to the item, remove the item from the ticket, or group and ungroup items.
Note: If the item has variations, a prompt to provide additional information appears. If you enable the 'Prompt for price at POS' setting for the item, a prompt to enter the item price appears. Swipe the small "dot" buttons to scroll through all the available categories and items.
Applying a ticket level discount
If ticket-level discounts are defined in Back Office, you can apply a single discount to the ticket.
-
Log in to the POS.

-
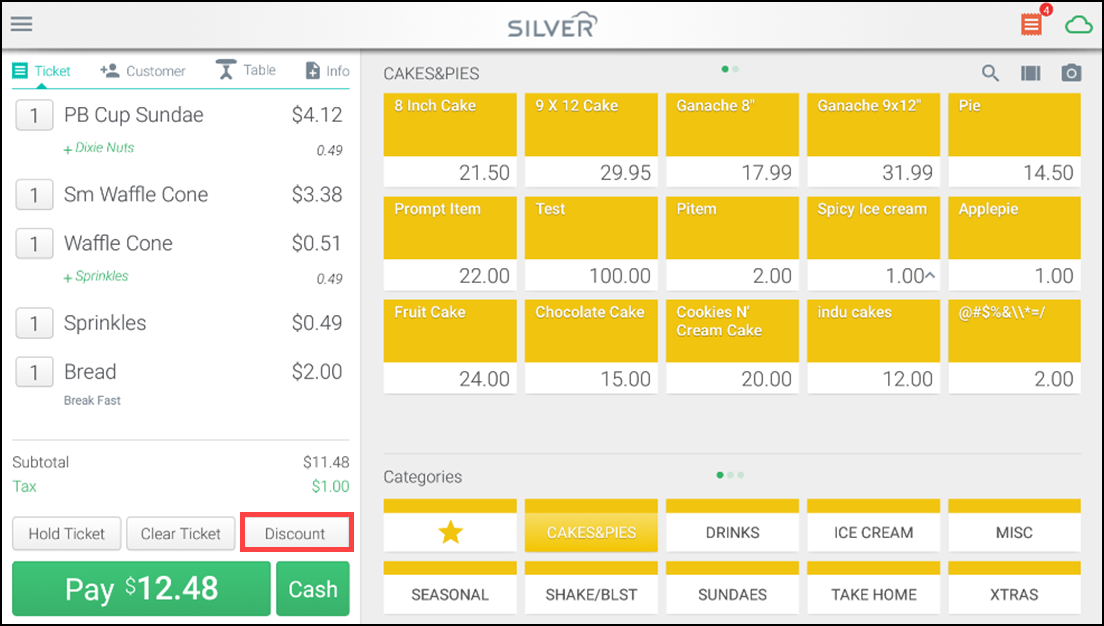
Add the items to the sale.
-
Tap Discount at the bottom of the ticket screen.
-
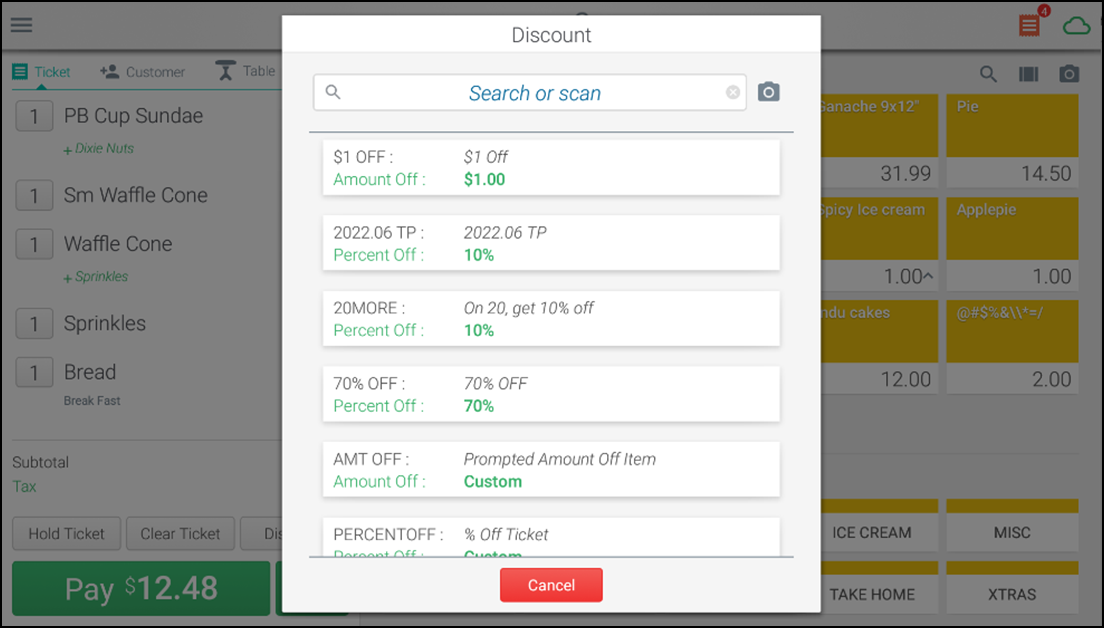
Tap the discount to apply from the list of available discounts. You can also scan discount barcodes to apply.
-
Do one of the following:
- If you selected a ticket discount that was not set up to prompt for an amount or a percent, skip to step 7.
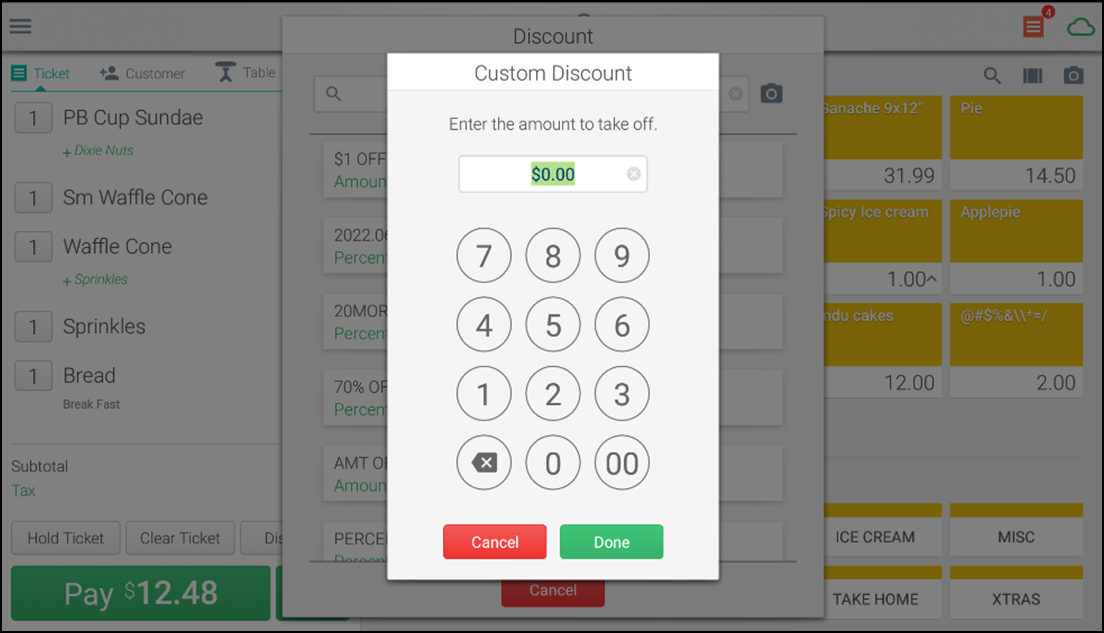
- If you selected a ticket discount that was set up to prompt for an amount or a percent, continue with step 6.
-
Use the numeric keypad to select the discount amount (percent or dollar amount).
-
Tap Done.
The discount appears near the bottom of the ticket.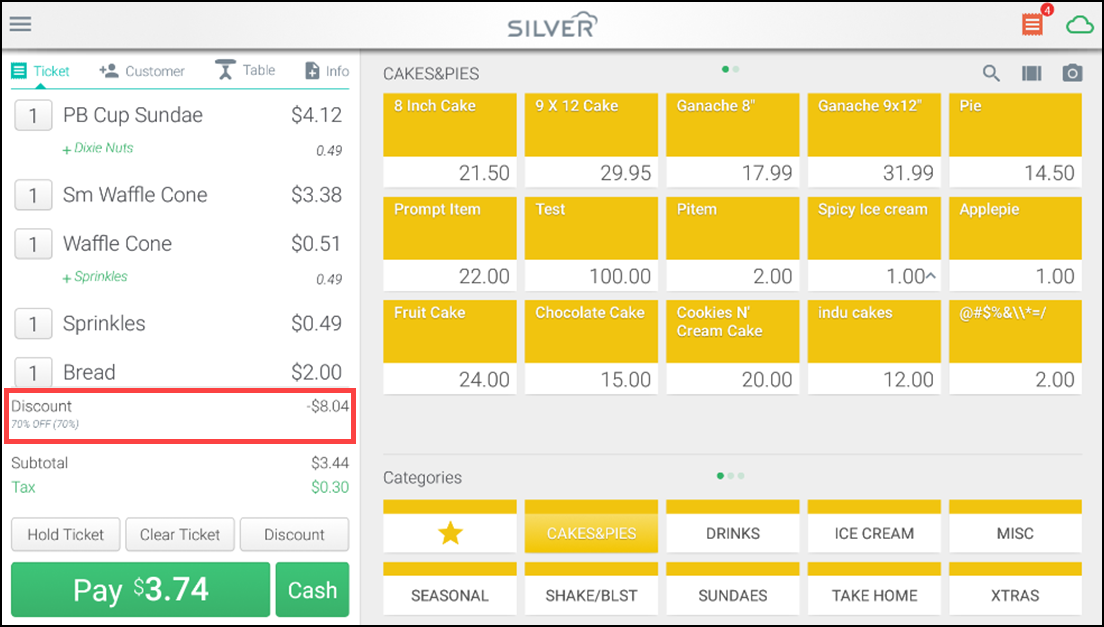
Note: You cannot apply ticket-level discounts to tickets that include one or more return items.
Tip: To remove a ticket-level discount, tap Discount, and then tap the discount code to remove.
Grouping and ungrouping like items on a ticket
The POS app allows you to group and ungroup like items on a ticket. This gives you more flexibility in applying discounts, price overrides, modifiers, and more to an item.
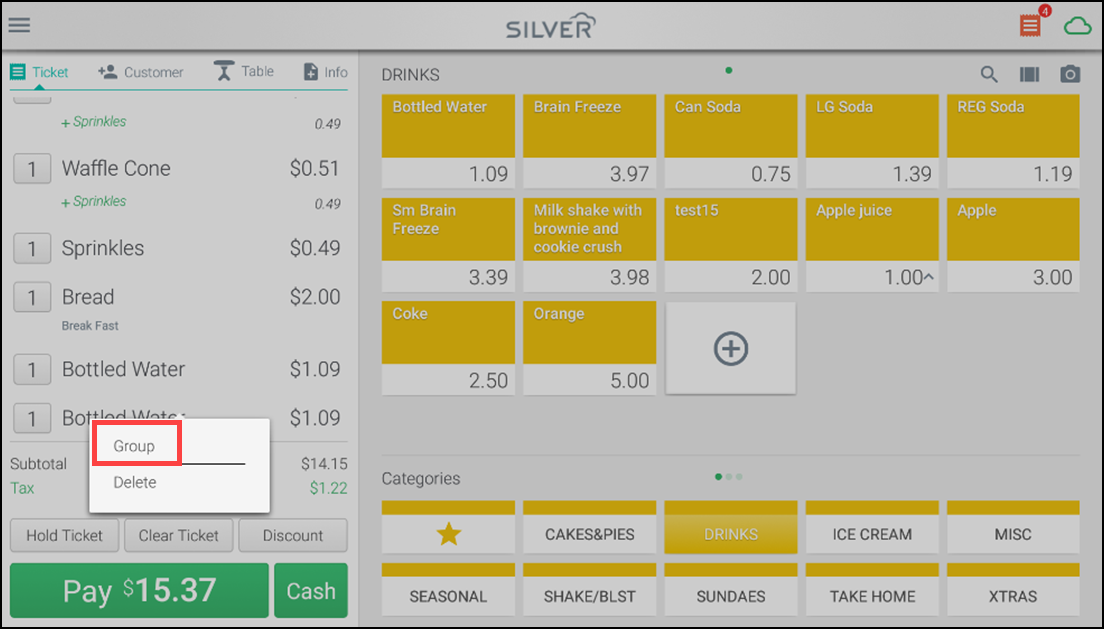
Tip: If you have multiple lines of the same item with identical attributes on the ticket, swipe the item and tap Group to group the items on a single row with the appropriate quantity displayed. Once you group an item, you can swipe on the item and tap Ungroup (for a quantity less than 50).
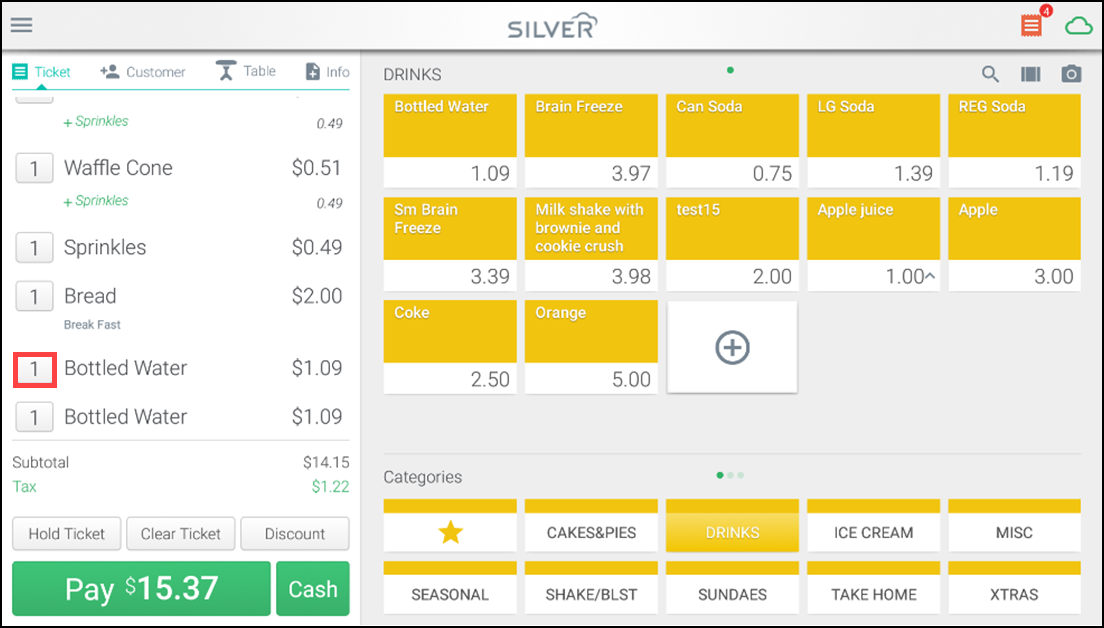
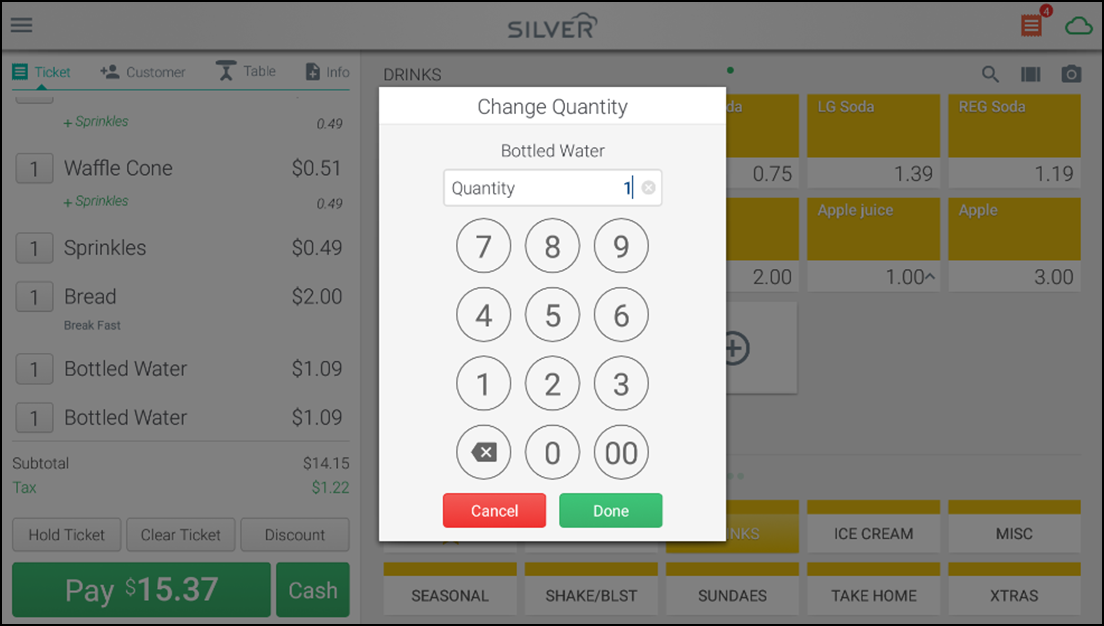
Tip: You can also tap the quantity shown in the box at the far-left of the line item. Tapping the quantity opens a numeric keypad where you can enter the quantity for the item, rather than tapping the item numerous times.
Clothing Store - Does Not Use Modifiers:
A customer purchases five identical pairs of jeans (at $45 each) and five white T-shirts (at $10 each) and provides a coupon for 25% off one item. Add the first pair of jeans to the ticket and then add the discount to those jeans. Then, add the other four pairs of jeans and the five white T-shirts. Because the other four pairs of jeans are exactly the same (but don't have a discount applied to them), you can swipe across the blue jeans line item and tap Group, to group the other four pairs of jeans as one item with a quantity of four. Do the same thing for the five identical white T-shirts.
Small Cafe - Uses Modifiers:
Modifiers provide additional information for an item and are commonly used in restaurants. The system essentially "attaches" the modifiers to the item, ensuring the kitchen or prep area gets the order correct. For example, a group of threefour people may each order a hamburger; however, the first customer adds cheese and pickles, the second customer wants the hamburger plain with meat and bread only, and the third customer wants the hamburger with extra onions and no mayonnaise. By placing each hamburger on a single row, you are able to capture these details for each hamburger. The items, along with their associated modifiers, print to the receipt printer.
At the same cafe, another customer orders four sesame seed bagels, all toasted with cream cheese and four small cups of coffee. Because the bagels and the coffees are all the same, you can simply swipe and group the bagels as a single line item with a quantity of four and add the four cups of coffee using the same method.
Putting a sale on hold
Putting a sale on hold allows you to continue completing transactions while you wait for something or someone to complete a transaction.
Scenario: A customer has begun the checkout process, but realizes they want to buy something else in addition to what they brought to the counter. Place the transaction on hold to save the transaction, and continue checking out other customers while the original customer selects their additional items. This scenario also works for customers in a bar/restaurant setting who may be running a 'tab.'
-
Log in to the POS. The ticket entry screen appears.
-
Add items to the ticket.
-
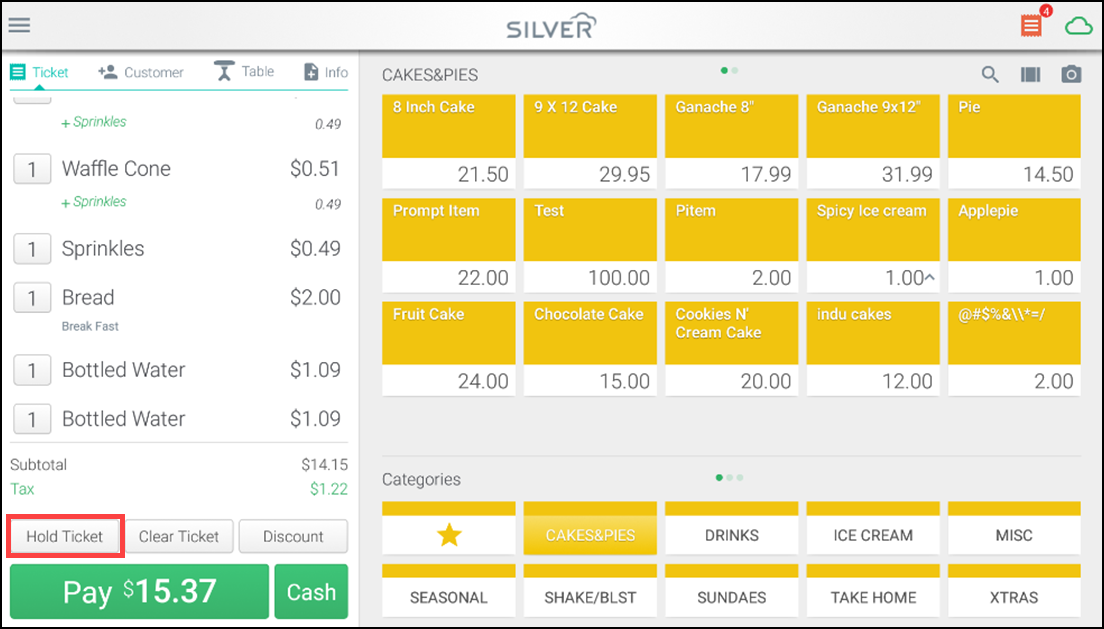
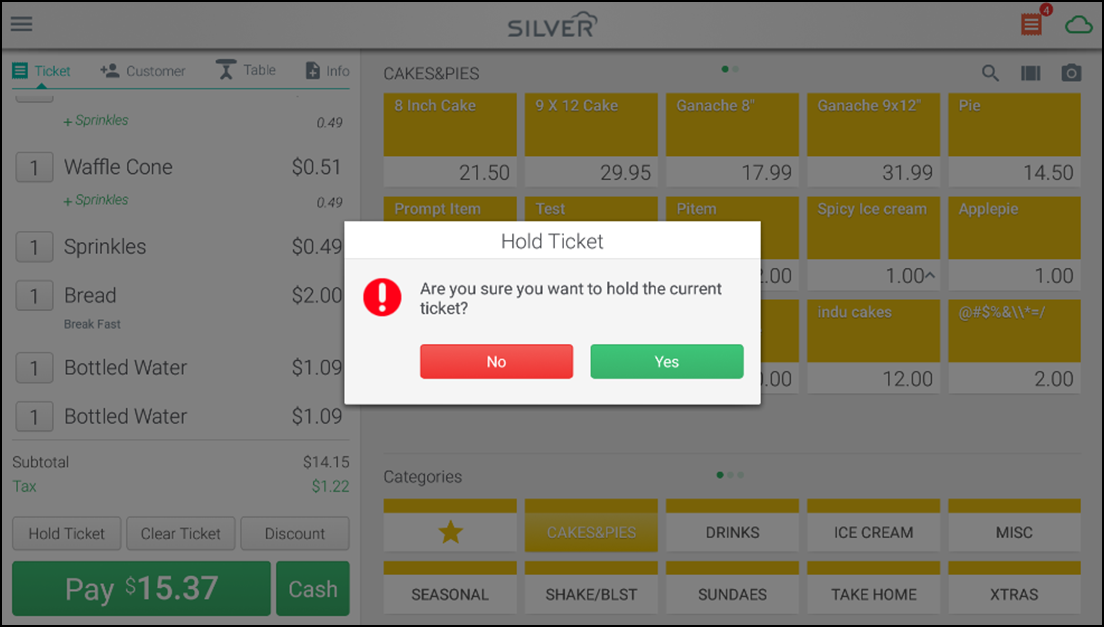
With the guest ticket active, tap Hold Ticket at the bottom of the ticket screen. The Hold Ticket screen appears.
-
Tap Yes to put the current sale on hold.
-
If the table/tag assignment feature is enabled, select the table/tag.
Note: If the sale includes any payments, they are deleted (and the corresponding credit card authorizations reversed) when you place the sale on hold. Placing an item on hold automatically prints the "chit" to the kitchen printer if set up.
-
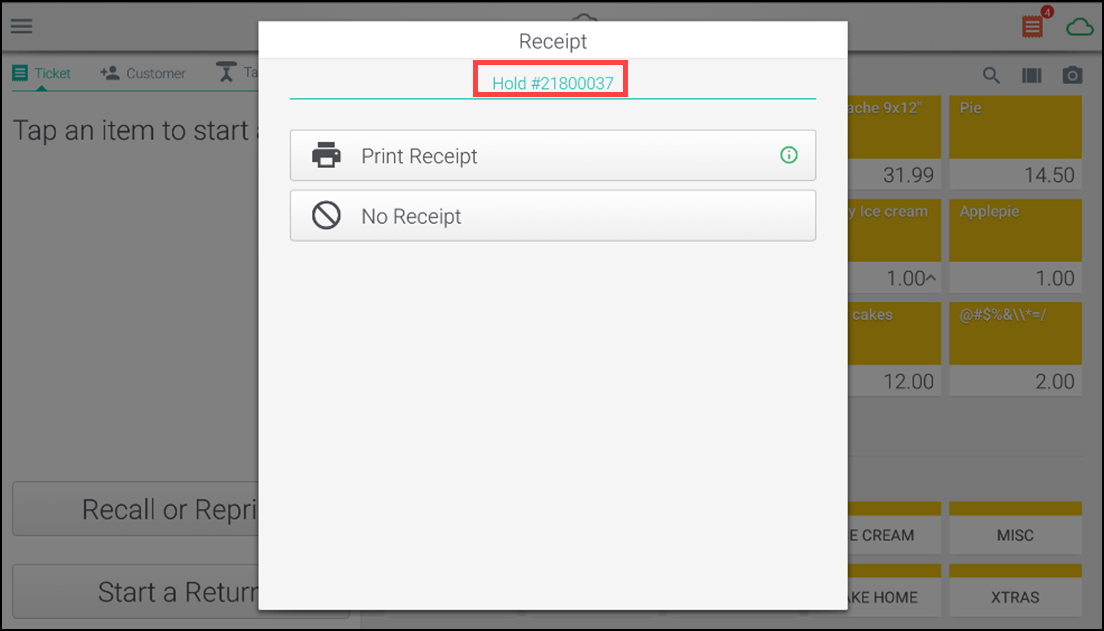
Tap Print Receipt to print a receipt for the hold, or tap No Receipt. The system returns you to the ticket entry screen. A hold receipt is identical to a regular sales receipt, except that your store name and address are replaced by the word HOLD at the top of the receipt.
Note: Any held tickets will be lost if you ever are instructed to delete the POS app.
Deleting an item from a sale
There are several ways to delete an item from a sale:
- Log in to the POS.
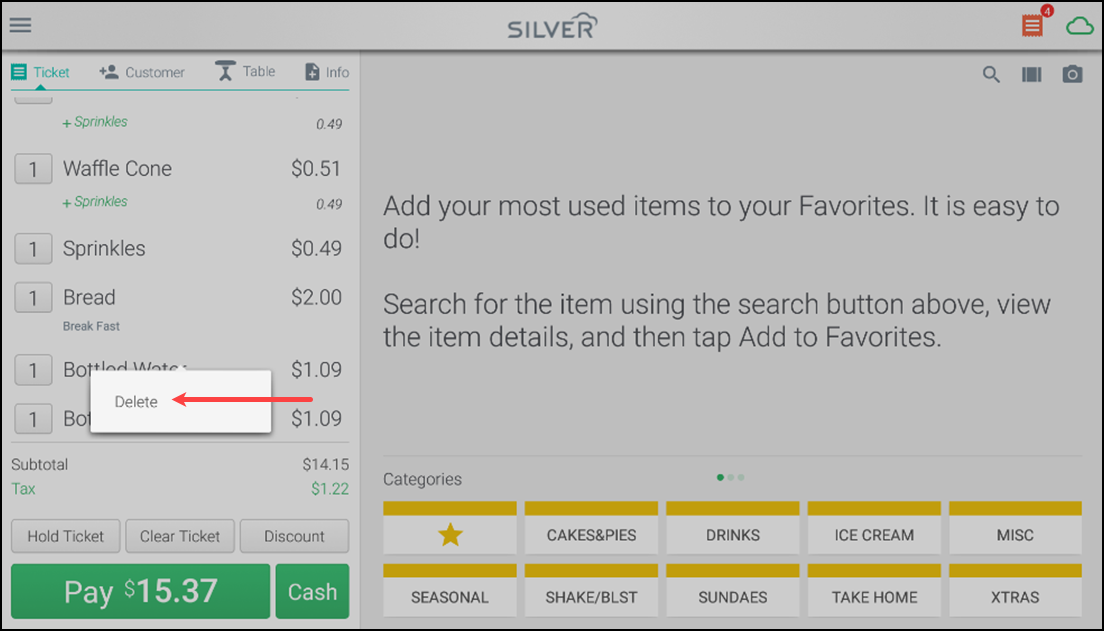
- With the guest ticket active, tap and swipe the item line, and then tap Delete.
Changing guest ticket tax amount
You can change the tax amount for the ticket, but not for individual items on the ticket. If the tax category or tax rate is incorrect, you can edit that information in Back Office.
-
Log in to the POS.
-
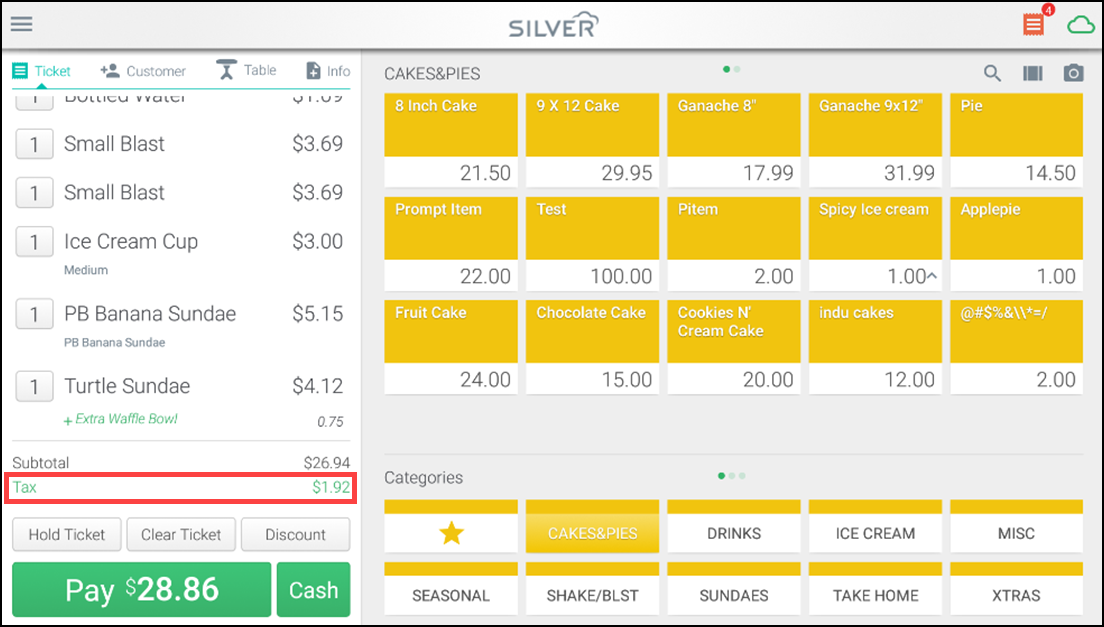
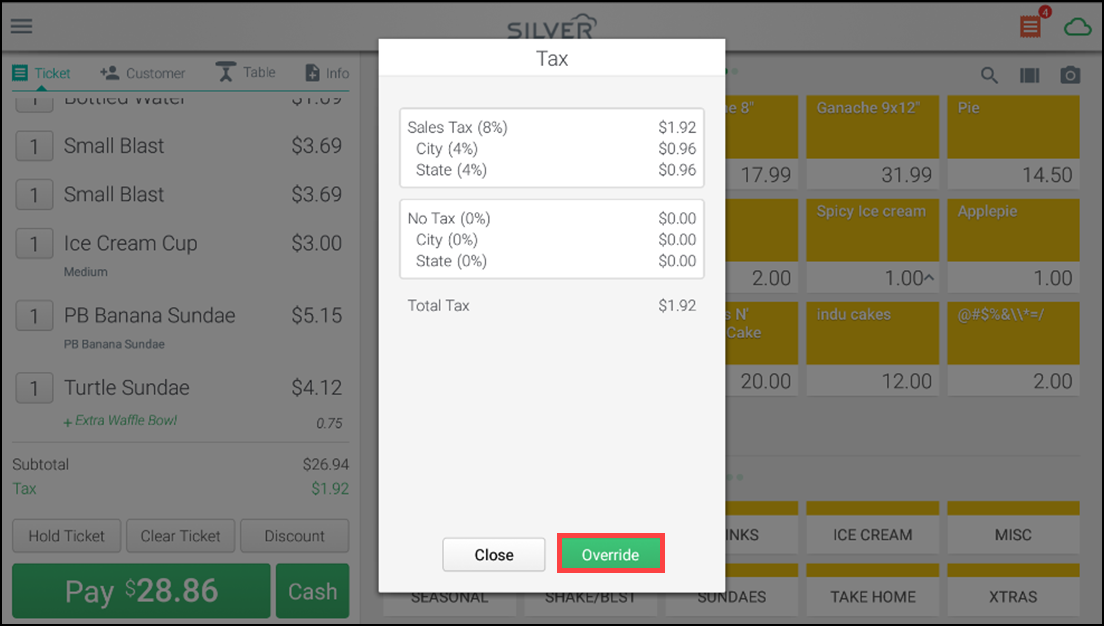
With the guest ticket active, tap Tax at the bottom of the screen. The Tax screen appears.
Tip: You can also tap the Tax amount in the Ticket view to view the tax categories and rates for each item in the ticket. Then tap Override to continue.
-
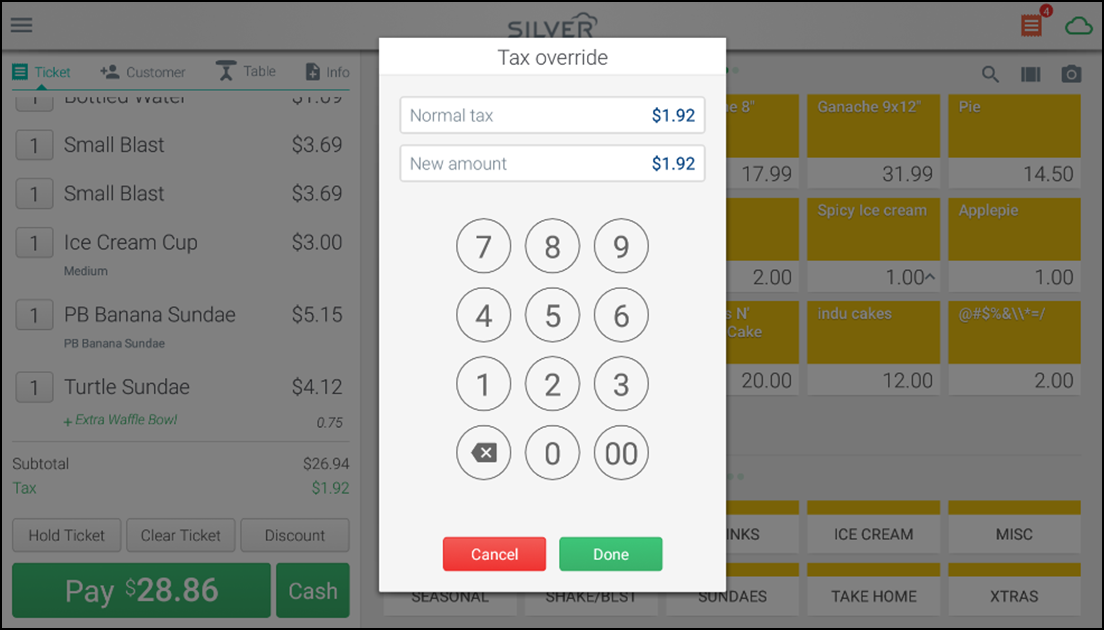
Tap Override. The Tax Override screen appears.
-
Use the numeric keypad to enter a new tax amount.
-
Tap Done.
Looking for resources or help with Silver? Click here.