Working with items
This section discusses the following:
- Using the POS to add a new item
- Using the POS to add an extended item
- Using the POS to edit an item
- Viewing item details in the POS
- Adding items to the favorites list
- Using the POS to rearrange items
- Looking up an item in the POS
- Overriding an item price
- Using the POS to link a bar code to an existing item
- Using the POS to add a bar code not on file
- Changing an item quantity
- Working with item variations
- Selecting modifiers
Using the POS to add a new item
You must be assigned to a user role with permission to access the Category/Item Management feature to add a new item from the POS.
- Log in to the POS. The ticket entry screen appears.
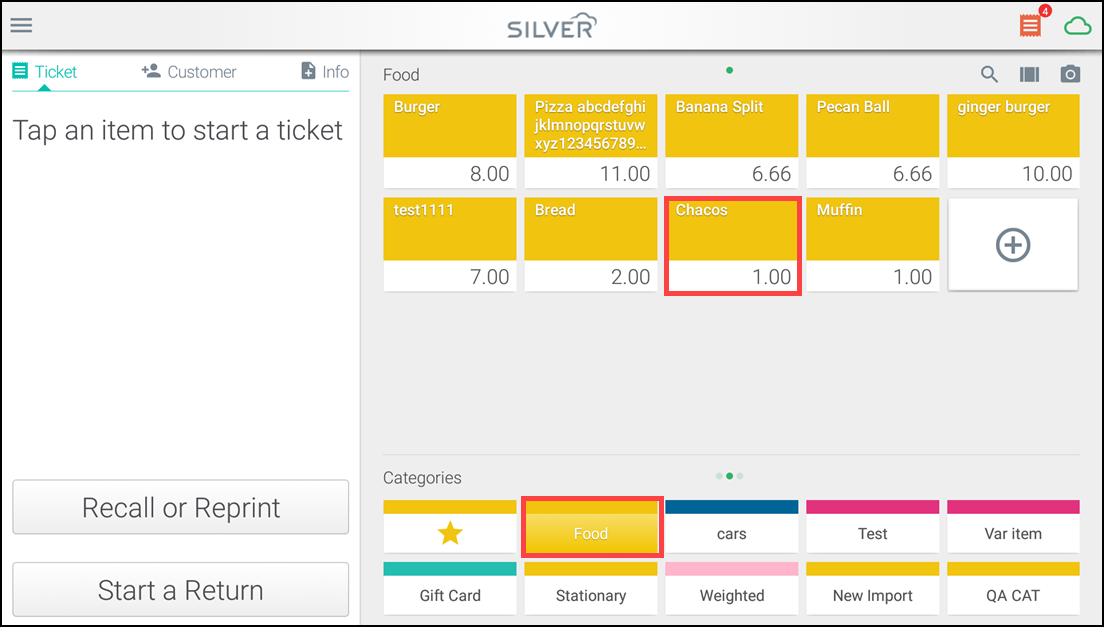
- Tap the category to which to add an item.
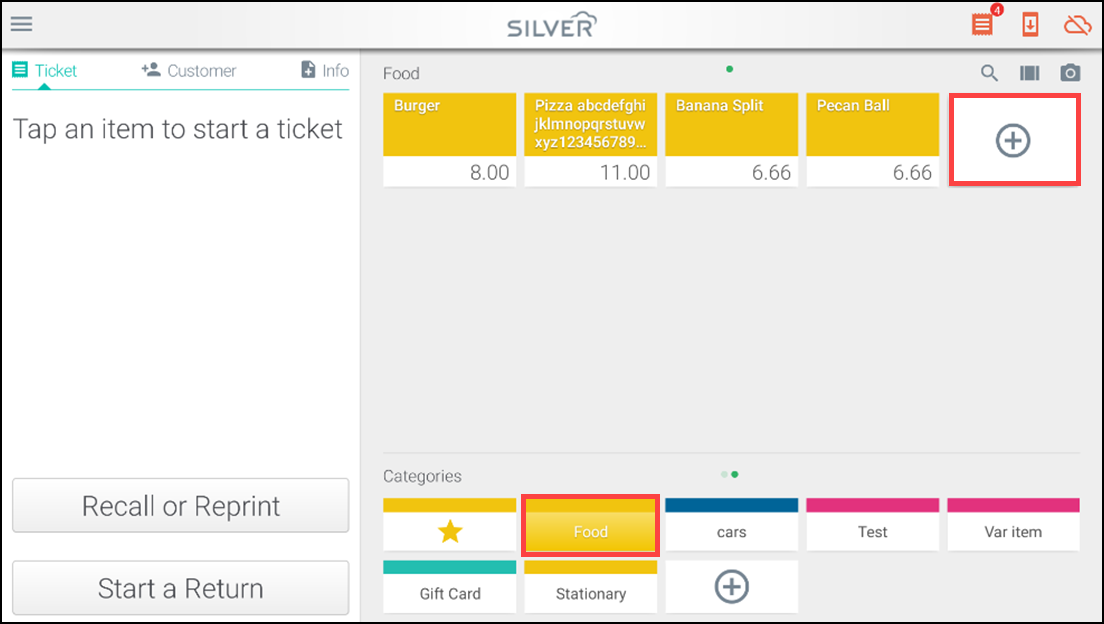
- Tap the add icon (+) in the category. The Add Item screen appears.
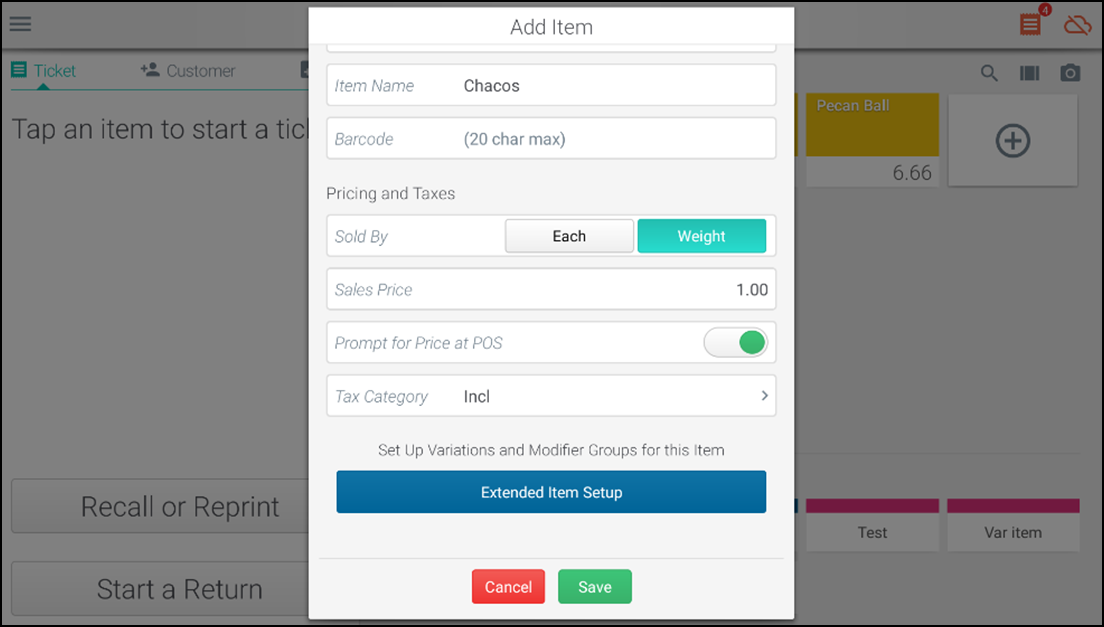
- Enter an name up to 50 characters.
- Tap Each or Weight to indicate whether you sell the item by quantity or by weight.
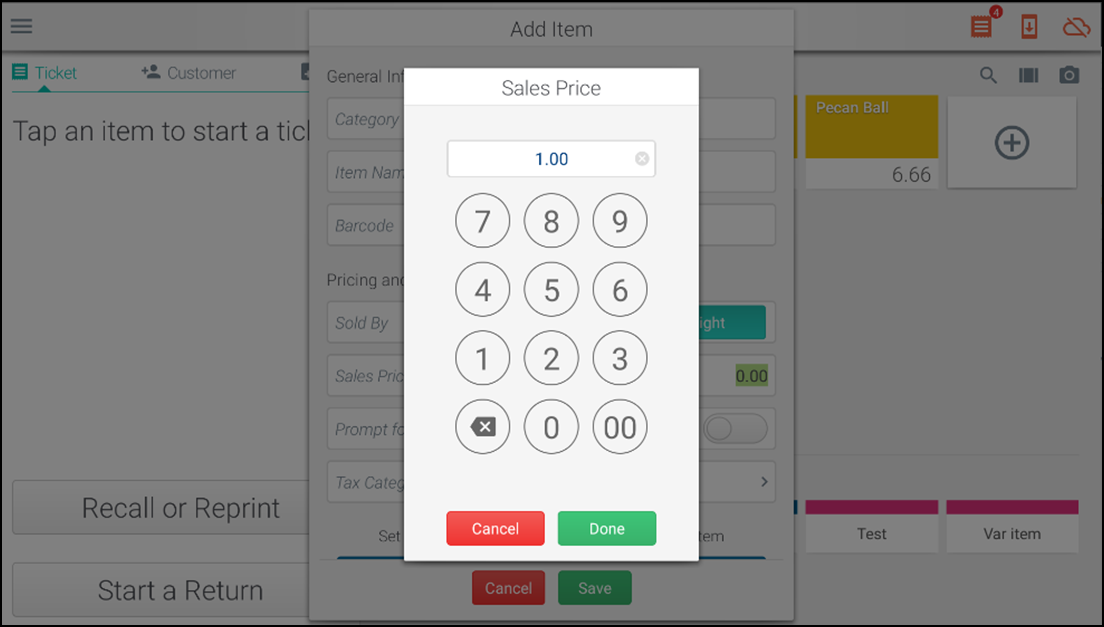
- Enter the sales price for the item.
- If you selected Each, the amount you specify is the selling price for each unit of the item.
- If you selected Weight, the amount is the selling price per unit of measure.
- Move the Prompt for Price at POS ON/OFF slider to ON only if you want the POS device to prompt for the entry of a price when you sell the item.
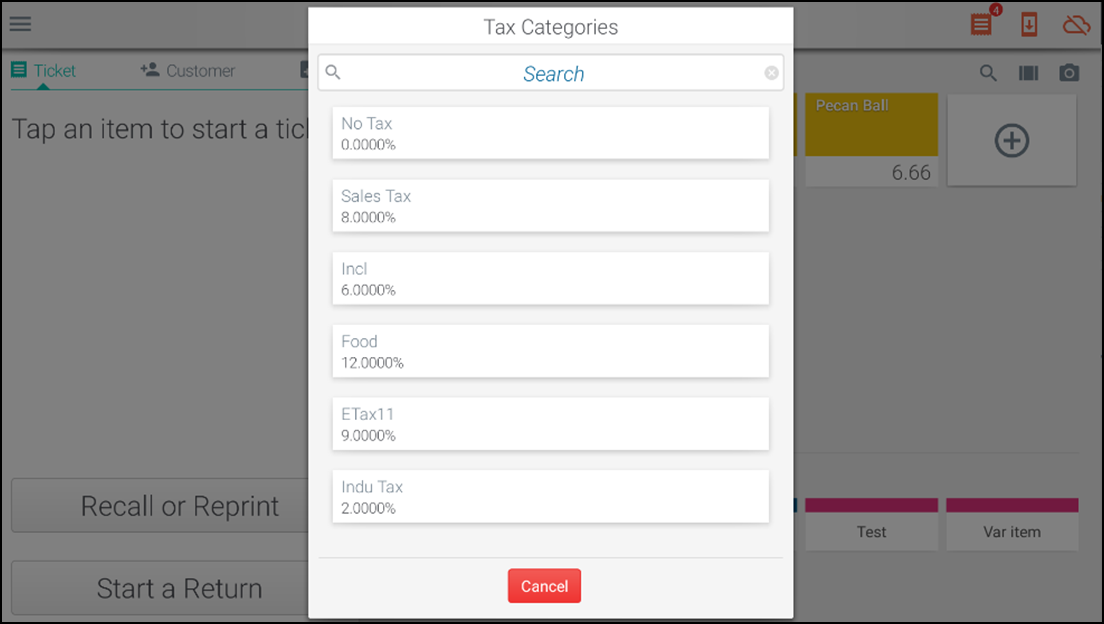
- Tap Tax category. The Tax Categories screen appears.
- Tap the appropriate tax category for the item.
- Tap Save Changes to create a new item. The created item will be available for selection at the ticket entry screen.
Using the POS to add an extended item
-
Log in to the POS. The ticket entry screen appears.
-
Tap the category to which to add an item.
-
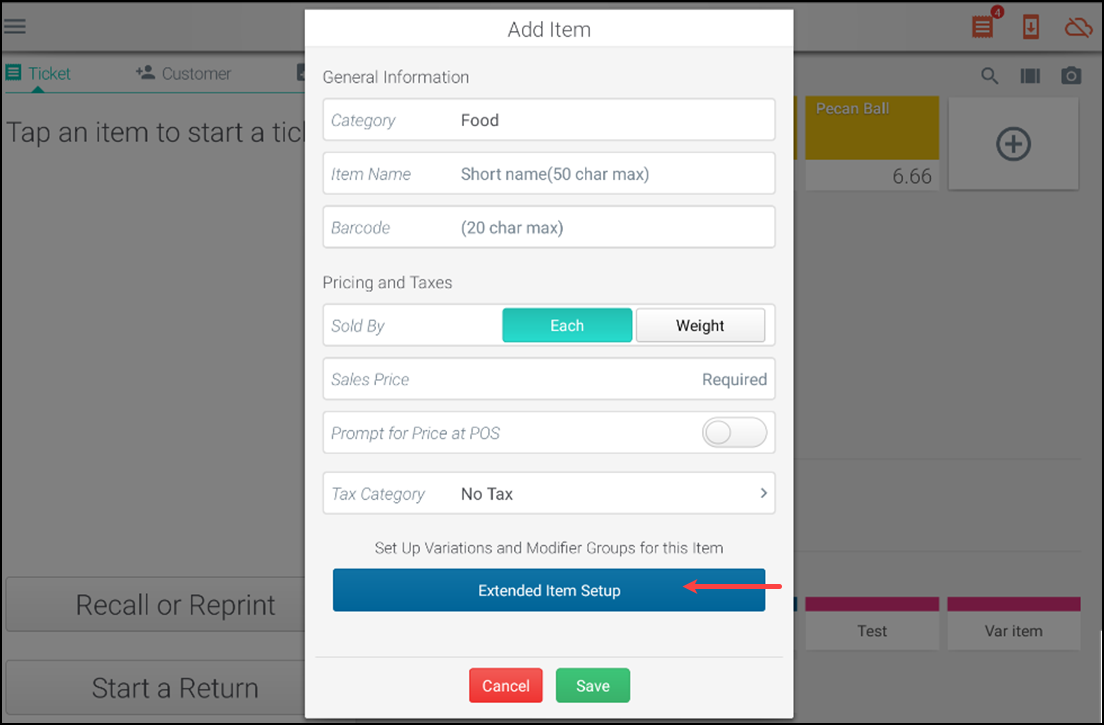
Tap Extended Item Setup.
-
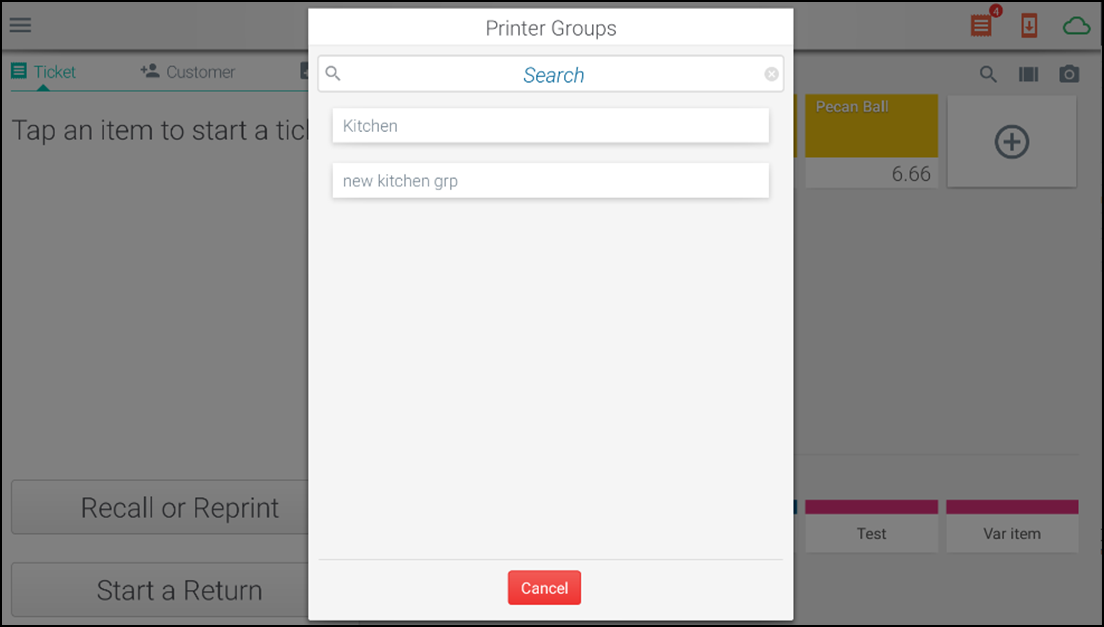
To set the printer group, tap Printer Group and select the printer group to assign.
-
If the item has variations, tap Set variations.
-
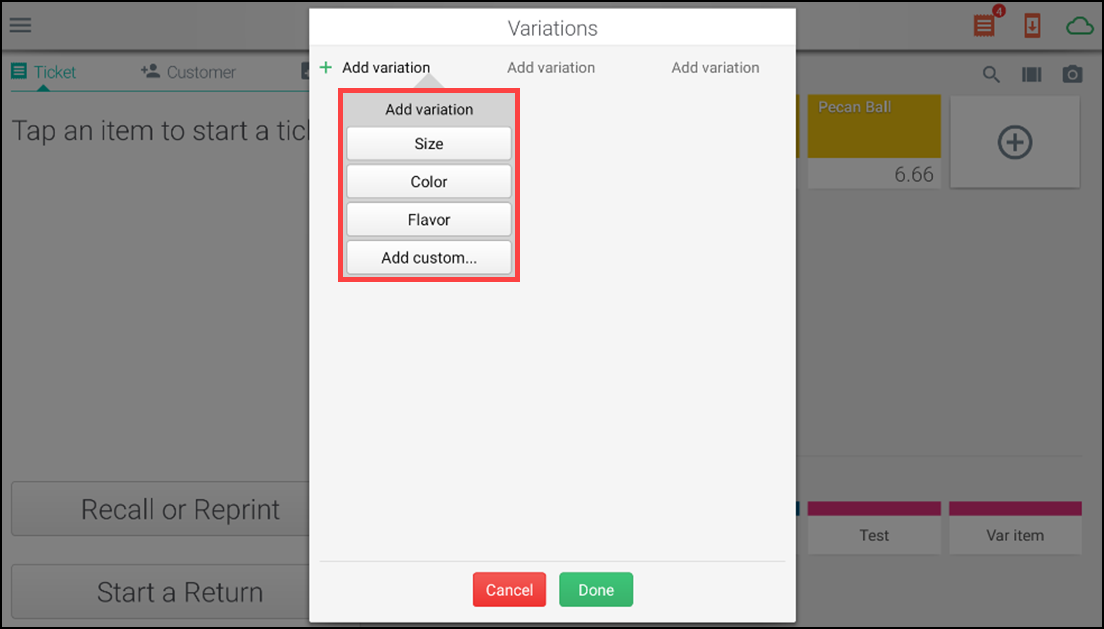
Tap Add variation and select or enter an appropriate label for the variation group (such as Color).
-
Tap add icon within the newly created group to create the specific options (Red, Blue, Green).
-
Tap Done. Adding a variation opens the option to Price by Variation on the Add item screen under Pricing and Taxes.
Note: You can remove a variation from the list by tapping the delete icon, and then tapping Delete. You can rearrange the variations within a variation type by tapping the hamburger icon and dragging the variation to the desired location.
- If the item has any modifiers, tap Assign Modifier Groups.
- Select the modifier groups to associate with the item.
- Tap Done, when all groups are selected.
- When finished, tap Save to add the item.
- If the item has any modifiers, tap Assign Modifier Groups.
Using the POS to edit an item
Note: This feature is not available to multi-store customers. If you are a multi-store customer, edit your items in Back Office while in Company View.
You must be assigned to a user role with permission to access the Manage Categories/Items feature to edit an item from the POS.
- Log in to the POS. The Ticket Entry screen appears.
- Add an item to the ticket.
- Tap the item.
- Tap Item detail.
- Tap Edit item.
- Make the necessary changes and tap Save.
Viewing item details in the POS
You can view item details on the POS through several methods. In all cases, you need to search for the item before viewing the details.
To search for and select an item:
- Log in to the POS.
- Tap the hamburger menu icon to open the slide out menu.
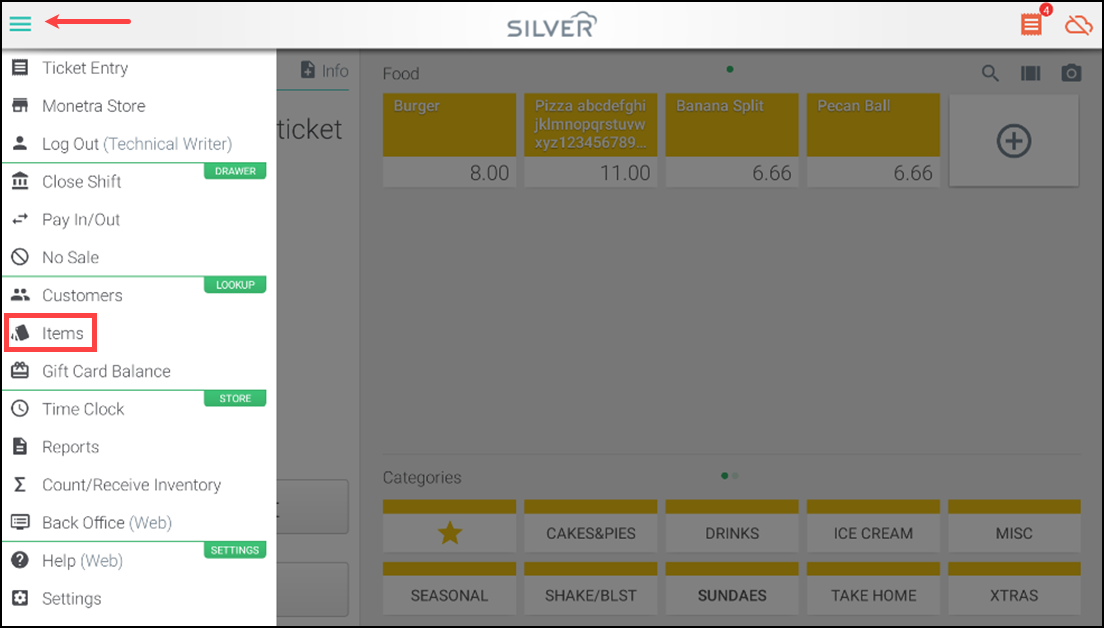
- Tap Items under the LOOKUP functions.
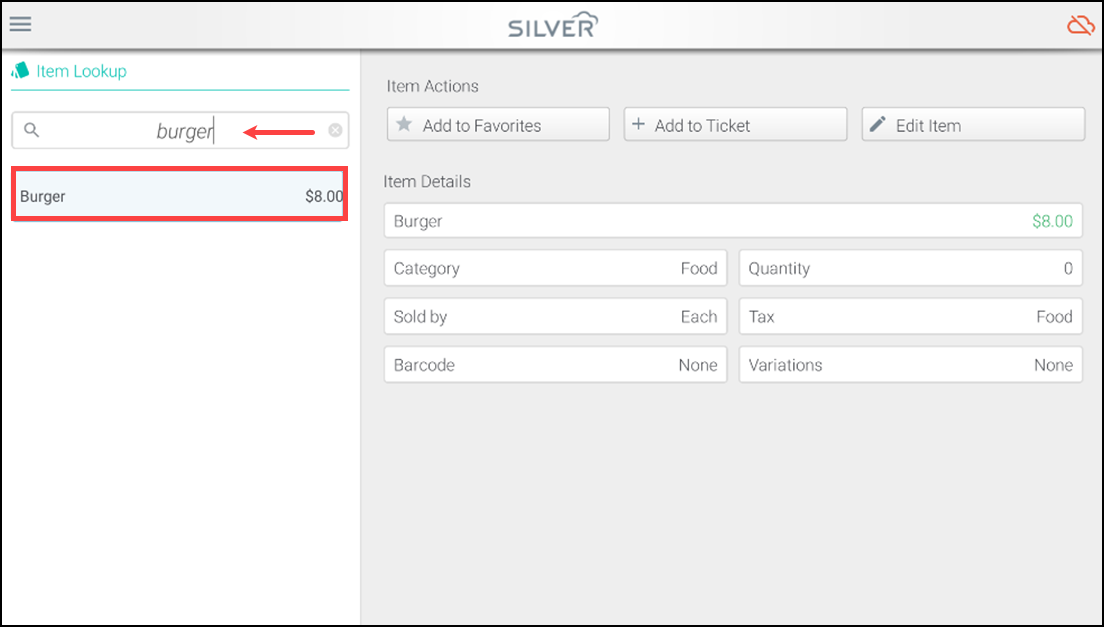
- Search for and select an item. The item details appear on the right panel.
To look up an item from the ticket entry screen:
- Log in to the POS. The ticket entry screen appears.
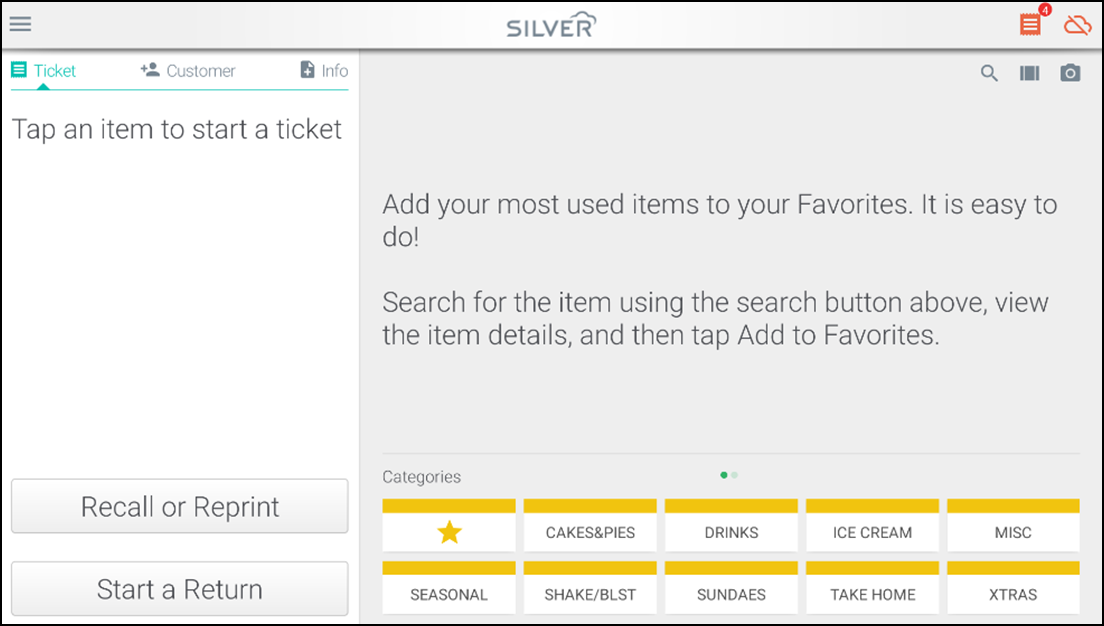
- Tap the search icon on the right panel above the category/item names.
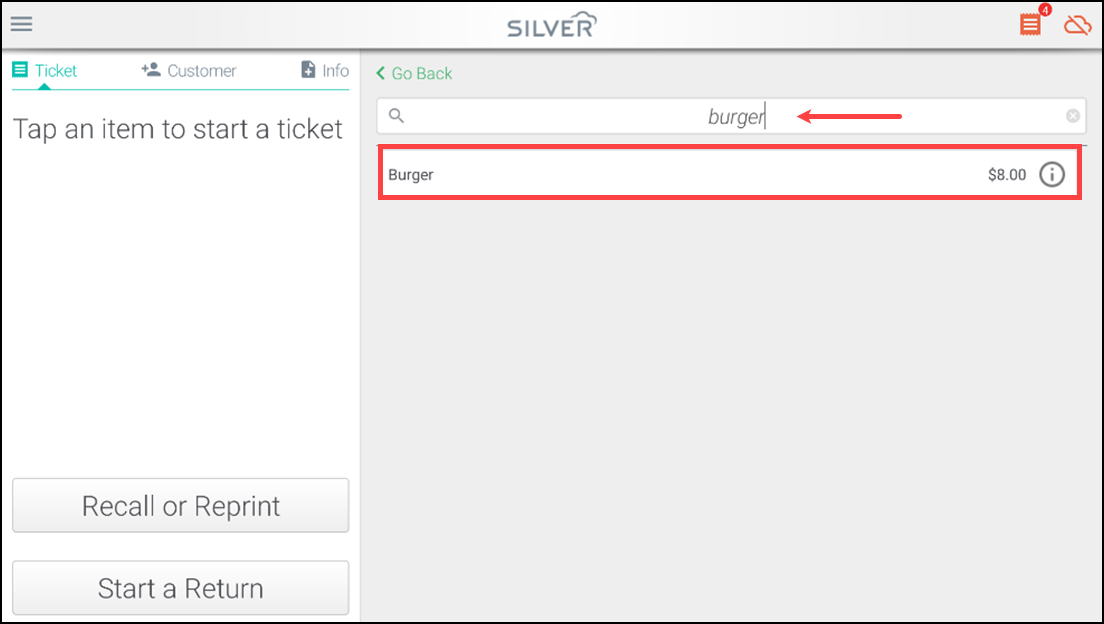
- Use the onscreen keyboard to search then tap the item when found.
To view additional tabs:
- At the ticket entry screen, add an item to the ticket.
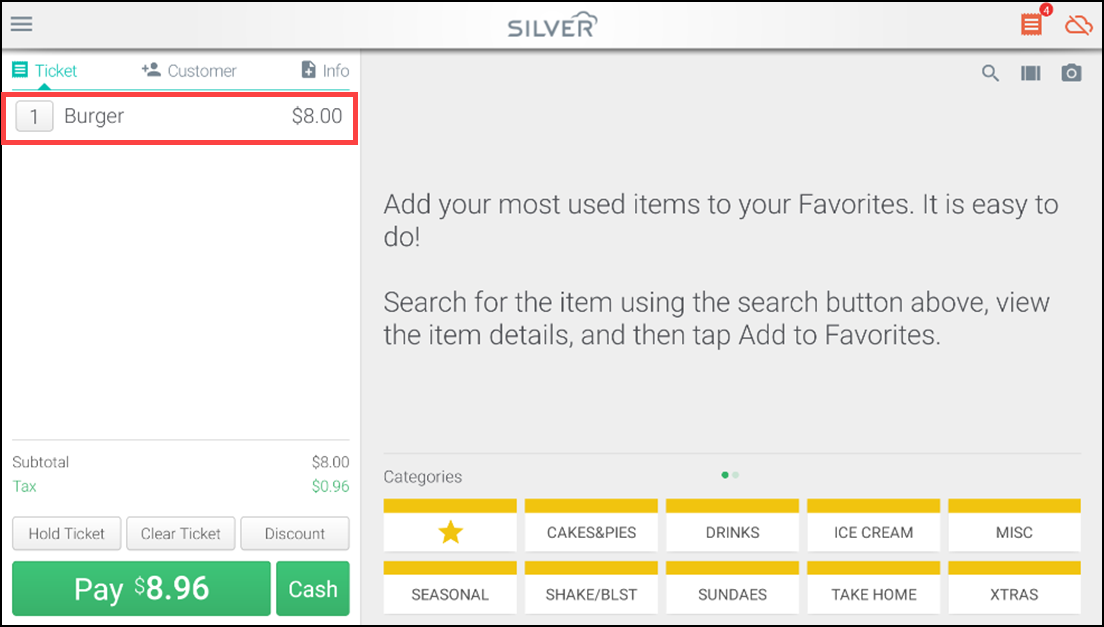
- Tap the item to open additional tab options.
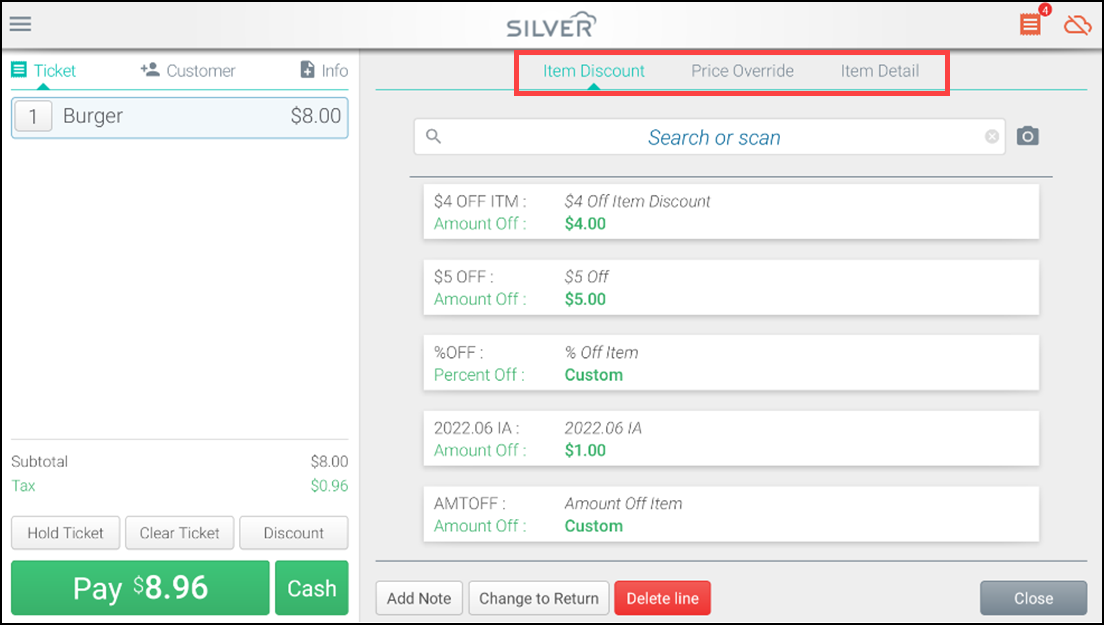
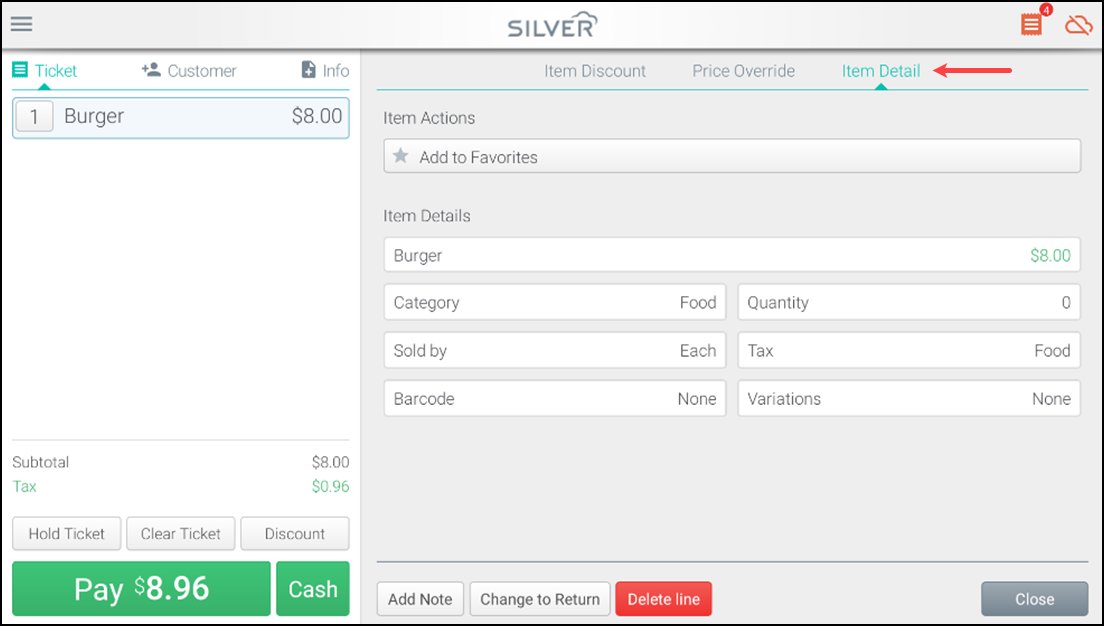
- Tap the Item Details tab.
- Tap Close to return to the menu screen.
You can view all information associated with an item including pricing, tax category, variation and more. Tap the information icon to view all variations associated with an item.
Users with proper permission can also edit item details from the POS by tapping Edit Item.
Adding items to the favorites list
Note: Favorite items vary by device; you must add items to the favorites list on each of your POS devices.
You may want to add your regularly sold items to a special favorites category. Favorited items are marked with a star, and the favorites category automatically appears at the start of every ticket. Tap an item in the favorite category to add that item to the ticket.
- Log in to the POS.
- Tap the hamburger menu icon to open the slide out menu.

- Tap Items under the LOOKUP functions.

- Search for an item using the search function in the favorites category or search from the slide out menu.
- Tap the item.
- Tap Item Details.
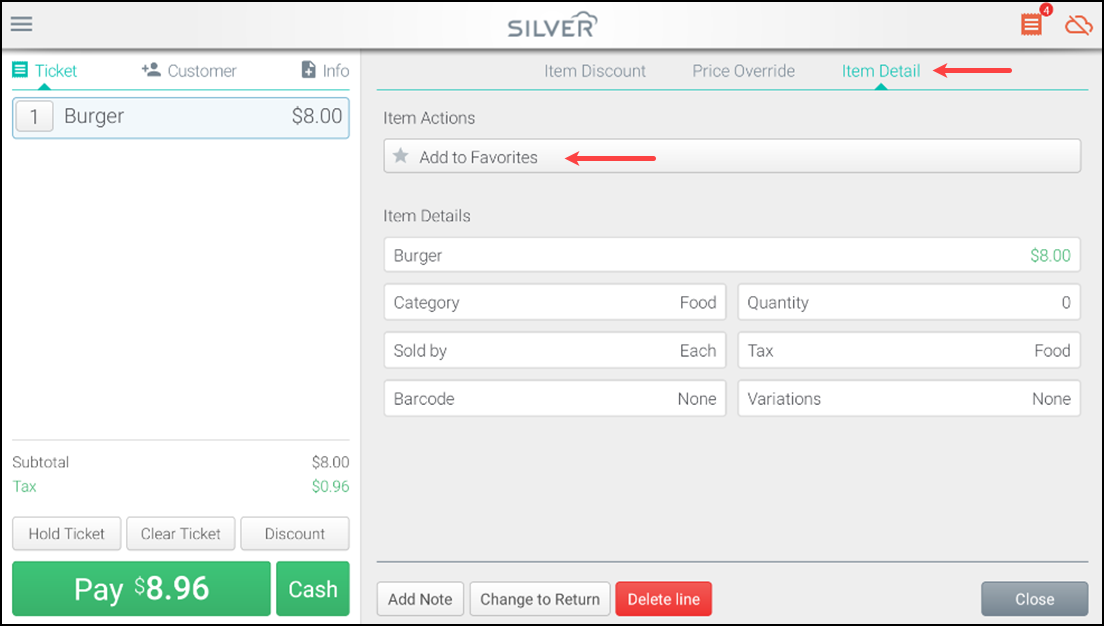
- Tap Add to Favorites.
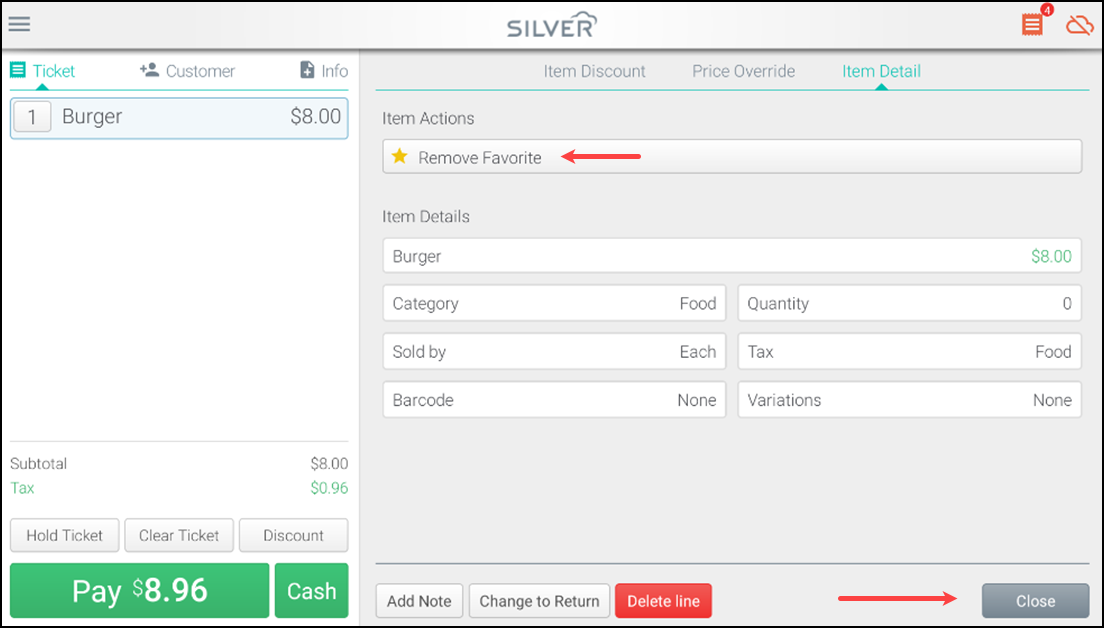
- Tap Close to return to the ticket entry screen.
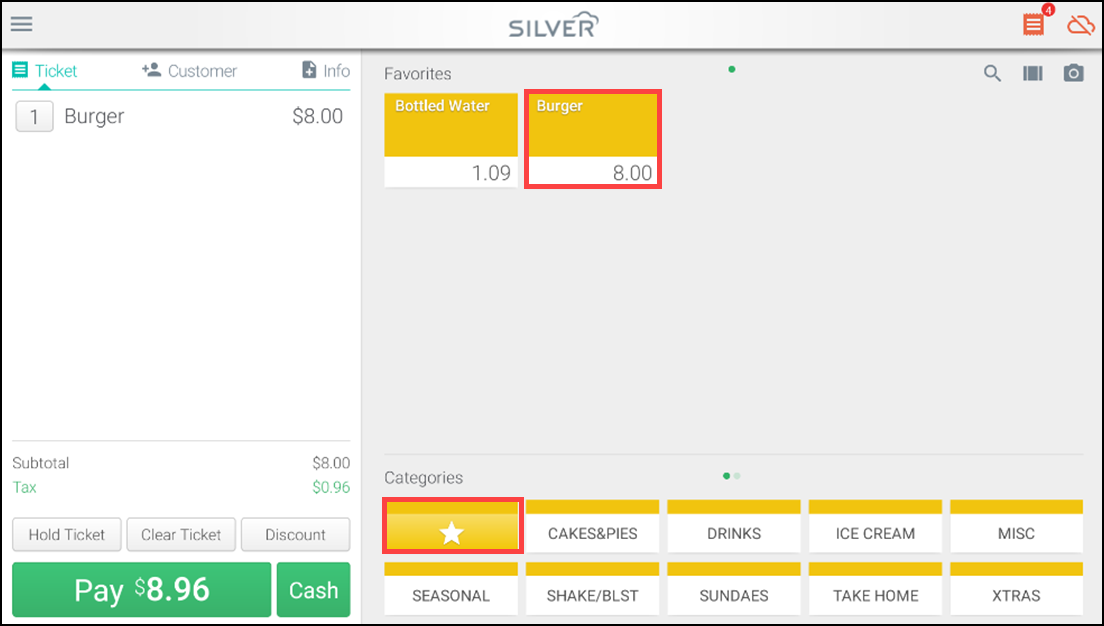
- Tap the favorite category to verify the item was added to the favorite list.
- Return to the ticket screen and verify it has been added to the favorites category:
- You can also add an item to favorites from the Item Details tab that appears when you tap an item that has already been added to a ticket.
- From the POS, tap and hold an item until it "shakes" and then drag it to the Favorites category. You can only drag items into the Favorites category. You cannot drag items into any other category. Please note this process does not work for multi-store customers.
Using the POS to rearrange items
Note: Your POS device must be connected to the Internet to save your changes. If you are one of our multi-store customers, you need to rearrange your items in the Back Office. Click here for instructions.
Follow these steps to rearrange the order of the items in the Items panel of the POS screen:
-
Tap a category for the item you want to move.
-
Tap and hold the item to move until all items begin to shake.
-
Drag the item to the desired location and then release the item.
-
Repeat these steps until all items appear in the desired order.
-
Tap Done to save your changes.
Note: To move an item to a second, third, etc., page of items, simply drag the 'shaking' item toward the edge of the screen to navigate between multiple pages of items.
Looking up an item in the POS
You can view item details on the POS through several methods. In all cases, you need to search for the item before viewing the details.
- Log in to the POS.
- Tap the hamburger menu icon to open the slide out menu.

- Tap Items under the Item LookUp functions.
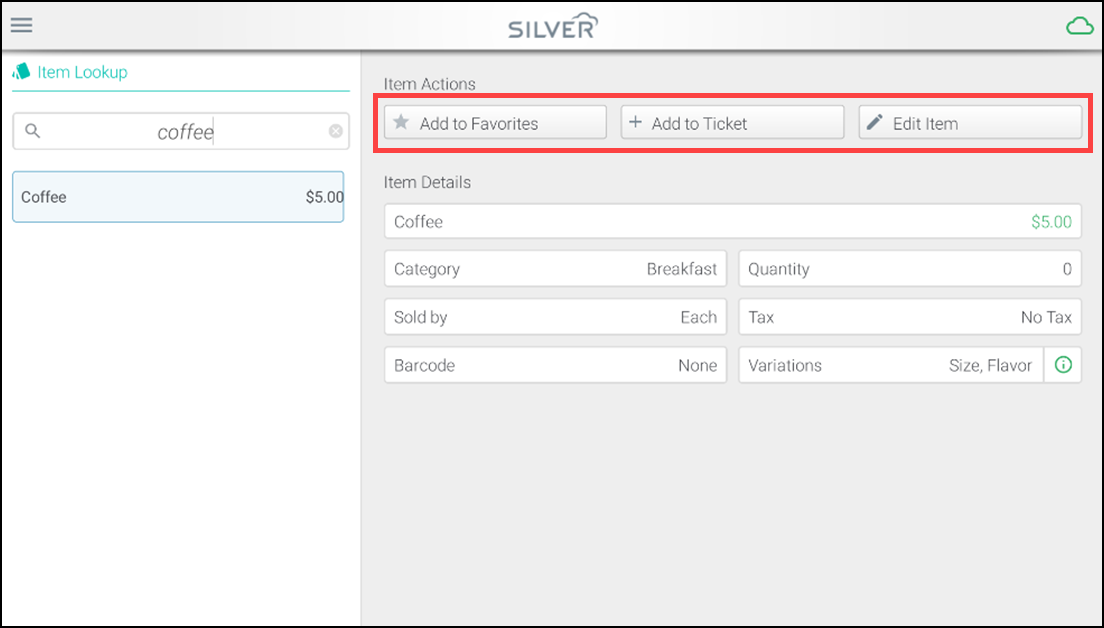
- Search for and select an item. The item details appear on the right panel.
- You can:
- Tap Add to favorites to add the item to your Favorites list.
- Add the item to the ticket.
- Review the Item details and make changes, if required.
Overriding an item price
Occasionally, you may need to adjust, or override the regular selling price of an item. Only employees assigned to a user role with proper permissions can complete an override.
-
Log in to POS. The ticket entry screen appears.
-
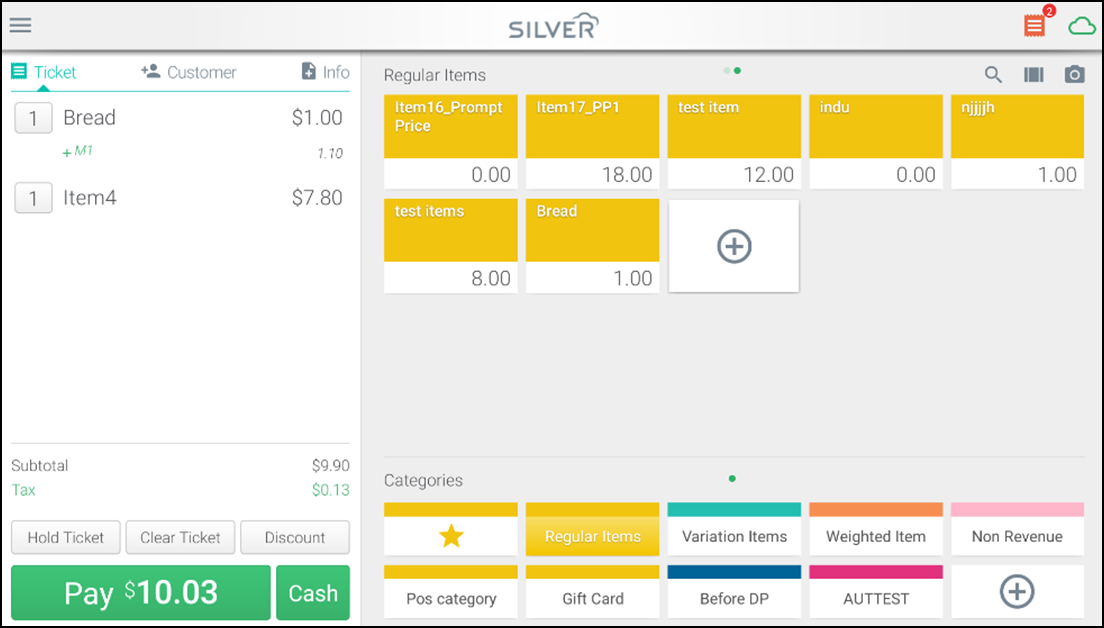
Add an item to the ticket.
-
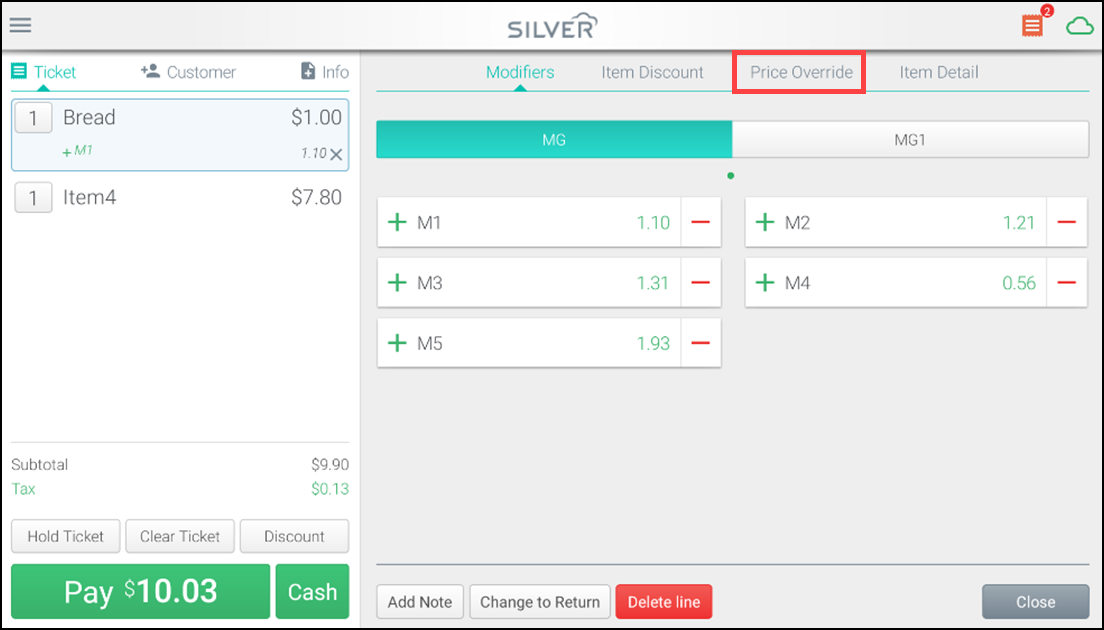
Tap the item to open the additional tab functions.
-
Tap Price override.
-
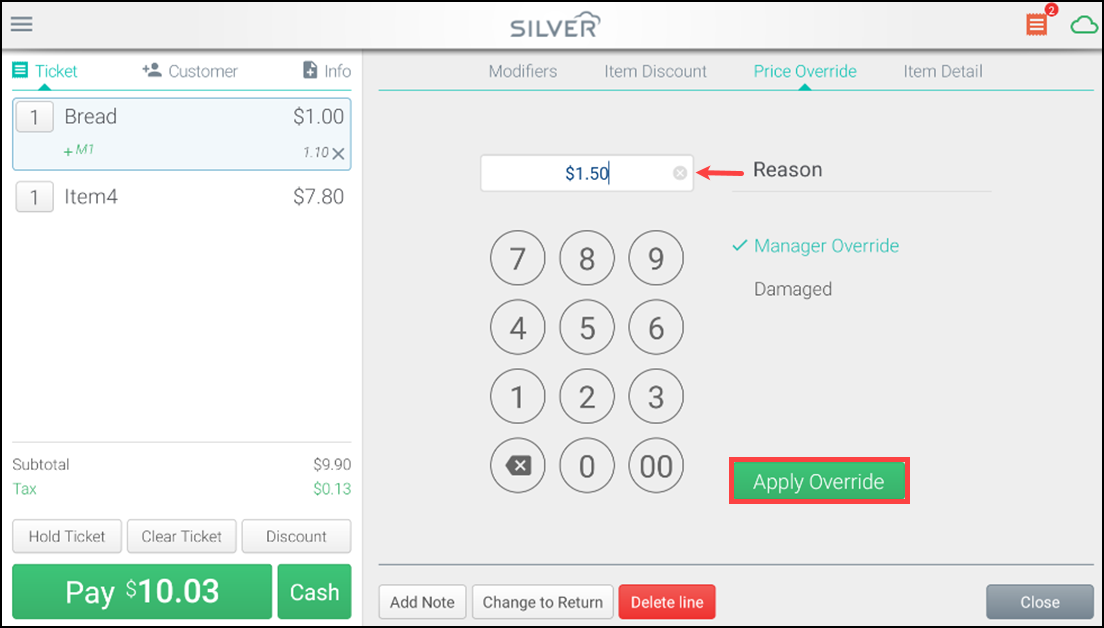
Use the numeric keypad to enter the new price.
-
Tap the Reason code for the price override.
-
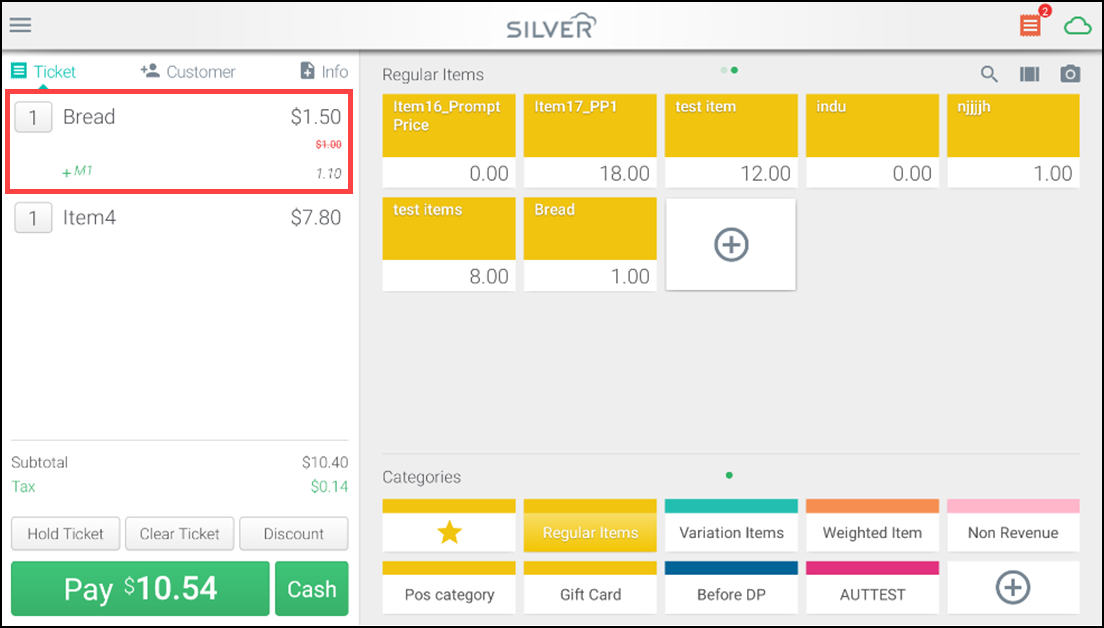
Tap Apply Override to return to the ticket screen, where the new price appears along with the original price shown below it (crossed out and red).
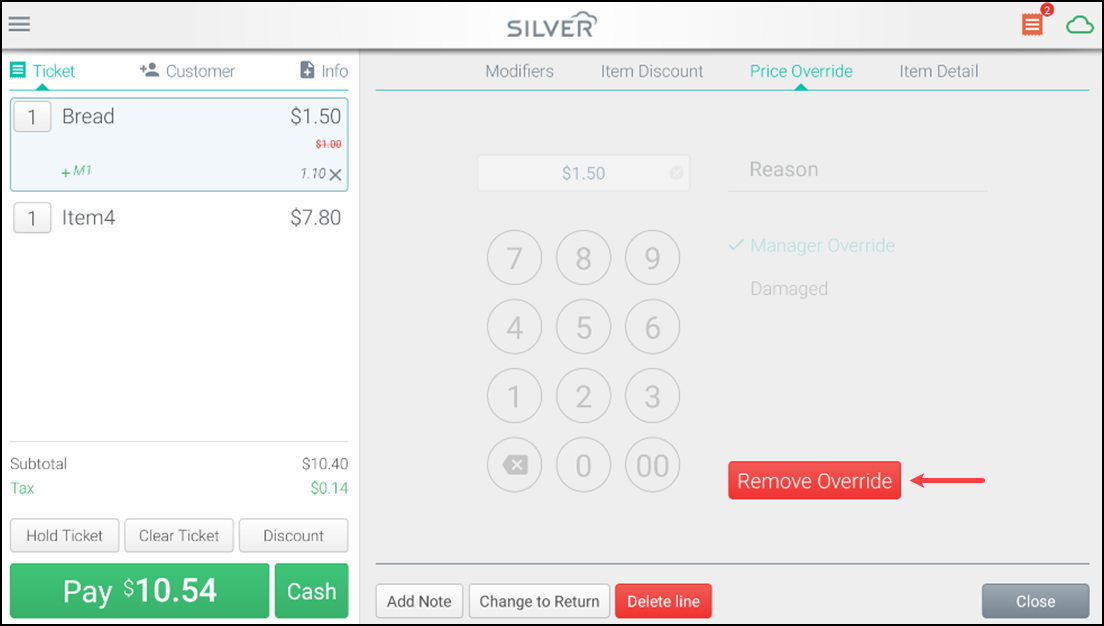
Note: To remove a price override from an item and restore it to its original price, access the price override tab and then tap Remove Override.
Using the POS to link a bar code to an existing item
When you scan an item, if the barcode is not found, you can link the barcode to an existing item record.
- Log in to the POS. The ticket entry screen appears.
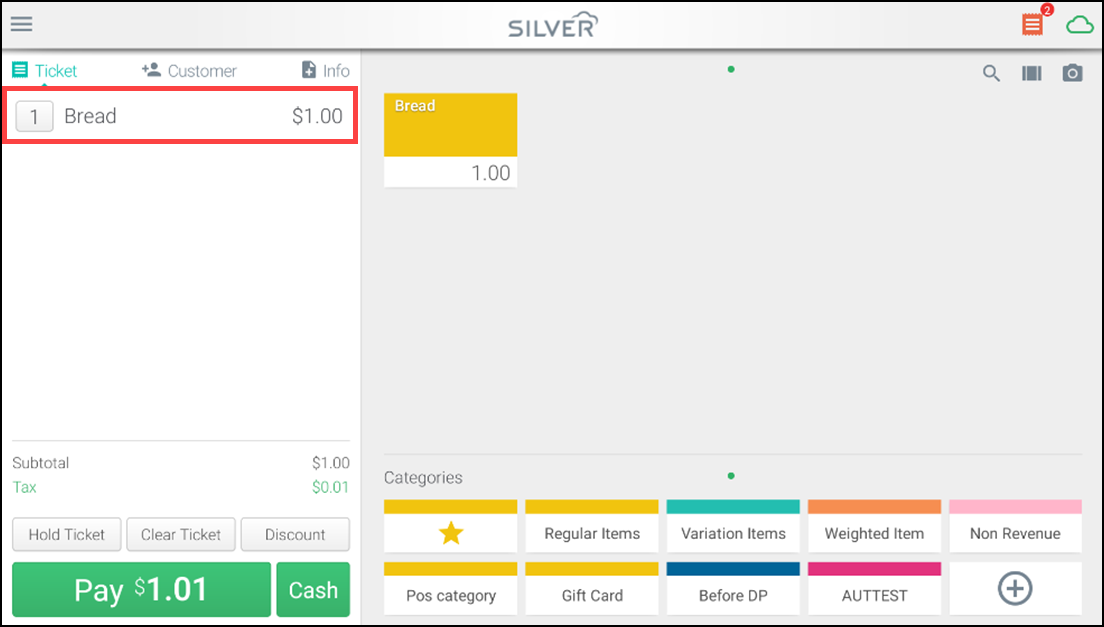
- Add an item to the ticket.
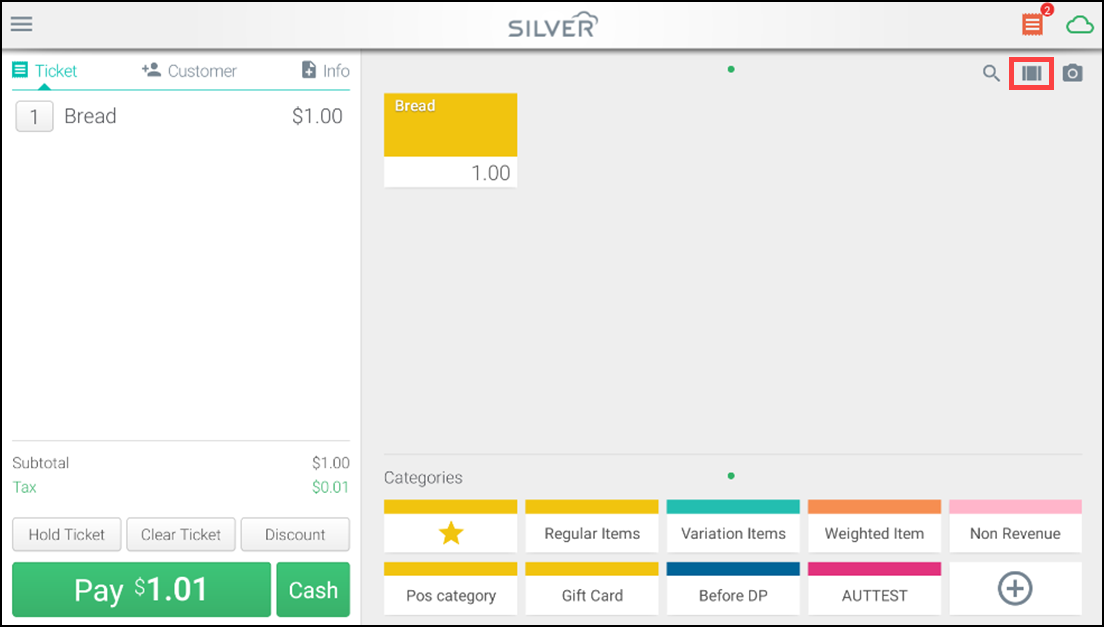
- Tap the bar code icon on the right side of the screen. The Enter Barcode screen appears.
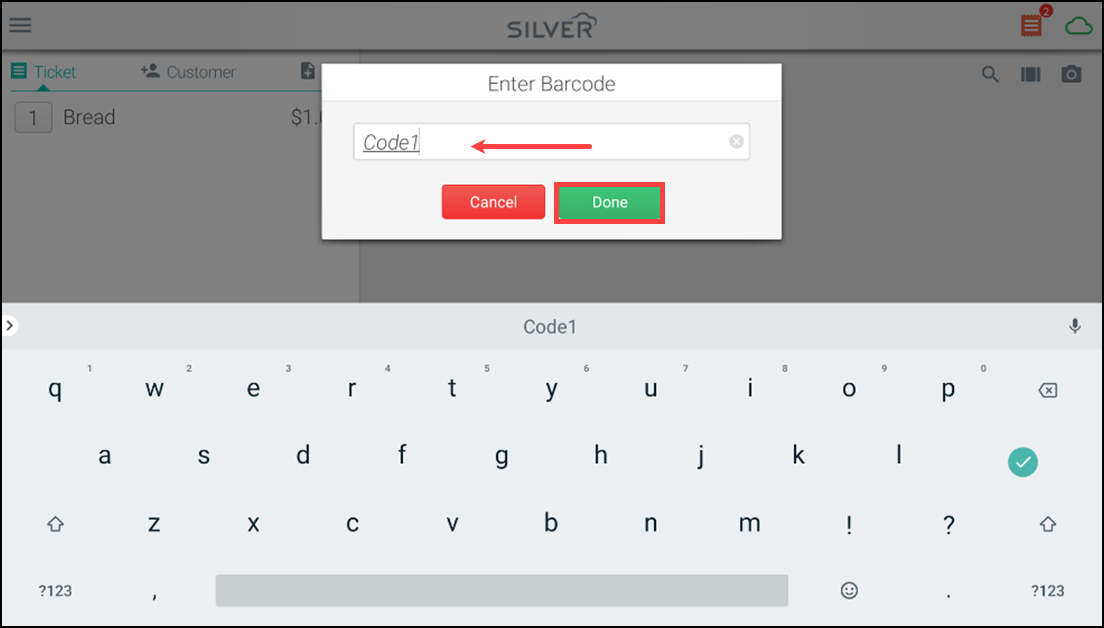
- Enter the bar code.
- Tap Done. The Barcode Not Found screen appears.
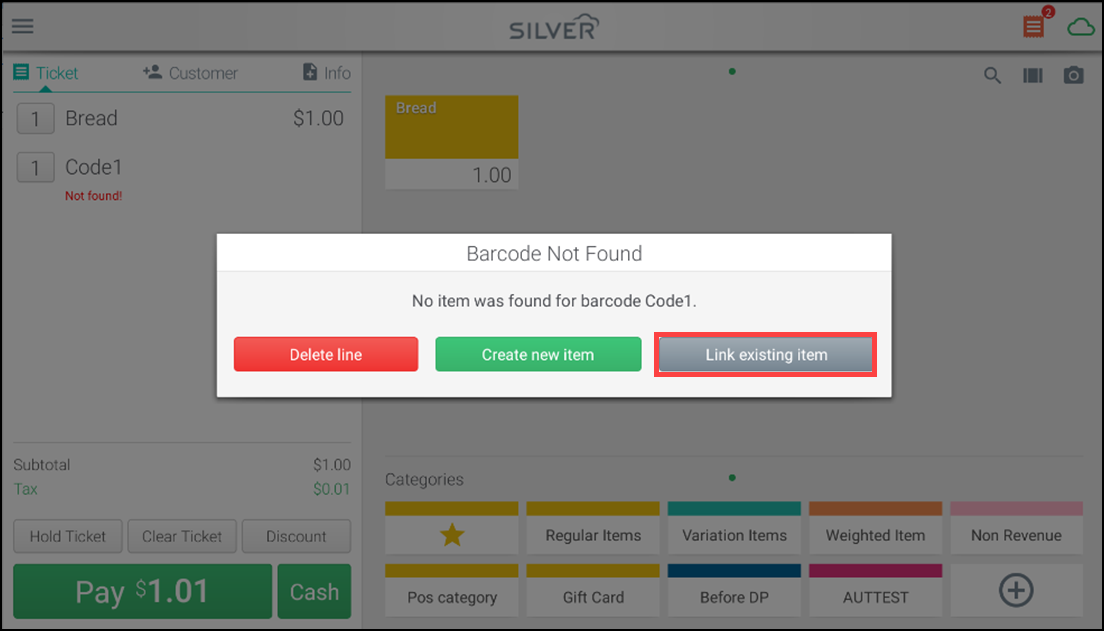
- Tap Link existing item.
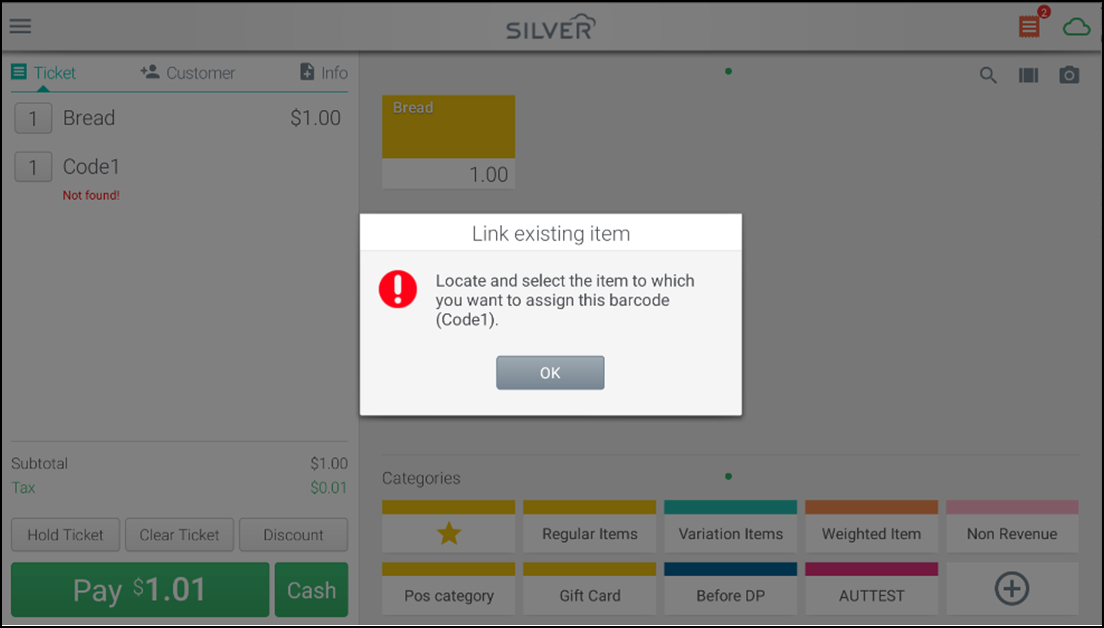
- Tap OK at the prompt.
- Search for and tap the item to which to link the scanned bar code.
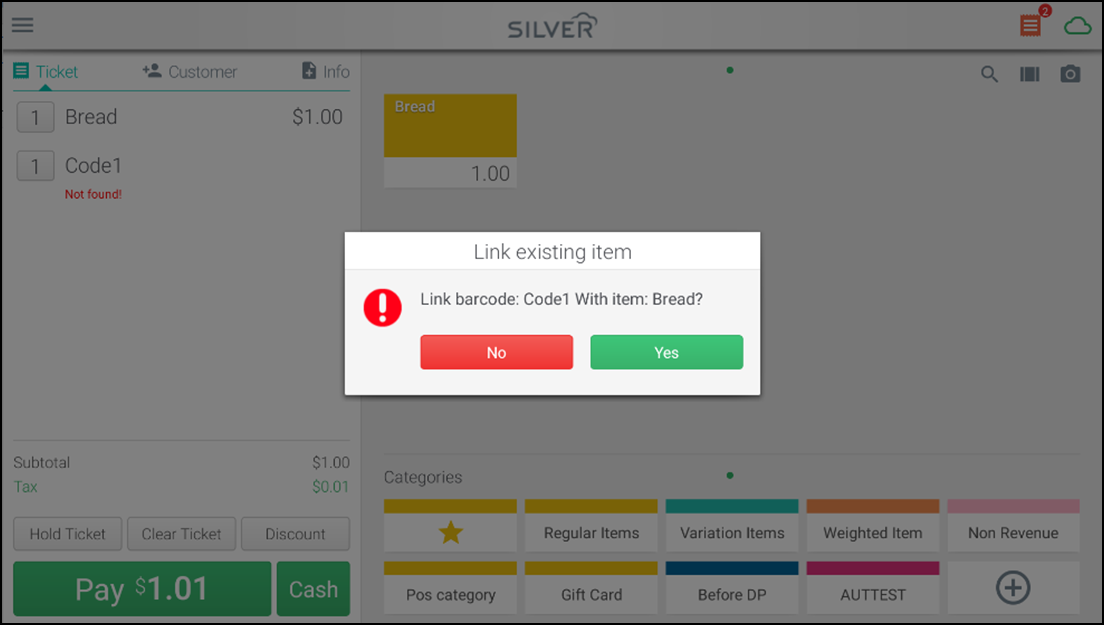
- Tap Yes to associate the scanned bar code with the item you selected.
Note: If the item you select already has a different bar code assigned to it, the system will alert you. You can choose to overwrite the existing bar code or search for the item again.
Using the POS to add a bar code not on file
If you scan a bar code not previously entered in Back Office, you can add it to your system from the POS ticket entry screen. After scanning a bar code, if the system cannot find the details, a Barcode Not Found pop-up window appears with three options.
- Log in to the POS. The ticket entry screen appears.

- Add an item to the ticket.

- Tap the bar code icon on the right side of the screen. The Enter Barcode screen appears.

- Enter the bar code.
- Tap Done. The Barcode Not Found screen appears.
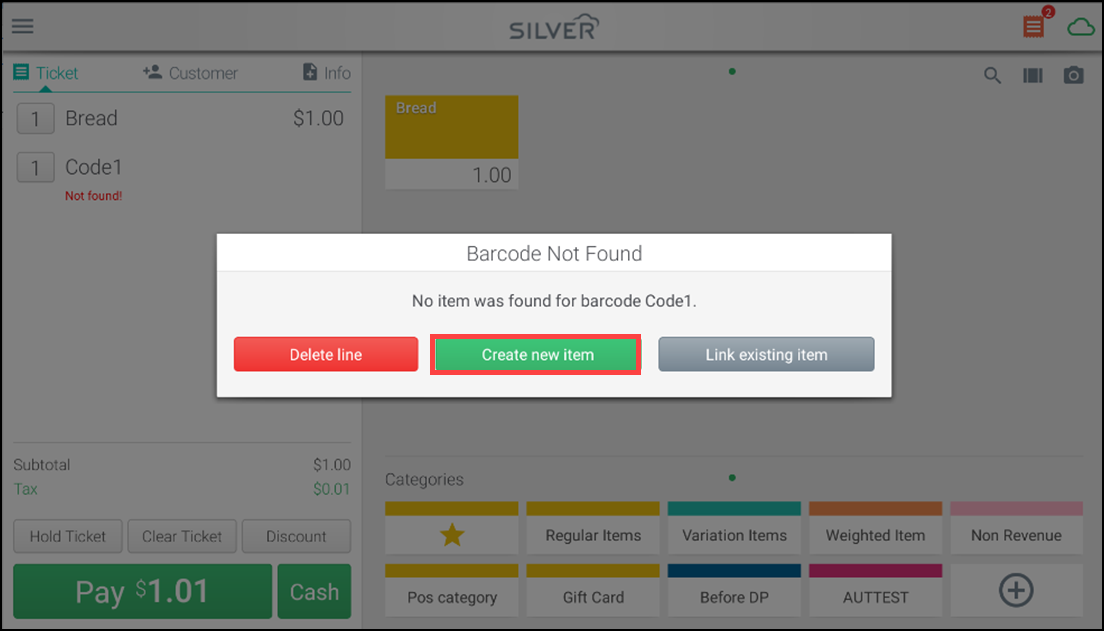
- Tap Create new item to add this new item to your system. The Add Item screen appears.
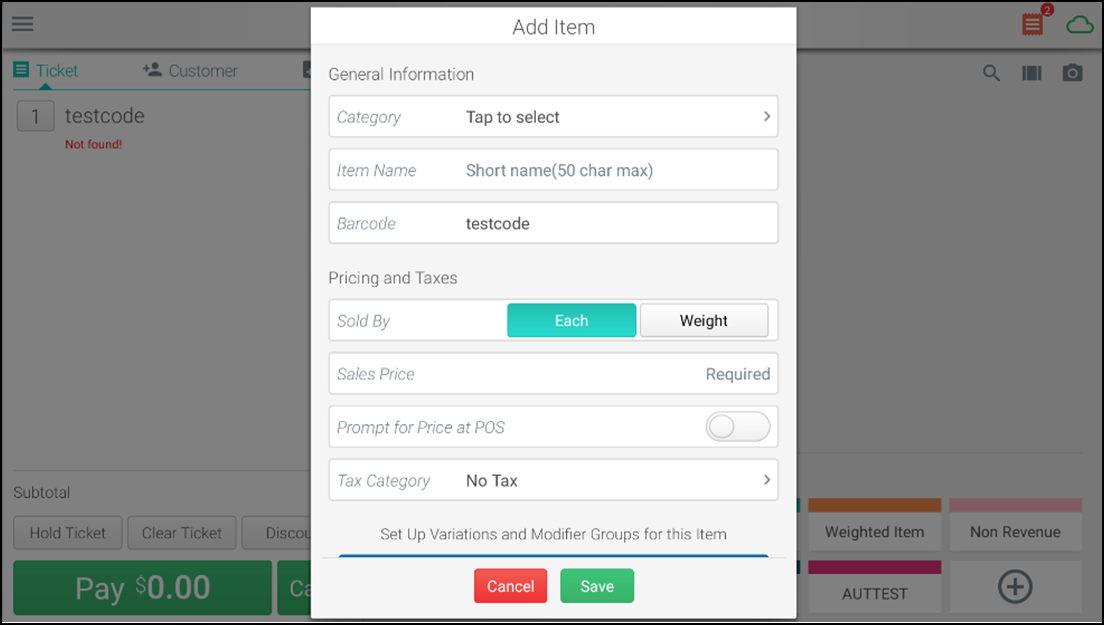
- Fill in the details to assign to that item, including category, description, price, and tax.
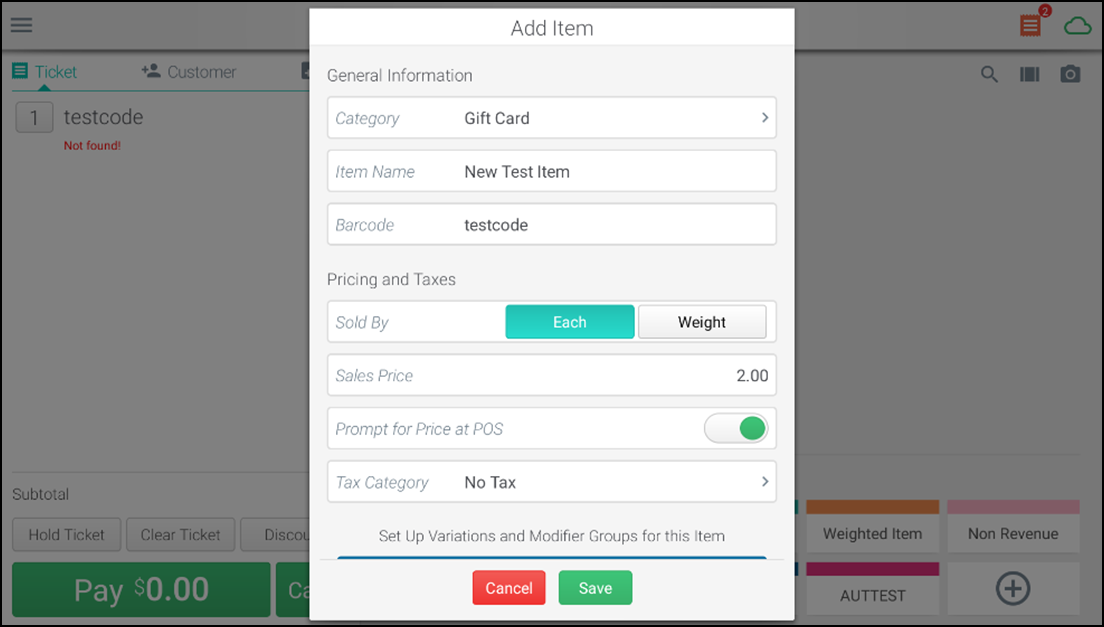
- Tap Save. Wait while the system adds the item and returns you to the ticket entry screen.
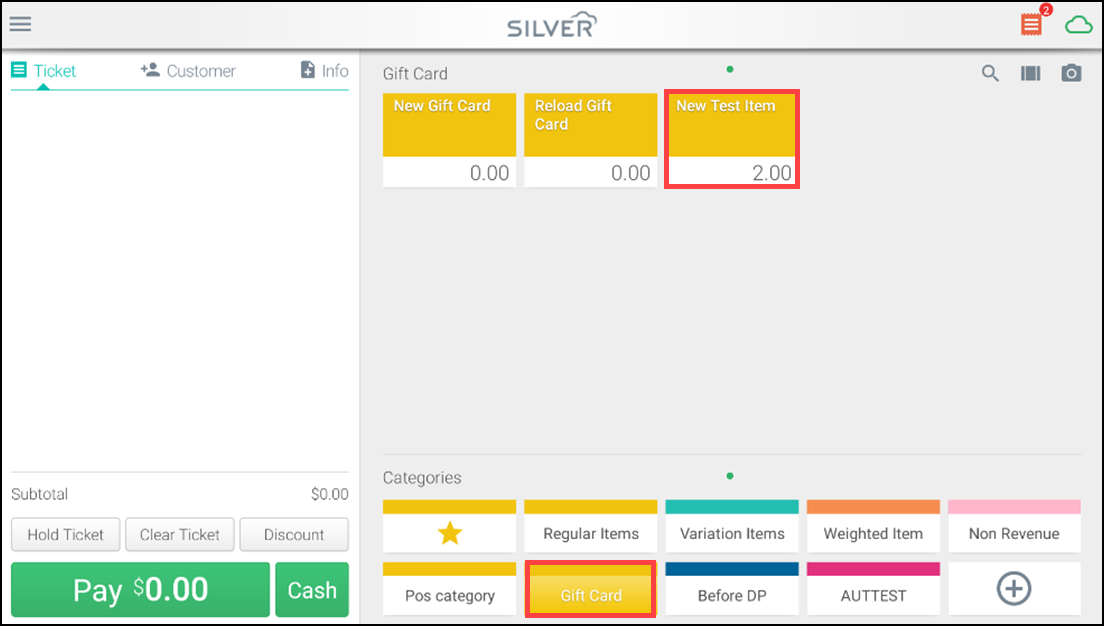
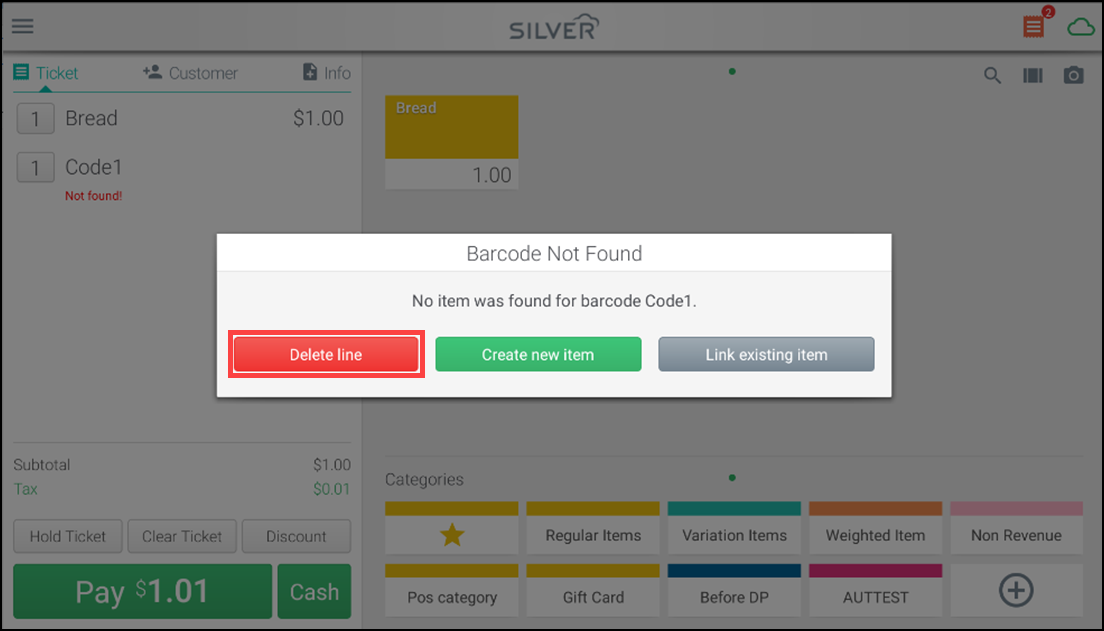
Note: Tap Delete at Barcode Not Found screen to remove the item from the ticket. Items added from a POS device are automatically updated to the Back Office and available and ready for sale on all other POS devices within minutes; however, you need to go to the Back Office and update this item with additional, important information, such as vendor, cost, quantity on hand, etc.
Changing an item quantity
Using this feature you can increase or decrease the quantity of an item on a ticket.
Note: If you decrease the quantity to zero (0), the system automatically removes the item from the ticket.
- Log in to the POS. The ticket entry screen appears.
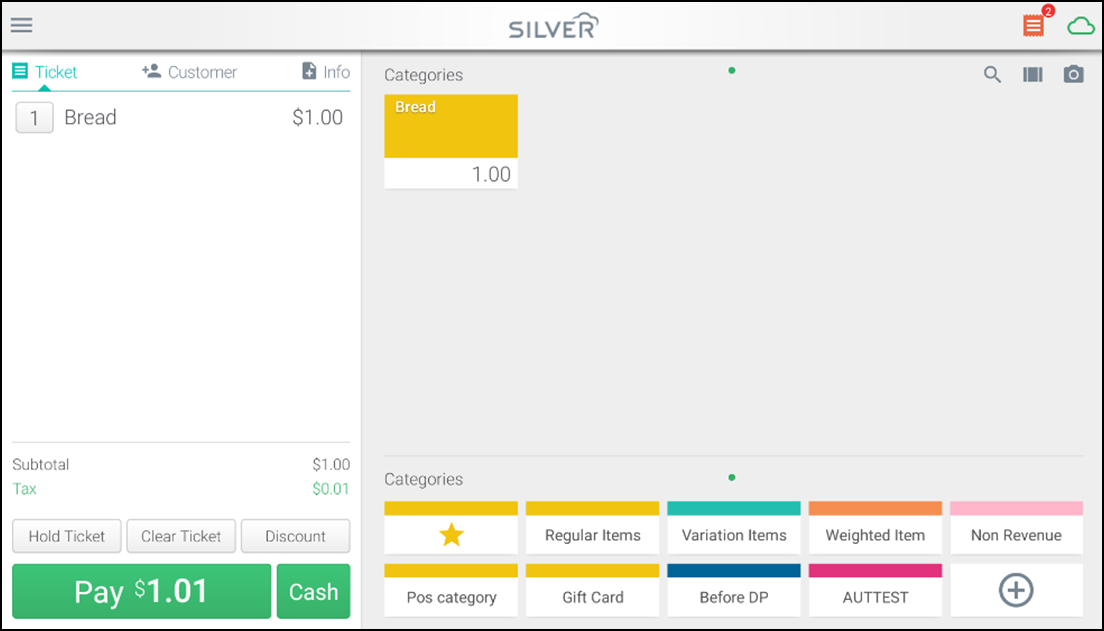
- Add items to the ticket.
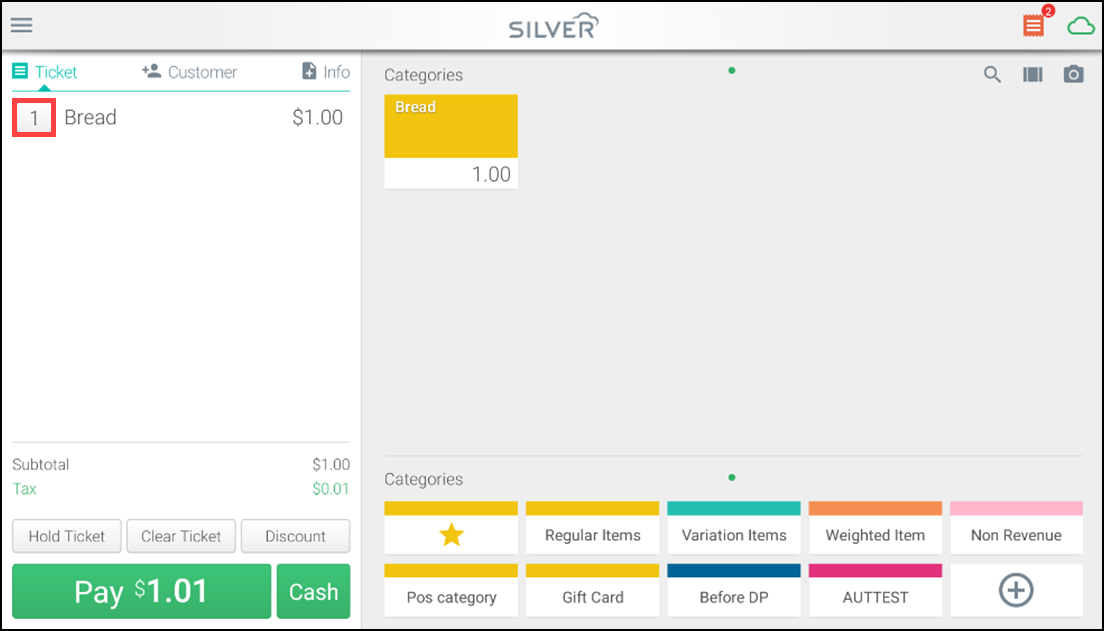
- Tap the quantity to the left of the item description. The Change Quantity screen appears.
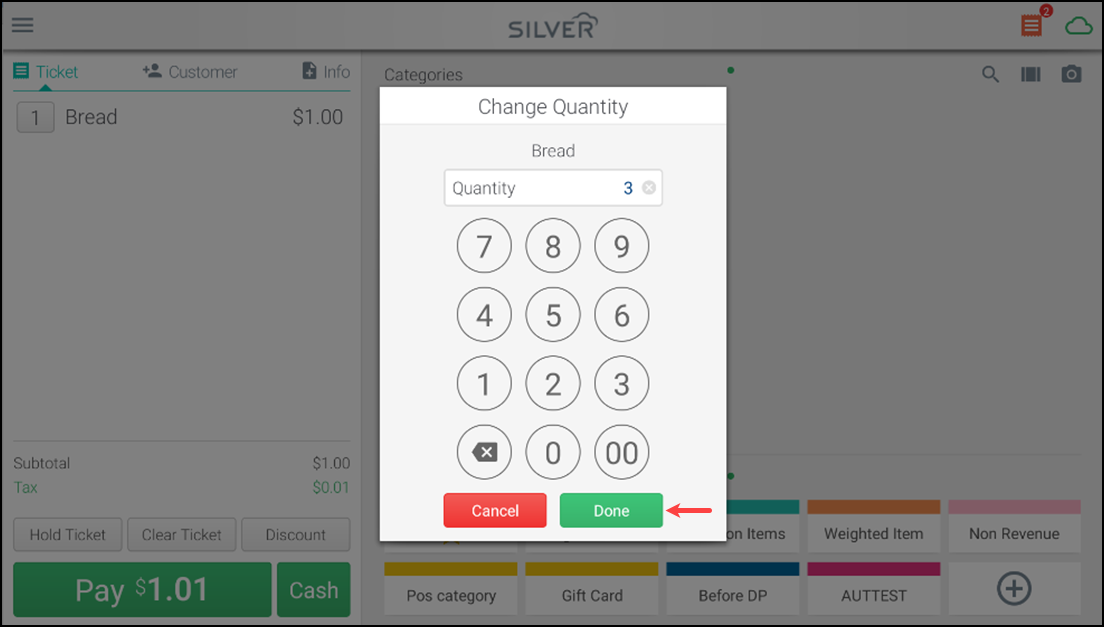
- Enter the new quantity for the item.
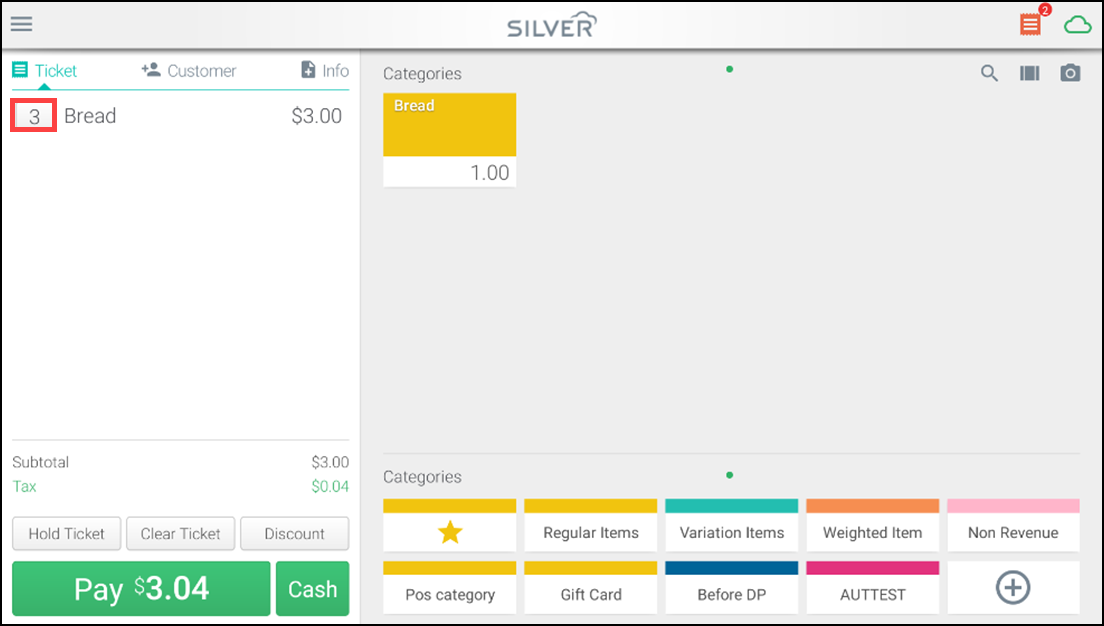
- Tap Done to add the quantity to the item.
Working with item variations
You establish item variations, like size and color, in Back Office before the item is sold on the POS. An item can have three variation groups. When you select an item with variations to sell, a window appears for you to select the variations.
To select a variation:
- Log in to the POS. The ticket entry screen appears.
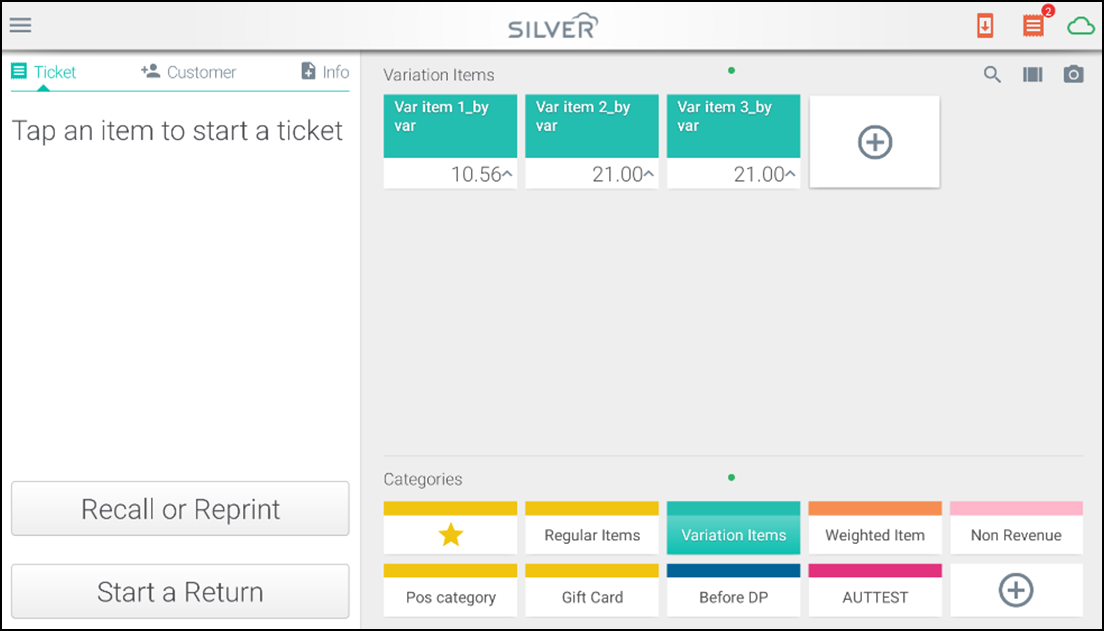
- Select an item for which there is a defined variation. The Select Variation screen appears.
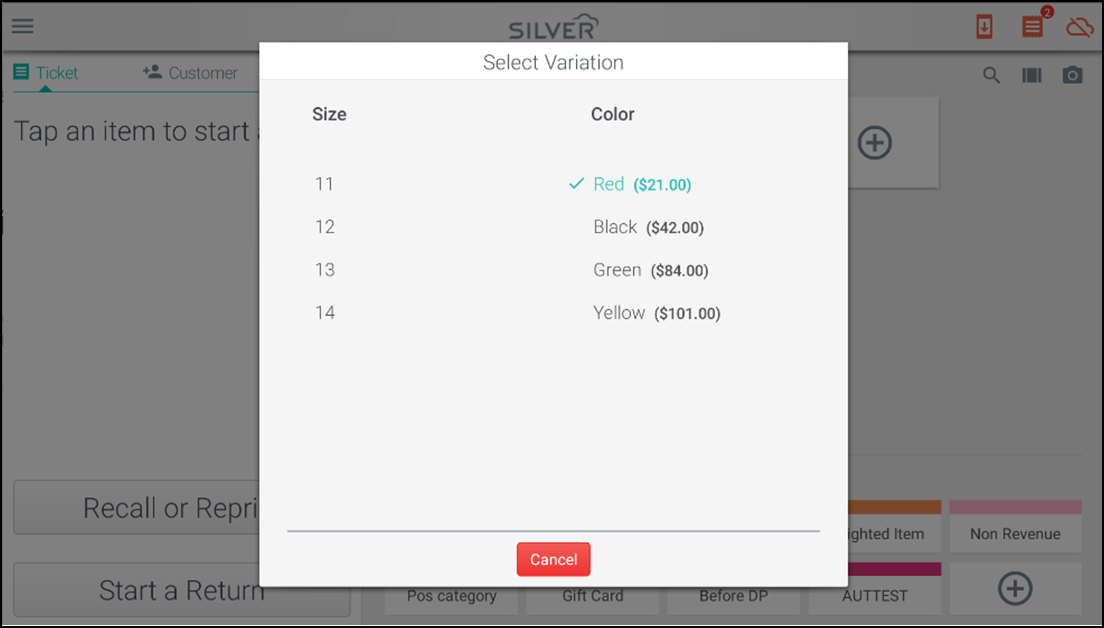
- Tap a variation needed for the item. After making the selections, the item is automatically added to the ticket and you can proceed with the sale.
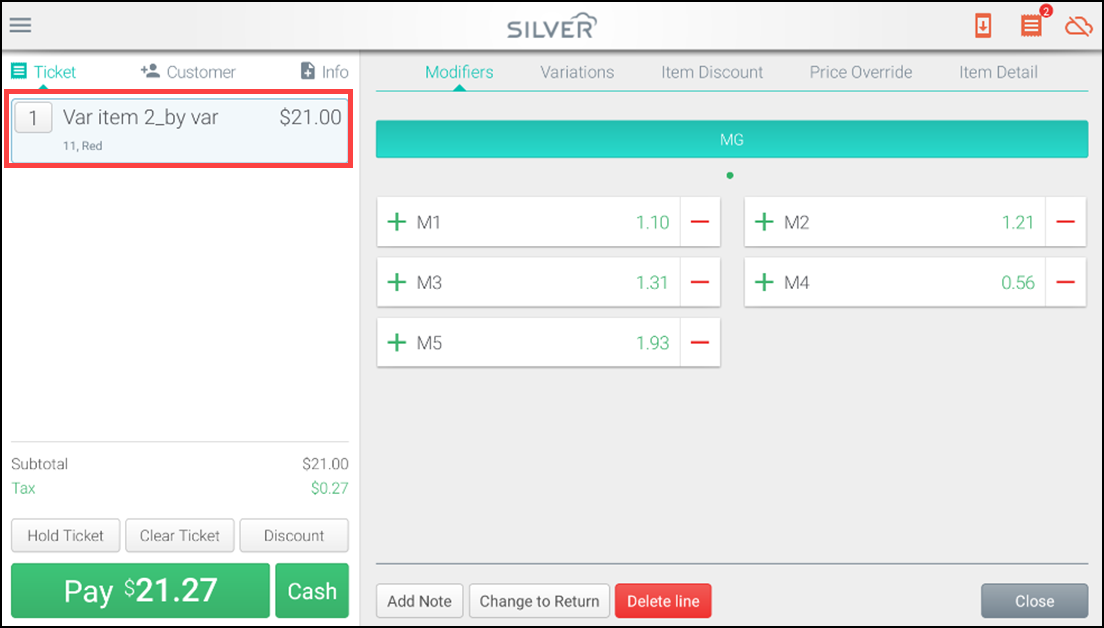
To change a variation to something other than the original selection:
You can change an item variation (such as color, size, size, pattern, etc.) after you add it to the ticket.
- Log in to the POS. The ticket entry screen appears.
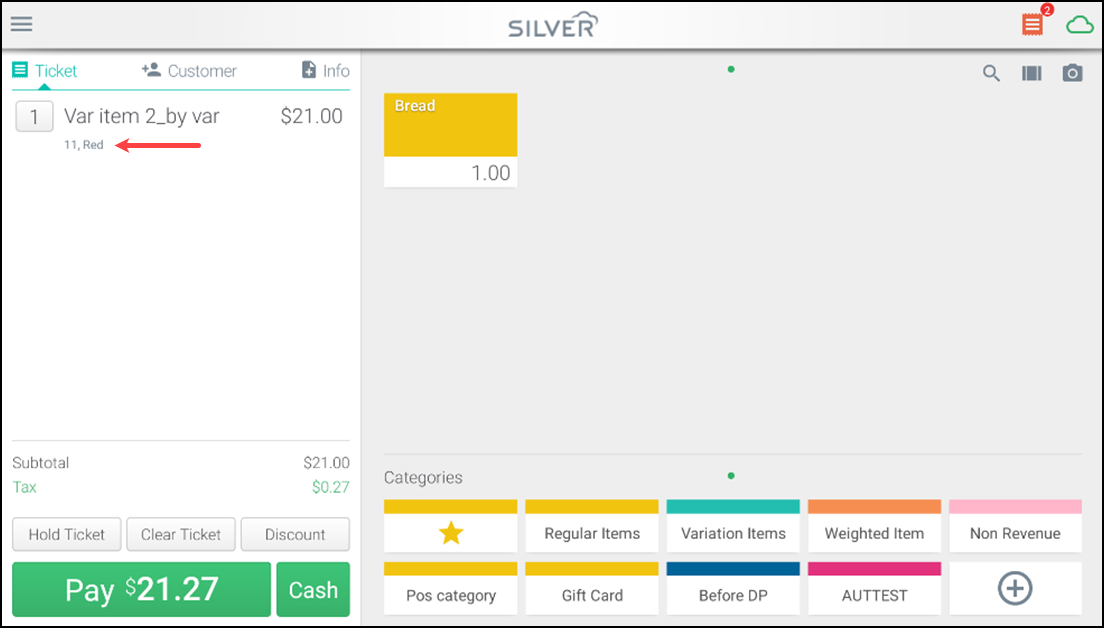
- Add items to the ticket.
- Tap an item to view the additional item tabs.
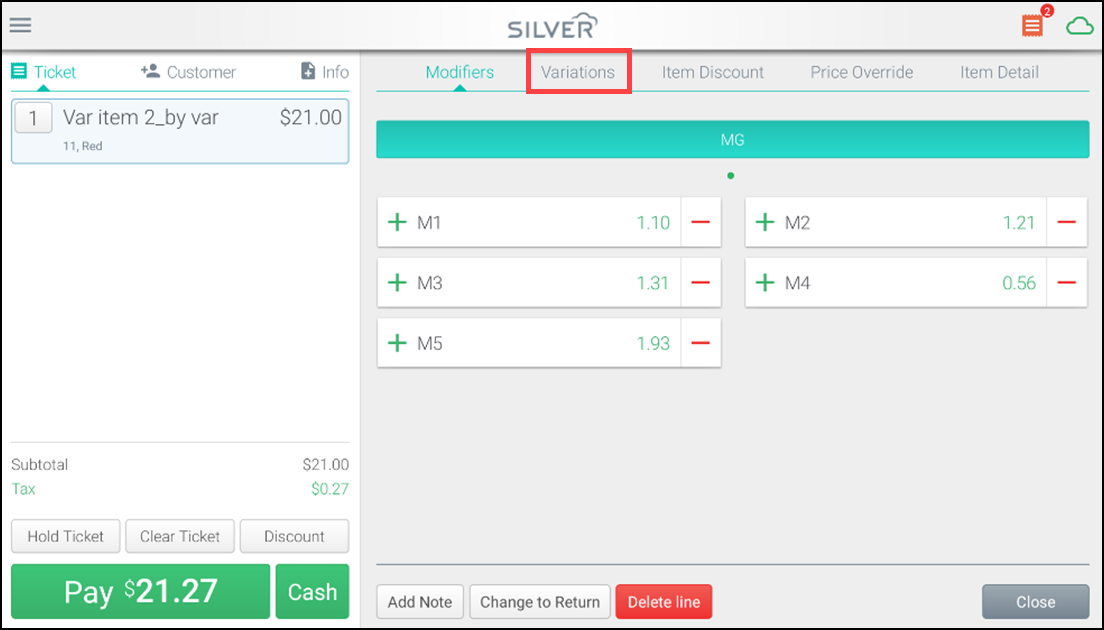
- Tap the Variations tab and select the desired variation.
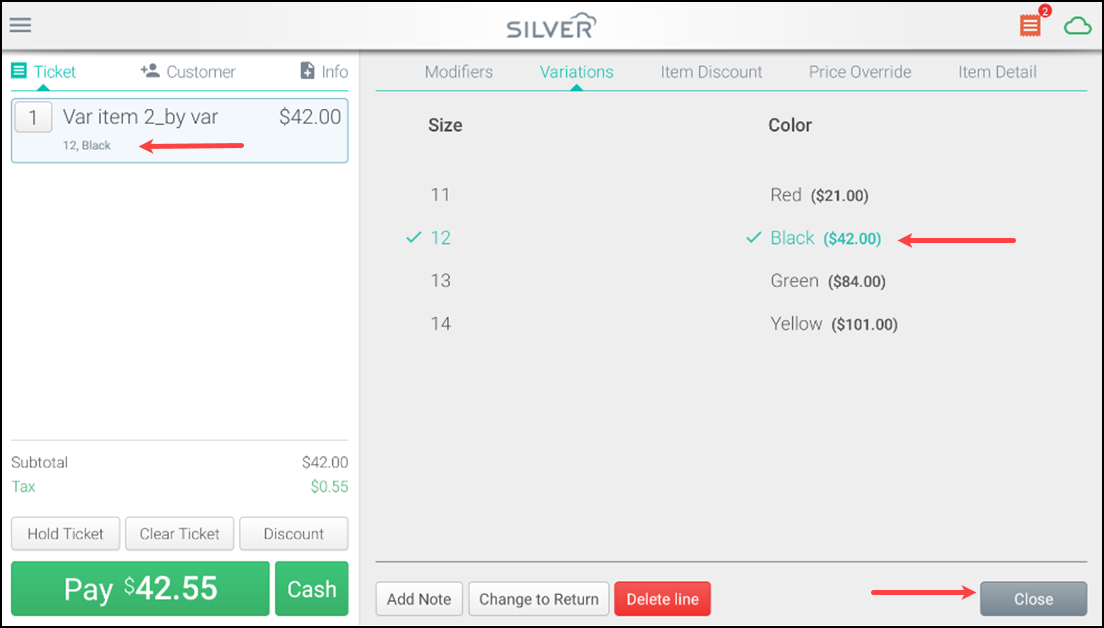
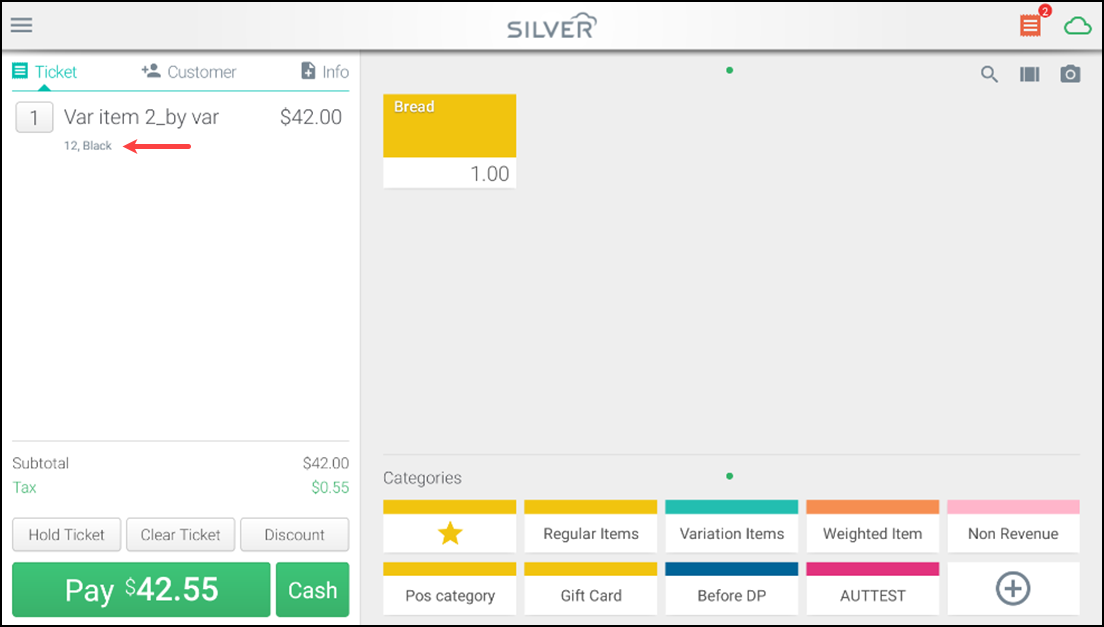
- Tap Close to return to the ticket entry screen. The variation for the item appears on the screen.
Selecting modifiers
- Modifiers allow you to provide special instructions to the kitchen or bar about menu items and how they should be prepared. For example, if a customer orders a coffee with cream, you can sell an item called 'Coffee' and use a modifier to show it needs to made with 'cream.'
- You must first create modifiers in Back Office before you can use them to modify items in the POS.
- Sometimes a modifier is a special request such as add pickles and other times. It is a change to the listed menu item (such as, no mayo). This feature is also allowing restaurants to charge for additional ingredients that may be added to an item, such as $1 for bacon.
- If you do not have modifiers set up in Back Office, you can only add kitchen notes.
- If you have set up modifiers and you do have a kitchen printer, you can use the kitchen notes and modifiers.
- If you have modifiers set up, but you do not have a kitchen printer, the modifiers will only print on the customer's receipt (but the kitchen notes will not print).
- If the kitchen printer is offline for any reason, the POS will show an alert and a popup to let you know there is an issue. Any tickets sent to the kitchen printer will be added to a storage queue for approximately 10 minutes. Once the kitchen printer is back online, the tickets will begin printing. If it takes longer than 10 minutes to get the kitchen printer back online, you can recall and re-send those tickets manually to a printer of your choice. If you are unable to get the kitchen printer back online, you can edit your receipt printer's settings and designate it as a receipt and kitchen printer. You would then need to take the printed receipts to the kitchen.
- For restaurant establishments, you can capitalize on the combination of kitchen printing and holding tickets to essentially work like a "tab". Although you are not capturing any payments, you can add the customer, place a drink order, place the order on hold, which will send the order (drink) to the kitchen printer. Later, you can recall the ticket and add an appetizer, put the ticket on hold, which will print the appetizer only to the kitchen printer.
- The system will only send an item to kitchen printer one time when you hold the ticket or during checkout.
To select modifiers for an item:
- Log in to the POS. The ticket entry screen appears.
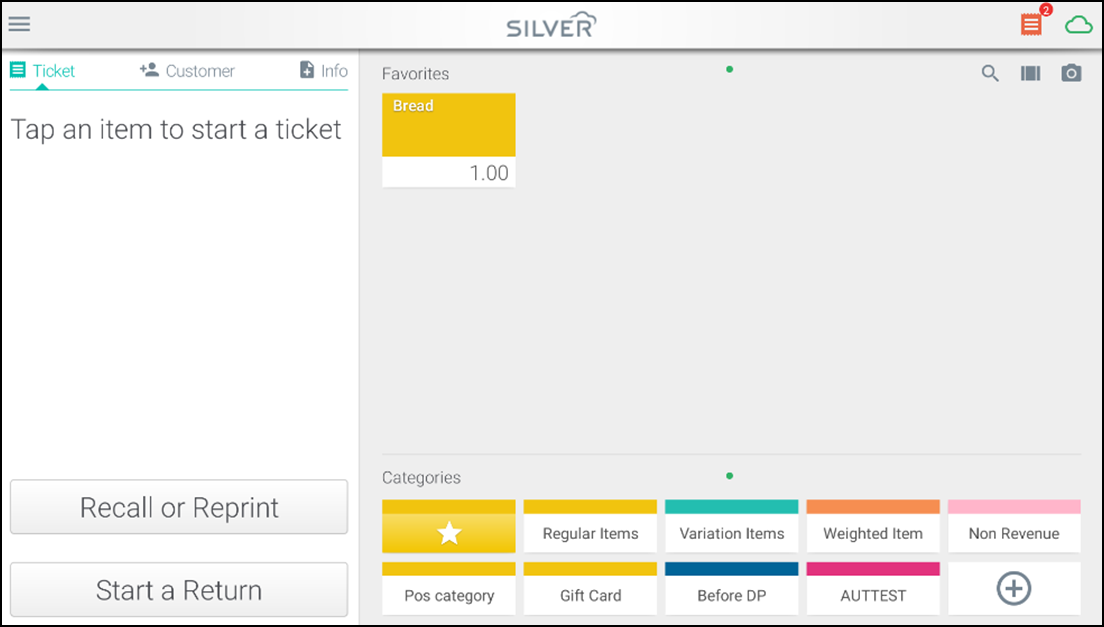
- Start a ticket by adding an item to ticket.
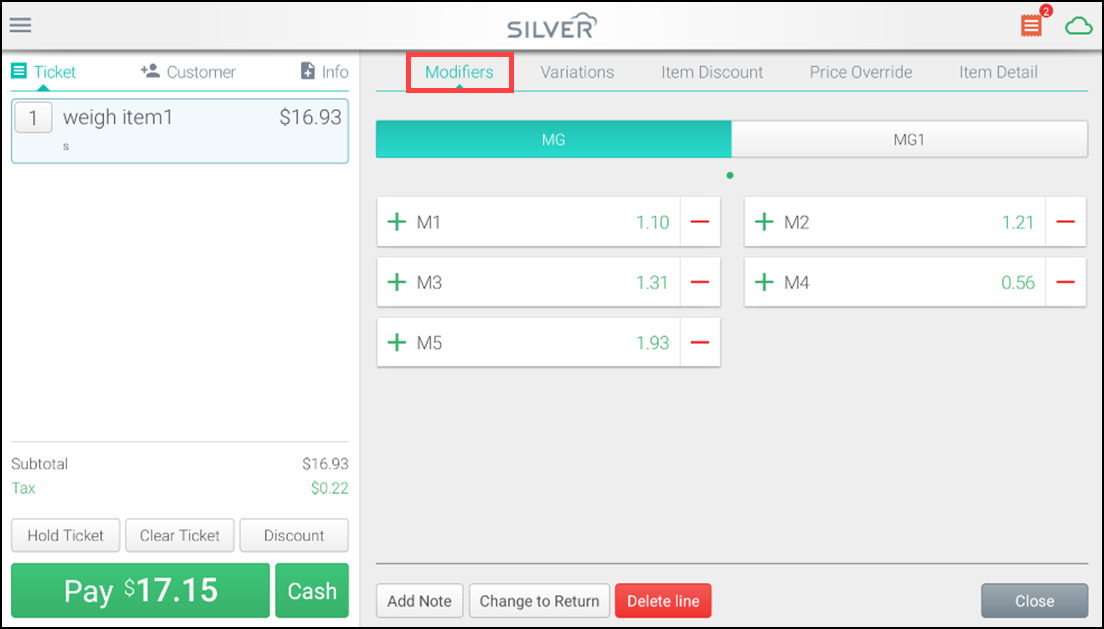
- Tap the item on the ticket screen to access additional tab options. If modifiers groups are assigned, the Modifiers tab appears. If you moved to a different tab, simply tap the Modifiers tab to return. Your modifier groups appear across the top, and the group you are currently viewing appears highlighted in a teal colour. The modifier options appear underneath the group name. In the example below we are looking at the 'Coffee adds' group to find the 'Cream' modifier.
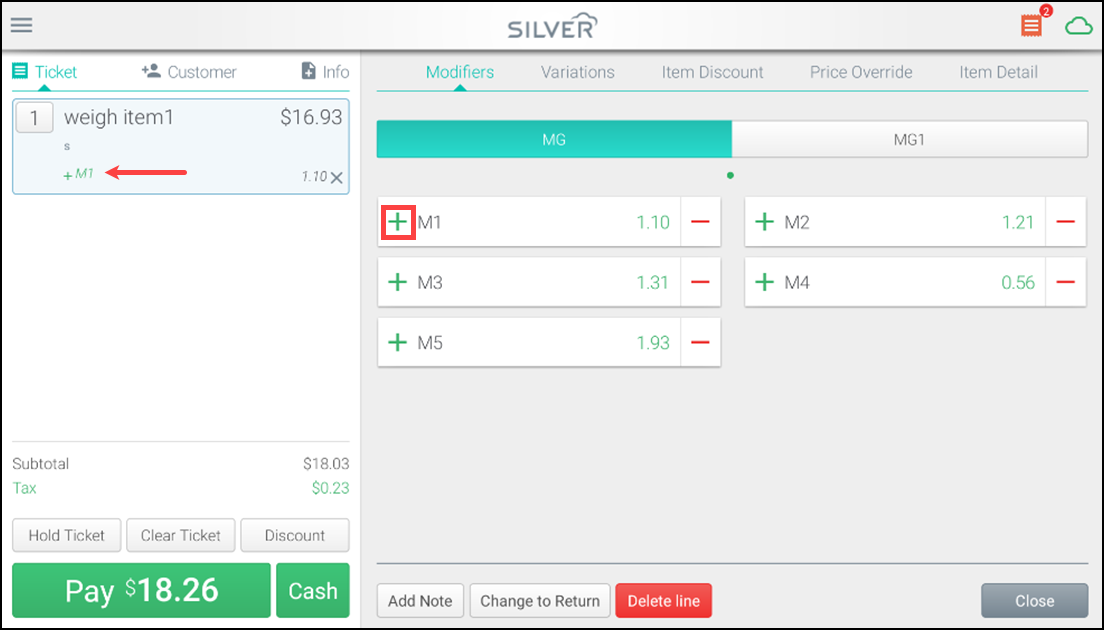
- Tap the green plus sign to add the modifier. The modifier appears underneath the ticket line item in green.
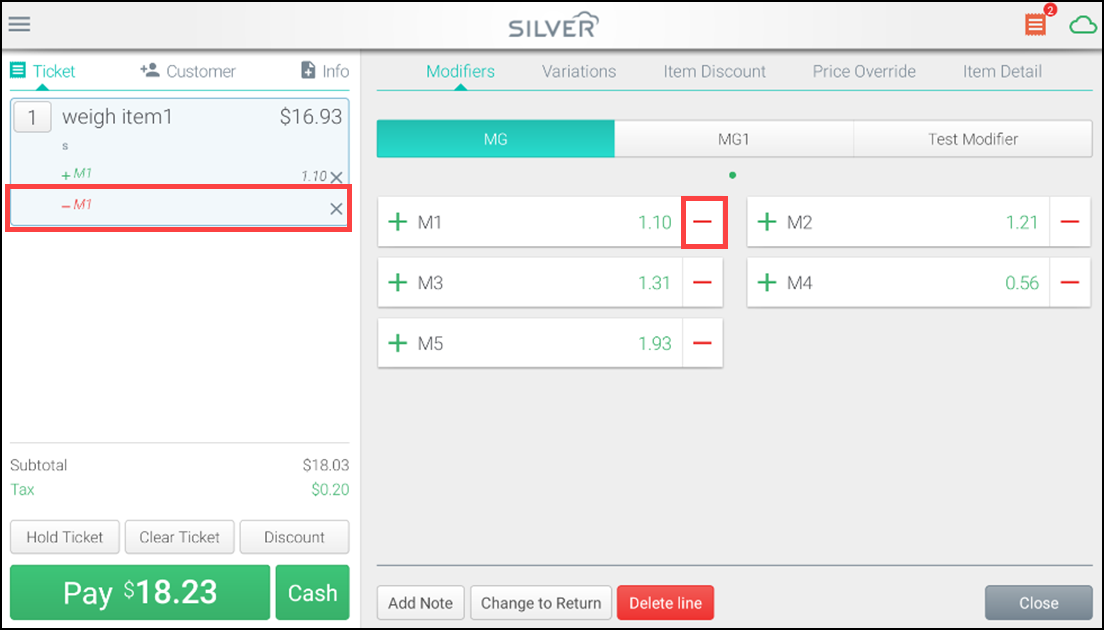
- Tap the red minus sign to remove modifiers.
Note: If you are using a kitchen printer, the modifiers appear when the ticket prints. The modifiers are priced in Back Office. For example, you can price bacon as $0.50 extra when bacon is added to a sandwich. The additional cost is automatically added to the ticket total.
Looking for resources or help with Silver? Click here.